


Aquest article finalitza la sèrie de notes traduïdes sobre OpenWhisk de l'autor . Avui veurem el procés de desplegament d'OpenWhisk a Kubernetes amb ordres corregides per treballar amb les versions actuals d'aplicacions. També cobrirà el procés d'execució de funcions d'OpenWhisk mitjançant Knative i TektonCD a Kubernetes mitjançant el temps d'execució de Nodejs.
Desplegant OpenWhisk a Kubernetes
Al llarg d'uns quants dies, vaig experimentar amb la implementació d'OpenWhisk a Kubernetes per crear un camp de proves senzill i ràpid. I com que sóc nou a Kubernetes, crec que es va dedicar un dia i mig a un desplegament reeixit. EN Els repositoris tenen instruccions molt clares per desplegar OpenWhisk a Kubernetes. Aquí teniu les instruccions de desplegament fetes per a Mac (També ho faré tot Linux, perquè prefereixo Linux. —aprox. traductor).
- Instal·lació del gestor de paquets
asdf, després del qual corregim automàticament~/.bash_profileo el seu equivalent així:
$ brew install asdf
$ [ -s "/usr/local/opt/asdf/asdf.sh" ] && . /usr/local/opt/asdf/asdf.sh
$ source ~/.bash_profile[En Linux Aquest pas no és necessari, tot i que hi ha cervesa disponible. —aprox. traductor]
- Afegint complements
minikubeиkubelet:
$ asdf plugin-add kubectl
$ asdf plugin-add minikube[De nou, ens saltem aquest pas Linux. —aprox. traductor]
- Instal·leu minikube i kubelet:
$ asdf install kubectl 1.9.0
$ asdf global kubectl 1.9.0
$ asdf install minikube 0.25.2
$ asdf global minikube 0.25.2[s'instal·len versions específiques, però ho he comprovat tot a les últimes versions disponibles Linux; Sospito que pots instal·lar la darrera versió sense problemes. —aprox. traductor]
En Linux Aquest pas es fa més o menys així (tot s'instal·la a ~/bin, que és al meu PATH, nota del traductor):
$ curl -L0 minikube https://storage.googleapis.com/minikube/releases/latest/minikube-linux-amd64 && chmod +x minikube && mv minikube ~/bin/
$ curl -L0 https://storage.googleapis.com/kubernetes-release/release/$(curl -s https://storage.googleapis.com/kubernetes-release/release/stable.txt)/bin/linux/amd64/kubectl && chmod +x kubectl && mv kubectl ~/bin/- Creeu una màquina virtual minikube (VirtualBox ha d'estar preinstal·lat):
$ minikube start --cpus 2 --memory 4096 --kubernetes-version=v1.9.0 --extra-config=apiserver.Authorization.Mode=RBAC[Tot funciona per a mi amb l'equip minikube start , sense paràmetres i amb valors per defecte. —aprox. traductor]
$ minikube start
  minikube v1.5.2 on Debian 8.11
  Automatically selected the 'virtualbox' driver
  Downloading VM boot image ...
    > minikube-v1.5.1.iso.sha256: 65 B / 65 B [--------------] 100.00% ? p/s 0s
    > minikube-v1.5.1.iso: 143.76 MiB / 143.76 MiB [-] 100.00% 5.63 MiB p/s 26s
  Creating virtualbox VM (CPUs=2, Memory=4096MB, Disk=20000MB) ...
  Preparing Kubernetes v1.16.2 on Docker '18.09.9' ...
  Downloading kubelet v1.16.2
  Downloading kubeadm v1.16.2
  Pulling images ...
  Launching Kubernetes ...  Waiting for: apiserver
Done! kubectl is now configured to use "minikube"- Canviar la xarxa a Docker al mode promiscu:
$ minikube ssh -- sudo ip link set docker0 promisc on- Creeu un espai de noms i marqueu el node de treball:
$ kubectl create namespace openwhisk
$ kubectl label nodes --all openwhisk-role=invoker- Obtenim el contingut del repositori i substituïm el tipus d'entrada al fitxer mycluster.yaml:
$ git clone https://github.com/apache/incubator-openwhisk-deploy-kube.git
$ cd incubator-openwhisk-deploy-kube/
$ cat << "EOF" > mycluster.yaml
whisk:
    ingress:
        type: NodePort
            api_host_name: 192.168.99.100
            api_host_port: 31001
nginx:
    httpsNodePort: 31001
EOF- Instal·leu Helm i implementeu-lo utilitzant-lo:
$ brew install kubernetes-helm
$ helm init # init Helm Tiller, не нужно на Helm v3+
$ kubectl get pods -n kube-system # verify that tiller-deploy is in the running state, не нужно на helm v3+
$ kubectl create clusterrolebinding tiller-cluster-admin --clusterrole=cluster-admin --serviceaccount=kube-system:default
$ helm install ./openwhisk/helm/ --namespace=openwhisk -f mycluster.yaml[En Linux Amb les darreres versions (la v3.0.1 ja estava disponible) serà una mica diferent. —aprox. traductor]
$ curl -L0 https://get.helm.sh/helm-v3.0.1-linux-amd64.tar.gz | tar -xzvf - linux-amd64/helm --strip-components=1; sudo mv helm /usr/local/bin
$ kubectl create clusterrolebinding tiller-cluster-admin --clusterrole=cluster-admin --serviceaccount=kube-system:default
$ helm install ./openwhisk/helm/ --namespace=openwhisk --generate-name -f mycluster.yaml- Comprovem que tot ha pujat (STATUS = En execució o Completat):
$ kubectl get pods -n openwhisk
NAME                                                              READY   STATUS      RESTARTS   AGE
openwhisk-1576070780-alarmprovider-6868dc694-plvpf                1/1     Running     1          1d5h
openwhisk-1576070780-apigateway-8d56f4979-825hf                   1/1     Running     1          1d5h
openwhisk-1576070780-cloudantprovider-544bb46596-9scph            1/1     Running     1          1d5h
openwhisk-1576070780-controller-0                                 1/1     Running     2          1d5h
openwhisk-1576070780-couchdb-7fd7f6c7cc-42tw6                     1/1     Running     1          1d5h
openwhisk-1576070780-gen-certs-z9nsb                              0/1     Completed   0          1d5h
openwhisk-1576070780-init-couchdb-r2vmt                           0/1     Completed   0          1d5h
openwhisk-1576070780-install-packages-27dtr                       0/1     Completed   0          1d4h
openwhisk-1576070780-invoker-0                                    1/1     Running     1          1d5h
openwhisk-1576070780-kafka-0                                      1/1     Running     1          1d5h
openwhisk-1576070780-kafkaprovider-f8b4cf4fc-7z4gt                1/1     Running     1          1d5h
openwhisk-1576070780-nginx-6dbdbf69bc-5x76n                       1/1     Running     1          1d5h
openwhisk-1576070780-redis-cfd8756f4-hkrt6                        1/1     Running     1          1d5h
openwhisk-1576070780-wskadmin                                     1/1     Running     1          1d5h
openwhisk-1576070780-zookeeper-0                                  1/1     Running     1          1d5h
wskopenwhisk-1576070780-invoker-00-1-prewarm-nodejs10             1/1     Running     0          61s
wskopenwhisk-1576070780-invoker-00-2-prewarm-nodejs10             1/1     Running     0          61s
wskopenwhisk-1576070780-invoker-00-3-whisksystem-invokerhealtht 1/1 Running 0 59s- Configuració de wsk perquè funcioni:
$ wsk property set --apihost 192.168.99.100:31001
$ wsk property set --auth 23bc46b1-71f6-4ed5-8c54-816aa4f8c502:123zO3xZCLrMN6v2BKK1dXYFpXlPkccOFqm12CdAsMgRU4VrNZ9lyGVCGuMDGIwP
Comprovem:
$ wsk -i list
Entities in namespace: default
packages
actions
triggers
rules
Problemes i Solucions
getsockopt: connexió rebutjada
$ wsk -i list
error: Unable to obtain the list of entities for namespace 'default': Get http://192.168.99.100:31001/api/v1/namespaces/_/actions?limit=0&skip=0: dial tcp 192.168.99.100:31001: getsockopt: connection refused
Comprovant que els contenidors es troben a l'espai de noms openwhisk en estat Running, perquè de vegades s'estavella amb errors CreateContainerConfigError.
L'invocador encara s'està inicialitzant — Init:1/2
El procés de descàrrega de diversos entorns d'execució pot trigar molt de temps. Per accelerar les coses, podeu especificar una llista mínima escurçada al fitxer mycluster.yaml:
whisk:
  runtimes: "runtimes-minimal-travis.json"
Contenidor amb nom -instal·lar-paquets- bloqueja a Error
Només augmenta els temps morts per a les proves de vivacitat.
Instal·lant OpenWhisk sobre Knative
Priti Desai va realitzar la instal·lació a sobre d'un clúster al núvol d'IBM, així com en un minikube normal, utilitzant Knative Build i BuildTemplates. També instal·laré a sobre de minukube, segons com al nostre bloc anteriorment, utilitzant les últimes versions de programari. Com que Knative Build i BuildTemplates han quedat oficialment obsolets, utilitzaré el reemplaçament recomanat en forma de Tekton Pipelines. La resta de l'article es va escriure després de llegir la documentació de Tekton Pipelines, però es basa en les idees de Priti. Per funcionar, necessitareu accés a algun registre de Docker: jo, com l'autor original, utilitzaré DockerHub.
$ curl -L0 https://github.com/solo-io/gloo/releases/download/v1.2.10/glooctl-linux-amd64; chmod +x glooctl-linux-amd64; mv glooctl-linux-amd64 ~/bin
$ glooctl install knative
$ kubectl get pods -n knative-serving
NAME                              READY   STATUS    RESTARTS   AGE
activator-77fc555665-rvrst        1/1     Running   0          2m23s
autoscaler-5c98b7c9b6-x8hh4       1/1     Running   0          2m21s
autoscaler-hpa-5cfd4f6845-w87kq   1/1     Running   0          2m22s
controller-7fd74c8f67-tprm8       1/1     Running   0          2m19s
webhook-74847bb77c-txr2g          1/1     Running   0          2m17s
$ kubectl get pods -n gloo-system
NAME                                      READY   STATUS    RESTARTS   AGE
discovery-859d7fbc9c-8xhvh                1/1     Running   0          51s
gloo-545886d9c6-85mwt                     1/1     Running   0          51s
ingress-67d4996d75-lkkmw                  1/1     Running   0          50s
knative-external-proxy-767dfd656c-wwv2z   1/1     Running   0          50s
knative-internal-proxy-6fdddcc6b5-7vqd8   1/1     Running   0          51s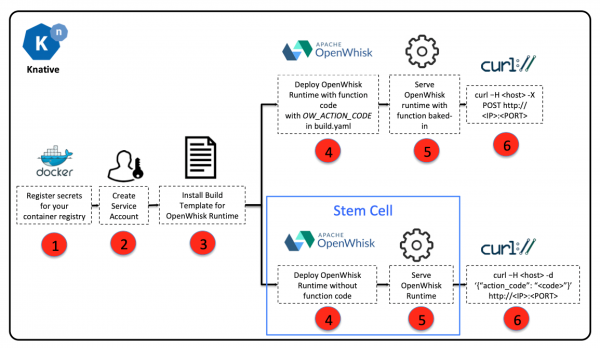
Construir i executar OpenWhisk a la part superior de Knative
- Obtenció dels continguts :
$ git clone https://github.com/tektoncd/catalog/
$ cd catalog/openwhisk- Configurem les dades per accedir al Registre com a variables d'entorn i les desem com a secret de Kubernetes:
$ export DOCKER_USERNAME=<your docker hub username>
$ export DOCKER_PASSWORD=<your docker hub password>
$ sed -e 's/${DOCKER_USERNAME}/'"$DOCKER_USERNAME"'/' -e 's/${DOCKER_PASSWORD}/'"$DOCKER_PASSWORD"'/' docker-secret.yaml.tmpl > docker-secret.yaml
$ kubectl apply -f docker-secret.yaml
Comprovem:
$ kubectl get secret
NAME                    TYPE                                  DATA      AGE
dockerhub-user-pass kubernetes.io/basic-auth 2 21s- Creeu un compte per a entorns de construcció:
$ kubectl apply -f service-account.yamlComprovem:
$ kubectl get serviceaccount/openwhisk-runtime-builder
NAME                        SECRETS   AGE
openwhisk-runtime-builder 2 31m- Creeu una tasca per crear una imatge per a OpenWhisk
$ kubectl apply -f openwhisk.yaml
task.tekton.dev/openwhisk created- Executem la tasca per construir la imatge (utilitzant NodeJS com a exemple):
Creeu un fitxer taskrun.yaml amb el contingut:
# Git Pipeline Resource for OpenWhisk NodeJS Runtime
apiVersion: tekton.dev/v1alpha1
kind: PipelineResource
metadata:
    name: openwhisk-nodejs-runtime-git
spec:
    type: git
    params:
        - name: revision
          value: master
        - name: url
          value: https://github.com/apache/openwhisk-runtime-nodejs.git
---

# Image Pipeline Resource for OpenWhisk NodeJS Sample Application
apiVersion: tekton.dev/v1alpha1
kind: PipelineResource
metadata:
    name: openwhisk-nodejs-helloworld-image
spec:
    type: image
    params:
        - name: url
          value: docker.io/${DOCKER_USERNAME}/openwhisk-nodejs-helloworld
---

# Task Run to build NodeJS image with the action source
apiVersion: tekton.dev/v1alpha1
kind: TaskRun
metadata:
    name: openwhisk-nodejs-helloworld
spec:
    serviceAccountName: openwhisk-runtime-builder
    taskRef:
        name: openwhisk
    inputs:
        resources:
            - name: runtime-git
              resourceRef:
                name: openwhisk-nodejs-runtime-git
        params:
            - name: DOCKERFILE
              value: "./runtime-git/core/nodejs10Action/knative/Dockerfile"
            - name: OW_ACTION_NAME
              value: "nodejs-helloworld"
            - name: OW_ACTION_CODE
              value: "function main() {return {payload: 'Hello World!'};}"
            - name: OW_PROJECT_URL
              value: ""
    outputs:
        resources:
            - name: runtime-image
              resourceRef:
                name: openwhisk-nodejs-helloworld-image
---
Apliquem les dades actuals d'aquest fitxer:
$ sed 's/${DOCKER_USERNAME}/'"$DOCKER_USERNAME"'/' -i taskrun.yamlApliquem:
$ kubectl apply -f taskrun.yaml
pipelineresource.tekton.dev/openwhisk-nodejs-runtime-git created
pipelineresource.tekton.dev/openwhisk-nodejs-helloworld-image created
taskrun.tekton.dev/openwhisk-nodejs-helloworld created
La comprovació del treball consisteix a obtenir el nom del pod i veure'n l'estat. També podeu veure el registre d'execució de cada pas, per exemple:
$ kubectl get taskrun
NAME                          SUCCEEDED   REASON      STARTTIME   COMPLETIONTIME
openwhisk-nodejs-helloworld   True        Succeeded   5m15s       44s
$ kubectl get pod openwhisk-nodejs-helloworld-pod-4640d3
NAME                                     READY   STATUS      RESTARTS   AGE
openwhisk-nodejs-helloworld-pod-4640d3   0/6     Completed   0          5m20s
$ kubectl logs openwhisk-nodejs-helloworld-pod-4640d3 -c step-git-source-openwhisk-nodejs-runtime-git-r8vhr
{"level":"info","ts":1576532931.5880227,"logger":"fallback-logger","caller":"logging/config.go:69","msg":"Fetch GitHub commit ID from kodata failed: open /var/run/ko/refs/heads/master: no such file or directory"}
{"level":"info","ts":1576532936.538926,"logger":"fallback-logger","caller":"git/git.go:81","msg":"Successfully cloned https://github.com/apache/openwhisk-runtime-nodejs.git @ master in path /workspace/runtime-git"}
{"level":"warn","ts":1576532936.5395331,"logger":"fallback-logger","caller":"git/git.go:128","msg":"Unexpected error: creating symlink: symlink /tekton/home/.ssh /root/.ssh: file exists"}
{"level":"info","ts":1576532936.8202565,"logger":"fallback-logger","caller":"git/git.go:109","msg":"Successfully initialized and updated submodules in path /workspace/runtime-git"}
Després de l'execució, tindrem una imatge al Registre que es pot desplegar mitjançant la utilitat kn, dissenyada per treballar amb serveis Knative, per exemple:
kn service create nodejs-helloworld --image docker.io/${DOCKER_USERNAME}/openwhisk-nodejs-helloworld
Service 'nodejs-helloworld' successfully created in namespace 'default'.
Waiting for service 'nodejs-helloworld' to become ready ... OK

Service URL:
http://nodejs-helloworld.default.example.com
Si utilitzeu Gloo, podeu comprovar la seva funcionalitat així:
$ curl -H "Host: nodejs-helloworld.default.example.com" -X POST $(glooctl proxy url --name knative-external-proxy)
{"OK":true}
$ curl -H "Host: nodejs-helloworld.default.example.com" -X POST $(glooctl proxy url --name knative-external-proxy)
{"payload":"Hello World!"}
Altres articles de la sèrie
Font: www.habr.com
