

I denne artikel vil jeg gerne præsentere en trin-for-trin instruktion om, hvordan man hurtigt kan implementere den mest skalerbare ordning i øjeblikket. Remote-Access VPN adgang baseret på AnyConnect og Cisco ASA – VPN Load Balancing Cluster.
Introduktion: Mange virksomheder verden over forsøger i lyset af den nuværende COVID-19 situation at overføre deres medarbejdere til fjernarbejde. På grund af det massive skift til fjernarbejde forøges belastningen på de eksisterende VPN-gateways i virksomhederne dramatisk, og der kræves hurtig skalering. På den anden side er mange virksomheder tvunget til hastigt at lære et begreb som fjernarbejde fra bunden.
For at hjælpe virksomheder med hurtigt at implementere en nem, sikker og skalerbar VPN-adgang for medarbejdere, tilbyder Cisco licenser til den multifunktionelle SSL-VPN-klient AnyConnect i op til 13 uger. .
.
Jeg har forberedt en trin-for-trin vejledning til en simpel version af implementeringen af en VPN Load-Balancing-klynge, som er den mest skalerbare VPN-teknologi.
Det nedenstående eksempel vil være ret simpelt med hensyn til de anvendte autentificerings- og autoriseringsalgoritmer, men det vil være en god mulighed for hurtig start (hvilket mange lige nu mangler) med mulighed for dyb tilpasning efter egne behov under implementeringen.
Korte oplysninger: Teknologien VPN Load Balancing Cluster er ikke failover og er ikke en funktion af clustering i dens oprindelige forståelse. Denne teknologi kan kombinere forskellige modeller af ASA (med visse begrænsninger) med det formål at balancere belastningen af Remote-Access VPN-forbindelser. Synchronisering af sessioner og konfigurationer mellem noderne i en sådan klynge er fraværende, men automatisk belastningsbalancering af VPN-forbindelser og sikring af forbindelsens pålidelighed er mulig, så længe der er mindst én aktiv node i klyngen. Belastningen i klyngen balanceres automatisk baseret på noderne i forhold til antallet af VPN-sessioner.
For fault tolerance of specific nodes in the cluster (if required), a file server can be used, thereby allowing the active connection to be processed by the Primary node of the file server. The file server is not a necessary condition for ensuring fault tolerance within a Load-Balancing cluster; the cluster itself will transfer the user session to another live node in case of a node failure, but without maintaining the connection status, which is precisely provided by the file server. Accordingly, these two technologies can be combined if necessary.
A VPN Load-Balancing cluster can contain more than two nodes.
VPN Load-Balancing cluster is supported on ASA 5512-X and above.
Since each ASA within the VPN Load-Balancing cluster is an independent unit in terms of the configurations carried out, all configuration steps are performed individually on each separate device.
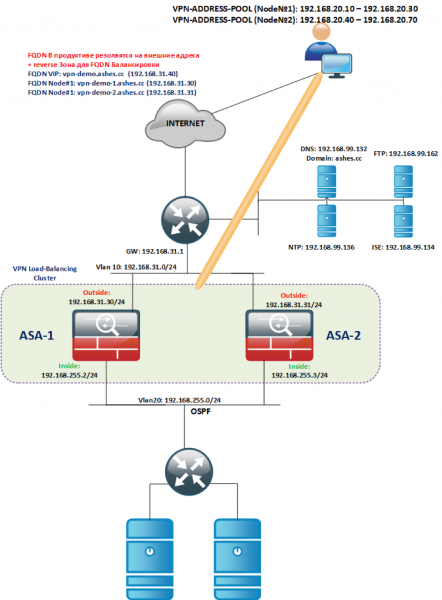
Logical topology of the provided example:
Initial deployment:
We deploy instances of ASAv from the required image templates (ASAv5/10/30/50).
We assign INSIDE/OUTSIDE interfaces to the same VLANs (Outside in its own VLAN, INSIDE in its own but common within the cluster, see topology); it is important that interfaces of the same type are in the same L2 segment.
Licenses:
- At the time of installation, ASAv will not have any licenses and will be limited to a performance of 100Kbps.
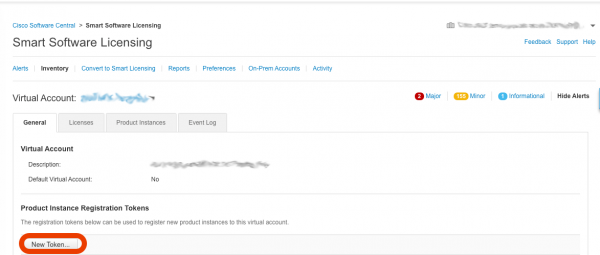
- To install the license, you need to generate a token in your Smart-Account cabinet: -> Smart Software Licensing
- In the opened window, after pressing the button New Token

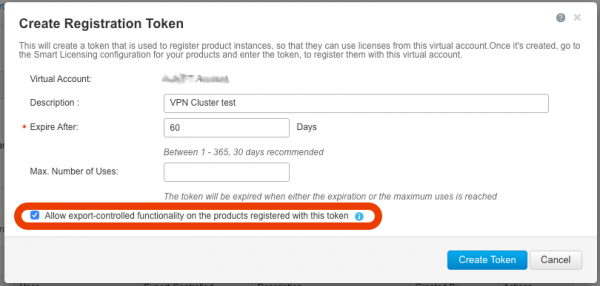
- Make sure that there is an active field in the opened window and the checkbox Allow export-controlled functionality… Without this active field, you will not be able to use strong encryption functions and, accordingly, VPN. If this field is not active, please contact your account team for activation requests.

- After clicking the button Opret token, a token will be created, which we will use to obtain the license for ASAv, we will copy it:

- Repeat steps C, D, E for each deployed ASAv.
- To make it easier to copy the token, we temporarily allow telnet. We will configure each ASA (the example below illustrates the settings on ASA-1). Telnet from outside does not work, if absolutely necessary, change the security-level to 100 on outside, then revert it back.
! ciscoasa(config)# int gi0/0 ciscoasa(config)# nameif outside ciscoasa(config)# ip adresse 192.168.31.30 255.255.255.0 ciscoasa(config)# no shut ! ciscoasa(config)# int gi0/1 ciscoasa(config)# nameif inside ciscoasa(config)# ip adresse 192.168.255.2 255.255.255.0 ciscoasa(config)# no shut ! ciscoasa(config)# telnet 0 0 inside ciscoasa(config)# username admin password cisco priv 15 ciscoasa(config)# ena password cisco ciscoasa(config)# aaa authentication telnet console LOCAL ! ciscoasa(config)# route outside 0 0 192.168.31.1 ! ciscoasa(config)# wr !- For registration of the token in the Smart Account cloud, it is necessary to provide internet access for ASA, .
In short, ASA needs:
- HTTPS access to the internet;
- time synchronization (preferably via NTP);
- a configured DNS server;
- Connect via telnet to our ASAs and configure them to activate the license through Smart Account.
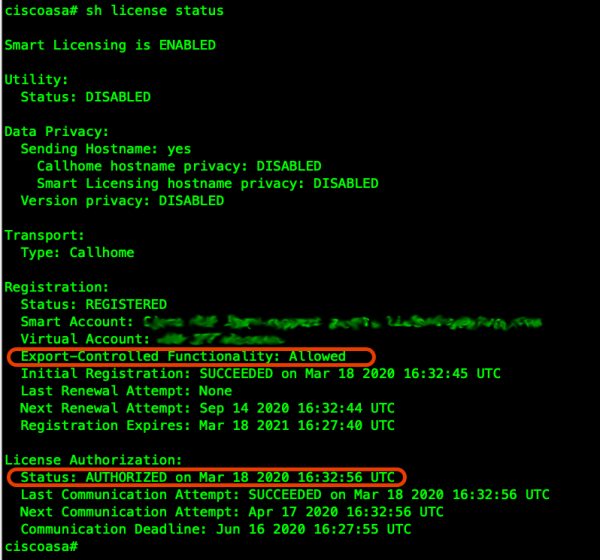
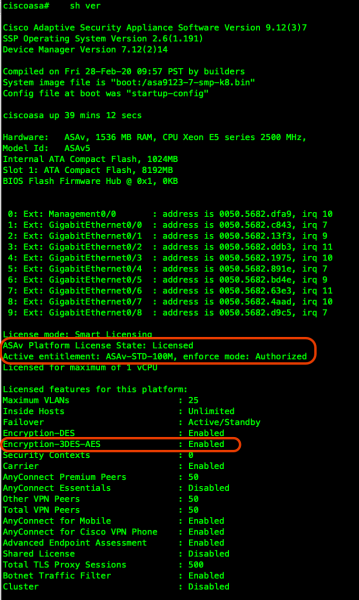
! ciscoasa(config)# clock set 19:21:00 Mar 18 2020 ciscoasa(config)# clock timezone MSK 3 ciscoasa(config)# ntp server 192.168.99.136 ! ciscoasa(config)# dns domain-lookup outside ciscoasa(config)# DNS server-group DefaultDNS ciscoasa(config-dns-server-group)# name-server 192.168.99.132 ! ! Let's check the DNS operation: ! ciscoasa(config-dns-server-group)# ping ya.ru Type escape sequence to abort. Sending 5, 100-byte ICMP Echos to 87.250.250.242, timeout is 2 seconds: !!!!! ! ! Let's check NTP synchronization: ! ciscoasa(config)# show ntp associations adresse ref clock st når poll reach delay offset disp *~192.168.99.136 91.189.94.4 3 63 64 1 36.7 1.85 17.5 * master (synced), # master (unsynced), + selected, - candidate, ~ configured ! ! Let's set the configuration of our ASAv for Smart-Licensing (according to your profile, in my case 100M as an example) ! ciscoasa(config)# license smart ciscoasa(config-smart-lic)# feature tier standard ciscoasa(config-smart-lic)# throughput level 100M ! ! If necessary, you can configure internet access through a proxy using the following block of commands: !call-home ! http-proxy ip_address port port ! ! We then insert the token copied from the Smart Account portal (<token>) and register the license ! ciscoasa(config)# end ciscoasa# license smart register idtoken <token>- We check that the device has successfully registered the license and encryption options are available:


Configuring basic SSL-VPN on each gateway
- Next, we configure access via SSH and ASDM:
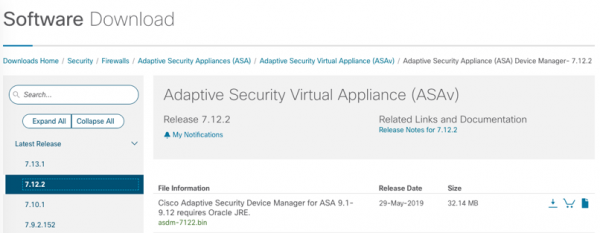
ciscoasa(config)# ssh ver 2 ciscoasa(config)# aaa authentication ssh console LOCAL ciscoasa(config)# aaa authentication http console LOCAL ciscoasa(config)# hostname vpn-demo-1 vpn-demo-1(config)# domain-name ashes.cc vpn-demo-1(config)# cry key gen rsa general-keys modulus 4096 vpn-demo-1(config)# ssh 0 0 inside vpn-demo-1(config)# http 0 0 inside ! ! Let's raise the HTTPS server for ASDM on port 445 to avoid overlapping with the SSL-VPN portal ! vpn-demo-1(config)# http server enable 445 !- To use ASDM, you must first download it from cisco.com, in my case, this is the following file:

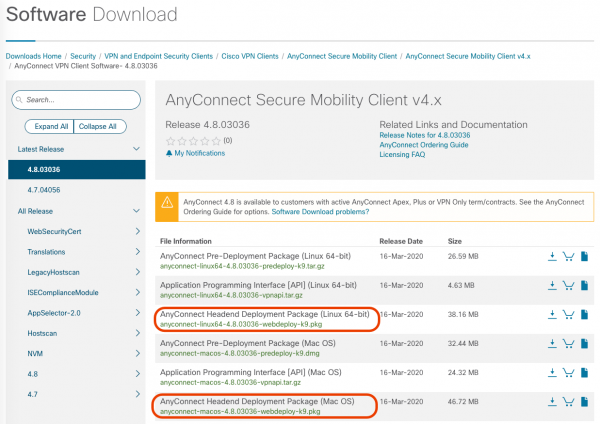
- For the AnyConnect client to work, each ASA must have an image for each desktop OS being used (planned for use: Linux/Windows/MAC). A file with Headend Deployment Package in the name:

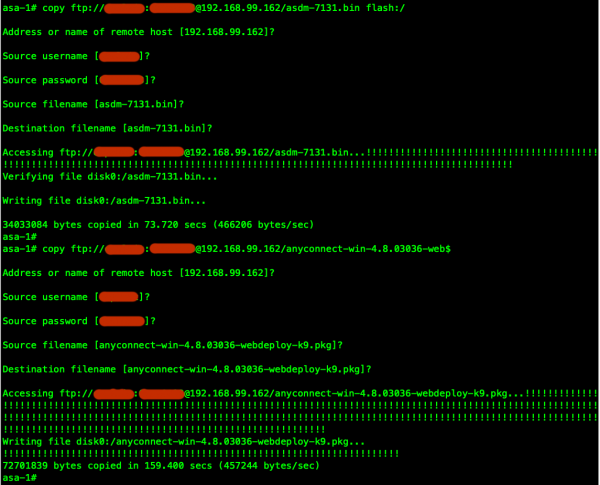
- Downloaded files can be hosted, for example, on an FTP server and uploaded to each individual ASA:

- We configure ASDM and a Self-Signed certificate for SSL-VPN (a trusted certificate is recommended in production). The installed FQDN of the Virtual cluster address (vpn-demo.ashes.cc), as well as each FQDN associated with the external address of each cluster node, must resolve in the external DNS zone to the IP address of the OUTSIDE interface (or to the mapped address if UDP/443 (DTLS) and TCP/443 (TLS) port forwarding is used). Detailed information on certificate requirements is provided in the section Certificate Verification of the documentation.
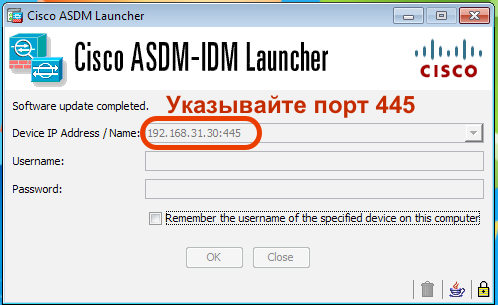
! vpn-demo-1(config)# crypto ca trustpoint SELF vpn-demo-1(config-ca-trustpoint)# enrollment self vpn-demo-1(config-ca-trustpoint)# fqdn vpn-demo.ashes.cc vpn-demo-1(config-ca-trustpoint)# subject-name cn=*.ashes.cc, ou=ashes-lab, o=ashes, c=ru vpn-demo-1(config-ca-trustpoint)# serial-number vpn-demo-1(config-ca-trustpoint)# crl configure vpn-demo-1(config-ca-crl)# cry ca enroll SELF % The fully-qualified domain name in the certificate will be: vpn-demo.ashes.cc Generate Self-Signed Certificate? [yes/no]: yes vpn-demo-1(config)# ! vpn-demo-1(config)# sh cry ca certificates Certificate Status: Available Certificate Serial Number: 4d43725e Certificate Usage: General Purpose Public Key Type: RSA (4096 bits) Signature Algorithm: SHA256 with RSA Encryption Issuer Name: serialNumber=9A439T02F95 hostname=vpn-demo.ashes.cc cn=*.ashes.cc ou=ashes-lab o=ashes c=ru Subject Name: serialNumber=9A439T02F95 hostname=vpn-demo.ashes.cc cn=*.ashes.cc ou=ashes-lab o=ashes c=ru Validity Date: start date: 00:16:17 MSK Mar 19 2020 end date: 00:16:17 MSK Mar 17 2030 Storage: config Associated Trustpoints: SELF CA Certificate Status: Available Certificate Serial Number: 0509 Certificate Usage: General Purpose Public Key Type: RSA (4096 bits) Signature Algorithm: SHA1 with RSA Encryption Issuer Name: cn=QuoVadis Root CA 2 o=QuoVadis Limited c=BM Subject Name: cn=QuoVadis Root CA 2 o=QuoVadis Limited c=BM Validity Date: start date: 21:27:00 MSK Nov 24 2006 end date: 21:23:33 MSK Nov 24 2031 Storage: config Associated Trustpoints: _SmartCallHome_ServerCA- For testing ASDM functionality, remember to specify the port, for example:

- Let's perform basic tunnel configuration:
- We will make the corporate network accessible through the tunnel, while internet traffic will go directly (this is not the safest method without protective measures on the connecting host, as it may lead to intrusions through an infected host and corporate data leakage, the option split-tunnel-policy tunnelall will allow all host traffic into the tunnel. However, Split-Tunnel provides the possibility to reduce the load on the VPN gateway and not process the Internet traffic of the host)
- We will issue addresses from the 192.168.20.0/24 subnet to hosts in the tunnel (pool with addresses from 10 to 30 (for node #1)). Hver node i VPN-klusteret skal have sin egen pulje.
- Vi vil udføre grundlæggende autentificering med en lokalt oprettet bruger på ASA (Dette anbefales ikke, da det er den nemmeste metode), det er bedre at lave autentificering gennem LDAP/RADIUS, og det er endnu bedre at knytte Multi-Factor Authentication (MFA), for eksempel Cisco DUO.
! vpn-demo-1(config)# ip local pool vpn-pool 192.168.20.10-192.168.20.30 mask 255.255.255.0 ! vpn-demo-1(config)# access-list split-tunnel standard permit 192.168.0.0 255.255.0.0 ! vpn-demo-1(config)# group-policy SSL-VPN-GROUP-POLICY internal vpn-demo-1(config)# group-policy SSL-VPN-GROUP-POLICY attributes vpn-demo-1(config-group-policy)# vpn-tunnel-protocol ssl-client vpn-demo-1(config-group-policy)# split-tunnel-policy tunnelspecified vpn-demo-1(config-group-policy)# split-tunnel-network-list value split-tunnel vpn-demo-1(config-group-policy)# dns-server value 192.168.99.132 vpn-demo-1(config-group-policy)# default-domain value ashes.cc vpn-demo-1(config)# tunnel-group DefaultWEBVPNGroup general-attributes vpn-demo-1(config-tunnel-general)# default-group-policy SSL-VPN-GROUP-POLICY vpn-demo-1(config-tunnel-general)# address-pool vpn-pool ! vpn-demo-1(config)# username dkazakov password cisco vpn-demo-1(config)# username dkazakov attributes vpn-demo-1(config-username)# service-type remote-access ! vpn-demo-1(config)# ssl trust-point SELF vpn-demo-1(config)# webvpn vpn-demo-1(config-webvpn)# enable outside vpn-demo-1(config-webvpn)# anyconnect image disk0:/anyconnect-win-4.8.03036-webdeploy-k9.pkg vpn-demo-1(config-webvpn)# anyconnect enable !- (VALGFRIT): I det ovennævnte eksempel brugte vi en lokal bruger på ASA til at autentificere eksterne brugere, hvilket selvfølgelig kun er praktisk anvendt i laboratorier. Jeg vil vise et eksempel på, hvordan man hurtigt kan tilpasse indstillingen til autentificering på RADIUS serveren, hvor vi bruger Cisco Identity Services Engine:
vpn-demo-1(config-aaa-server-group)# dynamic-authorization
vpn-demo-1(config-aaa-server-group)# interim-accounting-update
vpn-demo-1(config-aaa-server-group)# aaa-server RADIUS (outside) host 192.168.99.134
vpn-demo-1(config-aaa-server-host)# key cisco
vpn-demo-1(config-aaa-server-host)# exit
vpn-demo-1(config)# tunnel-group DefaultWEBVPNGroup general-attributes
vpn-demo-1(config-tunnel-general)# authentication-server-group  RADIUS
!
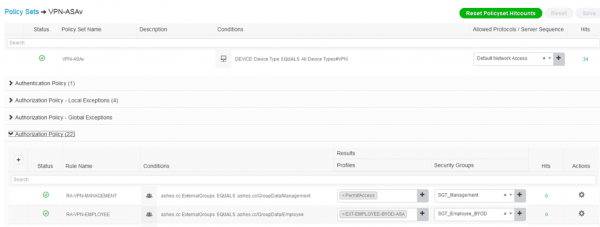
Denne integration har gjort det muligt ikke kun hurtigt at integrere autentifikationsproceduren med katalogtjenesten AD, men også at skelne, om den tilsluttede computer tilhører AD, at forstå, om det er en virksomhedsenhed eller en personlig enhed og evaluere tilstanden af den tilsluttede enhed.


- Lad os indstille Transparent NAT, så trafikken mellem klienten og ressourcerne i det corporate netværk ikke bliver NAT'et:
vpn-demo-1(config-network-object)# subnet 192.168.20.0 255.255.255.0 ! vpn-demo-1(config)# nat (inside,outside) source static any any destination static vpn-users vpn-users no-proxy-arp- (VALGFRIT): For at sende vores kunder ud på internettet gennem ASA (ved brug af tunnelall Muligheder) ved brug af PAT, samt udgang gennem den samme OUTSIDE grænseflade, hvor de tilsluttes, er det nødvendigt at foretage følgende indstillinger.
vpn-demo-1(config-network-object)# nat (outside,outside) source dynamic vpn-users interface vpn-demo-1(config)# nat (inside,outside) source dynamic any interface vpn-demo-1(config)# same-security-traffic permit intra-interface !- Det er yderst vigtigt ved brug af cluster at lade det interne netværk forstå, hvilken ASA der skal rutes tilbage til brugerne. For dette er det nødvendigt at udføre redistribution af ruterne for /32 adresserne, der tildeles klienterne.
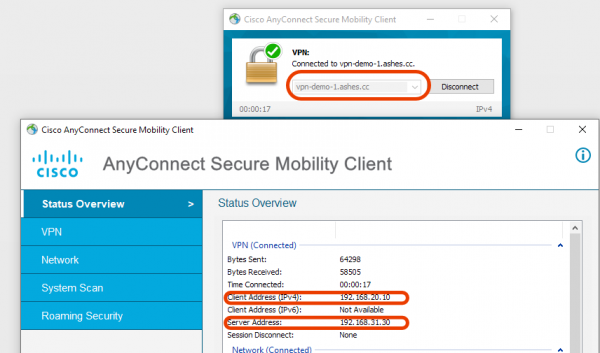
Vi har endnu ikke konfigureret clusteret, men vi har allerede fungerende VPN-gateways, som man kan tilslutte sig individuelt via FQDN eller IP.

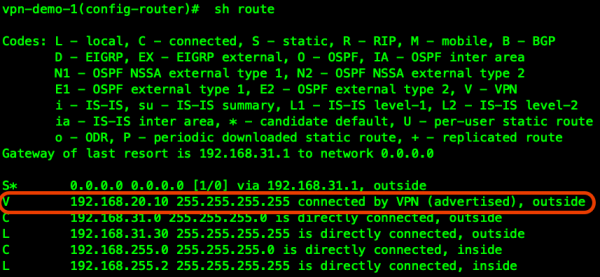
Vi ser den tilsluttede klient i routingtabellen på den første ASA:

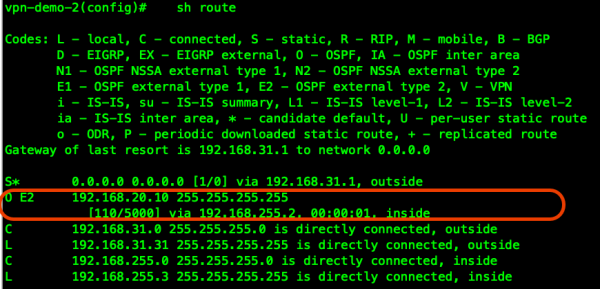
For at hele vores VPN-cluster og hele det virksomhedsnetværk skal vide ruten til vores klient, vil vi udføre redistribution af klientens præfiks i den dynamiske routingprotokol, for eksempel OSPF:
!
vpn-demo-1(config)# route-map RMAP-VPN-REDISTRIBUTE permit 1
vpn-demo-1(config-route-map)# match ip address VPN-REDISTRIBUTE
!
vpn-demo-1(config)# router ospf 1
vpn-demo-1(config-router)# network 192.168.255.0 255.255.255.0 area 0
vpn-demo-1(config-router)# log-adj-changes
vpn-demo-1(config-router)# redistribute static metric 5000 subnets route-map RMAP-VPN-REDISTRIBUTE
Nu har vi en rute til klienten fra den anden gateway ASA-2, og brugerne tilsluttet forskellige VPN-gateways i clusteret kan for eksempel kommunikere direkte via virksomhedens softphone, ligesom den omvendte trafik fra de ressourcer, som brugeren anmoder om, vil komme til den rette VPN-gateway:

Lad os gå videre til opsætningen af Load-Balancing for clusteret.
Adressen 192.168.31.40 vil blive brugt som Virtual IP (VIP - alle VPN-klienter vil primært forbinde til dette), fra denne adresse vil clusterets Master omdirigere til den mindre belastede node i clusteret. Glem ikke at angive den direkte og omvendte DNS-post både for hver ekstern adresse/FQDN for hver node i clusteret og for VIP.
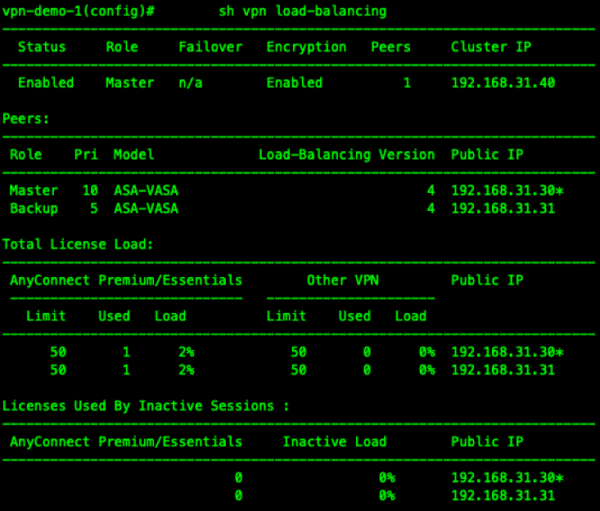
vpn-demo-1(config)# vpn load-balancing vpn-demo-1(config-load-balancing)# interface lbpublic outside vpn-demo-1(config-load-balancing)# interface lbprivate inside vpn-demo-1(config-load-balancing)# priority 10 vpn-demo-1(config-load-balancing)# cluster ip address 192.168.31.40 vpn-demo-1(config-load-balancing)# cluster port 4000 vpn-demo-1(config-load-balancing)# redirect-fqdn enable vpn-demo-1(config-load-balancing)# cluster key cisco vpn-demo-1(config-load-balancing)# cluster encryption vpn-demo-1(config-load-balancing)# cluster port 9023 vpn-demo-1(config-load-balancing)# participate vpn-demo-1(config-load-balancing)#- Vi tester clusterets funktion med to tilsluttede klienter:

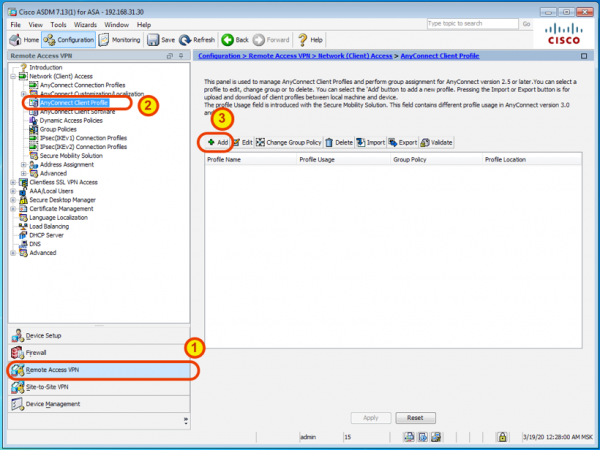
- Vi gør kundens oplevelse mere komfortabel med en automatisk indlæsning af AnyConnect-profilen via ASDM.

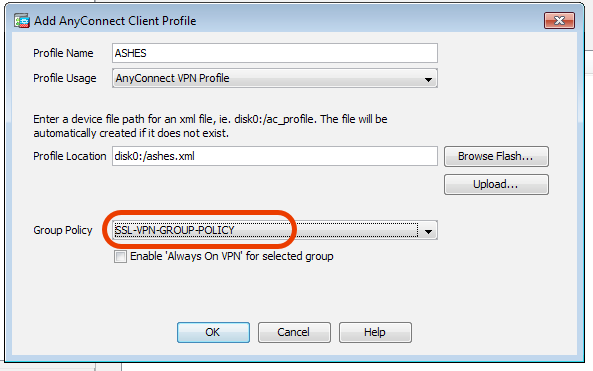
Vi navngiver profilen på en praktisk måde og associere vores gruppepolitik med den:

Ved næste forbindelse vil denne profil automatisk blive downloadet og installeret i AnyConnect-klienten, hvilket gør det nemt at vælge den fra listen, hvis der er behov for det:
Da vi kun har oprettet denne profil på én ASA ved brug af ASDM, skal du ikke glemme at gentage handlingerne på de øvrige ASA'er i klyngen.


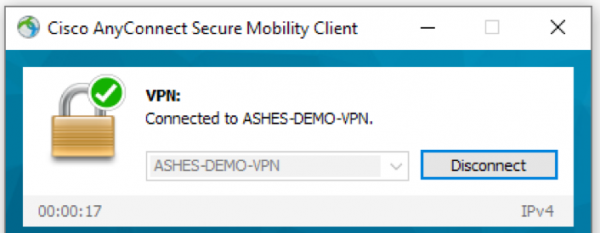
Output: Dermed har vi hurtigt implementeret en klynge af flere VPN-gateways med automatisk belastningsfordeling. At tilføje nye noder til klyngen er ikke svært, da vi får simpel horisontal skalering ved at implementere nye ASAv-virtuelle maskiner eller ved at bruge hardware ASA'er. Den multifunktionelle AnyConnect-klient kan markant udvide mulighederne for sikkert fjernadgang ved at anvende funktionen Posture (tilstandsbedømmelse), der mest effektivt anvendes sammen med systemet til centraliseret kontrol og adgangsregistrering Identity Services Engine.
Kilde: habr.com
