

Introduktion
Recently, while working on my thesis, I encountered the need to create an Ubuntu image for a single-board computer with ROS already installed (Robot Operating System – the operating system for robots). In short, the thesis is dedicated to managing a group of robots. The robots are equipped with two wheels and three range finders. All of this is controlled from ROS, which runs on the ODROID-C2 board.
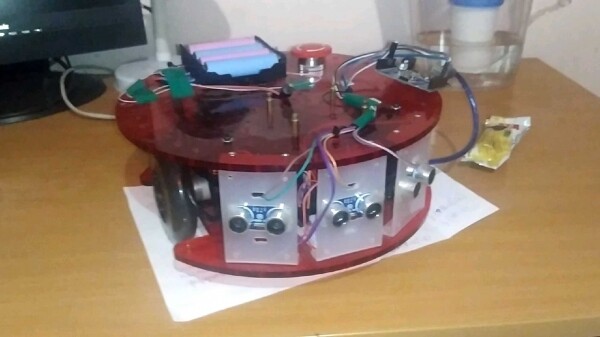
Robot Ladybug. Sorry for the poor quality of the photo
There was neither time nor desire to install ROS on each robot individually, which is why the need for a system image with ROS already installed arose. While browsing the internet, I found several approaches to how this could be done.
In general, all the solutions I found can be divided into the following groups.
- Programs that create an image from a ready and configured system (, , , systemback, etc.)
- Projects that allow you to build your own image (, )
- Building an image manually ( og , plus )
Using solutions from the first group seemed to be the simplest and most attractive option, but I couldn't create a live system image for ODROID. The solutions from the second group also didn't work for me due to a sufficiently high entry threshold. Manual building based on available tutorials also wasn't suitable, since there was no compressed file system in my image.
As a result, after coming across a video about chroot (chroot — change root, video link at the end of the post) and its capabilities, I decided to use it. I will describe my specific case of customizing Ubuntu for robotics developers.
Udgangsdata:
- The entire process of modifying the image (except for writing to the SD card using balenaEtcher) was carried out in the Ubuntu 18.04 operating system.
- The operating system I modified the build of – Ubuntu 18.04.3 mate desktop version.
- The machine where the assembled system is supposed to run – ODROID-C2.
Preparing the image
Download the Ubuntu image for ODROID from
Unpack the archive
unxz –kvCreate a directory where we will mount the image
mkdir mntDetermine the partition where the file system is located
fileLook for a partition with a file system in ext2, ext3, or ext4 format. We need the address of the beginning of the partition (highlighted in red in the screenshot):

Bemærkning. Filsystemets placering kan også ses ved hjælp af værktøjet parted.Vi monterer billedet
sudo mount -o loop,offset=$((264192*512)) mnt/Den nødvendige partition starter fra blok 264192 (dine tal kan variere), størrelsen af hver blok er 512 bytes, så vi ganger dem sammen for at få offsettet i bytes.
Gå ind i mappen med det monterede system og chroot ind i det
cd mnt/
sudo chroot ~/livecd/mnt/ bin/sh
~/livecd/mnt — den fulde sti til mappen med det monterede system
bin/sh — et shell (kan også erstattes med bin/bash)
Nu kan vi begynde at installere de nødvendige pakker og applikationer.

Installation af ROS
Jeg installerede den nyeste version af ROS (ROS Melodic) i henhold til .
Opdaterer pakkelisten
sudo apt-get updateHer stødte jeg på en fejl:
Err:6 http://deb.odroid.in/c2 bionic InRelease
De følgende signaturer var ugyldige: EXPKEYSIG 5360FB9DAB19BAC9 Mauro Ribeiro (mdrjr)
Den relaterer sig til, at nøglen til signaturen af pakkematerialet er udløbet. For at opdatere nøglerne indtaster vi:
sudo apt-key adv --keyserver keyserver.ubuntu.com --recv-keys AB19BAC9Forbereder systemet til installation af ROS
sudo sh -c 'echo "deb http://packages.ros.org/ros/ubuntu $(lsb_release -sc) main" > /etc/apt/sources.list.d/ros-latest.list'sudo apt-key adv --keyserver 'hkp://keyserver.ubuntu.com:80' --recv-key C1CF6E31E6BADE8868B172B4F42ED6FBAB17C654sudo apt updateInstallerer ROS
Desværre kunne jeg ikke installere desktop-versionen af ROS, så jeg installerede kun de grundlæggende pakker:sudo apt install ros-melodic-ros-base apt search ros-melodicBemærk 1. Under installationen opstod der nogle gange en fejl:
dpkg: error: failed to write status database record about 'iputils-ping' to '/var/lib/dpkg/status': No space left on deviceDet blev rettet ved at rydde cachen for apt-værktøjet:
sudo apt-get clean; sudo apt-get autocleanBemærk 2. Efter installationen virker det ikke at source kommandoen:
source /opt/ros/melodic/setup.bashfor vi har ikke kørt bash, så det skal IKKE indtastes i terminalen.
Installerer nødvendige afhængigheder
sudo apt install python-rosdep python-rosinstall python-rosinstall-generator python-wstool build-essentialsudo apt install python-rosdepsudo rosdep init rosdep updateSætter adgangsrettighederne
Da vi har chrooted ind og faktisk udfører alle handlinger som root i det samlede system, vil ROS også kun blive kørt med superbrugerrettigheder.
Ved forsøg på at køre roscore uden sudo opstår der en fejl:Traceback (most recent call last): File "/opt/ros/melodic/lib/python2.7/dist-packages/roslaunch/__init__.py", line 230, in main write_pid_file(options.pid_fn, options.core, options.port) File "/opt/ros/melodic/lib/python2.7/dist-packages/roslaunch/__init__.py", line 106, in write_pid_file with open(pid_fn, "w") as f: IOError: [Errno 13] Permission denied: '/home/user/.ros/roscore-11311.pid'For the error not to occur, we will recursively change the permissions of the user's home directory ROS. To do this, type:
sudo rosdep fix-permissionsInstall the packages rviz and rqt
sudo apt-get install ros-melodic-rqt ros-melodic-rviz
De sidste detaljer
- Exit from chroot:
sigreturn - Unmount the image
cd .. sudo umount mnt/ - We will pack the system image into an archive
xz –ckv1
All done! Now using you can write the system image to the SD card, insert it into ODROID-C2, and you will have Ubuntu with ROS installed!
Links:
- The video helped a lot with how to chroot in linux and why it's necessary:
Kilde: habr.com
