

Vor ein paar Tagen habe ich beschlossen, die Firmware meines Routers mit binwalk einem Reverse Engineering zu unterziehen.
Ich habe mir . Es ist nicht der beste Router, aber für meine Bedürfnisse völlig ausreichend.
Jedes Mal, wenn ich einen neuen Router kaufe, installiere ich . Warum? In der Regel kümmern sich die Hersteller nicht intensiv um die Unterstützung ihrer Router, und im Laufe der Zeit wird die Software veraltet, es treten Sicherheitslücken auf usw., kurz gesagt, Sie verstehen schon. Daher bevorzuge ich eine gut unterstützte Open-Source-Firmware, die von der Community gepflegt wird: OpenWRT.
Nachdem ich OpenWRT heruntergeladen hatte, habe ich auch für meinen neuen Archer C7 von der offiziellen Website heruntergeladen und beschlossen, es zu analysieren. Einfach aus Spaß und um über binwalk zu berichten.
Was ist binwalk?
ist ein Open-Source-Tool zur Analyse, Reverse Engineering und Extraktion von Firmware-Images.
Es wurde 2010 von Craig Heffner entwickelt und kann Firmware-Images scannen, Dateien finden, Dateisystem-Images identifizieren und extrahieren, ausführbaren Code, komprimierte Archive, Bootloader und Kernel, Dateiformate wie JPEG und PDF sowie vieles mehr.
Sie können binwalk verwenden, um die Firmware rückwärts zu analysieren, um zu verstehen, wie sie aufgebaut ist. Suchen Sie in den Binärdateien nach Schwachstellen, extrahieren Sie Dateien und suchen Sie nach Hintertüren oder digitalen Zertifikaten. Es ist auch möglich, Opcodes für viele verschiedene CPUs.
Sie können Abbilder von Dateisystemen entpacken, um bestimmte Passwortdateien (passwd, shadow usw.) zu suchen und versuchen, Passwort-Hashes zu knacken. Sie können eine binäre Analyse zwischen zwei oder mehr Dateien durchführen. Auch eine Entropieanalyse der Daten zur Suche nach komprimierten Daten oder kodierten Verschlüsselungsschlüsseln ist möglich. All dies ohne Zugriff auf den Quellcode.
Im Grunde ist alles, was Sie brauchen, vorhanden 🙂
Wie funktioniert binwalk?
Das Hauptmerkmal von binwalk ist sein signaturbasiertes Scannen. Binwalk kann Firmware-Images scannen, um verschiedene eingebettete Dateitypen und Dateisysteme zu finden.
Sie kennen das Kommandozeilenwerkzeug datei?
file /bin/bash
/bin/bash: ELF 64-bit LSB shared object, x86-64, version 1 (SYSV), dynamisch verlinkt, Interpreter /lib64/l, für GNU/Linux 3.2.0, BuildID[sha1]=12f73d7a8e226c663034529c8dd20efec22dde54, stripped
Der Befehl dateischaut sich den Dateikopf an und sucht nach einer Signatur (magische Zahl), um den Dateityp zu bestimmen. Wenn eine Datei zum Beispiel mit einer Bytefolge beginnt, 0x89 0x50 0x4E 0x47 0x0D 0x0A 0x1A 0x0A, weiß sie, dass es sich um eine PNG-Datei handelt. Es gibt eine Liste verbreiteter Dateisignaturen.
Binwalk funktioniert ähnlich. Statt nur nach Signaturen am Anfang der Datei zu suchen, scannt Binwalk die gesamte Datei. Zudem kann Binwalk Dateien extrahieren, die im Image gefunden wurden.
Werkzeuge datei und binwalk nutzt die Bibliothek libmagic zur Identifizierung von Dateisignaturen. Zusätzlich binwalk unterstützt es eine Liste benutzerdefinierter magischer Signaturen für die Suche nach komprimierten / archivierten Dateien, Firmware-Headern, Linux-Kernen, Bootloadern, Dateisystemen und mehr.
Lass uns Spaß haben?
Installation von binwalk
Binwalk wird auf mehreren Plattformen unterstützt, einschließlich Linux, OSX, FreeBSD und Windows.
Um die neueste Version von binwalk zu installieren, können Sie und den oder , die auf der Projektwebsite verfügbar ist, folgen.
Binwalk hat viele verschiedene Optionen:
$ binwalk

Binwalk v2.2.0
Craig Heffner, ReFirmLabs
https://github.com/ReFirmLabs/binwalk

Verwendung: binwalk [OPTIONEN] [DATEI1] [DATEI2] [DATEI3] ...

Signature Scan Optionen:
    -B, --signature              Suche nach gängigen Dateisignaturen in den Zieldateien
    -R, --raw=              Suche nach der angegebenen Bytefolge in den Zieldateien
    -A, --opcodes                Suche nach gängigen ausführbaren Opcode-Signaturen in den Zieldateien
    -m, --magic=          Gib eine benutzerdefinierte Magic-Datei an
    -b, --dumb                   Deaktiviere intelligente Signaturkeywords
    -I, --invalid                Zeige als ungültig markierte Ergebnisse an
    -x, --exclude=          Schließe Ergebnisse aus, die mit  übereinstimmen
    -y, --include=          Zeige nur Ergebnisse an, die mit  übereinstimmen

Extraktionsoptionen:
    -e, --extract                Automatisches Extrahieren bekannter Dateitypen
    -D, --dd=       Extrahiere -Signaturen, gib den Dateien eine Erweiterung von  und führe  aus
    -M, --matryoshka             Rekursive Suche in extrahierten Dateien
    -d, --depth=            Begrenze die Rekursionstiefe von Matryoshka (Standard: 8 Ebenen)
    -C, --directory=        Extrahiere Dateien/Ordner in ein benutzerdefiniertes Verzeichnis (Standard: aktuelles Arbeitsverzeichnis)
    -j, --size=             Begrenze die Größe jeder extrahierten Datei
    -n, --count=            Begrenze die Anzahl der extrahierten Dateien
    -r, --rm                     Lösche extrahierte Dateien nach der Nutzung
    -z, --carve                  Extrahiere Daten aus Dateien, führe jedoch keine Extraktionswerkzeuge aus
    -V, --subdirs                Extrahiere in Unterverzeichnisse, die durch den Offset benannt sind

Entropie-Optionen:
    -E, --entropy                Berechne die Dateientropie
    -F, --fast                   Verwende eine schnellere, aber weniger detaillierte Entropieanalyse
    -J, --save                   Speichere das Diagramm als PNG
    -Q, --nlegend                Lass die Legende im Entropiediagramm weg
    -N, --nplot                  Erstelle kein Entropiediagramm
    -H, --high=           Setze den Grenzwert für den Anstiegsentropietriggers (Standard: 0,95)
    -L, --low=            Setze den Grenzwert für den Abfallentropietriggers (Standard: 0,85)

Binär-Diffing Optionen:
    -W, --hexdump                Führe ein Hexdump/Diff einer oder mehrerer Dateien durch
    -G, --green                  Zeige nur Zeilen mit Bytes an, die in allen Dateien gleich sind
    -i, --red                    Zeige nur Zeilen mit Bytes an, die in allen Dateien unterschiedlich sind
    -U, --blue                   Zeige nur Zeilen mit Bytes an, die in einigen Dateien unterschiedlich sind
    -u, --similar                Zeige nur Zeilen an, die zwischen allen Dateien gleich sind
    -w, --terse                  Differenziere alle Dateien, zeige aber nur einen Hexdump der ersten Datei an

Raw-Kompressionsoptionen:
    -X, --deflate                Suche nach rohen Deflate-Kompressionsströmen
    -Z, --lzma                   Suche nach rohen LZMA-Kompressionsströmen
    -P, --partial                Führe einen oberflächlichen, aber schnelleren Scan durch
    -S, --stop                   Stoppe nach dem ersten Ergebnis

Allgemeine Optionen:
    -l, --length=           Anzahl der Bytes zum Scannen
    -o, --offset=           Scan ab diesem Datei-Offset starten
    -O, --base=             Füge allen gedruckten Offsets eine Basisadresse hinzu
    -K, --block=            Setze die Dateiblockgröße
    -g, --swap=             Kehre alle n Bytes vor dem Scannen um
    -f, --log=            Protokolliere Ergebnisse in eine Datei
    -c, --csv                    Protokolliere Ergebnisse in eine Datei im CSV-Format
    -t, --term                   Formatiere die Ausgabe für das Terminalfenster
    -q, --quiet                  Unterdrücke die Ausgabe auf stdout
    -v, --verbose                Aktiviere die ausführliche Ausgabe
    -h, --help                   Zeige die Hilfsausgabe an
    -a, --finclude=         Scanne nur Dateien, deren Namen mit diesem Regex übereinstimmen
    -p, --fexclude=         Scanne keine Dateien, deren Namen mit diesem Regex übereinstimmen
    -s, --status=           Aktiviere den Statusserver am angegebenen Port
Image-Scans
Wir beginnen mit der Suche nach Dateisignaturen innerhalb des Images (Image von der Seite ).
Starten von binwalk mit dem Parameter —signature:
$ binwalk --signature --term archer-c7.bin

DEZIMAL       HEXADECIMAL     BESCHREIBUNG
------------------------------------------------------------------------------------------
21876         0x5574          U-Boot Versionszeichenfolge, "U-Boot 1.1.4-g4480d5f9-dirty (Mai
                              20 2019 - 18:45:16)"
21940         0x55B4          CRC32 Polynom-Tabelle, Big Endian
23232         0x5AC0          uImage-Header, Header-Größe: 64 Bytes, Header CRC:
                              0x386C2BD5, erstellt: 2019-05-20 10:45:17, Bildgröße:
                              41162 Bytes, Datenadresse: 0x80010000, Einstiegspunkt:
                              0x80010000, Daten CRC: 0xC9CD1E38, OS: Linux, CPU: MIPS,
                              Bildtyp: Firmware-Abbild, Kompressionstyp: lzma, Bild
                              Name: "u-boot Bild"
23296         0x5B00          LZMA komprimierte Daten, Eigenschaften: 0x5D, Wörterbuchgröße:
                              8388608 Bytes, unkomprimierte Größe: 97476 Bytes
64968         0xFDC8          XML-Dokument, Version: "1.0"
78448         0x13270         uImage-Header, Header-Größe: 64 Bytes, Header CRC:
                              0x78A267FF, erstellt: 2019-07-26 07:46:14, Bildgröße:
                              1088500 Bytes, Datenadresse: 0x80060000, Einstiegspunkt:
                              0x80060000, Daten CRC: 0xBB9D4F94, OS: Linux, CPU: MIPS,
                              Bildtyp: Multi-File Abbild, Kompressionstyp: lzma,
                              Bildname: "MIPS OpenWrt Linux-3.3.8"
78520         0x132B8         LZMA komprimierte Daten, Eigenschaften: 0x6D, Wörterbuchgröße:
                              8388608 Bytes, unkomprimierte Größe: 3164228 Bytes
1167013       0x11CEA5        Squashfs-Dateisystem, Little Endian, Version 4.0,
                              Kompression: xz, Größe: 14388306 Bytes, 2541 Inodes,
                              Blockgröße: 65536 Bytes, erstellt: 2019-07-26 07:51:38
15555328      0xED5B00        gzip komprimierte Daten, von Unix, zuletzt geändert: 2019-07-26
                              07:51:41
Jetzt haben wir viele Informationen über dieses Image.
Das Image verwendet als Bootloader (Header des Images an Adresse 0x5AC0 und das komprimierte Image des Bootloaders an Adresse 0x5B00). Basierend auf dem uImage-Header an Adresse 0x13270 wissen wir, dass die Prozessorarchitektur MIPS ist und der Linux-Kernel Version 3.3.8 verwendet wird. Und basierend auf dem Image, das an Adresse 0x11CEA5, können wir sehen, dass rootfs das Dateisystem squashfs.
Jetzt lassen Sie uns den Bootloader (U-Boot) mit dem Befehl entpacken dd:
$ dd if=archer-c7.bin of=u-boot.bin.lzma bs=1 skip=23296 count=41162
41162+0 Datensätze eingegeben
41162+0 Datensätze ausgegeben
41162 Bytes (41 kB, 40 KiB) kopiert, 0,0939608 s, 438 kB/s
Da das Image mit LZMA komprimiert ist, müssen wir es entpacken:
$ unlzma u-boot.bin.lzmaJetzt haben wir das U-Boot-Image:
$ ls -l u-boot.bin
-rw-rw-r-- 1 sprado sprado 97476 Feb  5 08:48 u-boot.bin
Wie wäre es mit der Suche nach dem Standardwert für bootargs?
$ strings u-boot.bin | grep bootargs
bootargs
bootargs=console=ttyS0,115200 board=AP152 rootfstype=squashfs init=/etc/preinit mtdparts=spi0.0:128k(factory-uboot),192k(u-boot),64k(ART),1536k(uImage),14464k@0x1e0000(rootfs) mem=128M
Die Umgebungsvariable U-Boot bootargs wird verwendet, um Parameter an den Linux-Kernel zu übergeben. Und aus dem obigen verstehen wir besser den Flash-Speicher des Geräts.
Wie wäre es mit dem Extrahieren des Linux-Kernel-Images?
$ dd if=archer-c7.bin of=uImage bs=1 skip=78448 count=1088572
1088572+0 records in
1088572+0 records out
1088572 Bytes (1,1 MB, 1,0 MiB) kopiert, 1,68628 s, 646 kB/s
Wir können überprüfen, ob das Image erfolgreich extrahiert wurde, indem wir den Befehl datei:
$ file uImage
uImage: u-boot legacy uImage, MIPS OpenWrt Linux-3.3.8, Linux/MIPS, Multi-File Image (lzma), 1088500 Bytes, Fri Jul 26 07:46:14 2019, Load Address: 0x80060000, Entry Point: 0x80060000, Header CRC: 0x78A267FF, Data CRC: 0xBB9D4F94
Das uImage-Dateiformat ist im Wesentlichen ein Linux-Kernel-Image mit einem zusätzlichen Header. Lassen Sie uns diesen Header entfernen, um das endgültige Linux-Kernel-Image zu erhalten:
$ dd if=uImage of=Image.lzma bs=1 skip=72
1088500+0 records in
1088500+0 records out
1088500 Bytes (1,1 MB, 1,0 MiB) kopiert, 1,65603 s, 657 kB/s
Das Image ist komprimiert, also lassen Sie uns es entpacken:
$ unlzma Image.lzmaJetzt haben wir das Linux-Kernel-Image:
$ ls -la Image
-rw-rw-r-- 1 sprado sprado 3164228 Feb  5 10:51 Image
Was können wir mit dem Kernel-Image machen? Wir könnten beispielsweise nach Strings im Image suchen, um die Kernel-Version zu finden und Informationen über die Umgebung zu erfahren, die zur Erstellung des Kernels verwendet wurde:
$ strings Image | grep "Linux version"
Linux version 3.3.8 (leo@leo-MS-7529) (gcc version 4.6.3 20120201 (prerelease) (Linaro GCC 4.6-2012.02) ) #1 Mon May 20 18:53:02 CST 2019
Obwohl die Firmware im letzten Jahr (2019) veröffentlicht wurde, verwendet sie, während ich diesen Artikel schreibe, eine veraltete Version des Linux-Kernels (3.3.8), die 2012 herauskam, und wurde mit einer ebenfalls sehr alten Version von GCC (4.6) aus dem Jahr 2012 kompiliert!
(Anmerkung: Vertrauen Sie Ihren Routern im Büro und zu Hause immer noch?)
Mit der Option --opcodes können wir auch binwalk verwenden, um Maschineninstruktionen zu suchen und die Architektur des Prozessors des Images zu bestimmen:
$ binwalk --opcodes Image
DEZIMAL      HEXADECIMAL     BESCHREIBUNG
--------------------------------------------------------------------------------
2400         0x960           MIPS-Anweisungen, Funktionsepilog
2572         0xA0C           MIPS-Anweisungen, Funktionsepilog
2828         0xB0C           MIPS-Anweisungen, Funktionsepilog
Wie sieht es mit dem Root-Dateisystem aus? Anstatt das Image manuell zu extrahieren, lassen Sie uns die Option binwalk --extract:
$ binwalk --extract --quiet archer-c7.binDas vollständige Root-Dateisystem wird in ein Unterverzeichnis extrahiert:
$ cd _archer-c7.bin.extracted/squashfs-root/

$ ls
bin  dev  etc  lib  mnt  overlay  proc  rom  root  sbin  sys  tmp  usr  var  www

$ cat etc/banner
     MM           NM                    MMMMMMM          M       M
   $MMMMM        MMMMM                MMMMMMMMMMM      MMM     MMM
  MMMMMMMM     MM MMMMM.              MMMMM:MMMMMM:   MMMM   MMMMM
MMMM= MMMMMM  MMM   MMMM       MMMMM   MMMM  MMMMMM   MMMM  MMMMM'
MMMM=  MMMMM MMMM    MM       MMMMM    MMMM    MMMM   MMMMNMMMMM
MMMM=   MMMM  MMMMM          MMMMM     MMMM    MMMM   MMMMMMMM
MMMM=   MMMM   MMMMMM       MMMMM      MMMM    MMMM   MMMMMMMMM
MMMM=   MMMM     MMMMM,    NMMMMMMMM   MMMM    MMMM   MMMMMMMMMMM
MMMM=   MMMM      MMMMMM   MMMMMMMM    MMMM    MMMM   MMMM  MMMMMM
MMMM=   MMMM   MM    MMMM    MMMM      MMMM    MMMM   MMMM    MMMM
MMMM$ ,MMMMM  MMMMM  MMMM    MMM       MMMM   MMMMM   MMMM    MMMM
  MMMMMMM:      MMMMMMM     M         MMMMMMMMMMMM  MMMMMMM MMMMMMM
    MMMMMM       MMMMN     M           MMMMMMMMM      MMMM    MMMM
     MMMM          M                    MMMMMMM        M       M
       M
 ---------------------------------------------------------------
   Für die, die rocken werden... (%C, %R)
 ---------------------------------------------------------------
Jetzt können wir viele verschiedene Dinge tun.
Wir können nach Konfigurationsdateien, Passwort-Hashes, kryptografischen Schlüsseln und digitalen Zertifikaten suchen. Wir können Binärdateien analysieren, um und Schwachstellen.
Mit und wir können sogar eine ausführbare Datei aus dem Abbild starten (emulieren):
$ ls
bin  dev  etc  lib  mnt  overlay  proc  rom  root  sbin  sys  tmp  usr  var  www

$ cp /usr/bin/qemu-mips-static .

$ sudo chroot . ./qemu-mips-static bin/busybox
BusyBox v1.19.4 (2019-05-20 18:13:49 CST) multi-call binary.
Copyright (C) 1998-2011 Erik Andersen, Rob Landley, Denys Vlasenko
and others. Licensed under GPLv2.
See source distribution for full notice.

Usage: busybox [function] [arguments]...
   or: busybox --list[-full]
   or: function [arguments]...

    BusyBox ist eine Mehrzweck-Binärdatei, die viele gängige Unix-Dienste in einem einzigen ausführbaren Programm kombiniert. Die meisten Benutzer erstellen einen Link zu BusyBox für jede Funktion, die sie nutzen möchten, und BusyBox fungiert dann wie das jeweilige aufgerufene Programm.

Derzeit definierte Funktionen:
    [, [[, addgroup, adduser, arping, ash, awk, basename, cat, chgrp, chmod, chown, chroot, clear, cmp, cp, crond, crontab, cut, date, dd, delgroup, deluser, dirname, dmesg, echo, egrep, env, expr, false,
    fgrep, find, free, fsync, grep, gunzip, gzip, halt, head, hexdump, hostid, id, ifconfig, init, insmod, kill, killall, klogd, ln, lock, logger, ls, lsmod, mac_addr, md5sum, mkdir, mkfifo, mknod, mktemp,
    mount, mv, nice, passwd, pgrep, pidof, ping, ping6, pivot_root, poweroff, printf, ps, pwd, readlink, reboot, reset, rm, rmdir, rmmod, route, sed, seq, sh, sleep, sort, start-stop-daemon, strings,
    switch_root, sync, sysctl, tail, tar, tee, telnet, test, tftp, time, top, touch, tr, traceroute, true, udhcpc, umount, uname, uniq, uptime, vconfig, vi, watchdog, wc, wget, which, xargs, yes, zcat
Hallo! Beachten Sie jedoch, dass die Version von BusyBox — 1.19.4. Das ist eine sehr alte Version von BusyBox, die im April 2012 veröffentlicht wurde.
So veröffentlicht TP-Link im Jahr 2019 ein Firmware-Image unter Verwendung von Software (GCC-Toolchain, Kernel, BusyBox usw.) aus dem Jahr 2012!
Jetzt verstehen Sie, warum ich immer OpenWRT auf meinen Routern installiere?
Das ist noch nicht alles.
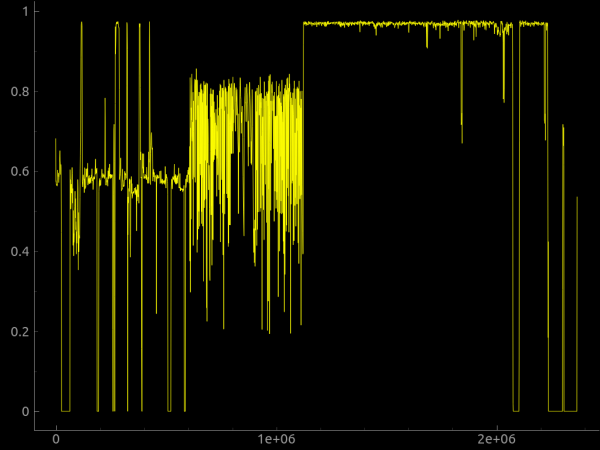
Binwalk kann auch eine Entropie-Analyse durchführen, rohe Entropiedaten drucken und Entropie-Diagramme generieren. In der Regel wird eine hohe Entropie beobachtet, wenn die Bytes im Image zufällig sind. Dies kann darauf hinweisen, dass das Image eine verschlüsselte, komprimierte oder obfuskierte Datei enthält. Hartcodierter Verschlüsselungsschlüssel? Warum nicht.
Wir können auch die Option --raw verwenden, um eine benutzerdefinierte Sequenz roher Bytes im Image zu suchen, oder die Option --hexdump um einen Hexdump durchzuführen, der zwei oder mehr Eingabedateien vergleicht.
können in Binwalk entweder über eine Datei für benutzerdefinierte Signaturen hinzugefügt werden, die in der Befehlszeile mit der Option --magicangegeben wird, oder indem man sie in das Verzeichnis $ HOME / .config / binwalk / magic.
einfügt. Weitere Informationen zu Binwalk finden Sie in .
der Binwalk-Erweiterung.
Es gibt Binwalk, als Python-Modul implementiert, kann von jedem Python-Skript zur programmgesteuerten Durchführung von Binwalk-Scans verwendet werden, und die Kommandozeilenanwendung von Binwalk kann mit nur zwei Zeilen Python-Code fast vollständig dupliziert werden!
import binwalk
binwalk.scan()
Mit der Python-API können Sie auch zur Anpassung und Erweiterung von Binwalk erstellen.
Es gibt auch ein und eine Cloud-Version .
Warum probieren Sie nicht einfach, ein Firmware-Image aus dem Internet herunterzuladen und Binwalk auszuprobieren? Ich verspreche Ihnen, es macht sehr viel Spaß 🙂
Quelle: habr.com
