

Welcome to lesson 8. This lesson is very important because upon its completion you will already be able to configure internet access for your users! It must be said that many stop their setup here 🙂 But we are not among them! There's still much interesting ahead. Now, let's get to the topic of our lesson.
As you probably guessed, today we will be talking about NAT. I am sure that everyone watching this lesson knows what NAT is. Therefore, we will not go into detail about how it works. I will just repeat that NAT is an address translation technology created to save 'public' IP addresses, which are routed on the Internet.
In the previous lesson, you probably noticed that NAT is part of the Access Control policy. This is quite logical. In SmartConsole, NAT settings are placed in a separate tab. We will definitely take a look there today. Overall, in this lesson we will discuss types of NAT, set up internet access, and consider a classic example of port forwarding. That is, the functionality that is most often used in companies. Let’s get started.
Two Ways to Configure NAT
Check Point supports two ways to configure NAT: Automatic NAT and Manual NAT. For each of these methods, there are two types of translations: Hide NAT and Static NAT. Generally, this looks like the picture here:
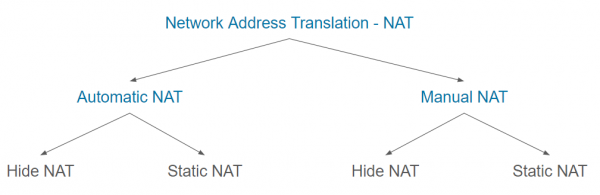
I understand that it probably looks quite complex right now, so let's take a closer look at each type.
Automatic NAT
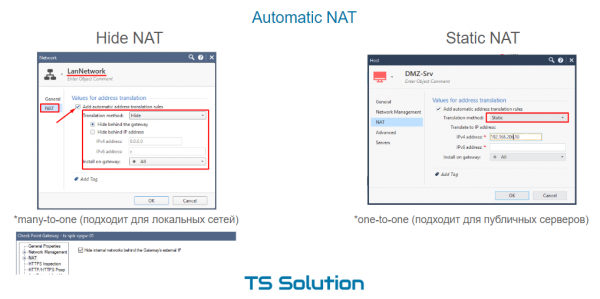
This is the fastest and easiest way. NAT configuration is done literally in two clicks. All you need to do is open the properties of the desired object (whether it's a gateway, network, host, etc.), go to the NAT tab, and check the box “Add automatic address translation rules”. Here, you will also see the field — translation method. There are two, as mentioned above.
1. Automatic Hide NAT
By default, this is Hide. That is, in this case, our network will 'hide' behind some public IP address. The address can be taken from the external interface of the gateway, or you can specify another one. This type of NAT is often called dynamic or many-to-one, as multiple internal addresses are mapped to a single external one. This is naturally possible by using different ports during translation. Hide NAT works only in one direction (inside to outside) and is ideal for local networks when simple internet access is needed. If traffic is initiated from the external network, NAT will not operate as expected. This adds another layer of protection for internal networks.
2. Automatic Static NAT
Hide NAT is great, but you may need to provide access from the external network to an internal server. For example, to a DMZ server, as in our case. In this situation, Static NAT can help. It is also quite simple to configure. You just need to change the translation method to Static in the object's properties and specify the public IP address to be used for NAT (see the image above). That is, if someone from the external network accesses this address (on any port!), the request will be forwarded to the server with the corresponding internal IP. Additionally, if the server accesses the internet, its IP will also change to the specified address. This is NAT in both directions. It’s also called one-to-one and is sometimes used for public servers. Why 'sometimes'? Because it has one major drawback – the public IP address is fully occupied (all ports). You cannot use the same public address for different internal servers (with different ports). For instance, HTTP, FTP, SSH, SMTP, etc. To resolve this issue, Manual NAT can be used.
Manual NAT
The feature of Manual NAT is that you need to create your own translation rules. In that same NAT tab in the Access Control Policy. Manual NAT also allows you to create more complex translation rules. You have access to fields such as: Original Source, Original Destination, Original Services, Translated Source, Translated Destination, Translated Services.
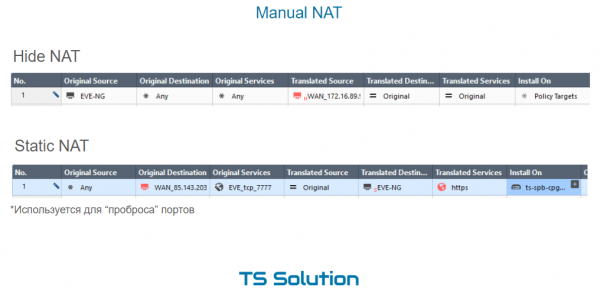
There are also two types of NAT possible here – Hide and Static.
1. Manual Hide NAT
Hide NAT in this case can be used in different situations. Here are a couple of examples:
- When accessing a specific resource from the local network, you want to use a different address for translation (different from the one used in all other cases).
- In a local network, there are a huge number of computers. Automatic Hide NAT won't work here, as this setup allows for only one public IP address, behind which the computers will “hide.” There may simply not be enough ports for the translation. As you recall, there are just over 65,000 of them. Each computer can generate hundreds of sessions. Manual Hide NAT allows you to set a pool of public IP addresses. This thus increases the number of possible NAT translations.
2. Manual Static NAT
Static NAT is used much more frequently when manually creating translation rules. A classic example is port forwarding. This is the case when requests from an external network are made to a public IP address (which may belong to a gateway) on a specific port, and the request is translated to an internal resource. In our lab work, we will forward port 80 to a DMZ server.
Video lesson

Stay tuned for more and join our 🙂
Source: habr.com
