

For what?
With the rise of internet censorship by authoritarian regimes, an increasing number of useful internet resources and websites are being blocked, including those containing technical information.
As a result, it becomes impossible to fully utilize the internet, violating the fundamental right to freedom of speech, as enshrined in the .
Article 19
Everyone has the right to freedom of beliefs and to freely express them; this right includes the freedom to hold beliefs without interference and the freedom to seek, receive, and disseminate information and ideas by any means and regardless of frontiers.
In this guide, we will set up our own free* based on technology , in the cloud infrastructure (AWS), using a free account (for 12 months), on an instance (virtual machine) running .
I tried to make this step-by-step guide as user-friendly as possible for those far from IT. The only thing required is patience in following the steps outlined below.
Note
- AWS offers for 12 months, limited to 15 gigabytes of traffic per month.
- The most up-to-date version of this guide can be found at
Steps
- Registering a free AWS account
- Creating an AWS instance
- Connecting to the AWS instance
- Configuring Wireguard
- Configuring VPN clients
- Verifying VPN installation correctness
Useful links
1. Registering an AWS account
To register a free AWS account, a real phone number and a valid Visa or Mastercard credit card are required. I recommend using virtual cards that are provided for free by or . To verify the card's validity, $1 is charged during registration, which will be refunded later.
1.1. Opening the AWS management console
You need to open a browser and go to the following address:
Click on the 'Register' button

1.2. Filling out personal information
Fill in the information and click the 'Continue' button
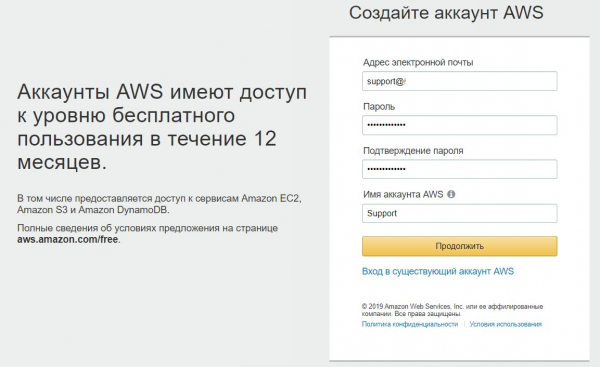
1.3. Filling out contact information
Fill in the contact details.
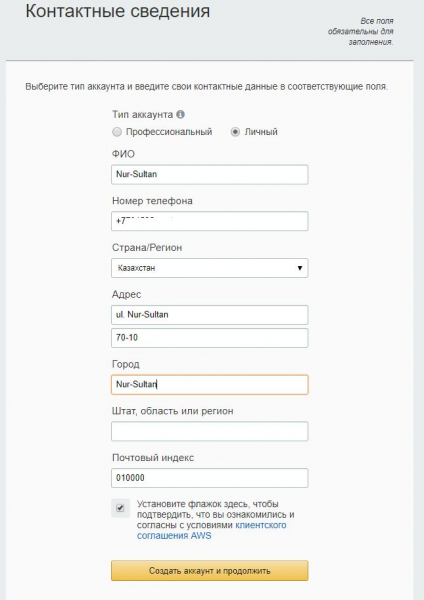
1.4. Providing payment information.
Card number, expiration date, and cardholder name.
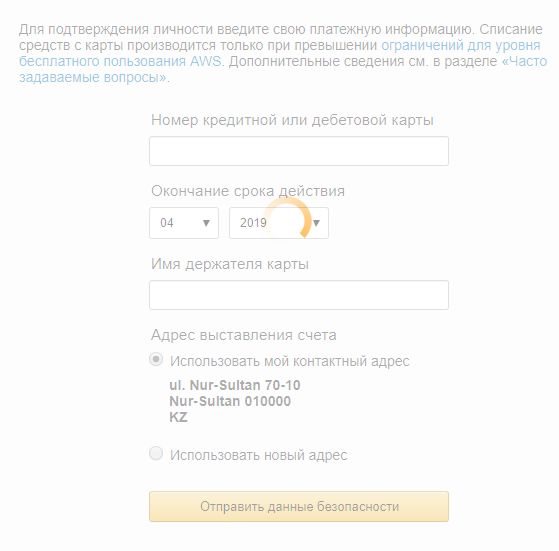
1.5. Account verification
At this stage, the phone number is verified and $1 is debited from the payment card. A 4-digit code appears on the computer screen, and a call from Amazon is made to the specified phone. During the call, you need to enter the code displayed on the screen.
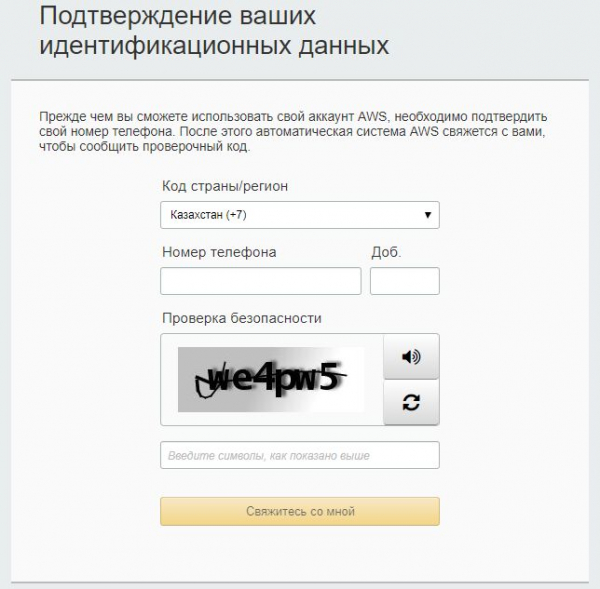
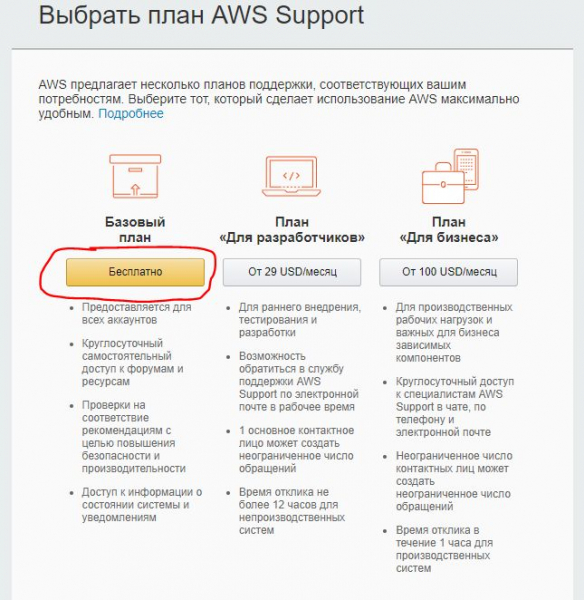
1.6. Choosing a tariff plan.
Select — Basic plan (free)
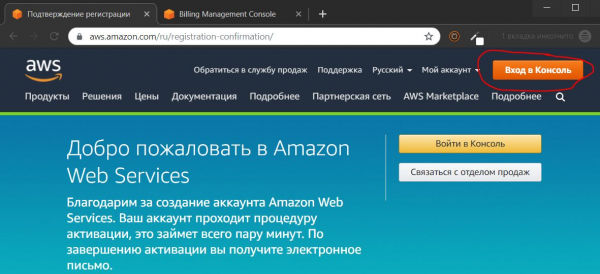
1.7. Accessing the control panel
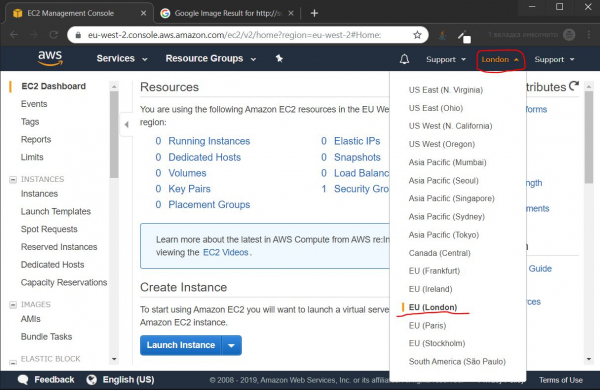
1.8. Choosing a data center location
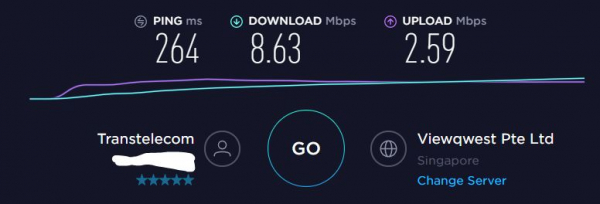
1.8.1. Speed testing
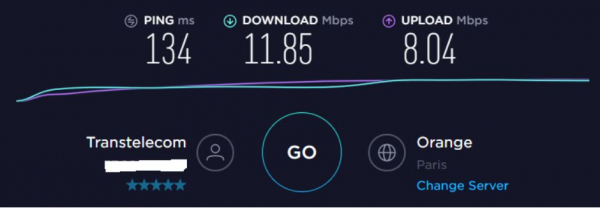
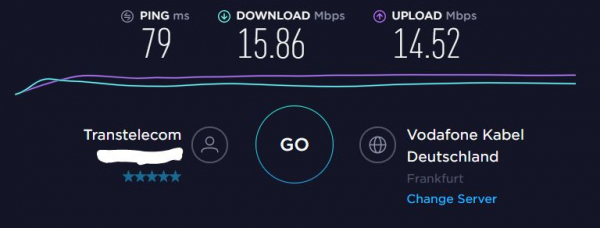
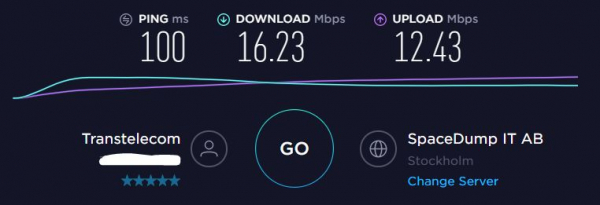
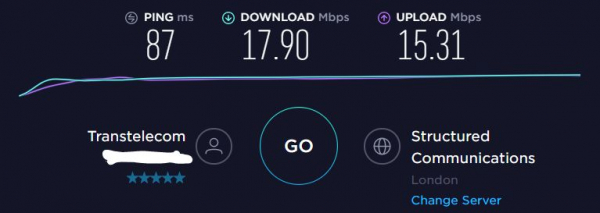
Before selecting a data center, it is recommended to test the access speed to the nearest data centers; in my location, the results are as follows: Paris
- Singapore

- Frankfurt

- Stockholm

- The best speed results are shown by the data center in London. Therefore, I chose it for further configuration.

- London

2. Creating an AWS instance
2.1 Creating a virtual machine
2.1.1. Choosing an instance type
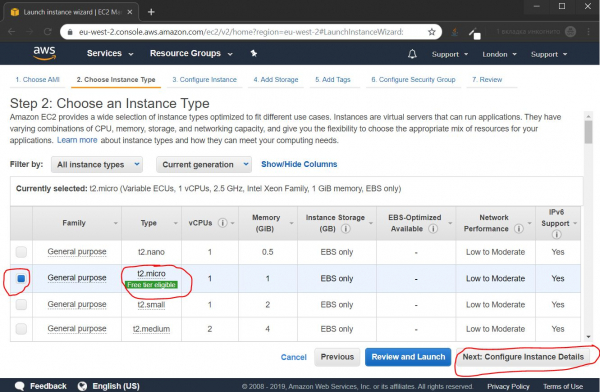
By default, the t2.micro instance is selected, which is what we need; simply click the button
Next: Configure Instance Details 2.1.2. Configuring instance parameters
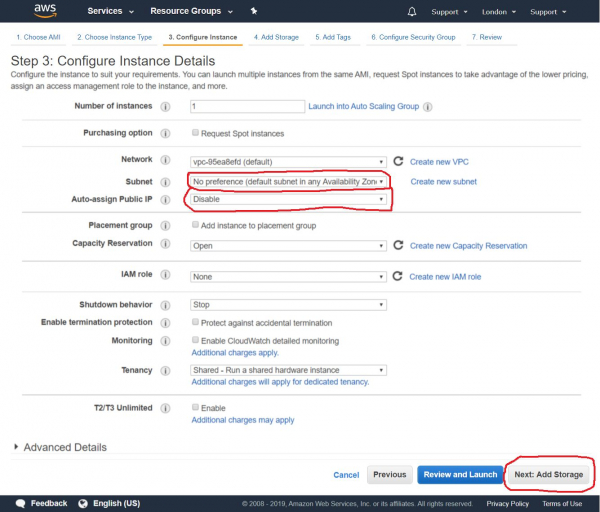
Later, we will connect a static public IP to our instance, so at this stage we disable the auto-assigning of a public IP and click the button
Next: Add Storage 2.1.3. Connecting storage
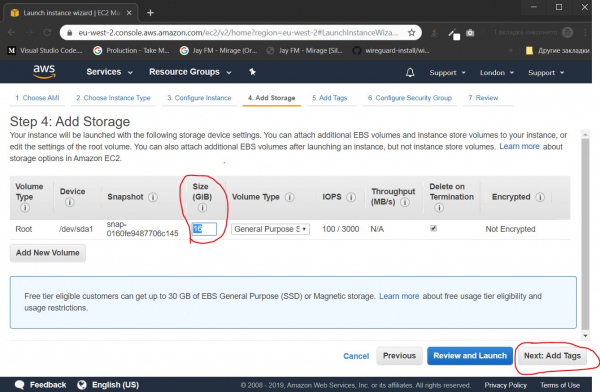
Specify the size of the ‘hard disk’. For our purposes, 16 gigabytes is sufficient, and click the button
Next: Add Tags 2.1.4. Configuring tags
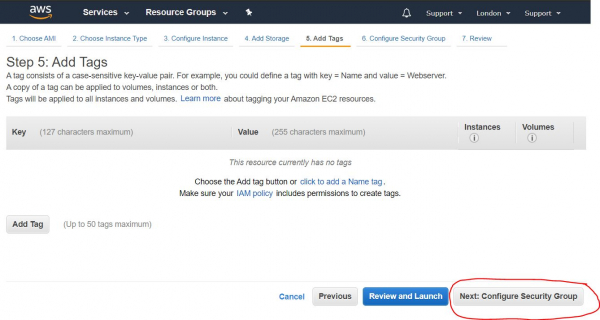
If we were creating multiple instances, we could group them by tags for easier management. In this case, this functionality is unnecessary, so we immediately click the button
Next: Configure Security Group 2.1.5. Opening ports
At this stage, we configure the firewall by opening the necessary ports. The set of open ports is called a 'Security Group'. We need to create a new security group, give it a name, description, add a UDP port (Custom UDP Rule), and in the Port Range field, we need to assign a port number from the range
dynamic ports After filling in the necessary data, click the button
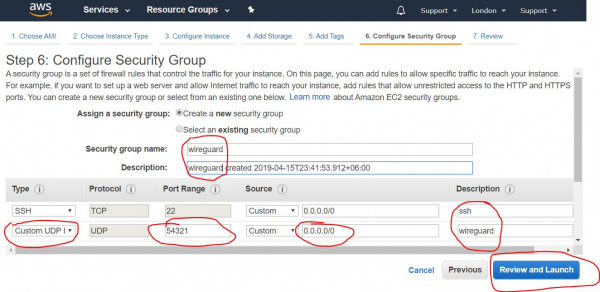
Review and Launch 2.1.6. Reviewing all settings
On this page, we review all the settings of our instance, check if everything is in order, and click the button
Launch 2.1.7. Creating access keys
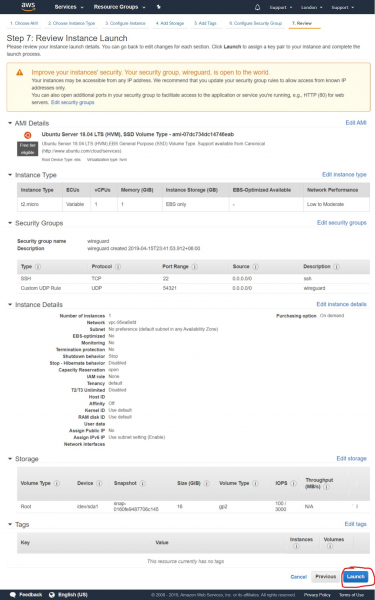
Creating access keys
Then a dialog box appears, offering either to create or add an existing SSH key, which we will use to connect remotely to our instance. We choose the option 'Create a new key pair' to generate a new key. We assign it a name and click the button Download Key Pair, to download the created keys. Store them in a safe place on your local computer's disk. After downloading, click the button Launch Instances
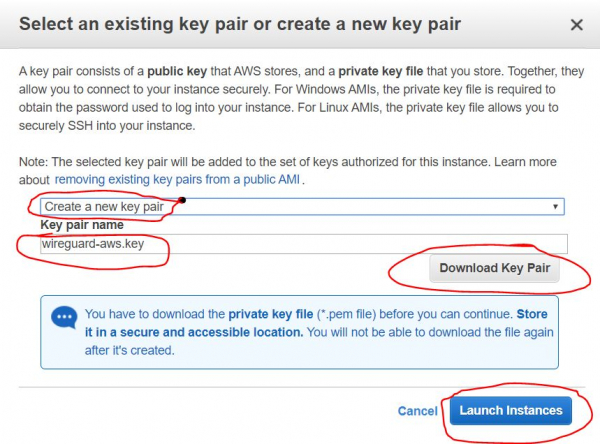
2.1.7.1. Saving Access Keys
Here we see the step of saving the created keys from the previous step. After we click the button Download Key Pair, the key is saved as a certificate file with the *.pem extension. In this case, I named it wireguard-awskey.pem
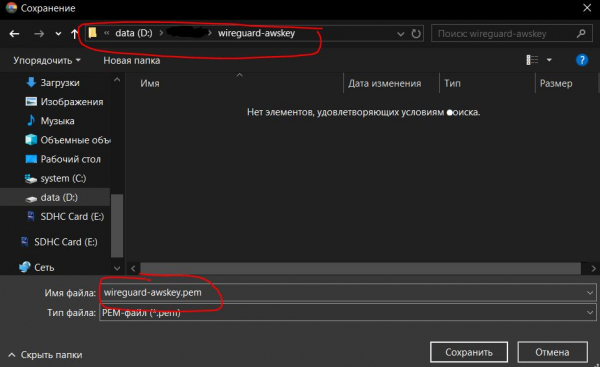
2.1.8. Review of Instance Creation Results
Next, we see a message about the successful launch of the instance we just created. We can go to the list of our instances by clicking the button View instances
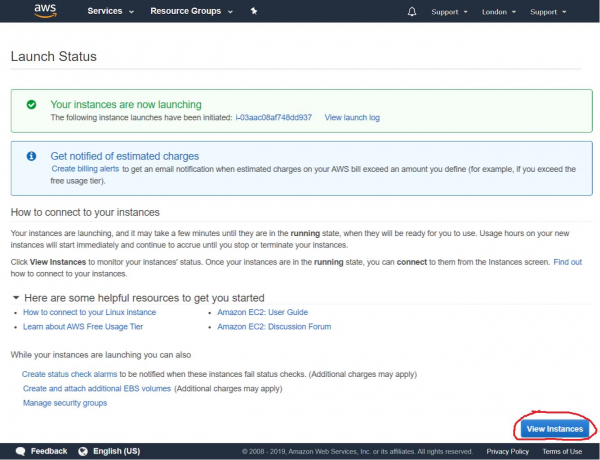
2.2. Creating an External IP Address
2.2.1. Starting the Creation of an External IP
Next, we need to create a permanent external IP address through which we will connect to our VPN server. To do this, in the navigation panel on the left side of the screen, select the item Elastic IPs from the category NETWORK & SECURITY and click the button Allocate new address
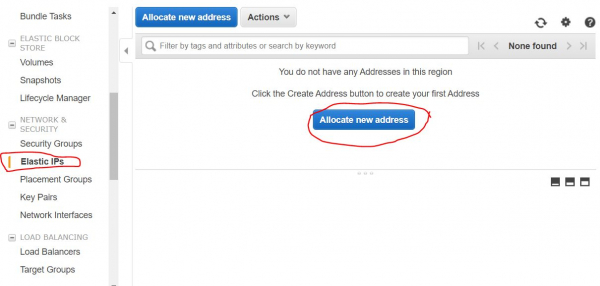
2.2.2. Settings for Creating an External IP
In the next step, we need to ensure that the option Amazon pool is enabled (enabled by default), and click the button Allocate
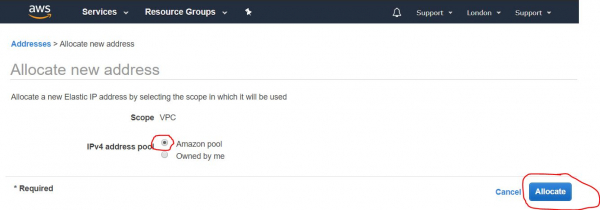
2.2.3. Review of External IP Address Creation Results
On the next screen, we will see the external IP address we received. It is recommended to memorize it, or better yet, write it down. We will need it multiple times during further configuration and use of the VPN server. In this guide, as an example, I am using the IP address 4.3.2.1. After writing down the address, click the button Close
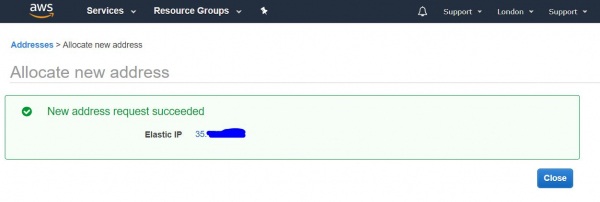
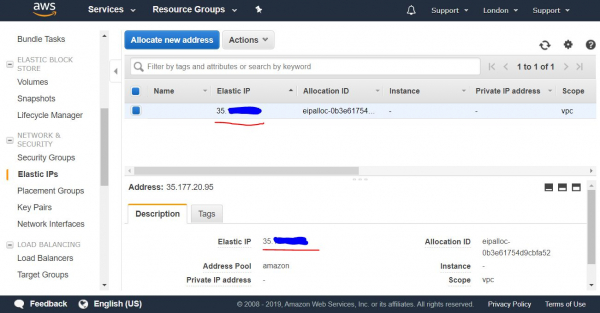
2.2.4. List of External IP Addresses
Next, we see the list of our persistent public IP addresses (Elastic IPs).
2.2.5. Assigning an External IP to an Instance
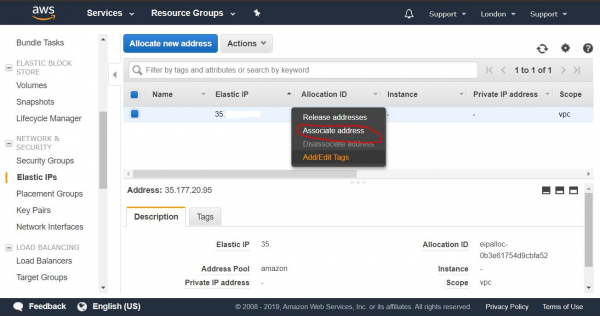
In this list, we select the IP address we obtained and right-click to open the drop-down menu. We then select the item Associate address, to assign it to the instance we created earlier.
2.2.6. Configuring the Assignment of an External IP
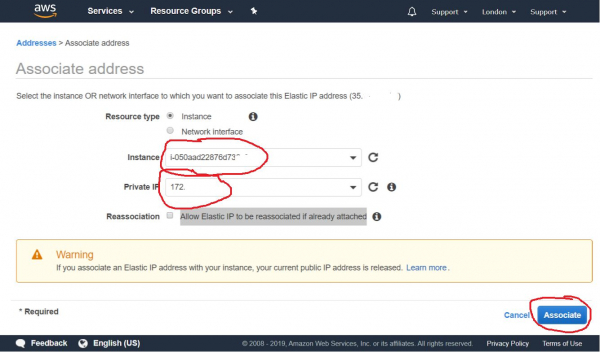
In the next step, we select our instance from the drop-down list and click the button Associate
2.2.7. Overview of External IP Allocation Results
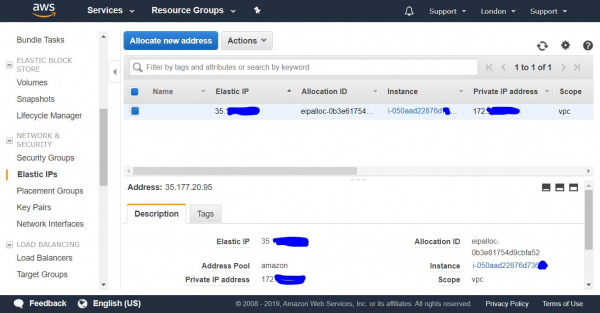
After this, we can see that our instance is linked to our permanent public IP address and its private IP address.
Now we can connect to our newly created instance from outside, from our computer via SSH.
3. Connecting to AWS Instance
— is a secure protocol for remotely managing computer devices.
3.1. Connecting via SSH from a Windows Computer
To connect from a Windows computer, you first need to download and install the program .
3.1.1. Importing the Private Key for Putty
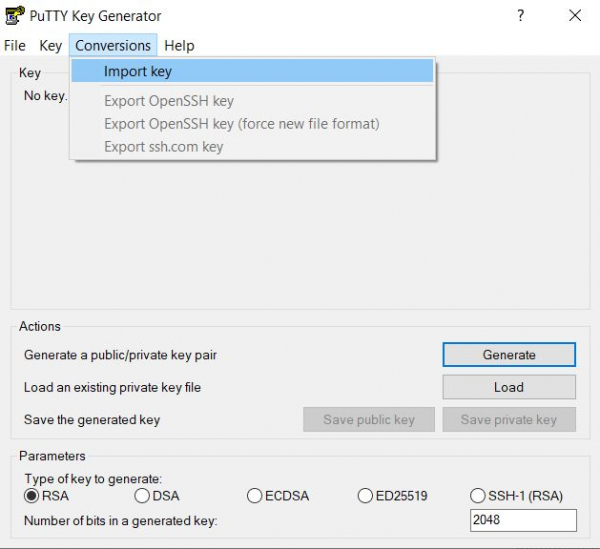
3.1.1.1. After installing Putty, you need to run the PuTTYgen utility that comes with it to import the certificate key from PEM format into a format suitable for use in Putty. To do this, in the top menu, select Conversions->Import Key
3.1.1.2. Selecting the AWS Key in PEM Format
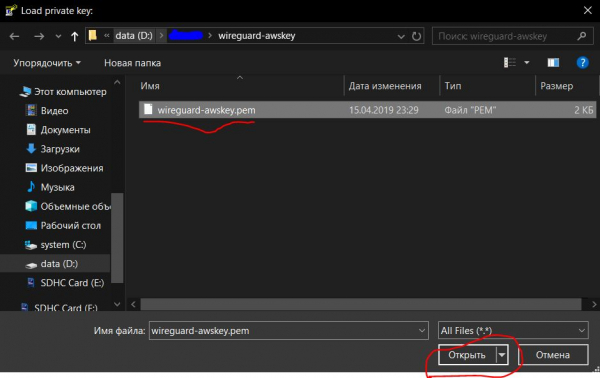
Next, select the key that we previously saved at stage 2.1.7.1, in our case its name is wireguard-awskey.pem
3.1.1.3. Specifying the Key Import Parameters
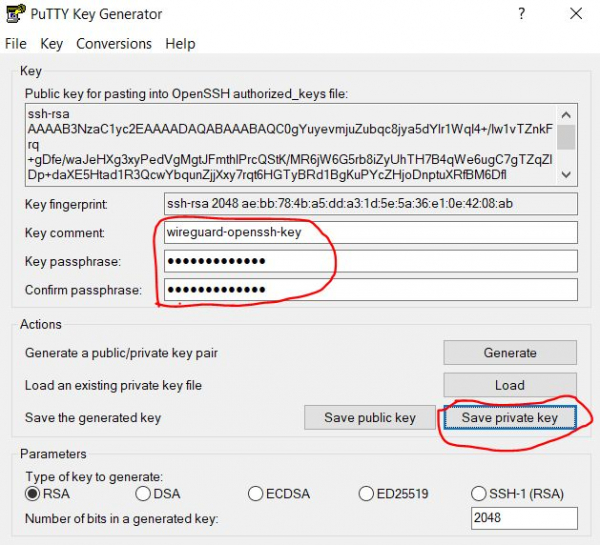
At this step, we need to provide a comment for this key (description) and set a password for security purposes, along with its confirmation. This will be requested at each connection. This way, we protect the key with a password from unauthorized use. The password can be left unset, but that is less secure in case the key falls into the wrong hands. After this, we click the button Save private key
3.1.1.4. Saving the Imported Key
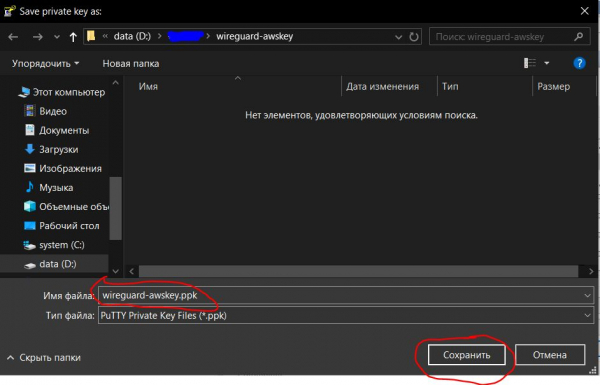
A file save dialog box opens, and we save our private key as a file with the extension .ppk, suitable for use in the program Putty.
We specify the name of the key (in our case, wireguard-awskey.ppk) and click the button Save.
3.1.2. Creating and Configuring a Connection in Putty
3.1.2.1. Creating a Connection
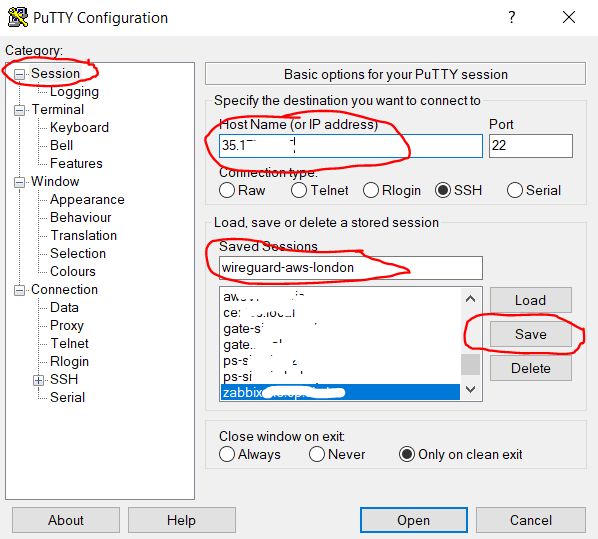
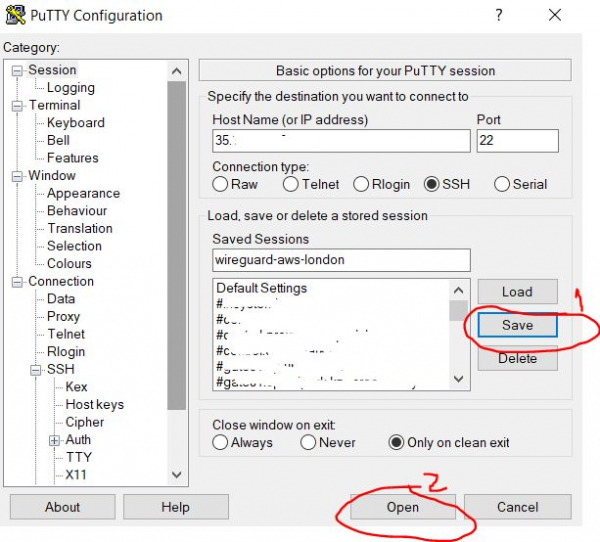
Open the Putty program, select the category Session (it’s open by default) and in the field Host Name enter the public IP address of our server, which we obtained at step 2.2.3. In the field Saved Session enter an arbitrary name for our connection (in my case, wireguard-aws-london), and then press the button Save to save the changes we made.
3.1.2.2. Setting Up User Auto-login
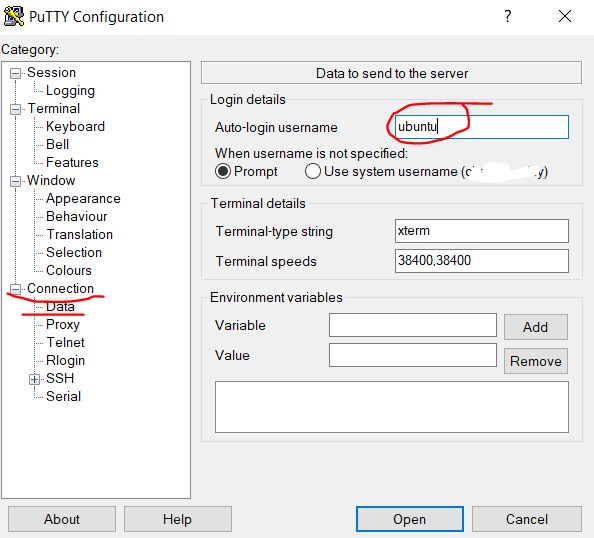
Next, in the category Connection, select the subcategory Data and in the field Auto-login username enter the username ubuntu — this is the standard user for the AWS instance running Ubuntu.
3.1.2.3. Selecting a Private Key for SSH Connection
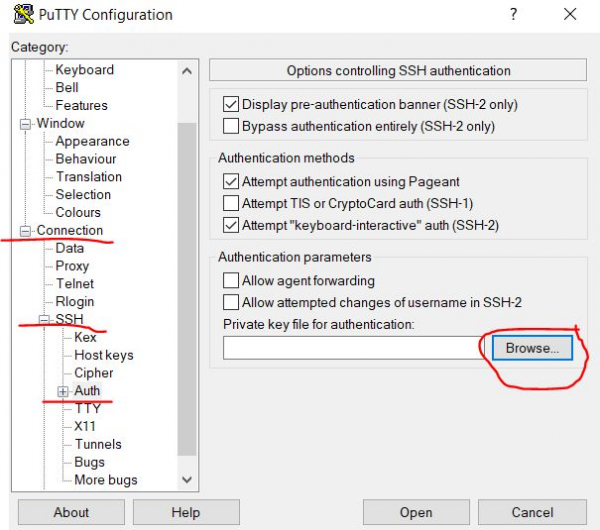
Next, we go to the subcategory Connection/SSH/Auth and next to the field Private key file for authentication we click on the button Browse… to select the key certificate file.
3.1.2.4. Opening the Imported Key
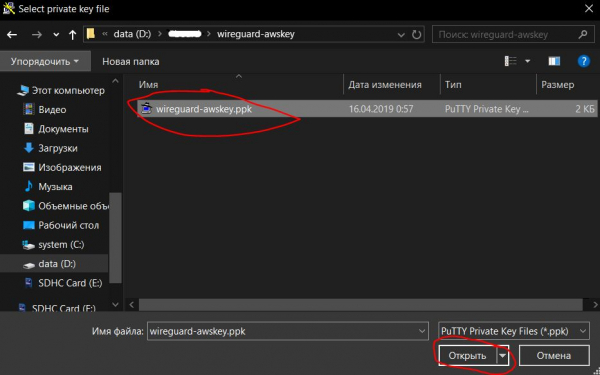
We specify the key we imported earlier in step 3.1.1.4, in our case it is the file wireguard-awskey.ppk, and click the button Open.
3.1.2.5. Saving Settings and Starting the Connection
Returning to the category page Session we click the button again Save, to save the changes we made in the previous steps (3.1.2.2 — 3.1.2.4). And then we press the button Open to open the remote connection we created and configured via SSH.
3.1.2.7. Setting Up Trust Between Hosts
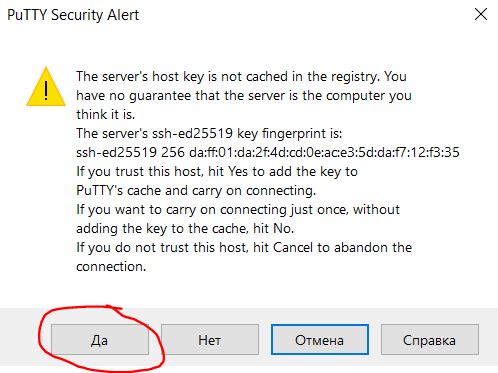
At the next step, upon the first connection attempt, we receive a warning that trust is not set between the two computers, and it asks whether to trust the remote computer. We will click the button Yes, thus adding it to the list of trusted hosts.
3.1.2.8. Entering the Password for Accessing the Key
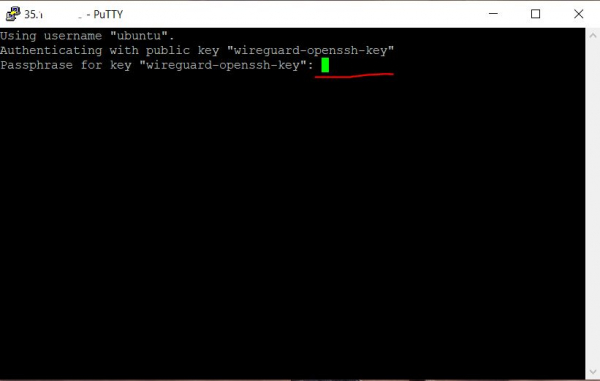
After that, a terminal window opens, where the password for the key is requested, if you set one earlier in step 3.1.1.3. When entering the password, no actions occur on the screen. If you make a mistake, you can use the key Backspace.
3.1.2.9. Welcome Message About Successful Connection
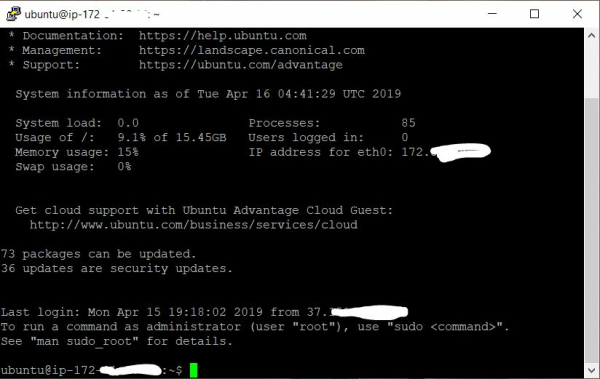
After successfully entering the password, a welcome message is displayed in the terminal, indicating that the remote system is ready to execute our commands.
4. Configuring the Wireguard Server
The most up-to-date instructions for installing and using Wireguard with the scripts described below can be found in the repository:
4.1. Installing Wireguard
In the terminal, type the following commands (you can copy to the clipboard and paste it into the terminal by right-clicking):
4.1.1. Cloning the Repository
Clone the repository with the Wireguard installation scripts
git clone https://github.com/pprometey/wireguard_aws.git wireguard_aws4.1.2. Changing to the Scripts Directory
Change to the directory with the cloned repository
cd wireguard_aws4.1.3. Running the Initialization Script
Run the Wireguard installation script as administrator (root user)
sudo ./initial.shDuring the installation, certain data will be requested, necessary for configuring Wireguard
4.1.3.1. Entering the Connection Point
Enter the external IP address and the open port of the Wireguard server. The external IP address of the server was obtained in step 2.2.3, and the port was opened in step 2.1.5. Enter them together, separated by a colon, for example 4.3.2.1:54321, and then press the key Enter
Output example:
Enter the endpoint (external ip and port) in format [ipv4:port] (e.g. 4.3.2.1:54321): 4.3.2.1:543214.1.3.2. Enter the internal IP address
Enter the IP address of the Wireguard server in the secure VPN subnet. If you don't know what this is, just press the Enter key to set the default value (10.50.0.1)
Output example:
Enter the server address in the VPN subnet (CIDR format) ([ENTER] set to default: 10.50.0.1):4.1.3.3. Specify the DNS server
Enter the DNS server IP address, or just press the Enter key to set the default value 1.1.1.1 (Cloudflare public DNS)
Output example:
Enter the ip address of the server DNS (CIDR format) ([ENTER] set to default: 1.1.1.1):4.1.3.4. Specify the WAN interface
Next, you need to enter the name of the external network interface that will listen to the internal VPN network interface. Just press Enter to set the default value for AWS (eth0)
Output example:
Enter the name of the WAN network interface ([ENTER] set to default: eth0):4.1.3.5. Specify the client name
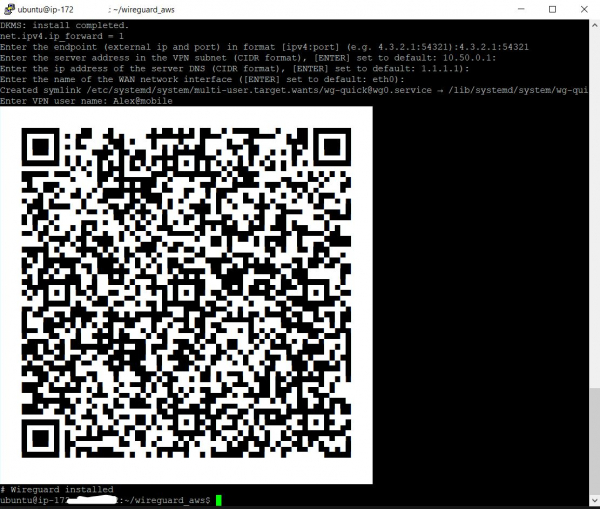
Enter the VPN user name. The thing is, the Wireguard VPN server cannot start until at least one client is added. In this case, I entered the name Alex@mobile
Output example:
Enter VPN user name: Alex@mobileAfter this, a QR code with the configuration of the just added client should appear on the screen, which needs to be scanned using the Wireguard mobile client on Android or iOS for its setup. Additionally, below the QR code, the text of the configuration file will be displayed for manual client configuration. How to do this will be explained below.
4.2. Adding a new VPN user
To add a new user, you need to run the script in the terminal add-client.sh
sudo ./add-client.shThe script prompts for the user name:
Output example:
Enter VPN user name: Also, the user name can be passed as a script parameter (in this case Alex@mobile):
sudo ./add-client.sh Alex@mobileAs a result of running the script, a configuration file for the client will be created in the directory with the client's name at the path /etc/wireguard/clients/{ИмяКлиента} a file with the client's configuration will be created /etc/wireguard/clients/{ИмяКлиента}/{ИмяКлиента}.conf, and a QR code for setting up mobile clients and the contents of the configuration file will be displayed on the terminal screen.
4.2.1. User configuration file
To display the contents of the .conf file for manual client setup on the screen, use the command cat
sudo cat /etc/wireguard/clients/Alex@mobile/Alex@mobile.confthe result of the execution:
[Interface]
PrivateKey = oDMWr0toPVCvgKt5oncLLRfHRit+jbzT5cshNUi8zlM=
Address = 10.50.0.2/32
DNS = 1.1.1.1

[Peer]
PublicKey = mLnd+mul15U0EP6jCH5MRhIAjsfKYuIU/j5ml8Z2SEk=
PresharedKey = wjXdcf8CG29Scmnl5D97N46PhVn1jecioaXjdvrEkAc=
AllowedIPs = 0.0.0.0/0, ::/0
Endpoint = 4.3.2.1:54321
Client configuration file description:
[Interface]
PrivateKey = Client's private key
Address = Client's IP address
DNS = DNS used by the client

[Peer]
PublicKey = Server's public key
PresharedKey = Shared key between server and client
AllowedIPs = Allowed connection addresses (all - 0.0.0.0/0, ::/0)
Endpoint = IP address and port for connection
4.2.2. Client configuration QR code
You can display the QR code for the previously created client configuration on the terminal screen using the command qrencode -t ansiutf8 (in this example, a client named Alex@mobile is used):
sudo cat /etc/wireguard/clients/Alex@mobile/Alex@mobile.conf | qrencode -t ansiutf85. Configuring VPN clients
5.1. Setting up the Android mobile client
The official Wireguard client for Android can be
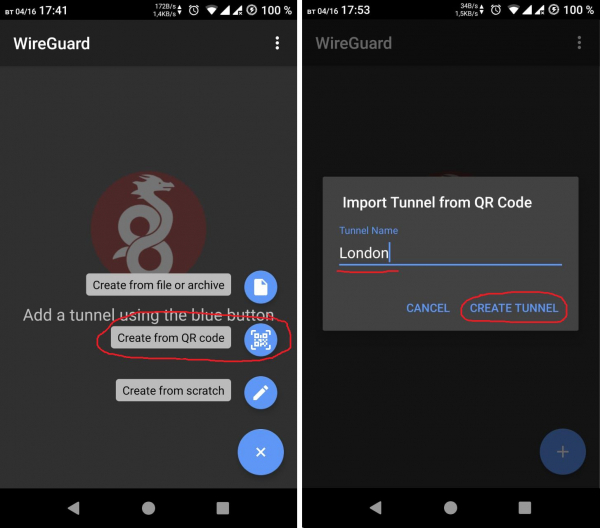
After that, you need to import the configuration by scanning the QR code with the client configuration (see section 4.2.2) and give it a name:
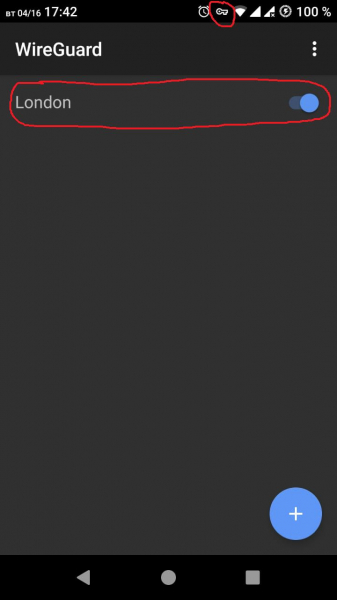
After successfully importing the configuration, you can enable the VPN tunnel. A notification on successful connection will appear as a key icon in the Android system panel
5.2. Setting up the Windows client
First, you need to download and install the program — this is the Wireguard client for Windows.
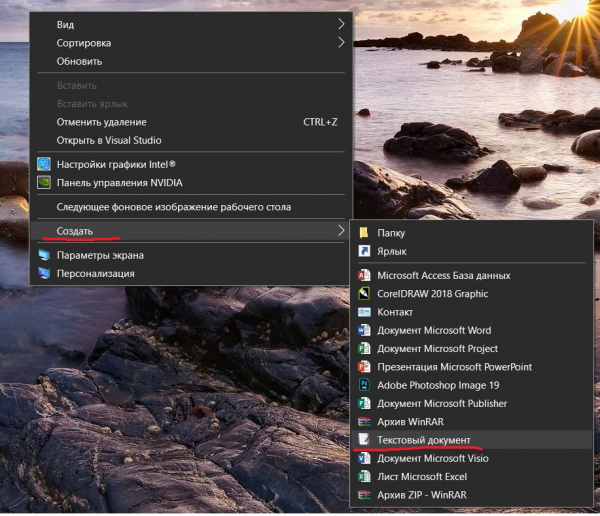
5.2.1. Creating a configuration file for import
Right-click to create a text file on the desktop.
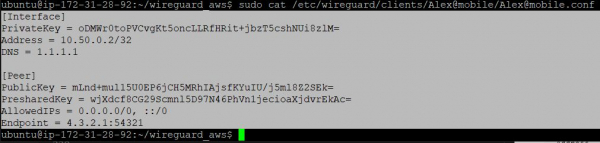
5.2.2. Copying the configuration file contents from the server
Next, return to the Putty terminal and display the contents of the configuration file for the required user as described in step 4.2.1.
Then, highlight the configuration text in the Putty terminal with the right mouse button; once the highlighting is finished, it will automatically copy to the clipboard.
5.2.3. Copying the configuration to the local configuration file
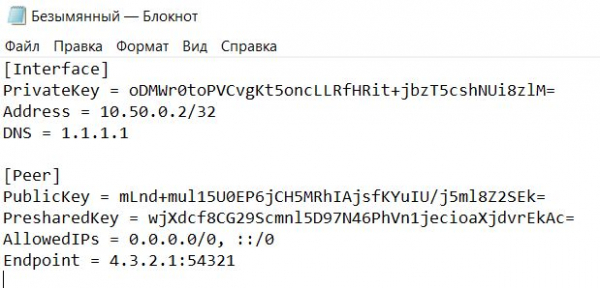
After this, return to the text file we created earlier on the desktop and paste the configuration text from the clipboard.
5.2.4. Saving the local configuration file
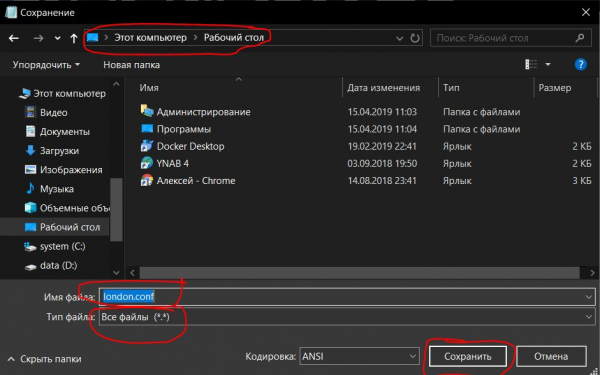
Save the file with the extension .conf (in this case named london.conf)
5.2.5. Importing the local configuration file
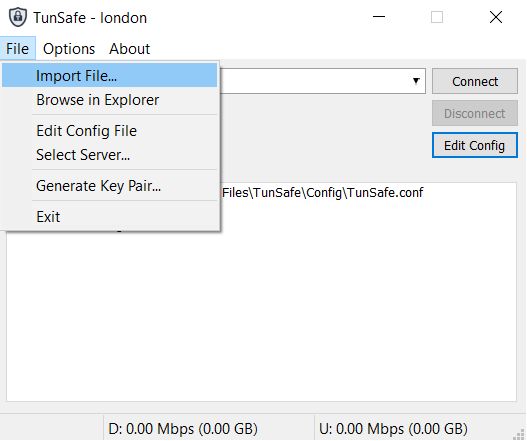
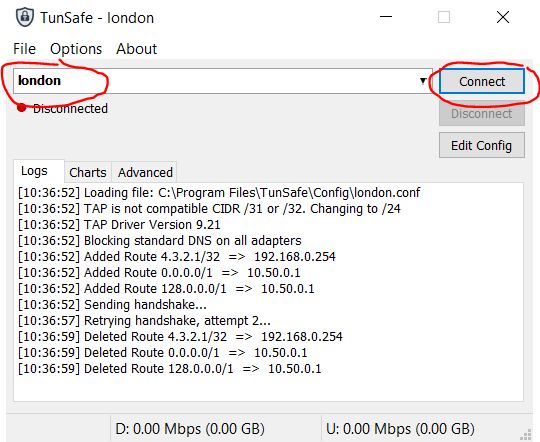
Next, you need to import the configuration file into the TunSafe program.
5.2.6. Establishing the VPN connection
Select this configuration file and connect by pressing the button Connect.
6. Checking Connection Success
To check the success of the VPN tunnel connection, you need to open a browser and go to the site
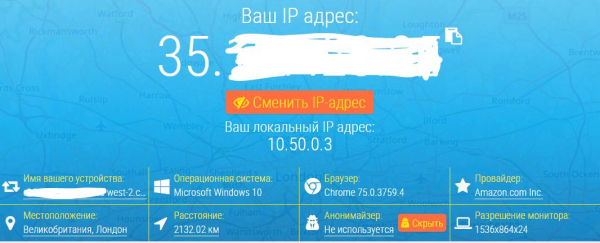
The displayed IP address should match the one we obtained in step 2.2.3.
If so, then the VPN tunnel is working successfully.
From a terminal in Linux, you can check your IP address by entering the command:
curl http://zx2c4.com/ipOr you can simply visit Pornhub if you are in Kazakhstan.
Source: habr.com
