


Last time we discussed the capabilities of NSX Edge concerning both static and dynamic routing, and today we will dive into load balancing.
Before we begin with the configuration, I would like to briefly remind you of the main types of load balancing.
Theory
Current load balancing solutions are typically divided into two categories: Layer 4 (transport layer) and Layer 7 (application layer) load balancing. The OSI model is not the best reference point when describing load balancing methods. For example, if an L4 load balancer also supports TLS termination, does it then become an L7 load balancer? That's one of the questions.
- L4 Load Balancer is often a middle proxy positioned between the client and a set of available backends, which terminates TCP connections (i.e., responds to SYN), selects a backend, and initiates a new TCP session towards it, sending a SYN on its own. This type is one of the basics, though there are other variations.
- L7 Load Balancer distributes traffic to available backends in a more sophisticated manner than an L4 load balancer. It can make backend selection decisions based on, for instance, the content of an HTTP message (URL, cookies, etc.).
Regardless of the type, a load balancer can support the following features:
- Service discovery — the process of determining the available backend set (Static, DNS, Consul, Etcd, etc.).
- Health checks of discovered backends (active 'ping' of a backend using HTTP requests, passive detection of issues in TCP connections, the presence of several consecutive 503 HTTP codes in responses, etc.).
- The load balancing itself (round-robin, random selection, source IP hash, URI).
- TLS termination and certificate verification.
- Security-related options (authentication, DoS attack prevention, rate limiting) and much more.
NSX Edge offers support for two deployment modes of the load balancer:
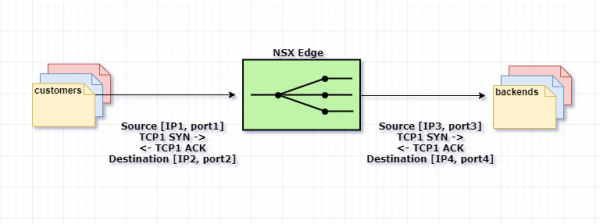
Proxy mode, or one-armIn this mode, NSX Edge uses its IP address as the source address when sending a request to one of the backends. Thus, the load balancer performs both Source and Destination NAT functions simultaneously. The backend sees all traffic as coming from the load balancer and responds directly to it. In this configuration, the load balancer must be on the same network segment as the internal servers.
Here's how it works:
1. The user sends a request to the VIP address (the address of the load balancer) configured on Edge.
2. Edge selects one of the backends and performs destination NAT, replacing the VIP address with the address of the selected backend.
3. Edge performs source NAT, replacing the requester's address with its own.
4. The packet is sent to the selected backend.
5. The backend does not respond directly to the user, but to Edge, since the original user's address has been changed to that of the load balancer.
6. Edge forwards the server's response to the user.
See the diagram below.
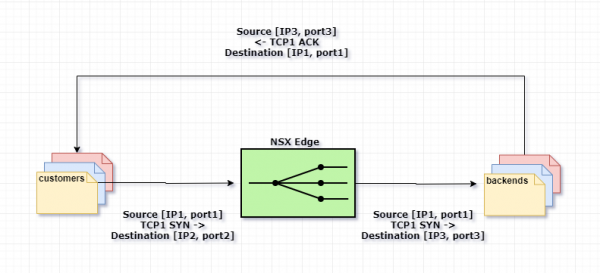
Transparent or inline mode. In this scenario, the load balancer has interfaces in both the internal and external networks. There is no direct access to the internal network from the outside. The built-in load balancer acts as a NAT gateway for virtual machines within the internal network.
The mechanism is as follows:
1. The user sends a request to the VIP address (the address of the load balancer) configured on Edge.
2. Edge selects one of the backends and performs destination NAT, replacing the VIP address with the address of the selected backend.
3. The packet is sent to the selected backend.
4. The backend receives the request with the original user's address (source NAT was not performed) and responds directly to it.
5. The traffic is again received by the load balancer since, in inline mode, it typically serves as the default gateway for the server farm.
6. Edge performs source NAT to send traffic to the user, using its VIP as the source IP address.
See the diagram below.
Practice
On my test setup, 3 Apache servers are configured to operate over HTTPS. Edge will balance HTTPS requests using a round-robin method, proxying each new request to a new server.
Let's get started.
Generate an SSL certificate that will be used by NSX Edge.
You can import a valid CA certificate or use a self-signed one. In this test, I will use a self-signed certificate.
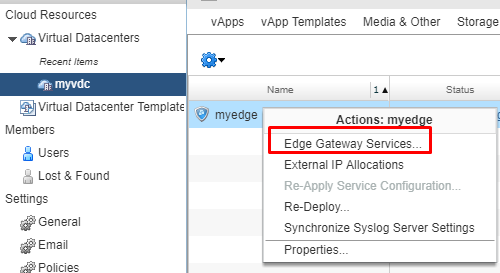
- In the vCloud Director interface, go to the Edge service settings.

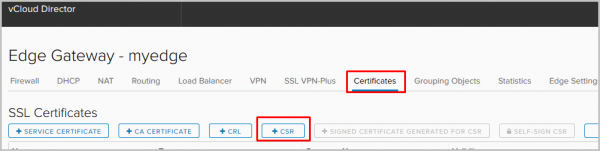
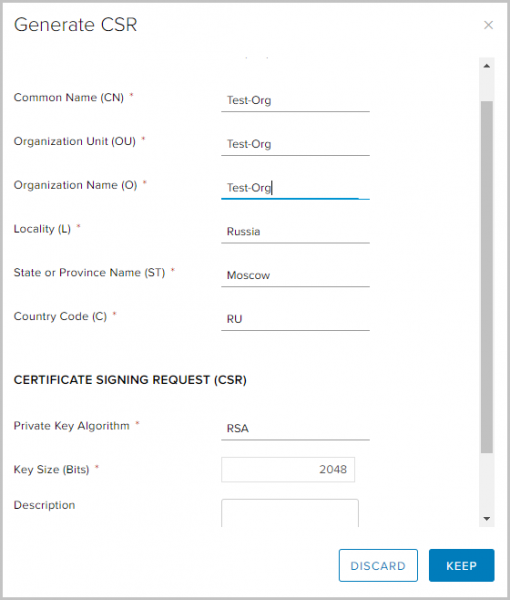
- Go to the Certificates tab. From the actions list, select to add a new CSR.

- Fill in the necessary fields and click Keep.

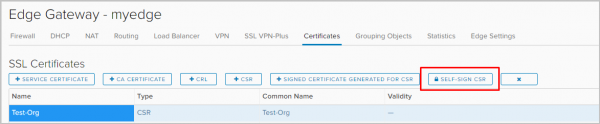
- Select the newly created CSR and choose the self-sign CSR option.

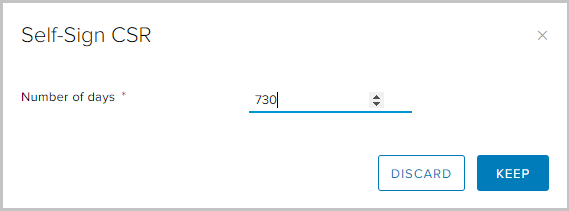
- Choose the validity period for the certificate and click Keep.

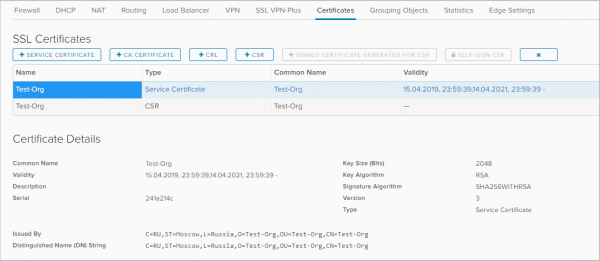
- The self-signed certificate has appeared in the list of available certificates.

Configure the Application Profile.
Application profiles provide more comprehensive control over network traffic, making management simple and effective. They allow you to define the behavior for specific types of traffic.
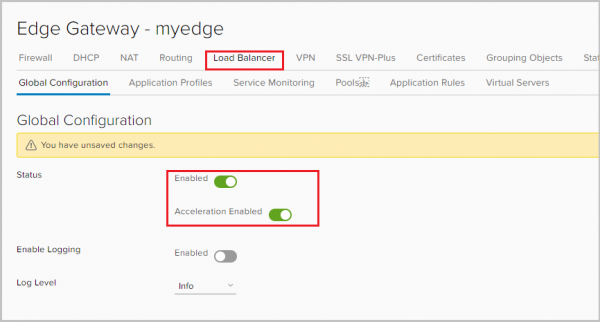
- Go to the Load Balancer tab and enable the balancer. The Acceleration enabled option here allows the balancer to use faster L4 balancing instead of L7.

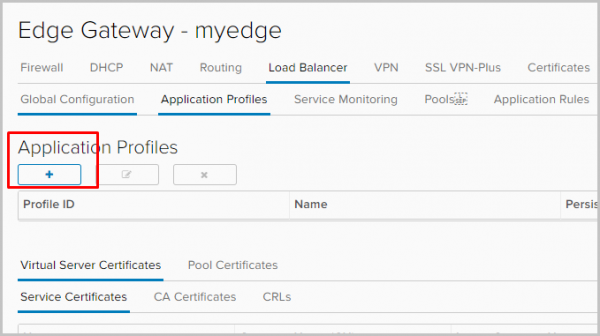
- Go to the Application profile tab to define the application profile. Click +.

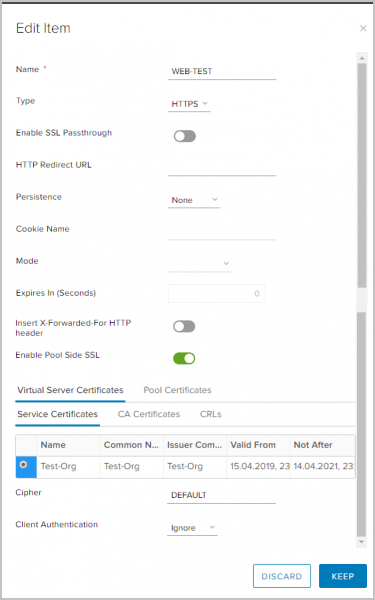
- Set the profile name and select the type of traffic for which the profile will be applied. Let me explain some parameters.
Persistence – retains and tracks session data, for example: which specific server from the pool is handling the user request. This ensures that user requests are directed to the same pool member throughout the session or across subsequent sessions.
Enable SSL passthrough – selecting this option means that NSX Edge stops terminating SSL. Instead, termination happens directly on the servers being load balanced.
Insert X-Forwarded-For HTTP header – allows determination of the original client IP address connecting to the web server through the balancer.
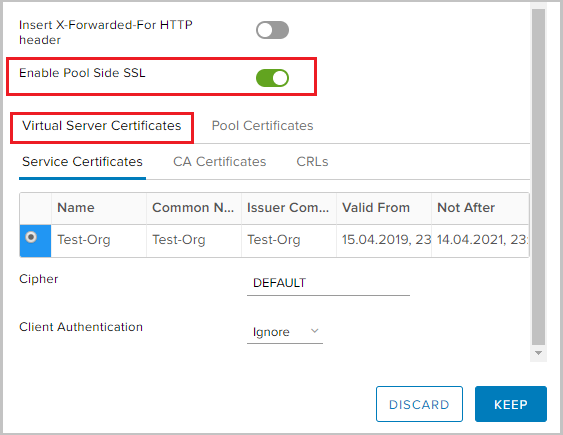
Enable Pool Side SSL – indicates that the selected pool consists of HTTPS servers.

- Since I will be balancing HTTPS traffic, I need to enable Pool Side SSL and select the previously generated certificate under the Virtual Server Certificates tab → Service Certificate.

- Similarly for Pool Certificates → Service Certificate.

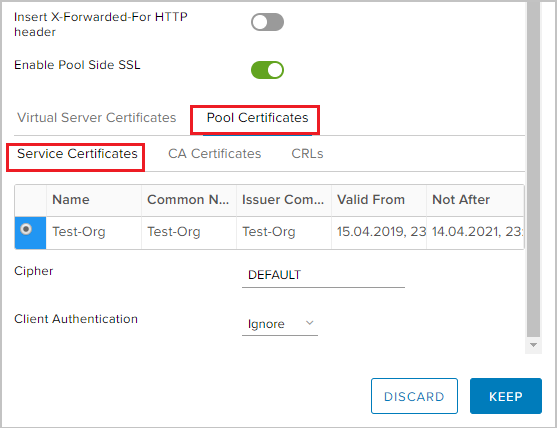
Create a pool of servers for which traffic will be balanced Pools
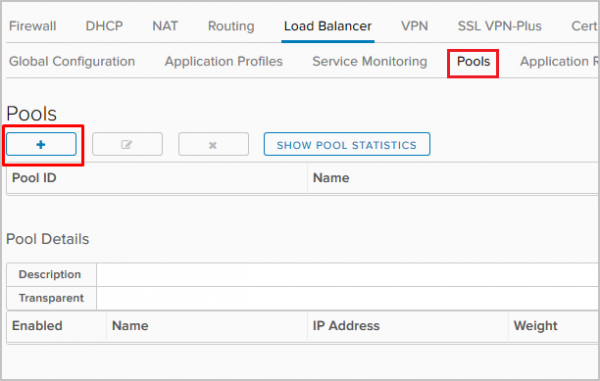
- Go to the Pools tab. Click +.

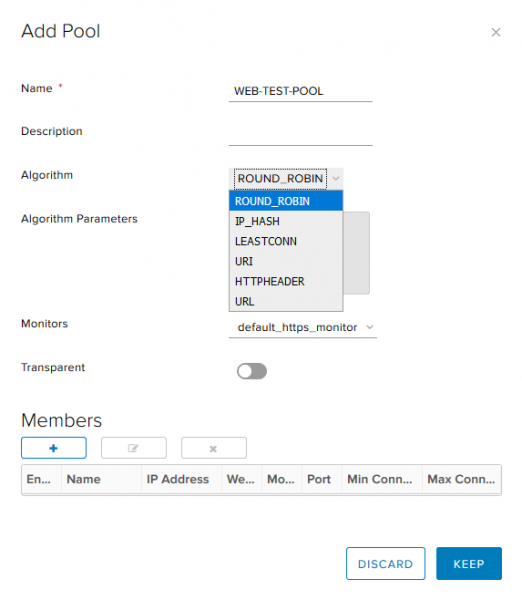
- Set the pool name, choose the algorithm (I will use round robin) and the monitoring type for the backend health check. The Transparent option indicates whether the original source IP of clients is visible to internal servers.
- If the option is disabled, traffic for internal servers comes with the source IP of the balancer.
- If the option is enabled, internal servers see the source IP of the clients. In such a configuration, NSX Edge must act as the default gateway to ensure that returned packets go through NSX Edge.
NSX supports the following load balancing algorithms:
- IP_HASH – server selection based on the results of a hash function for the source and destination IP of each packet.
- LEASTCONN – load balancing of incoming connections based on the number of connections already established on a specific server. New connections will be directed to the server with the least number of connections.
- ROUND_ROBIN – new connections are sent to each server in turn, according to its assigned weight.
- URI – the left part of the URI (before the question mark) is hashed and divided by the total weight of the servers in the pool. The result indicates which server receives the request, ensuring that the request always goes to the same server as long as all servers remain available.
- HTTPHEADER – load balancing based on a specific HTTP header that can be specified as a parameter. If the header is missing or has no value, the ROUND_ROBIN algorithm is applied.
- URL – each HTTP GET request looks for the URL parameter specified as an argument. If the parameter is followed by an equal sign and a value, then the value is hashed and divided by the total weight of the running servers. The result indicates which server receives the request. This process is used to track user IDs in requests and ensure that the same user ID is always sent to the same server, as long as all servers remain available.

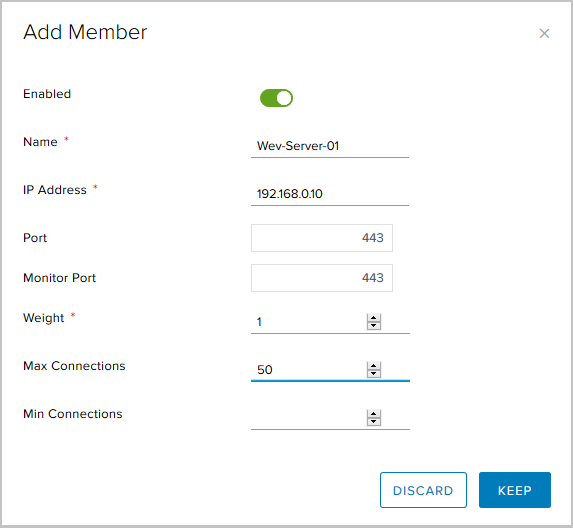
- In the Members block, click + to add servers to the pool.

1. The address of the Elasticsearch server (set during installation).- server name;
- server IP address;
- port to which the server will receive traffic;
- port for health check (Monitor healthcheck);
- weight (Weight) – this parameter allows you to regulate the proportional amount of traffic received by a specific member of the pool;
- Max Connections – the maximum number of connections to the server;
- Min Connections – the minimum number of connections that the server must handle before traffic is redirected to the next member of the pool.

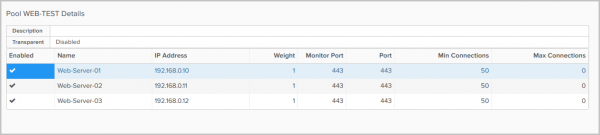
This is what the final pool of three servers looks like.


Adding Virtual Server
- Go to the Virtual Servers tab. Click +.

- Activate the virtual server using Enable Virtual Server.
We assign it a name, select the previously created Application Profile, Pool, and specify the IP address to which the Virtual Server will accept external requests. We specify the HTTPS protocol and port 443.
Optional parameters here:
Connection Limit – the maximum number of simultaneous connections that the virtual server can handle;
Connection Rate Limit (CPS) – the maximum number of new incoming requests per second.

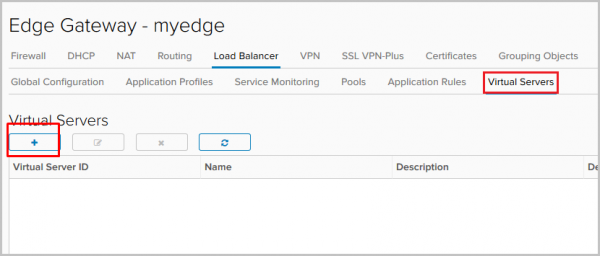
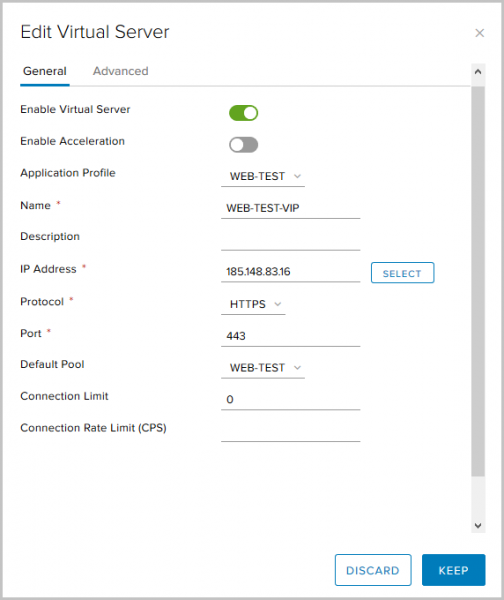
At this point, the configuration of the load balancer is complete, and we can test its functionality. The servers have a simple configuration allowing us to understand which specific server from the pool processed the request. During setup, we selected the Round Robin load balancing algorithm, and the Weight parameter for each server is set to one, so each subsequent request will be handled by the next server in the pool.
We enter the external address of the load balancer in the browser and see:
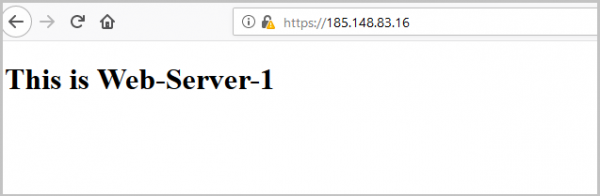
After refreshing the page, the request will be processed by the next server:

And again – to check the third server from the pool:
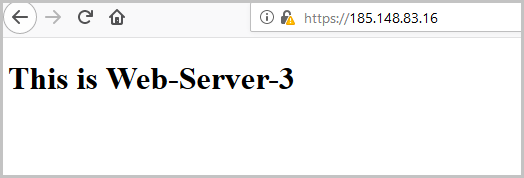
When checking, we can see that the certificate sent to us by Edge is the same one that we generated at the very beginning.
Checking the status of the load balancer from the Edge gateway console. For this, enter show service loadbalancer pool.
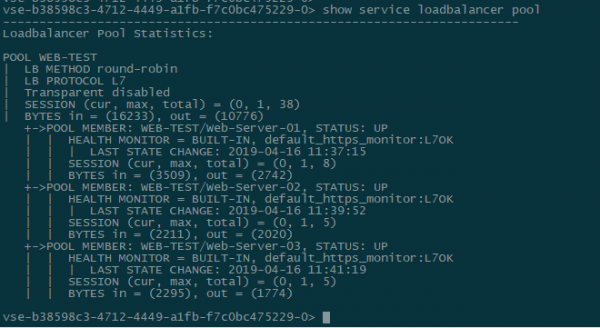
Setting up a Service Monitor to check the status of servers in the pool
Using the Service Monitor, we can track the status of the servers in the backend pool. If the response to a request does not match the expected one, the server can be taken out of the pool so that it does not receive any new requests.
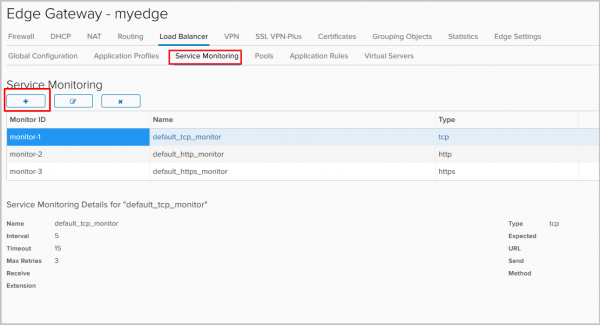
By default, three checking methods are configured:
- TCP-monitor,
- HTTP-monitor,
- HTTPS-monitor.
Let's create a new one.
- We go to the Service Monitoring tab and click +.

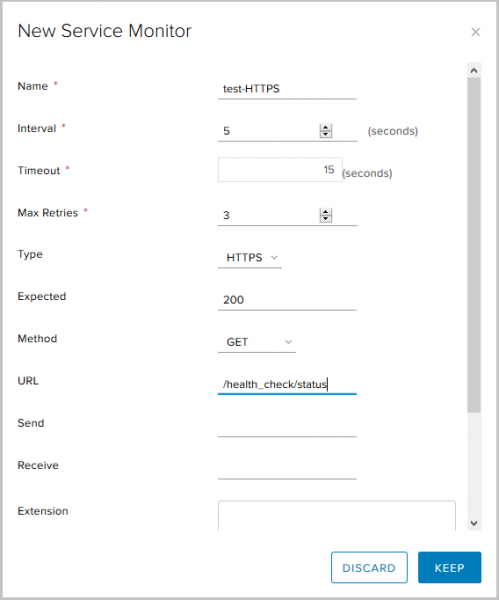
- We select:
- a name for the new method;
- the interval at which requests will be sent,
- the timeout waiting for a response,
- the monitoring type – HTTPS request using the GET method, the expected status code – 200(OK) and the request URL.
- The setup of the new Service Monitor is now complete, and we can use it when creating a pool.

Setting up Application Rules
Application Rules – a way to manipulate traffic based on specific triggers. With this tool, we can create advanced load balancing rules, the configuration of which may not be possible through Application profiles or using other services available on the Edge Gateway.
- To create a rule, navigate to the Application Rules tab of the load balancer.

- Select a name, the script that will use the rule, and click Keep.

- Once the rule is created, we need to edit the already configured Virtual Server.

- In the Advanced tab, add the rule we created.


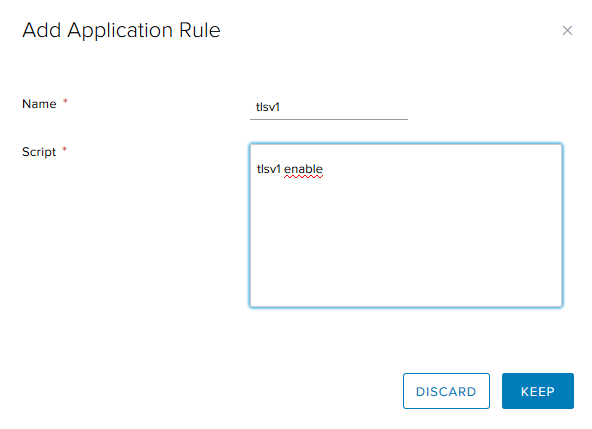
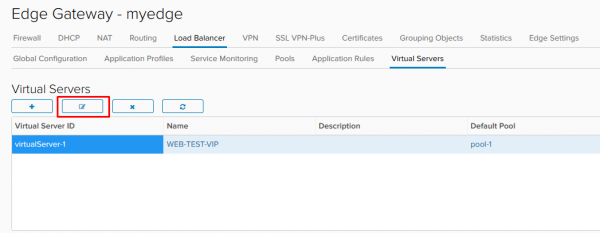
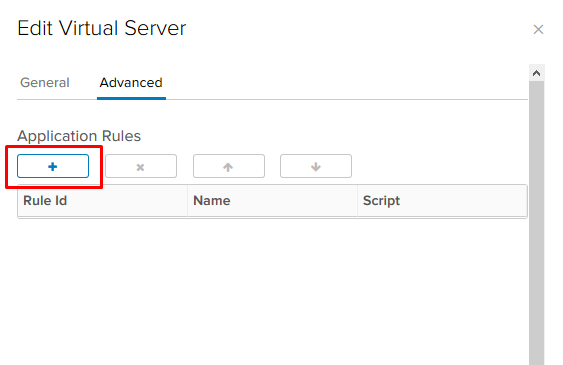
In the example above, we enabled support for tlsv1.
A couple more examples:
Redirecting traffic to another pool.
With this script, we can redirect traffic to another load balancing pool if the main pool is not functioning. For the rule to take effect, multiple pools should be configured on the load balancer, and all members of the main pool must be in a down state. You need to specify the name of the pool, not its ID.
acl pool_down nbsrv(PRIMARY_POOL_NAME) eq 0
 use_backend SECONDARY_POOL_NAME if PRIMARY_POOL_NAME
Redirecting traffic to an external resource.
Here we redirect traffic to an external website if all members of the main pool are in a down state.
acl pool_down nbsrv(NAME_OF_POOL) eq 0
 redirect location http://www.example.com if pool_down
Even more examples .
That's all I have on the load balancer. If you have any questions, feel free to ask; I'm ready to help.
Source: habr.com
