


Despite all the advantages of Palo Alto Networks firewalls, there is not much material available in Russian networks regarding the configuration of these devices, as well as texts describing the experience of their implementation. We decided to summarize the materials we have accumulated over time while working with this vendor's equipment and share the peculiarities we encountered during various project implementations.
To get acquainted with Palo Alto Networks, this article will cover the configurations necessary to solve one of the most common tasks of firewalling: SSL VPN for remote access. We will also discuss auxiliary functions for general firewall configuration, user identification, applications, and security policies. If readers find the topic interesting, we will later publish materials detailing Site-to-Site VPN, dynamic routing, and centralized management using Panorama.
Palo Alto Networks firewalls utilize a number of innovative technologies including App-ID, User-ID, and Content-ID. The application of these functionalities ensures a high level of security. For example, App-ID can identify application traffic based on signatures, decoding, and heuristics, regardless of the port and protocol used, including within an SSL tunnel. User-ID allows for user identification in the network through integration with LDAP. Content-ID enables traffic scanning and identification of transferred files and their contents. Other features of firewalls include intrusion prevention, vulnerability protection, DoS attack protection, built-in anti-spyware, URL filtering, clustering, and centralized management.
For demonstration purposes, we will use an isolated test environment with a configuration identical to a real one, except for the device names, AD domain name, and IP addresses. In reality, things are more complex—there may be many branches. At the borders of central sites, a cluster will be installed instead of a single firewall, and dynamic routing may also be required.
The test environment uses PAN-OS 7.1.9As a typical configuration, let’s consider a network with a Palo Alto Networks firewall at the perimeter. The firewall provides remote SSL VPN access to the headquarters. An Active Directory domain will be used as the user database (Figure 1).
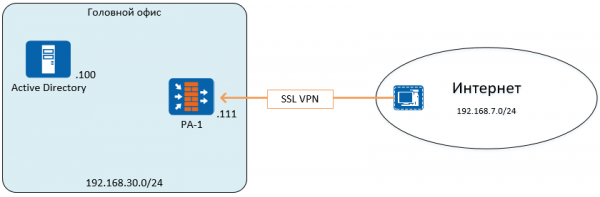
Figure 1 – Structural Diagram of the Network
Configuration steps:
- Device Preconfiguration. Setting the name, an IP address management, static routes, administrator accounts, management profiles
- License installation, configuration, and update installation
- Configuration of security zones, network interfaces, traffic policies, address translation
- Configuration of the LDAP authentication profile and User Identification feature
- SSL VPN Configuration
1. Preconfiguration
The main configuration tool for the Palo Alto Networks firewall is the web interface, management can also be performed via CLI. By default, the management interface has been assigned the IP address 192.168.1.1/24, login: admin, password: admin.
The address can be changed either by connecting to the web interface from the same network, or by using the command set deviceconfig system ip-address netmask. This is executed in configuration mode. To switch to configuration mode, the command configureis used. All changes to the firewall take effect only after confirming the settings with the command commit, both in CLI mode and in the web interface.
To change settings in the web interface, use the section Device -> General Settings and Device -> Management Interface Settings. Name, banners, time zone, and other settings can be specified in the General Settings section (Figure 2).
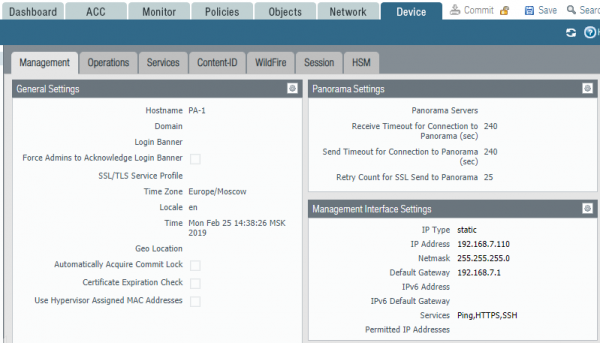
Figure 2 – Management Interface Parameters
In the case of a virtual firewall in an ESXi environment, the General Settings section must enable the use of the MAC address assigned by the hypervisor, or configure the hypervisor with the MAC addresses specified on the firewall interfaces, or modify the settings of the virtual switches to allow MAC address changes. Otherwise, traffic will not pass.
The management interface is configured separately and is not displayed in the list of network interfaces. In the section Management Interface Settings the default gateway for the management interface is specified. Other static routes are configured in the virtual routers section, which will be discussed later.
To allow access to the device through other interfaces, it is necessary to create a management profile. Management Profile in the section Network -> Network Profiles -> Interface Mgmt and assign it to the corresponding interface.
Next, DNS and NTP need to be configured in the section Device -> Services for obtaining updates and displaying the correct time (see Fig. 3). By default, all traffic generated by the firewall uses the management interface's IP address as the source IP address. A different interface can be assigned for each specific service in the section Service Route Configuration.
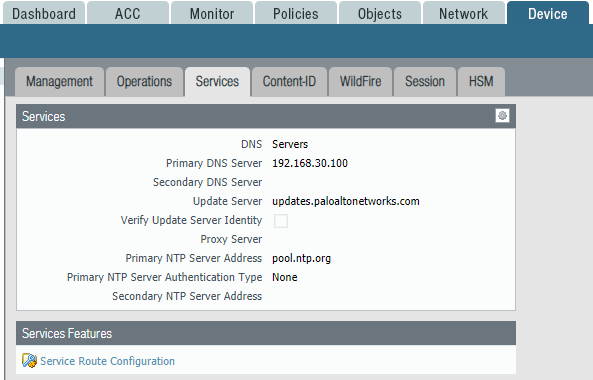
Figure 3 – DNS, NTP, and system route service parameters
2. Installing licenses, configuring, and setting up updates
For the full functionality of the firewall, a license must be installed. A trial license can be obtained from Palo Alto Networks partners. Its duration is 30 days. The license can be activated either through a file or using an Auth-Code. Licenses are configured in the section Device -> Licenses (see Fig. 4).
After installing the license, it is necessary to configure updates in the section Device -> Dynamic Updates.
In the section Device -> Software new versions of PAN-OS can be downloaded and installed.
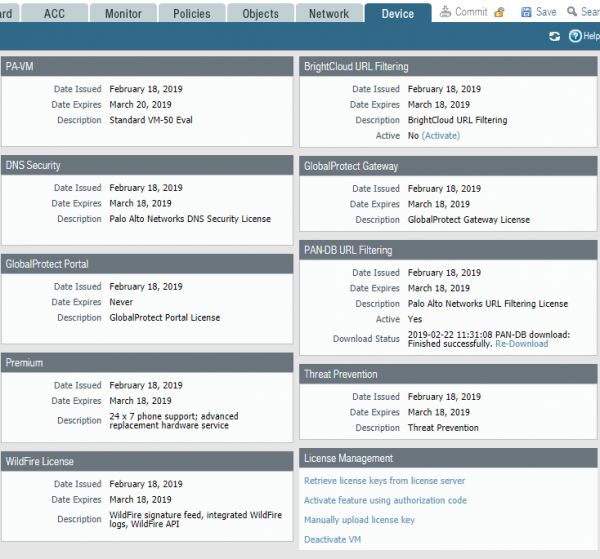
Figure 4 – License management panel
3. Configuring security zones, network interfaces, traffic policy, address translation
Palo Alto Networks firewalls apply zone logic when configuring network rules. Network interfaces are assigned to a specific zone, and this is used in traffic rules. This approach allows for changes in interface settings in the future without changing traffic rules, but rather reassigning the necessary interfaces to the corresponding zones. By default, traffic within a zone is allowed, and traffic between zones is denied; this is handled by the pre-installed rules intrazone-default and interzone-default.
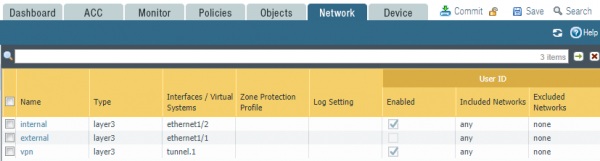
Figure 5 – Security zones
In this example, the interface in the internal network is assigned to the zone internal, while the interface directed to the Internet is assigned to the zone external. A tunnel interface is created for SSL VPN assigned to the zone vpn (see Fig. 5).
Palo Alto Networks firewall network interfaces can operate in five different modes:
- Tap – used for collecting traffic for monitoring and analysis
- HA – used for cluster operation
- Virtual Wire In this mode, Palo Alto Networks combines two interfaces and transparently passes traffic between them without changing MAC and IP addresses.
- Layer2 Switch Mode
- Layer3 Router Mode
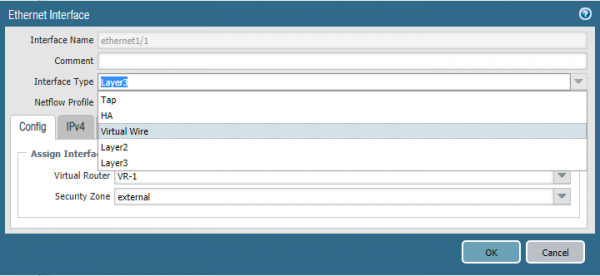
Figure 6 – Interface mode configuration
In this example, Layer3 mode will be used (see Fig. 6). The network interface settings specify the IP address, mode of operation, and the corresponding security zone. In addition to the interface mode, it must be assigned to a Virtual Router, analogous to a VRF instance in Palo Alto Networks. Virtual routers are isolated from one another and have their own routing tables and network protocol settings.
In the virtual router settings, static routes and routing protocol settings are specified. In this example, only the default route for accessing external networks has been created (see Fig. 7).
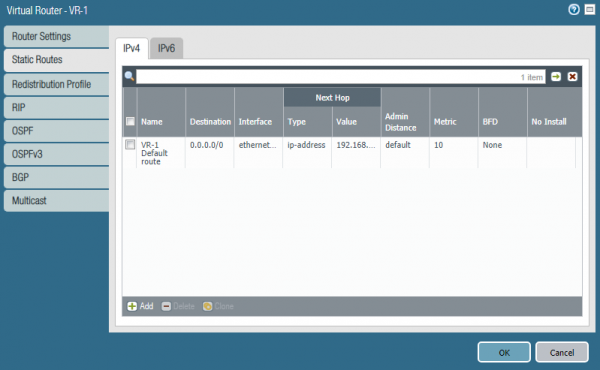
Figure 7 – Virtual router configuration
The next stage of configuration is traffic policies, under Policies -> Security. An example of the configuration is shown in Figure 8. The logic of the rules works the same as for all firewalls. Rules are checked top to bottom, until the first match. A brief description of the rules:
1. SSL VPN Access to Web Portal. Allows access to the web portal for authenticating remote connections.
2. VPN traffic – allows traffic between remote connections and the headquarters.
3. Basic Internet – allows applications such as dns, ping, traceroute, ntp. The firewall allows applications based on signatures, decoding, and heuristics, rather than port numbers and protocols, which is why the Service section specifies application-default. The default port/protocol for this application.
4. Web Access – allows internet access via HTTP and HTTPS protocols without application control.
5,6. Default rules for all other traffic.
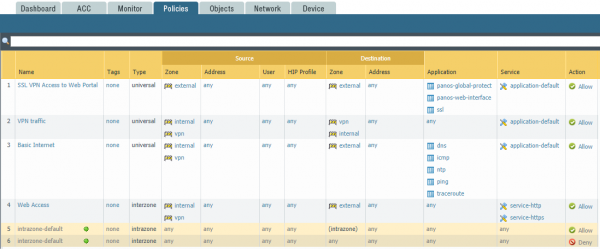
Figure 8 – Example of network rules configuration
To configure NAT, use the section Policies -> NAT. An example of NAT configuration is shown in Figure 9.

Figure 9 – Example of NAT configuration
For any traffic from internal to external, the source address can be changed to the external IP address of the firewall and use Port Address Translation (PAT).
4. Configuration of the LDAP authentication profile and User Identification function.
Before connecting users via SSL-VPN, it is necessary to configure the authentication mechanism. In this example, authentication will occur on the Active Directory domain controller through the Palo Alto Networks web interface.
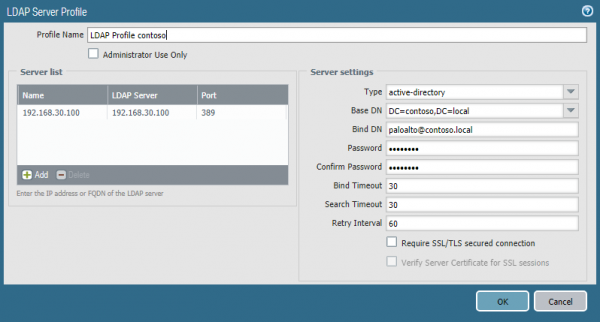
Figure 10 – LDAP Profile
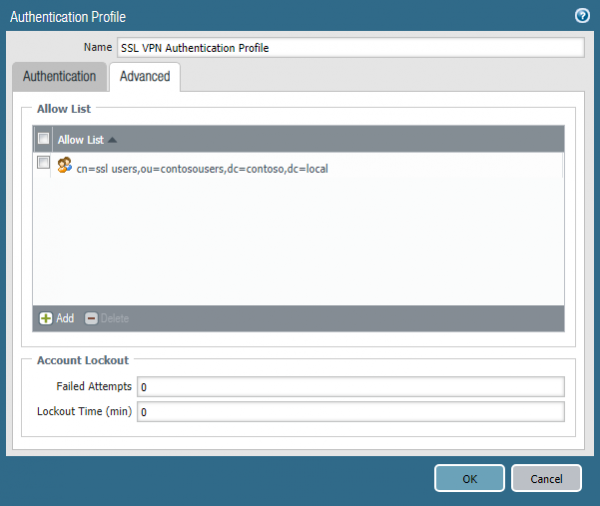
To ensure that authentication works, it needs to be configured. LDAP Profile and Authentication Profile. In the section Device -> Server Profiles -> LDAP (fig. 10), you need to specify the IP address and port of the domain controller, the LDAP type, and the user account that belongs to the groups Server Operators, Event Log Readers, Distributed COM Users. Then, in the section Device -> Authentication Profile create an authentication profile (fig. 11), select the previously created one, and in the Advanced tab, specify the user group (fig. 12) that is allowed remote access. It is important to note the parameter in the profile LDAP Profile User Domain , otherwise group-based authorization will not work. The field must contain the NetBIOS name of the domain.Figure 11 – Authentication Profile
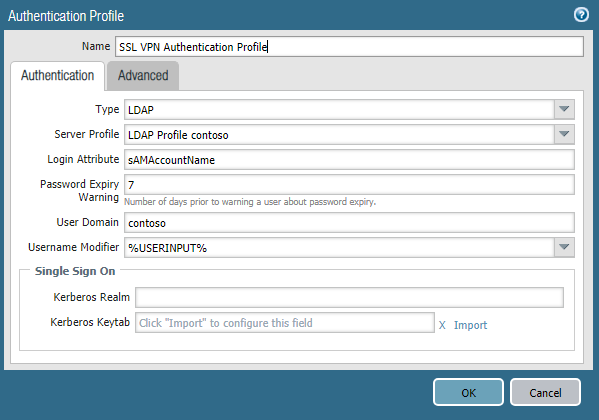
Figure 12 – AD Group Selection
The next stage is to configure
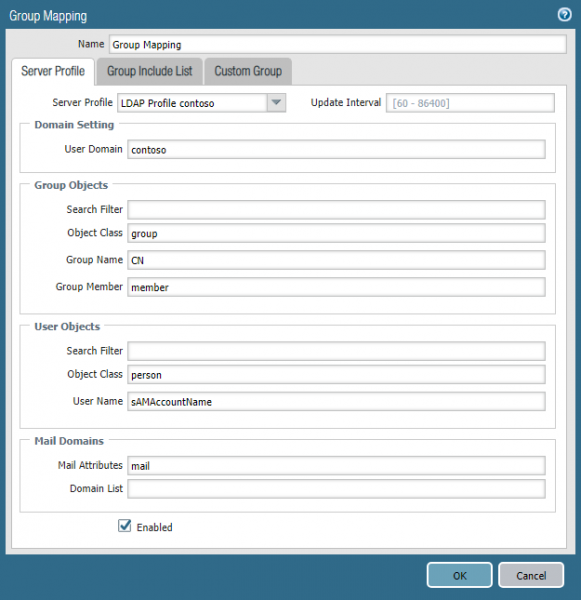
Device -> User Identification . Here, you need to specify the IP address of the domain controller, credentials for connection, and configure the parametersEnable Security Log Enable Session, Enable Probing, (fig. 13). In the section Group Mapping (fig. 14), you need to mark the object identification parameters in LDAP and the list of groups that will be used for authorization. As in the Authentication Profile, you need to specify the User Domain parameter here. Figure 13 – User Mapping Parameters
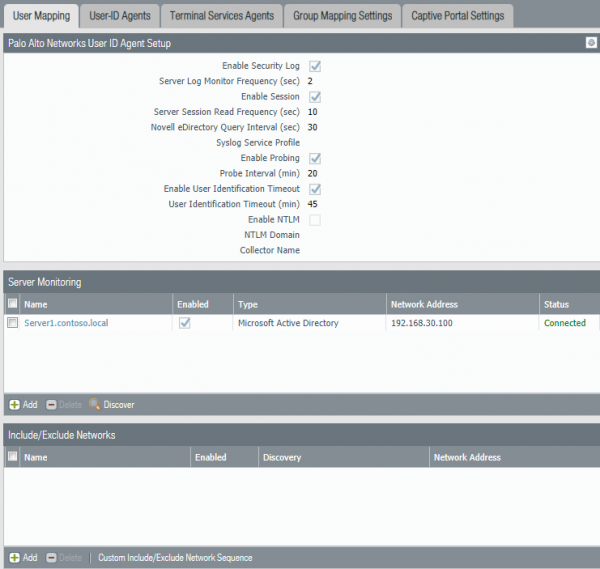
Figure 14 – Group Mapping Parameters
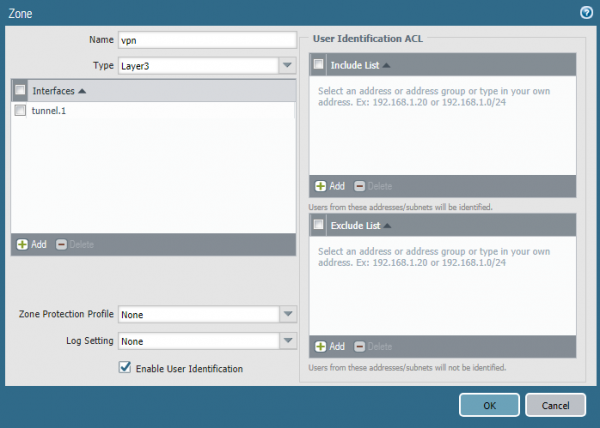
The final step at this stage will be creating a VPN zone and an interface for this zone. On the interface, you need to enable the parameter
Enable User Identification (fig. 15). Figure 15 – VPN Zone Configuration
5. SSL VPN Configuration
5. Setting up SSL VPN
Before connecting to the SSL VPN, the remote user must access the web portal, authenticate, and download the Global Protect client. The client will then request credentials and connect to the corporate network. The web portal operates in https mode, and accordingly, a certificate must be installed for it. Use a public certificate whenever possible. This way, the user will not receive a warning about the invalidity of the certificate on the site. If it is not possible to use a public certificate, you will need to issue your own, which will be applied to the web page for https. It can be self-signed or issued through a local certification authority. The remote computer must have the root or self-signed certificate in the trusted root authorities list to avoid an error when connecting to the web portal. In this example, a certificate issued through the Active Directory Certificate Services will be used.
To issue a certificate, you need to create a certificate request in the section Device -> Certificate Management -> Certificates -> Generate. In the request, specify the name of the certificate and the IP address or FQDN of the web portal (Fig. 16). After generating the request, download .csr file and copy its contents into the certificate request field in the AD CS Web Enrollment web form. Depending on the certification authority's configuration, the certificate request needs to be approved and the issued certificate downloaded in the format Base64 Encoded Certificate. Additionally, download the root certificate of the certification authority. Then, both certificates must be imported to the firewall. When importing the certificate for the web portal, it is necessary to select the request with a pending status and click import. The name of the certificate must match the name specified earlier in the request. The name of the root certificate can be defined arbitrarily. After importing the certificate, it is necessary to create SSL/TLS Service Profile in the section Device -> Certificate Management. In the profile, specify the previously imported certificate.
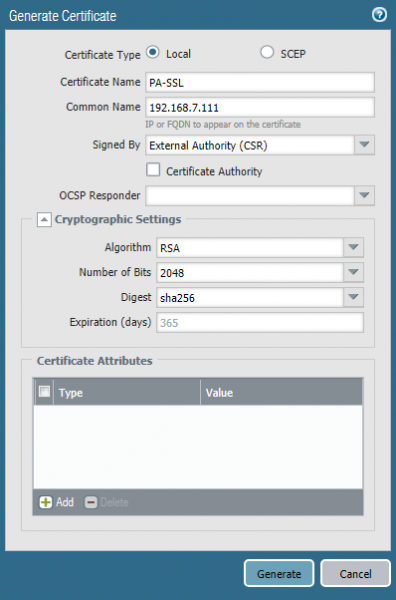
Figure 16 – Certificate Request
The next step is to configure the objects Global Protect Gateway and Global Protect Portal in the section Network -> Global Protect. In the settings, specify the external IP address of the firewall, as well as the previously created Global Protect Gateway SSL Profile SSL Profile, Authentication Profile, tunnel interface and client IP settings. You need to specify an IP address pool from which the address will be assigned to the client, and Access Route – these are the subnets to which the route will apply for the client. If the goal is to route all user traffic through the firewall, then you need to specify the subnet 0.0.0.0/0 (fig. 17).
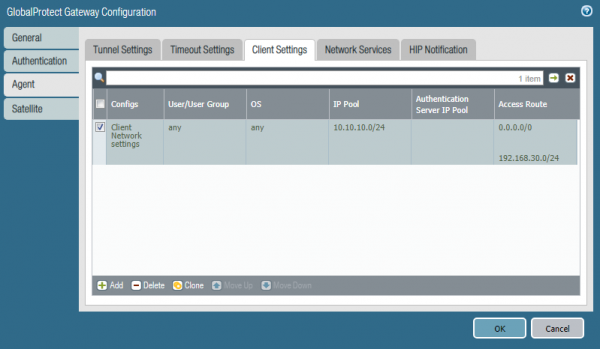
Figure 17 – Configuration of IP address pool and routes
Next, you need to configure Global Protect Portal. Specify the IP address of the firewall, SSL Profile and Authentication Profile and the list of external IP addresses of the firewalls that the client will connect to. If there are multiple firewalls, you can set a priority for each one, which users will use to select a firewall for connection.
In the section Device -> GlobalProtect Client you need to download the VPN client distribution from the Palo Alto Networks servers and activate it. For connection, the user should go to the portal webpage, where they will be prompted to download GlobalProtect Client. After downloading and installing, the user can enter their credentials and connect to the corporate network via SSL VPN.
Conclusion
At this point, the configuration of Palo Alto Networks is complete. We hope the information was helpful, and the reader gained insight into the technologies used in Palo Alto Networks. If you have any questions about the configuration or suggestions for future article topics, please leave them in the comments; we would be happy to respond.
Source: habr.com
