

Note: translation.: The author of the article, Reuven Harrison, has over 20 years of experience in software development and is currently the CTO and co-founder of Tufin, a company that creates security policy management solutions. While considering Kubernetes network policies as a powerful means for network segmentation within a cluster, he believes they are not as straightforward to implement in practice. This rather extensive material aims to enhance professionals' awareness of this issue and assist them in creating the necessary configurations.
Today, many companies are increasingly choosing Kubernetes to run their applications. The interest in this software is so high that some even call Kubernetes 'the new operating system for data centers.' Gradually, Kubernetes (or k8s) is beginning to be seen as a critical part of the business that demands the organization of mature business processes, including network security.
For security professionals grappling with working with Kubernetes, a real revelation may be the platform's default policy: allow everything.
This guide will help to understand the internal workings of network policies, and how they differ from rules for traditional firewalls. It will also discuss some pitfalls and provide recommendations that will help secure applications in Kubernetes.
Kubernetes Network Policies
The Kubernetes network policy mechanism allows the management of interactions between applications deployed on the platform at the network level (the third layer in the OSI model). Network policies lack some advanced features of modern firewalls, such as Layer 7 OSI control and threat detection; however, they provide a basic level of network security which serves as a decent starting point.
Network policies control communication between pods.
Workloads in Kubernetes are distributed across pods, which consist of one or more containers deployed together. Kubernetes assigns each pod an IP address that is accessible from other pods. Kubernetes network policies set access rights for groups of pods in the same way that security groups in the cloud manage access to virtual machine instances.
Defining Network Policies
Like other Kubernetes resources, network policies are defined in YAML. In the example below, the application balance is granted access to postgres:
apiVersion: networking.k8s.io/v1
kind: NetworkPolicy
metadata:
  name: default.postgres
  namespace: default
spec:
  podSelector:
    matchLabels:
      app: postgres
  ingress:
  - from:
    - podSelector:
        matchLabels:
          app: balance
  policyTypes:
- Ingress 
(Note: translation.: this screenshot, like all subsequent similar ones, was created not using native Kubernetes tools but with the Tufin Orca tool, developed by the company of the original article's author and mentioned at the end of the material.)
To define your own network policy, basic knowledge of YAML is required. This language is based on indentation (using spaces, not tabs). An indented element belongs to the nearest indented element above it. A new list element begins with a dash, while all other elements appear as key-value.
After describing the policy in YAML, use , to create it in the cluster:
kubectl create -f policy.yamlNetwork Policy Specification
The Kubernetes network policy specification includes four elements:
-
podSelector: defines the pods affected by this policy (targets) - mandatory; -
policyTypes: specifies which types of policies are included: ingress and/or egress - optional, but I recommend explicitly stating it in all cases; -
ingress: defines the allowed incoming traffic to the target pods - optional; -
egress: defines the allowed outgoing traffic from the target pods - optional.
An example borrowed from the Kubernetes website (I replaced role to app), shows how all four elements are used:
apiVersion: networking.k8s.io/v1
kind: NetworkPolicy
metadata:
  name: test-network-policy
  namespace: default
spec:
  podSelector:    # <<<
    matchLabels:
      app: db
  policyTypes:    # <<<
  - Ingress
  - Egress
  ingress:        # <<<
  - from:
    - ipBlock:
        cidr: 172.17.0.0/16
        except:
        - 172.17.1.0/24
    - namespaceSelector:
        matchLabels:
          project: myproject
    - podSelector:
        matchLabels:
          role: frontend
    ports:
    - protocol: TCP
      port: 6379
  egress:         # <<<
  - to:
    - ipBlock:
        cidr: 10.0.0.0/24
    ports:
    - protocol: TCP
port: 5978 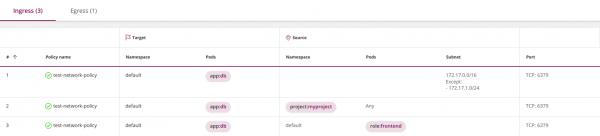

Please note that not all four elements are required to be included. Only podSelectorthe other parameters can be optional.
If omitted policyTypes, the policy will be interpreted as follows:
- By default, it is assumed to define the ingress side. If there are no explicit instructions in the policy, the system will assume that all traffic is denied.
- The behavior on the egress side will be determined by the presence or absence of the corresponding egress parameter.
To avoid errors, I recommend always explicitly indicating policyTypes.
According to the logic outlined above, if the parameters are ingress and/or egress omitted, the policy will deny all traffic (see the 'Cleanup Rule' below).
The default policy is to allow
If no policies are defined, Kubernetes by default allows all traffic. All pods can freely exchange information with each other. From a security perspective, this may seem illogical, but remember that Kubernetes was initially created by developers to facilitate application interaction. Network policies were added later.
Namespaces
Namespaces are a mechanism for collaboration within Kubernetes. They are designed to isolate logical environments from each other, with data exchange between namespaces being allowed by default.
Like most Kubernetes components, network policies exist within a specific namespace. In the block metadata you can specify which namespace the policy belongs to:
apiVersion: networking.k8s.io/v1
kind: NetworkPolicy
metadata:
  name: test-network-policy
  namespace: my-namespace  # <<<
spec:
...
If the namespace in the metadata is not explicitly stated, the system will use the namespace specified in kubectl (default namespace=default):
kubectl apply -n my-namespace -f namespace.yamlI recommend to explicitly indicate the namespace, unless you are writing a policy intended for multiple namespaces at once.
Main element podSelector in the policy will choose pods from the namespace to which the policy belongs (it does not have access to pods from another namespace).
Similarly, podSelectors in ingress and egress blocks can only select pods from their own namespace, unless you combine them using namespaceSelector (this will be discussed in the section 'Filtering by namespaces and pods').
Naming rules for policies
Policy names are unique within a single namespace. Two policies with the same name cannot exist in the same namespace, but policies with the same names can exist in different namespaces. This is convenient when you want to reuse the same policy across multiple namespaces.
I especially like one way of naming. It consists of combining the namespace name with the target pods. For example:
apiVersion: networking.k8s.io/v1
kind: NetworkPolicy
metadata:
  name: default.postgres  # <<<<
  namespace: default
spec:
  podSelector:
    matchLabels:
      app: postgres
  ingress:
  - from:
    - podSelector:
        matchLabels:
          app: admin
  policyTypes:
- Ingress 
Labels
Custom labels can be attached to Kubernetes objects such as pods and namespaces. Labels (labels — tags) are equivalent to tags in the cloud. Kubernetes network policies use labels to select pods, to which they apply:
podSelector:
  matchLabels:
    role: db
… or namespaces, to which they apply. In this example, all pods in namespaces with matching labels are selected:
namespaceSelector:
  matchLabels:
    project: myproject
One caveat: when using namespaceSelector make sure that the selected namespaces contain the necessary label. Note that built-in namespaces, such as default and kube-system, do not contain labels by default.
You can add a label to a namespace as follows:
kubectl label namespace default namespace=default Note that the namespace in the section metadata should refer to the actual name of the namespace, not to the label:
apiVersion: networking.k8s.io/v1
kind: NetworkPolicy
metadata:
  name: test-network-policy
  namespace: default   # <<<<
spec:
...
Source and destination
Firewall policies consist of rules with sources and targets. Kubernetes network policies are defined for a specific target—a set of pods to which they apply—and then establish rules for incoming (ingress) and/or outgoing (egress) traffic. In our example, the target of the policy will be all pods in the namespace default with a label with the key app and value Service meshes typically solve such problems using mTLS: certificates in this case serve as necessary identifiers.:
apiVersion: networking.k8s.io/v1
kind: NetworkPolicy
metadata:
  name: test-network-policy
  namespace: default
spec:
  podSelector:
    matchLabels:
      app: db   # <<<
  policyTypes:
  - Ingress
  - Egress
  ingress:
  - from:
    - ipBlock:
        cidr: 172.17.0.0/16
        except:
        - 172.17.1.0/24
    - namespaceSelector:
        matchLabels:
          project: myproject
    - podSelector:
        matchLabels:
          role: frontend
    ports:
    - protocol: TCP
      port: 6379
  egress:
  - to:
    - ipBlock:
        cidr: 10.0.0.0/24
    ports:
    - protocol: TCP
port: 5978 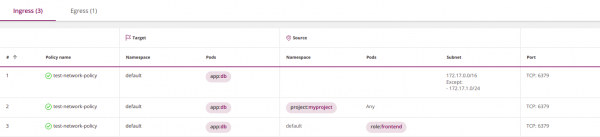

Subsection ingress in this policy opens incoming traffic to the target pods. In other words, ingress acts as the source, and the target is the corresponding recipient. Similarly, egress is the recipient, while the target is its source.
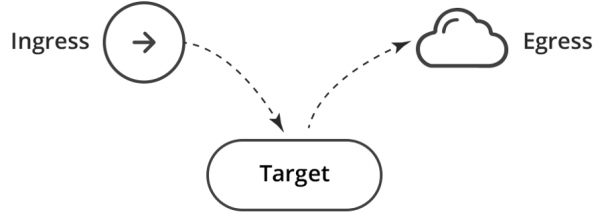
This is equivalent to two rules for the firewall: Ingress → Target; Target → Egress.
Egress and DNS (important!)
By limiting outgoing traffic, pay special attention to DNS — Kubernetes uses this service to map services to IP addresses. For example, the following policy will not work because you did not allow the application balance to access DNS:
apiVersion: networking.k8s.io/v1
kind: NetworkPolicy
metadata:
  name: default.balance
  namespace: default
spec:
  podSelector:
    matchLabels:
      app: balance
  egress:
  - to:
    - podSelector:
        matchLabels:
          app: postgres
  policyTypes:
- Egress 
You can fix it by allowing access to the DNS service:
apiVersion: networking.k8s.io/v1
kind: NetworkPolicy
metadata:
  name: default.balance
  namespace: default
spec:
  podSelector:
    matchLabels:
      app: balance
  egress:
  - to:
    - podSelector:
        matchLabels:
          app: postgres
  - to:               # <<<
    ports:            # <<<
    - protocol: UDP   # <<<
      port: 53        # <<<
  policyTypes:
- Egress 
The last element to — is empty, and therefore it indirectly selects all pods in all namespaces, allowing balance to send DNS queries to the corresponding Kubernetes service (which usually operates in the namespace kube-system).
This approach works; however, it is overly permissive and insecure, as it allows sending DNS queries outside the cluster.
You can improve it in three consecutive steps.
1. Allow DNS queries only inside to the cluster by adding namespaceSelector:
apiVersion: networking.k8s.io/v1
kind: NetworkPolicy
metadata:
  name: default.balance
  namespace: default
spec:
  podSelector:
    matchLabels:
      app: balance
  egress:
  - to:
    - podSelector:
        matchLabels:
          app: postgres
  - to:
    - namespaceSelector: {} # <<
    ports:
    - protocol: UDP
      port: 53
  policyTypes:
- Egress 
2. Allow DNS queries only within the namespace kube-system.
You need to add a label to the namespace for this kube-system: kubectl label namespace kube-system namespace=kube-system — and include it in the policy using namespaceSelector:
apiVersion: networking.k8s.io/v1
kind: NetworkPolicy
metadata:
  name: default.balance
  namespace: default
spec:
  podSelector:
    matchLabels:
      app: balance
  egress:
  - to:
    - podSelector:
        matchLabels:
          app: postgres
  - to:
    - namespaceSelector:         # <<
        matchLabels:             # <<
          namespace: kube-system # <<
    ports:
    - protocol: UDP
      port: 53
  policyTypes:
- Egress 
3. Paranoids may go even further and restrict DNS queries to a specific DNS service within kube-system. The section on 'Filtering by namespaces and pods' will explain how to achieve this.
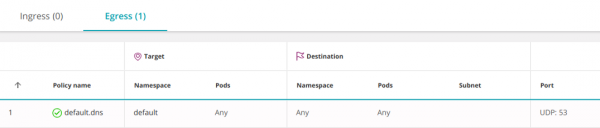
Another option is to allow DNS at the namespace level. In this case, it won't need to be opened for every service:
apiVersion: networking.k8s.io/v1
kind: NetworkPolicy
metadata:
  name: default.dns
  namespace: default
spec:
  podSelector: {} # <<
  egress:
  - to:
    - namespaceSelector: {}
    ports:
    - protocol: UDP
      port: 53
  policyTypes:
  - Egress
Empty podSelector selects all pods in the namespace.
First match and order of rules
In conventional firewalls, the action ('Allow' or 'Deny') regarding a packet is determined by the first rule it satisfies. In Kubernetes, the order of policies does not matter.
By default, when no policies are defined, communication between pods is allowed, and they can freely exchange information. Once you start formulating policies, every pod affected by at least one of them becomes isolated according to the disjunction (logical OR) of all policies that selected it. Pods not affected by any policy remain open.
This behavior can be changed using a deny-all rule.
Deny-all rule
Firewall policies typically deny any traffic that is not explicitly allowed.
In Kubernetes, there is no 'deny' action, however a similar effect can be achieved with a regular (allowing) policy by selecting an empty ingress pod group:
apiVersion: networking.k8s.io/v1
kind: NetworkPolicy
metadata:
  name: deny-all
  namespace: default
spec:
  podSelector: {}
  policyTypes:
- Ingress 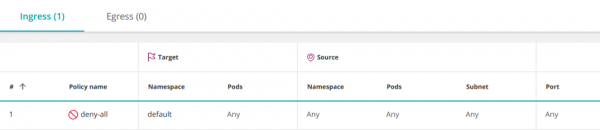
This policy selects all pods in the namespace and leaves ingress undefined, blocking all incoming traffic.
Similarly, you can restrict all outgoing traffic from the namespace:
apiVersion: networking.k8s.io/v1
kind: NetworkPolicy
metadata:
  name: deny-all-egress
  namespace: default
spec:
  podSelector: {}
  policyTypes:
- Egress 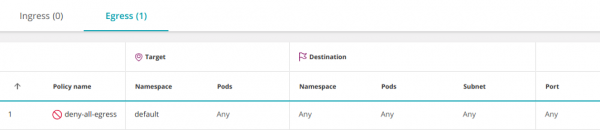
Note that any additional policies allowing traffic to pods in the namespace will take precedence over this rule (similar to adding an allow rule before a deny in a firewall configuration).
Allow All (Any-Any-Any-Allow)
To create an 'Allow All' policy, you need to supplement the above deny policy with an empty element ingress:
apiVersion: networking.k8s.io/v1
kind: NetworkPolicy
metadata:
  name: allow-all
  namespace: default
spec:
  podSelector: {}
  ingress: # <<<
  - {}     # <<<
  policyTypes:
- Ingress 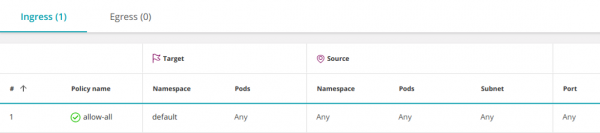
It opens access from all pods in all namespaces (and all IPs) to any pod in the namespace default. This behavior is enabled by default, so it usually does not need to be defined explicitly. However, it may sometimes be necessary to temporarily disable specific permissions for troubleshooting.
The rule can be narrowed down to allow access only to a specific set of pods (app:balance) in the namespace default:
apiVersion: networking.k8s.io/v1
kind: NetworkPolicy
metadata:
  name: allow-all-to-balance
  namespace: default
spec:
  podSelector:
    matchLabels:
      app: balance
  ingress:
  - {}
  policyTypes:
- Ingress 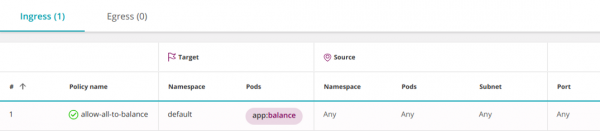
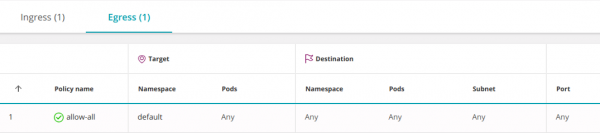
The following policy allows all incoming (ingress) and outgoing (egress) traffic, including access to any IP outside the cluster:
apiVersion: networking.k8s.io/v1
kind: NetworkPolicy
metadata:
  name: allow-all
spec:
  podSelector: {}
  ingress:
  - {}
  egress:
  - {}
  policyTypes:
  - Ingress
- Egress 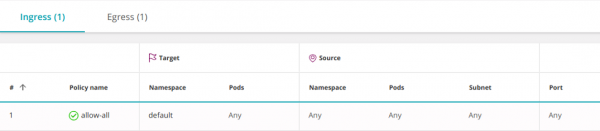
Combining multiple policies
Policies are combined using a logical OR at three levels; permissions for each pod are determined according to the disjunction of all policies that affect it:
1. In the fields from and to you can define three types of elements (all of which are combined using OR):
-
namespaceSelector— selects the namespace in its entirety; -
podSelector— selects pods; -
ipBlock— selects a subnet.
The number of elements (even identical ones) in the subdivisions from/to is not limited. All will be combined logically with OR.
apiVersion: networking.k8s.io/v1
kind: NetworkPolicy
metadata:
  name: default.postgres
  namespace: default
spec:
  ingress:
  - from:
    - podSelector:
        matchLabels:
          app: indexer
    - podSelector:
        matchLabels:
          app: admin
  podSelector:
    matchLabels:
      app: postgres
  policyTypes:
- Ingress 
2. Inside a policy section ingress can contain multiple elements from (united by logical OR). Similarly, the section egress can include multiple elements to (also united by disjunction):
apiVersion: networking.k8s.io/v1
kind: NetworkPolicy
metadata:
  name: default.postgres
  namespace: default
spec:
  ingress:
  - from:
    - podSelector:
        matchLabels:
          app: indexer
  - from:
    - podSelector:
        matchLabels:
          app: admin
  podSelector:
    matchLabels:
      app: postgres
  policyTypes:
- Ingress 
3. Different policies are also combined using logical OR
But there is one restriction when combining them, which : Kubernetes can only combine policies with different policyTypes (Ingress or Egress). Policies defining ingress (or egress) will overwrite each other.
Connection between namespaces
By default, communication between namespaces is allowed. This can be altered using a restrictive policy, which will limit outgoing and/or incoming traffic to a namespace (see "Cleanup Rule" above).
By blocking access to a namespace (see "Cleanup Rule" above), you can make exceptions in the restrictive policy, allowing connections from a specific namespace with namespaceSelector:
apiVersion: networking.k8s.io/v1
kind: NetworkPolicy
metadata:
  name: database.postgres
  namespace: database
spec:
  podSelector:
    matchLabels:
      app: postgres
  ingress:
  - from:
    - namespaceSelector: # <<<
        matchLabels:
          namespace: default
  policyTypes:
- Ingress 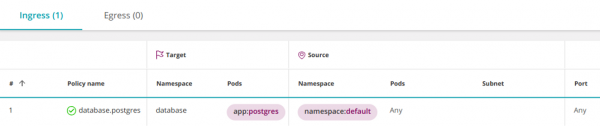
As a result, all pods in the namespace default will gain access to pods postgres in the namespace database. But what if you want to grant access to postgres only specific pods in the namespace default?
Filtering by namespaces and pods
Kubernetes version 1.11 and above allows combining operators namespaceSelector and podSelector using logical AND. It looks like this:
apiVersion: networking.k8s.io/v1
kind: NetworkPolicy
metadata:
  name: database.postgres
  namespace: database
spec:
  podSelector:
    matchLabels:
      app: postgres
  ingress:
  - from:
    - namespaceSelector:
        matchLabels:
          namespace: default
      podSelector: # <<<
        matchLabels:
          app: admin
  policyTypes:
- Ingress 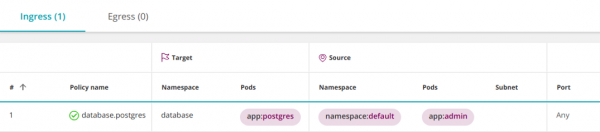
Why is this interpreted as AND instead of the usual OR?
Note that podSelector It does not start with a dash. In YAML, this means that podSelector and the preceding one namespaceSelector belong to the same list item. Therefore, they are combined using logical AND.
Adding a dash before podSelector will create a new list item that will be combined with the previous one namespaceSelector using a logical OR.
To select pods with a specific label across all namespaces, enter empty namespaceSelector:
apiVersion: networking.k8s.io/v1
kind: NetworkPolicy
metadata:
  name: database.postgres
  namespace: database
spec:
  podSelector:
    matchLabels:
      app: postgres
  ingress:
  - from:
    - namespaceSelector: {}
      podSelector:
        matchLabels:
          app: admin
  policyTypes:
- Ingress 
Multiple labels are combined with AND
Rules for the firewall with multiple objects (hosts, networks, groups) are combined using logical OR. The following rule will trigger if the packet source matches Host_1 OR Host_2:
| Source | Destination | Service | Action |
| ----------------------------------------|
| Host_1 | Subnet_A    | HTTPS   | Allow  |
| Host_2 |             |         |        |
| ----------------------------------------|
Conversely, in Kubernetes various labels in podSelector or namespaceSelector are combined with logical AND. For example, the following rule will select pods that have both labels role=db I can use version=v2:
podSelector:
  matchLabels:
    role: db
    version: v2
The same logic applies to all types of operators: policy target selectors, pod selectors, and namespace selectors.
Subnets and IP addresses (IPBlocks)
For network segmentation, firewalls use VLANs, IP addresses, and subnets.
In Kubernetes, IP addresses are automatically assigned to pods and can change frequently, so labels are used to select pods and namespaces in network policies.
Subnets (ipBlocks) are used when managing incoming (ingress) or outgoing (egress) external (North-South) connections. For example, this policy allows all pods from the namespace default access to the Google DNS service:
apiVersion: networking.k8s.io/v1
kind: NetworkPolicy
metadata:
  name: egress-dns
  namespace: default
spec:
  podSelector: {}
  policyTypes:
  - Egress
  egress:
  - to:
    - ipBlock:
        cidr: 8.8.8.8/32
    ports:
    - protocol: UDP
port: 53 
An empty pod selector in this example means "select all pods in the namespace."
This policy only allows access to 8.8.8.8; access to any other IP is denied. Thus, you essentially blocked access to the internal Kubernetes DNS service. If you want to open it, specify this explicitly.
Usually ipBlocks and podSelectors are mutually exclusive since internal pod IP addresses are not used in ipBlocks. Specifying internal pod IPs, you will effectively allow connections to/from pods with these addresses. In practice, you won't know which IP address to use, which is why they shouldn't be used for selecting pods.
As a counterexample, the following policy includes all IPs and therefore allows access to all other pods:
apiVersion: networking.k8s.io/v1
kind: NetworkPolicy
metadata:
  name: egress-any
  namespace: default
spec:
  podSelector: {}
  policyTypes:
  - Egress
  egress:
  - to:
    - ipBlock:
cidr: 0.0.0.0/0 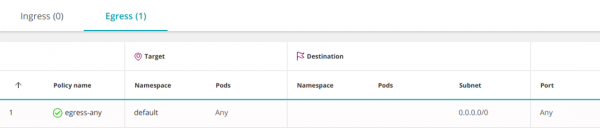
You can allow access only to external IPs, excluding the internal IP addresses of pods. For example, if your pod's subnet is 10.16.0.0/14:
apiVersion: networking.k8s.io/v1
kind: NetworkPolicy
metadata:
  name: egress-any
  namespace: default
spec:
  podSelector: {}
  policyTypes:
  - Egress
  egress:
  - to:
    - ipBlock:
        cidr: 0.0.0.0/0
        except:
- 10.16.0.0/14 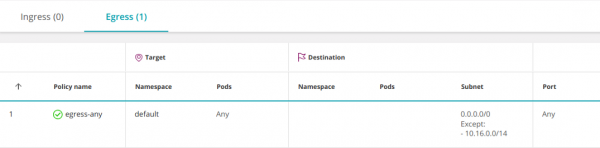
Ports and protocols
Typically, pods listen on a single port. This means you can simply omit port numbers in the policies and leave everything at default. However, it's recommended to make policies as restrictive as possible, so in some cases, you may still specify ports:
apiVersion: networking.k8s.io/v1
kind: NetworkPolicy
metadata:
  name: default.postgres
  namespace: default
spec:
  ingress:
  - from:
    - podSelector:
        matchLabels:
          app: indexer
    - podSelector:
        matchLabels:
          app: admin
    ports:             # <<<
      - port: 443      # <<<
        protocol: TCP  # <<<
      - port: 80       # <<<
        protocol: TCP  # <<<
  podSelector:
    matchLabels:
      app: postgres
  policyTypes:
- Ingress 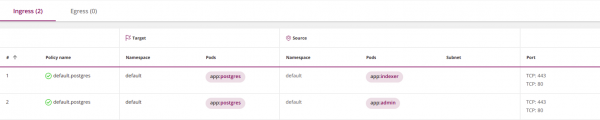
Note that the selector ports applies to all elements within the block to or from, which contains it. To specify different ports for different sets of elements, break down ingress or egress into several subsections with to or from and explicitly list your ports in each:
apiVersion: networking.k8s.io/v1
kind: NetworkPolicy
metadata:
  name: default.postgres
  namespace: default
spec:
  ingress:
  - from:
    - podSelector:
        matchLabels:
          app: indexer
    ports:             # <<<
     - port: 443       # <<<
       protocol: TCP   # <<<
  - from:
    - podSelector:
        matchLabels:
          app: admin
    ports:             # <<<
     - port: 80        # <<<
       protocol: TCP   # <<<
  podSelector:
    matchLabels:
      app: postgres
  policyTypes:
- Ingress 
Default port behavior:
- If you completely omit the port definitions (
ports), it means all protocols and all ports; - If you omit the protocol definition (
protocol), it means TCP; - If you omit the port definition (
port), it means all ports.
Best practice: do not rely on default values; explicitly specify what you need.
Please note that you must use the ports of pods, not services (more on this in the next paragraph).
Are the policies defined for pods or services?
Typically, pods in Kubernetes communicate with each other through a service — a virtual load balancer that redirects traffic to the pods implementing the service. One might think that network policies control access to services, but this is not the case. Kubernetes network policies work with the ports of pods, not services.
For example, if a service listens on port 80 but redirects traffic to port 8080 of its pods, the network policy must specify port 8080.
This mechanism should be considered suboptimal: if the internal structure of the service (whose ports are listened to by the pods) changes, network policies will need updating.
A new architectural approach using Service Mesh (for example, see about Istio below — note from the translator) addresses this issue.
Is it necessary to specify both Ingress and Egress?
The short answer is yes; for pod A to communicate with pod B, it must be allowed to create an outgoing connection (for this, an egress policy should be configured), and pod B must be able to accept an incoming connection (for this, an ingress policy is required, respectively).
However, in practice, one can rely on a default policy that allows connections in one or both directions.
If a certain podsource is selected by one or more egress-policies, the restrictions imposed on it will be determined by their disjunction. In this case, it will be necessary to explicitly allow connection to pod-the recipient. If a pod is not selected by any policy, its outgoing (egress) traffic is allowed by default.
Similarly, the fate of pod-the recipient, selected by one or more ingress-policies, will be determined by their disjunction. In this case, it is necessary to explicitly allow it to receive traffic from pod-source. If a pod is not selected by any policy, all incoming (ingress) traffic for it is allowed by default.
See the section 'Stateful or Stateless' below.
Logs
Kubernetes network policies do not log traffic. This complicates determining whether a policy is working correctly and significantly hinders analysis in the security domain.
Control over traffic to external services
Kubernetes network policies do not allow specifying a full domain name (DNS) in egress sections. This fact leads to significant inconvenience when trying to restrict traffic to external recipients who lack a fixed IP address (such as aws.com).
Policy Check
Firewalls will alert you or may even refuse to accept an incorrect policy. Kubernetes also conducts some verification. When setting a network policy through kubectl, Kubernetes may claim that it is invalid and refuse to accept it. In other cases, Kubernetes will accept the policy and fill in missing details. These can be viewed using the command:
kubernetes get networkpolicy -o yamlNote that the Kubernetes validation system is not infallible and may overlook certain types of errors.
Execution
Kubernetes does not implement network policies on its own; it acts merely as an API gateway, placing the burden of control on an underlying system known as the Container Networking Interface (CNI). Setting policies in a Kubernetes cluster without specifying the appropriate CNI is akin to creating policies on a firewall management server without subsequently installing them on the firewalls. You must ensure that a suitable CNI is in place or, in the case of cloud-hosted Kubernetes platforms, (a list of providers can be found — editor’s note), enabling network policies that will set up the CNI for you.
Be aware that Kubernetes will not alert you if you set a network policy without the appropriate supporting CNI.
Stateful or Stateless?
All Kubernetes CNIs I have encountered maintain state (for instance, Calico uses Linux conntrack). This allows a pod to receive replies to its initiated TCP connection without needing to establish it anew. However, I am not aware of any Kubernetes standard that guarantees statefulness.
Advanced Security Policy Management
Here are some ways to increase the effectiveness of security policy enforcement in Kubernetes:
- The architectural pattern Service Mesh uses sidecar containers to provide detailed telemetry and control over service-level traffic. An example can be taken from .
- Some CNI providers have enhanced their tools to extend beyond Kubernetes network policies.
- provides visibility and automation for Kubernetes network policies.
The Tufin Orca package manages Kubernetes network policies (and serves as the source for the screenshots provided above).
Additional information
- ;
- ;
- ;
- .
Conclusion
Kubernetes network policies offer a decent set of tools for segmenting clusters; however, they are often unintuitive and contain many nuances. I believe the complexity often leads to errors in the policies of many existing clusters. Possible solutions to this issue are automating policy definitions or applying other segmentation tools.
I hope this guide helps clarify some questions and resolve issues you may encounter.
P.S. from the translator
Also read in our blog:
- "Back to Microservices with Istio": , , ;
- Illustrated guide to networking in Kubernetes: , ;
- «»;
- «»;
- «».
Source: habr.com
