

At our request, Habr has created a hub and we are pleased to publish the first post there. Subscribe!
Kubernetes is simple. So why are banks paying me big money to work in this area when anyone can learn this technology in just a few hours?
If you doubt that Kubernetes can be learned this quickly, I suggest you try it yourself. Specifically, by mastering this material, you will be able to launch a microservices-based application in a Kubernetes cluster. I can guarantee this, as this is exactly the methodology I use to teach our clients about Kubernetes. What sets this guide apart from others? In fact, quite a lot. Most similar materials start with explanations of basic concepts — Kubernetes concepts and the specifics of the kubectl command. The authors of these materials assume that their readers are familiar with application development, microservices, and Docker containers. However, we will take a different approach. First, we'll explain how to run a microservices-based application on your computer. Then we'll cover building container images for each microservice. Only after that will we introduce Kubernetes and go through deploying a microservices-based application in a Kubernetes-managed cluster.
This approach, gradually approaching Kubernetes, will provide the depth of understanding necessary for an ordinary person to grasp how simple everything is organized in Kubernetes. Kubernetes is undoubtedly a straightforward technology, provided that the person wanting to learn it knows where and how it is used.
Now, without further ado, let's get to work and talk about the application we will be using.
Experimental Application
Our application will perform just one function. It takes a single sentence as input and then, using text analysis tools, conducts sentiment analysis of that sentence, obtaining an assessment of the author's emotional attitude towards a certain object.
Here's what the main window of this application looks like.
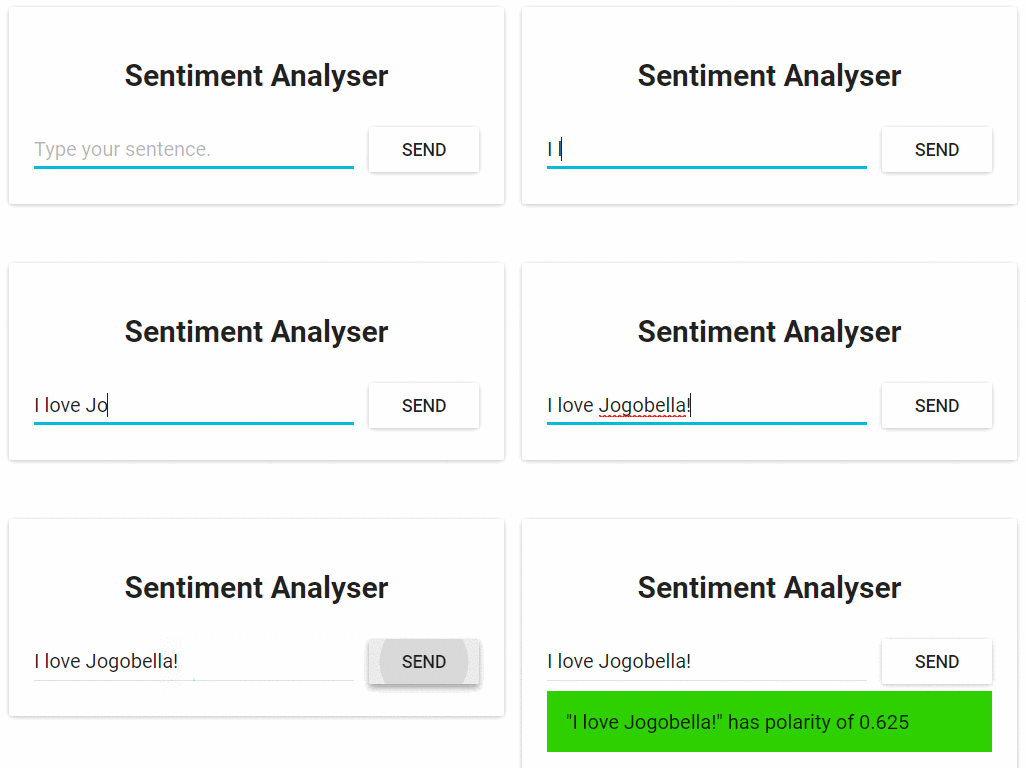
Web application for sentiment analysis of texts
From a technical perspective, the application consists of three microservices, each addressing a specific set of tasks:
- SA-Frontend — an Nginx web server that serves static React files.
- SA-WebApp — a web application written in Java that handles requests from the frontend.
- SA-Logic — a Python application that performs text sentiment analysis.
It is important to note that the microservices do not exist in isolation. They implement the idea of 'separation of concerns,' but they need to interact with one another.
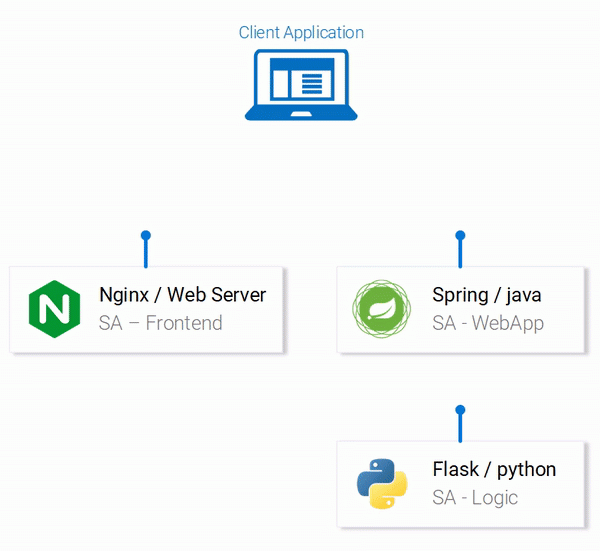
Data flows in the application
In the diagram above, you can see the numbered stages of the system's operation, illustrating the data flows in the application. Let’s break them down:
- The browser requests a file from the server
index.html(which, in turn, loads the React application package). - The user interacts with the application, triggering a call to the web application based on Spring.
- The web application redirects the request for text analysis to the Python application.
- The Python application performs the text sentiment analysis and returns the result as a response to the request.
- The Spring application sends the response to the React application (which, in turn, displays the text analysis result to the user).
The code for all these applications can be found . I recommend that you copy this repository right now, as we have many interesting experiments with it ahead.
Running a microservices-based application on a local computer
To get the application running, we need to start all three microservices. Let’s begin with the most appealing one — the frontend application.
▍Setting up React for local development
To run the React application, you need to install the Node.js and NPM platforms on your computer. Once you have installed everything, navigate to the project folder using the terminal sa-frontend and execute the following command:
npm install By executing this command, the dependencies of the React application will be downloaded into the folder node_modules , as listed in the file package.json. After the dependencies have finished downloading, execute this command in the same folder:
npm start That’s it. The React application is now running and can be accessed in the browser at the following address localhost:3000. You can change something in its code. The effect of these changes will be immediately visible in the browser. This is possible thanks to so-called "hot" module replacement. As a result, frontend development becomes a simple and enjoyable task.
▍Preparing the React Application for Production
For real-world use of the React application, we need to transform it into a set of static files and serve them to clients using a web server.
To build the React application, again using the terminal, navigate to the folder sa-frontend and execute the following command:
npm run build This will create a directory in the project folder build. It will contain all the static files needed for the React application to function.
▍Serving Static Files with Nginx
First, you need to install and start the Nginx web server. You can download it and find installation and startup instructions. Then you need to copy the contents of the folder sa-frontend/build in the folder [your_nginx_installation_dir]/html.
With this approach, the file generated during the build process of the React application index.html will be accessible at the address [your_nginx_installation_dir]/html/index.html. This is the file that, by default, the Nginx server serves when accessed. The server is configured to listen on port 80, but you can configure it as needed by editing the file [your_nginx_installation_dir]/conf/nginx.conf.
Now open the browser and go to the address localhost:80. You will see the React application page.
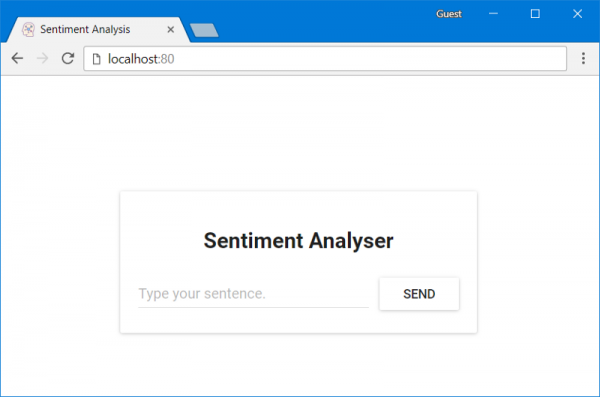
React Application Served by Nginx
If you type something in the field Type your sentence and press the button Send — nothing will happen. But if you check the console, you will see error messages. To understand where these errors are occurring, let's analyze the application's code.
▍Analyzing the Frontend Application Code
Looking at the code in the file App.js, we can see that pressing the button Send calls the method analyzeSentence(). The code for this method is shown below. Note that each line with a comment of the form # Номер, has an explanation provided below the code. We will analyze other code fragments in the same manner.
analyzeSentence() {
    fetch('http://localhost:8080/sentiment', {  // #1
        method: 'POST',
        headers: {
            'Content-Type': 'application/json'
        },
        body: JSON.stringify({
                       sentence: this.textField.getValue()})// #2
    })
        .then(response => response.json())
        .then(data => this.setState(data));  // #3
}
1. The URL to which the POST request is sent. It is assumed that an application waiting for such requests is hosted at this address.
2.The body of the request sent to the application. Here is an example of the request body:
{
    sentence: "I like yogobella!"
} 3.Upon receiving a response to the request, the component's state is updated. This triggers a re-rendering of the component. If we receive data (i.e., a JSON object containing the entered data and the calculated text score), we will display the component Polarity, as the corresponding conditions will be met. Here is how we describe the component:
const polarityComponent = this.state.polarity !== undefined ?
     :
    null;
The code seems to be fully functional. So what's wrong here? If you guess that at the address to which the application is attempting to send the POST request, there is currently nothing to accept and process this request, you would be absolutely right. Specifically, to handle requests coming to the address http://localhost:8080/sentiment, we need to run a web application based on Spring.
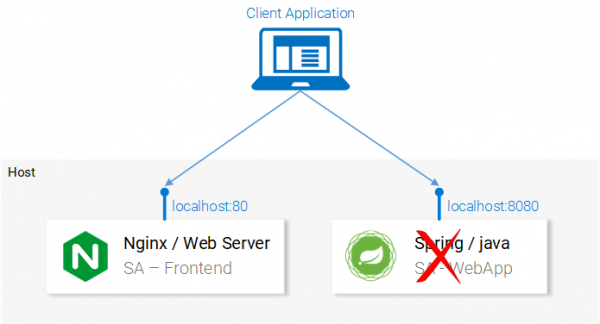
We need a Spring application capable of accepting a POST request
▍Setting up a web application based on Spring
To deploy a Spring application, you will need JDK8 and Maven and properly configured environment variables. Once you have everything installed, you can continue working on our project.
▍Packaging the application into a jar file
Navigate to the folder sa-webapp and enter the following command:
mvn install After executing this command, a directory will be created in the folder sa-webapp . Here, you will find the Java application packaged in a jar file represented by the file targetsentiment-analysis-web-0.0.1-SNAPSHOT.jar ▍Running the Java application.
and start the application with the following command:
Go to the folder target java -jar sentiment-analysis-web-0.0.1-SNAPSHOT.jar
During the execution of this command, an error will occur. To begin resolving it, we can analyze the exception details in the stack trace data:During the execution of this command, an error will occur. To begin fixing it, we can analyze the exception details in the stack trace data:
Error creating bean with name 'sentimentController': Injection of autowired dependencies failed; nested exception is java.lang.IllegalArgumentException: Could not resolve placeholder 'sa.logic.api.url' in value "${sa.logic.api.url}" The most important thing for us here is the mention of the inability to determine the value sa.logic.api.url. Let's analyze the code where the error occurs.
▍Code analysis of the Java application
Here is a fragment of the code where the error occurs.
@CrossOrigin(origins = "*")
@RestController
public class SentimentController {
    @Value("${sa.logic.api.url}")    // #1
    private String saLogicApiUrl;
    @PostMapping("/sentiment")
    public SentimentDto sentimentAnalysis(
        @RequestBody SentenceDto sentenceDto)
    {
        RestTemplate restTemplate = new RestTemplate();
        return restTemplate.postForEntity(
                saLogicApiUrl + "/analyse/sentiment",    // #2
                sentenceDto, SentimentDto.class)
                .getBody();
    }
}- In S
entimentControllerthere is a fieldsaLogicApiUrl. Its value is set by the propertysa.logic.api.url. - Line
saLogicApiUrlconcatenated with the value/analyse/sentiment. Together, they form the address to make a call to the microservice that performs text analysis.
▍Setting the property value
In Spring, the standard source of property values is the file application.properties, which can be found at sa-webapp/src/main/resources. But using it is not the only way to set property values. This can also be done with a command of the following form:
java -jar sentiment-analysis-web-0.0.1-SNAPSHOT.jar --sa.logic.api.url=WHAT.IS.THE.SA.LOGIC.API.URLThe value of this property should point to the address of our Python application.
By configuring it, we inform the Spring web application where it needs to make requests for text analysis.
To make our lives easier, let's decide that the Python application will be accessible at the address localhost:5000 and try not to forget about it. As a result, the command to run the Spring application will look like:
java -jar sentiment-analysis-web-0.0.1-SNAPSHOT.jar --sa.logic.api.url=http://localhost:5000 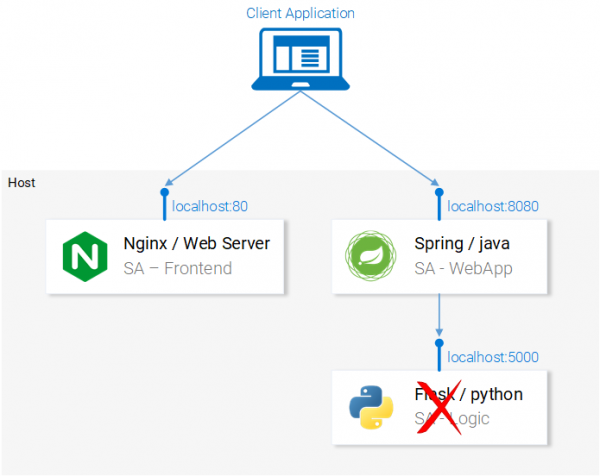
Our system lacks the Python application
Now we just need to start the Python application, and the system will work as expected.
▍Configuring the Python application
To run the Python application, you must have Python 3 and Pip installed, and the corresponding environment variables must be properly configured.
▍Installing dependencies
Go to the project folder sa-logic/sa and execute the following commands:
python -m pip install -r requirements.txt
python -m textblob.download_corpora
▍Running the application
After installing the dependencies, we are ready to run the application:
python sentiment_analysis.pyAfter executing this command, we will see the following message:
* Running on http://0.0.0.0:5000/ (Press CTRL+C to quit) This means that the application is running and waiting for requests at the address localhost:5000/
▍Code Exploration
Let's take a look at the Python application's code to understand how it responds to requests:
from textblob import TextBlob
from flask import Flask, request, jsonify
app = Flask(__name__)                             #1
@app.route("/analyse/sentiment", methods=['POST'])   #2
def analyse_sentiment():
    sentence = request.get_json()['sentence']           #3
    polarity = TextBlob(sentence).sentences[0].polarity #4
    return jsonify(                                       #5
        sentence=sentence,
        polarity=polarity
    )
if __name__ == '__main__':
app.run(host='0.0.0.0', port=5000) #6- Object Initialization
Flask. - Setting the address for executing POST requests to it.
- Extracting the property
sentencefrom the request body. - Initializing an anonymous object
TextBloband getting the valuepolarityfor the first sentence received in the request body (in our case, this is the only sentence being analyzed). - Returning a response, which includes the sentence text and the calculated score for it
polarity. - Running the Flask application, which will be accessible at the address
0.0.0.0:5000(it can also be accessed using a structure likelocalhost:5000).
Now the microservices that make up the application are active. They are configured to interact with each other. Here's what the application's architecture looks like at this stage.
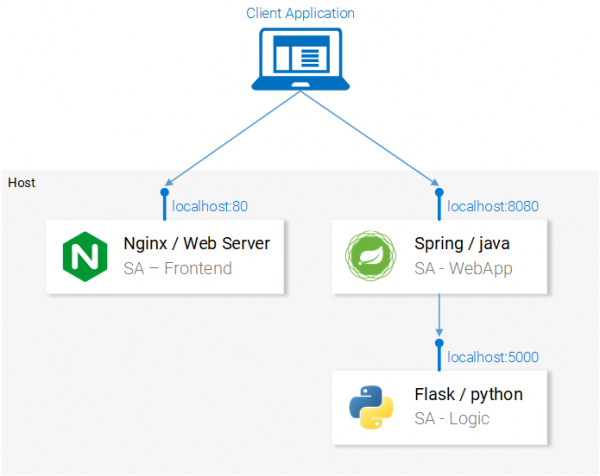
All microservices that make up the application are in operational condition.
Now, before proceeding, open the React application in the browser and try to analyze a sentence using it. If everything is done correctly — after clicking the button Send you will see the analysis results below the text field.
In the next section, we will discuss how to run our microservices in Docker containers. This is necessary to prepare the application for deployment in a Kubernetes cluster.
Docker Containers
— is a system for automating the deployment, scaling, and management of containerized applications. It is also referred to as a 'container orchestrator'. If Kubernetes works with containers, we must first acquire these containers before using this system. But first, let’s discuss what containers are. Perhaps the best answer to what they are can be found in Docker:
A container image is a lightweight, standalone, executable package that contains a specific application, including everything necessary for its execution: application code, runtime, system tools and libraries, and configurations. Containerized applications can run in both Linux and Windows environments, consistently performing the same regardless of the infrastructure.
This means that containers can be executed on any computers, including production servers, and the applications contained within them will work uniformly in any environment.
To explore the features of containers and compare them with other application deployment methods, let’s examine the example of serving a React application using a virtual machine and a container.
▍Serving Static Files of a React Application Using a Virtual Machine
Attempting to organize the serving of static files using virtual machines leads us to the following drawbacks:
- Inefficient resource utilization, as each virtual machine is a complete operating system.
- Platform dependence. What works on a certain local machine may not work on a production server.
- Slow and resource-intensive scaling of a solution based on virtual machines.
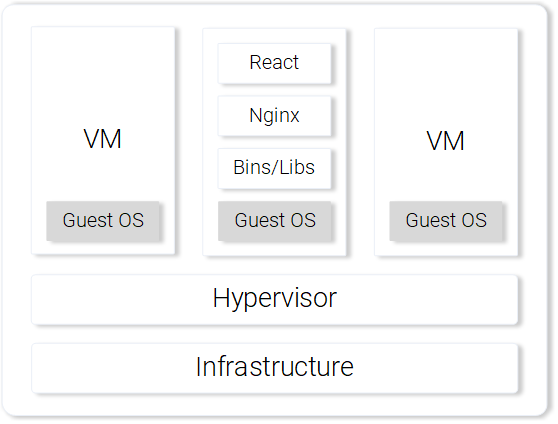
A web server Nginx, serving static files, running on a virtual machine
If we instead use containers for a similar task, we can note the following strengths compared to virtual machines:
- Efficient resource usage: operating within the operating system using Docker.
- Platform independence. A container that a developer can run on their computer will work anywhere.
- Lightweight deployment through the use of image layers.
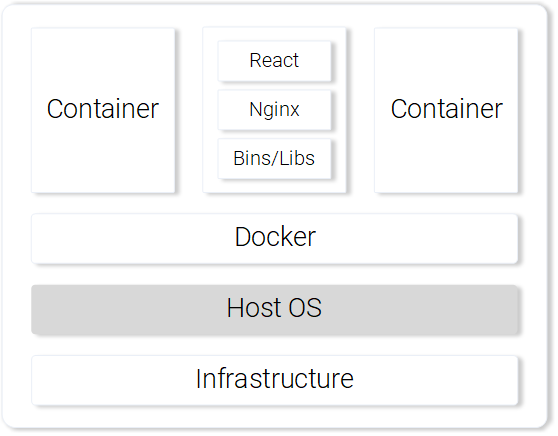
An Nginx web server serving static files, running in a container.
We compared virtual machines and containers on just a few points, but even that is enough to feel the strong advantages of containers. You can find details about Docker containers.
▍Building a container image for a React application
The main building block of a Docker container is the file Dockerfile. At the beginning of this file, the base image of the container is recorded, then it includes a sequence of instructions specifying the order of creating the container to meet the needs of a certain application.
Before we start working with the file Dockerfile, let's remember what we did to prepare the React application files for deployment on the Nginx server:
- Building the React application package (
npm run build). - Starting the Nginx server.
- Copying the contents of the directory
buildfrom the project foldersa-frontendto the server foldernginx/html.
Below you will see parallels between creating a container and the actions described above performed on a local computer.
▍Preparing the Dockerfile for the SA-Frontend application
The instructions that will be contained in Dockerfile for the application SA-Frontend, consist of only two commands. The fact is that the Nginx developer group has prepared a base for Nginx, which we will use to build our image. Here are the two steps we need to describe:
- The base image should be the Nginx image.
- The contents of the folder
sa-frontend/buildneed to be copied into the image foldernginx/html.
If we translate this description to the file Dockerfile, it will look like this:
FROM nginx
COPY build /usr/share/nginx/html
As you can see, everything here is very simple, and the contents of the file are quite readable and understandable. This file tells the system that it needs to take the image nginx with everything it already contains, and copy the contents of the directory build to the directory nginx/html.
You may have a question about where I know exactly where to copy the files from the folder build, that is — where the path came from /usr/share/nginx/html. Actually, there's nothing complicated here. The relevant information can be found in of the image.
▍Building the Image and Uploading It to the Repository
Before we can work with the finished image, we need to send it to the image repository. For this, we will use the free cloud platform for hosting images, Docker Hub. At this stage of the work, you need to do the following:
- Install .
- Register on the Docker Hub website.
- Log into your account by executing a command in the terminal that looks like this:
docker login -u="$DOCKER_USERNAME" -p="$DOCKER_PASSWORD"
Now, you need to navigate to the directory using the terminal sa-frontend and execute a command that looks like this:
docker build -f Dockerfile -t $DOCKER_USER_ID/sentiment-analysis-frontend . Here and below in similar commands, $DOCKER_USER_ID needs to be replaced with your username on Docker Hub. For example, this part of the command could look like this: rinormaloku/sentiment-analysis-frontend.
In this case, this command can be shortened by omitting the -f Dockerfile, as this file already exists in the folder where we are executing this command.
To send the finished image to the repository, we will need the following command:
docker push $DOCKER_USER_ID/sentiment-analysis-frontendAfter executing it, check the list of your repositories on Docker Hub to understand if the image was successfully sent to the cloud storage.
▍Running the Container
Now anyone can download and run the image known as $DOCKER_USER_ID/sentiment-analysis-frontend.To do this, you need to execute the following sequence of commands:
docker pull $DOCKER_USER_ID/sentiment-analysis-frontend
docker run -d -p 80:80 $DOCKER_USER_ID/sentiment-analysis-frontend
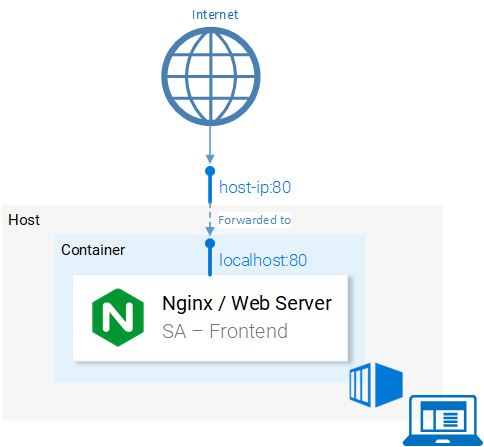
Now the container is running, and we can continue working by creating other images we need. But before continuing, let's clarify the structure 80:80, which appears in the command to run the image and might seem unclear.
- The first number
80is the host port (that is, the local computer). - The second number
80is the container port to which the request should be redirected.
Let's consider the following illustration.
Port Redirection
The system redirects requests from port <hostPort> to port .That is, a request to the port of the computer is redirected to the port of the container. 80 Since the port 80 is open on the local computer, the application can be accessed from this computer at the address
Since the port 80 is open on the local computer, you can access the application from this computer at the address localhost:80If your system does not support Docker, the application can be run on a Docker virtual machine, the address of which will look like :80. To find out the IP address of the Docker virtual machine, you can use the command docker-machine ip.
At this stage, after successfully launching the frontend application container, you should be able to open its page in the browser.
▍The .dockerignore file
While building the application image SA-Frontend, we may have noticed that this process turns out to be extremely slow. This happens because the Docker daemon needs to be sent the build context for the image. The directory representing the build context is set as the last argument in the command docker build. In our case, a dot appears at the end of this command. This leads to the following structure being included in the build context:
sa-frontend:
|   .dockerignore
|   Dockerfile
|   package.json
|   README.md
+---build
+---node_modules
+---public
---src
But we only need the folder build. Uploading anything else is a waste of time. The build process can be sped up by instructing Docker which directories to ignore. This is precisely why we need the .dockerignore. If you are familiar with the .gitignore, the structure of this file will surely seem familiar to you. It lists the directories that the image build system can ignore. In our case, the contents of this file look like this:
node_modules
src
public
File .dockerignore must be in the same folder as the Dockerfile. Now the build of the image will only take seconds.
Now let's focus on the image for the Java application.
▍Building the container image for the Java application
You know what, you have already learned everything necessary for creating container images. That is why this section will be quite short.
Open the file Dockerfile, which is located in the project folder sa-webapp. If you read the text of this file, you will encounter only two new constructs starting with the keywords ENV and EXPOSE:
ENV SA_LOGIC_API_URL http://localhost:5000
…
EXPOSE 8080
The keyword ENV allows declaring environment variables inside Docker containers. In particular, in our case, it allows specifying the URL for accessing the API of the application that performs text analysis.
The keyword EXPOSE allows Docker to be instructed to open a port. We will be using this port while working with the application. Here it can be noted that in Dockerfile for the application SA-Frontend such a command does not exist. This is only for documentation purposes; in other words, this structure is intended for those who will read. Dockerfile.
Building the image and sending it to the repository looks exactly the same as in the previous example. If you are not very confident in your skills yet, the corresponding commands can be found in the file README.md in the folder sa-webapp.
▍Building a container image for a Python application
If you take a look at the contents of the file Dockerfile in the folder sa-logic, you won’t find anything new there. The commands for building the image and sending it to the repository should already be familiar to you, but they, like in other applications of ours, can be found in the file README.md in the folder sa-logic.
▍Testing containerized applications
Can you trust something that you haven’t tested? Neither can I. Let’s test our containers.
- We will start the application container
sa-logicand configure it to listen on port5050:docker run -d -p 5050:5000 $DOCKER_USER_ID/sentiment-analysis-logic - We will start the application container
sa-webappand configure it to listen on port8080. Additionally, we need to set up the port on which the Python application will wait for requests from the Java application by reassigning the environment variableSA_LOGIC_API_URL:$ docker run -d -p 8080:8080 -e SA_LOGIC_API_URL='http://:5000' $DOCKER_USER_ID/sentiment-analysis-web-app
To learn how to find the IP address of the container or the Docker virtual machine, refer to the file .
We will start the application container sa-frontend:
docker run -d -p 80:80 $DOCKER_USER_ID/sentiment-analysis-frontend Now everything is ready to access the application in the browser at the address localhost:80 and test the application.
Note that if you changed the port for sa-webapp, or if you are working with a Docker virtual machine, you will need to edit the file App.js from the folder sa-frontend, updating the IP address or port number in the method analyzeSentence(), replacing the outdated data with the current information. After that, you need to rebuild the image and use it.
Here’s what our application’s diagram looks like now.
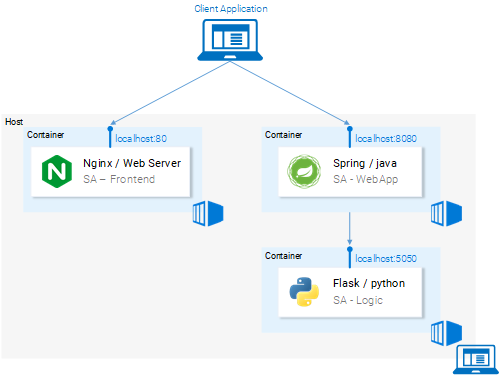
Microservices are running in containers
Summary: why do we need a Kubernetes cluster?
We just studied the files Dockerfile, talked about how to build images and send them to the Docker repository. Additionally, we learned how to speed up image builds using the file. .dockerignoreAs a result, our microservices are now running in Docker containers. You may understandably wonder why we need Kubernetes. The answer to this question will be addressed in the second part of this material. In the meantime, consider the following question:
Let's assume that our web application for text analysis has become globally popular. Millions of requests come to it every minute. This means the microservices sa-webapp and sa-logic will be under enormous load. How do we scale the containers in which the microservices are running?
Source: habr.com
