

Windows 10 includes a built-in antivirus Windows Defender (“Windows Defender”), protecting your computer and data from unwanted programs: viruses, spyware, ransomware, and many other types of malware and hacker activities.
While the built-in solution is sufficient for most users, there are situations where you might not want to use this program. For example, if you are configuring a device that will not be connected to the network; if you need to perform a task that is blocked by this program; or if you need to comply with the security policy requirements of your organization.
The only problem is that you cannot completely remove or disable Windows Defender – this system is deeply integrated into Windows 10. However, there are several workarounds that you can use to disable the antivirus – using Local Group Policy, the registry, or Windows settings in the 'Security' section (temporarily).
How to Disable Windows Defender through Windows Security Settings
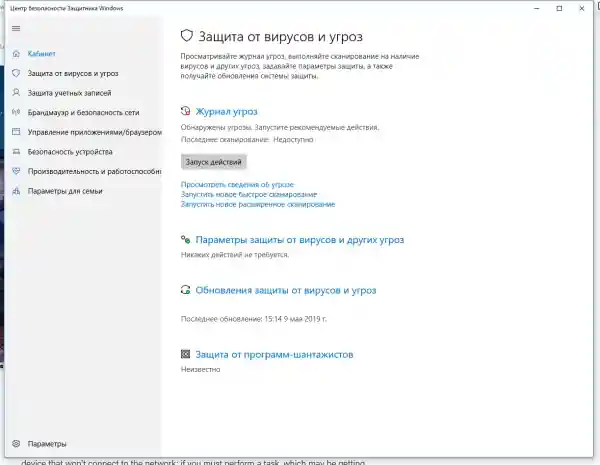
If you need to perform a specific task and do not need to disable Defender completely, you can do this temporarily. To do this, use the search function in the 'Start' button to find the 'Windows Defender Security Center' section, and select 'Virus & Threat Protection'.
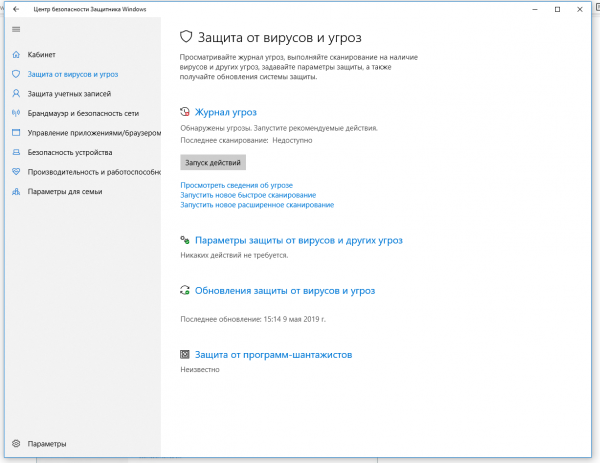
From there, navigate to 'Virus & Threat Protection Settings' and click on the 'Real-time Protection' toggle.
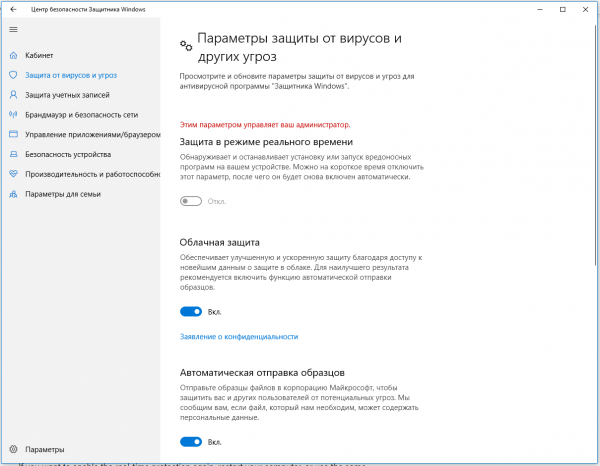
This will disable real-time protection on your computer, allowing you to install applications or perform a specific task that was previously blocked by antivirus.
To re-enable real-time protection, restart your computer or go through all the setup steps again, but on the last step, enable the toggle.
This solution is not permanent, but it is best suited for temporarily disabling the Windows 10 antivirus to perform a specific task.
How to Disable Windows Defender through Group Policies
In Windows 10 Pro and Enterprise versions, you have access to the Local Group Policy Editor, where you can permanently disable Windows Defender as follows:
Launch the executable script gpedit.msc via the Start button. The policy editor will open. Navigate to the following path: Computer Configuration > Administrative Templates > Windows Components > Windows Defender Antivirus.
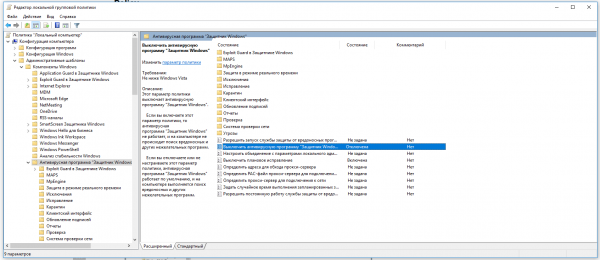
Double-click on the item 'Turn off Windows Defender Antivirus'. Select the 'Enabled' option to enable this setting, thereby disabling Defender.
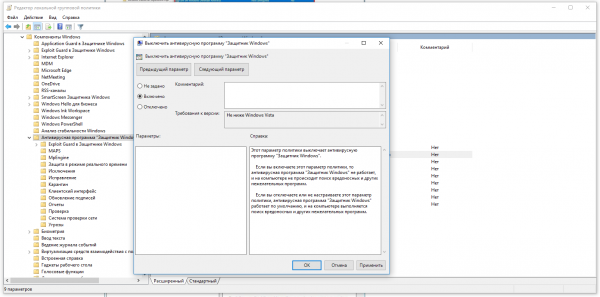
Click 'OK' and restart your computer.
After this, the antivirus will be permanently disabled on your device. However, you will notice that the shield icon remains in the taskbar – this is normal, as this icon belongs to the 'Windows Security' application, not the antivirus itself.
If you change your mind, you can always re-enable Defender by repeating these steps, selecting the 'Not Configured' option on the last step, after which you will need to restart your computer again.
How to disable Windows Defender through the registry
If you do not have access to the policy editor, or you have Windows 10 Home installed, you can edit the Windows registry to disable Defender.
I remind you that editing the registry is risky, and mistakes in this matter can cause irreparable damage to your currently installed copy of Windows. It's best to back up your system before you start editing.
To completely disable Defender via the registry, launch the regedit program via the Start button, and navigate to the following path:
HKEY_LOCAL_MACHINE\SOFTWARE\Policies\Microsoft\Windows Defender
Tip: You can copy this path and paste it into the address bar of the registry editor.
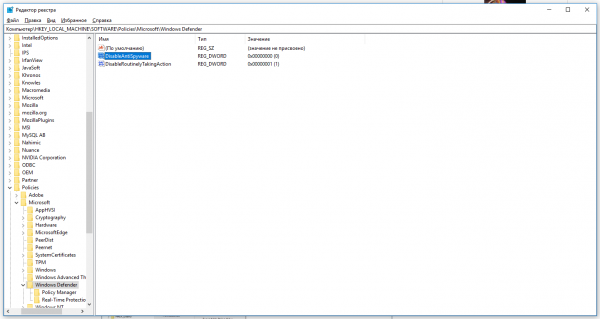
Then right-click on the Windows Defender key (folder), select 'New', and DWORD (32-bit) Value. Name the new key DisableAntiSpyware and press 'Enter'. Then double-click to open the key editor and set its value to 1.
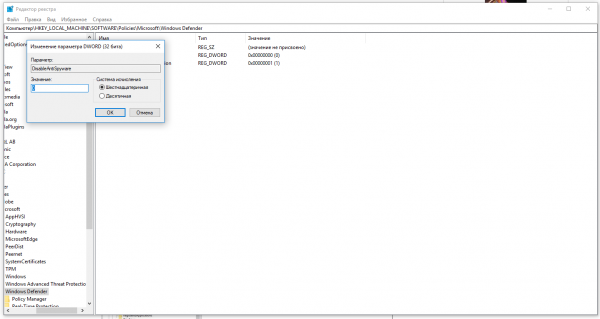
Click OK, and restart your computer.
After this, Windows Defender will no longer protect your system. If you decide to revert these changes, repeat all the steps, but at the end delete this key or set its value to 0.
Recommendations
Despite the availability of several methods to disable Windows Defender, we do not recommend using your computer without antivirus software. However, you may encounter situations where turning off this feature is the best option. If you are installing a third-party antivirus program, you do not need to manually disable Defender, as it will turn off automatically during the installation.
Source: habr.com
