

At the beginning of this month, on May 3, a major release of the 'management system for distributed data storage in Kubernetes' was announced — . More than a year ago we already a general overview of Rook. At that time, we were asked to share our experience of its practical usage — and now, right at such a significant milestone in the project's history, we are pleased to share our accumulated impressions.
In brief, Rook is a set of for Kubernetes that fully take control of the deployment, management, and automatic recovery of data storage solutions such as Ceph, EdgeFS, Minio, Cassandra, and CockroachDB.
Currently, the most developed (and downward API support (simultaneously with this in stable solution at this stage is .
Note: among the significant changes in the Rook 1.0.0 release related to Ceph, we can note the support for Ceph Nautilus and the ability to use NFS for CephFS or RGW buckets. Among other highlights is the 'maturation' of EdgeFS support to beta level.
So, in this article we will:
- answer the question of what advantages we see in using Rook for deploying Ceph in a Kubernetes cluster;
- share our experience and impressions from using Rook in production;
- explain why we say 'Yes!' to Rook and our plans for it.
Let's start with general concepts and theory.
"I have an advantage of one Rook!" (unknown chess player)
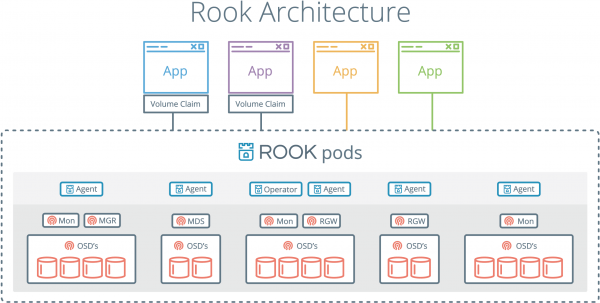
One of the main advantages of Rook is that interaction with data storage is carried out through Kubernetes mechanisms. This means that there is no longer a need to copy commands for setting up Ceph from a piece of paper into the console.
— Want to deploy CephFS in the cluster? Just write a YAML file!
— What? You want to deploy an object store with S3 API too? Just write a second YAML file!
Rook is built according to the rules of a typical operator. Interaction with it occurs via , in which we describe the characteristics of the Ceph entities we need (since this is the only stable implementation, the article will focus on Ceph by default unless otherwise specified). According to the specified parameters, the operator will automatically perform the necessary setup commands.
Let's look at specifics using the example of creating an Object Store, more precisely — CephObjectStoreUser.
apiVersion: ceph.rook.io/v1
kind: CephObjectStore
metadata:
  name: {{ .Values.s3.crdName }}
  namespace: kube-rook
spec:
  metadataPool:
    failureDomain: host
    replicated:
      size: 3
  dataPool:
    failureDomain: host
    erasureCoded:
      dataChunks: 2
      codingChunks: 1
  gateway:
    type: s3
    sslCertificateRef:
    port: 80
    securePort:
    instances: 1
    allNodes: false
---
apiVersion: ceph.rook.io/v1
kind: CephObjectStoreUser
metadata:
  name: {{ .Values.s3.crdName }}
  namespace: kube-rook
spec:
  store: {{ .Values.s3.crdName }}
  displayName: {{ .Values.s3.username }}
The parameters listed are quite standard and likely don't need comments, but special attention should be paid to those highlighted in template variables.
The overall workflow boils down to the fact that through the YAML file we 'order' resources, for which the operator executes the necessary commands and returns us a 'not quite real' secret that we can then work with. (see below). And from the variables mentioned above, a command and the name of the secret will be formed.
What is this command? When creating a user for the object storage, the Rook operator inside the pod will execute the following:
radosgw-admin user create --uid="rook-user" --display-name="{{ .Values.s3.username }}"The result of executing this command will be a JSON structure:
{
    "user_id": "rook-user",
    "display_name": "{{ .Values.s3.username }}",
    "keys": [
        {
           "user": "rook-user",
           "access_key": "NRWGT19TWMYOB1YDBV1Y",
           "secret_key": "gr1VEGIV7rxcP3xvXDFCo4UDwwl2YoNrmtRlIAty"
        }
    ],
    ...
}
Keys — which will be needed in the future by applications to access the object storage via the S3 API. The Rook operator kindly selects them and stores them in its namespace in the form of a secret named rook-ceph-object-user-{{ $.Values.s3.crdName }}-{{ $.Values.s3.username }}.
To use the data from this secret, simply add it to the container as environment variables. As an example, here is a template for a Job where we automatically create buckets for each user environment:
{{- range $bucket := $.Values.s3.bucketNames }}
apiVersion: batch/v1
kind: Job
metadata:
  name: create-{{ $bucket }}-bucket-job
  annotations:
    "helm.sh/hook": post-install
    "helm.sh/hook-weight": "2"
spec:
  template:
    metadata:
      name: create-{{ $bucket }}-bucket-job
    spec:
      restartPolicy: Never
      initContainers:
      - name: waitdns
        image: alpine:3.6
        command: ["/bin/sh", "-c", "while ! getent ahostsv4 rook-ceph-rgw-{{ $.Values.s3.crdName }}; do sleep 1; done" ]
      - name: config
        image: rook/ceph:v1.0.0
        command: ["/bin/sh", "-c"]
        args: ["s3cmd --configure --access_key=$(ACCESS-KEY) --secret_key=$(SECRET-KEY) -s --no-ssl --dump-config | tee /config/.s3cfg"]
        volumeMounts:
        - name: config
          mountPath: /config
        env:
        - name: ACCESS-KEY
          valueFrom:
            secretKeyRef:
              name: rook-ceph-object-user-{{ $.Values.s3.crdName }}-{{ $.Values.s3.username }}
              key: AccessKey
        - name: SECRET-KEY
          valueFrom:
            secretKeyRef:
              name: rook-ceph-object-user-{{ $.Values.s3.crdName }}-{{ $.Values.s3.username }}
              key: SecretKey
      containers:
      - name: create-bucket
        image: rook/ceph:v1.0.0
        command:
        - "s3cmd"
        - "mb"
        - "--host=rook-ceph-rgw-{{ $.Values.s3.crdName }}"
        - "--host-bucket= "
        - "s3://{{ $bucket }}"
        ports:
        - name: s3-no-sll
          containerPort: 80
        volumeMounts:
        - name: config
          mountPath: /root
      volumes:
      - name: config
        emptyDir: {}
---
{{- end }}
All actions listed in this Job were carried out without leaving Kubernetes. The structures described in the YAML files are stored in a Git repository and reused multiple times. This is a huge advantage for DevOps engineers and the CI/CD process as a whole.
With Rook and Rados, it's a pleasure.
Using the combination of Ceph + RBD imposes certain limitations on mounting volumes to pods.
In particular, a secret for accessing Ceph must be present in the namespace for stateful applications to function. It’s reasonable if you have 2-3 environments in your namespaces: you can go and copy the secret manually. But what to do if a separate environment with its own namespace is created for each developer feature?
We resolved this issue using , which automatically copied secrets to new namespaces (an example of such a hook is described in ).
#! /bin/bash

if [[ $1 == “--config” ]]; then
   cat <<EOF
{"onKubernetesEvent":[
 {"name": "OnNewNamespace",
  "kind": "namespace",
  "event": ["add"]
  }
]}
EOF
else
    NAMESPACE=$(kubectl get namespace -o json | jq '.items | max_by( .metadata.creationTimestamp ) | .metadata.name')
    kubectl -n ${CEPH_SECRET_NAMESPACE} get secret ${CEPH_SECRET_NAME} -o json | jq ".metadata.namespace="${NAMESPACE}"" | kubectl apply -f -
fi
However, when using Rook, this problem simply does not exist. The mounting process occurs using proprietary drivers based on or (currently in beta) and therefore does not require secrets.
Rook automatically resolves many issues, which encourages us to use it in new projects.
The Siege of Rook
Let's complete the practical part by deploying Rook and Ceph, allowing us to conduct our own experiments. To make it easier to storm this impregnable fortress, the developers have prepared a Helm package. Let's download it:
$ helm fetch rook-master/rook-ceph --untar --version 1.0.0 In the file rook-ceph/values.yaml you can find many different settings. The most important thing is to specify tolerations for the agents and discovery. We explained the purpose of the taints/tolerations mechanism in detail in .
In short, we don't want the pods with the client application to be located on the same nodes as the disks for data storage. The reason is simple: this way, the operation of the Rook agents won’t affect the application itself.
So, let's open the file rook-ceph/values.yaml with your favorite editor and add the following block at the end:
discover:
  toleration: NoExecute
  tolerationKey: node-role/storage
agent:
  toleration: NoExecute
  tolerationKey: node-role/storage
  mountSecurityMode: Any
On each node reserved for data storage, we add the corresponding taint:
$ kubectl taint node ${NODE_NAME} node-role/storage="":NoExecuteAfter which we install the Helm chart with the command:
$ helm install --namespace ${ROOK_NAMESPACE} ./rook-cephNow it is necessary to create a cluster and specify the location of the :
apiVersion: ceph.rook.io/v1
kind: CephCluster
metadata:
  clusterName: "ceph"
  finalizers:
  - cephcluster.ceph.rook.io
  generation: 1
  name: rook-ceph
spec:
  cephVersion:
    image: ceph/ceph:v13
  dashboard:
    enabled: true
  dataDirHostPath: /var/lib/rook/osd
  mon:
    allowMultiplePerNode: false
    count: 3
  network:
    hostNetwork: true
  rbdMirroring:
    workers: 1
  placement:
    all:
      tolerations:
      - key: node-role/storage
        operator: Exists
  storage:
    useAllNodes: false
    useAllDevices: false
    config:
      osdsPerDevice: "1"
      storeType: filestore
    resources:
      limits:
        memory: "1024Mi"
      requests:
        memory: "1024Mi"
    nodes:
    - name: host-1
      directories:
      - path: "/mnt/osd"
    - name: host-2
      directories:
      - path: "/mnt/osd"
    - name: host-3
      directories:
      - path: "/mnt/osd"
Check the Ceph status — we expect to see HEALTH_OK:
$ kubectl -n ${ROOK_NAMESPACE} exec $(kubectl -n ${ROOK_NAMESPACE} get pod -l app=rook-ceph-operator -o name -o jsonpath='{.items[0].metadata.name}') -- ceph -sLet's also check that the pods with the client application do not end up on the nodes reserved for Ceph:
$ kubectl -n ${APPLICATION_NAMESPACE} get pods -o custom-columns=NAME:.metadata.name,NODE:.spec.nodeNameNext, additional components can be configured optionally. More about them is mentioned in . We strongly recommend installing the dashboard and toolbox for administration.
Rook hooks: does Rook have enough for everything?
As you can see, the development of Rook is in full swing. However, there are still issues that prevent us from fully abandoning manual Ceph configuration:
- No Rook driver metrics on mounted block usage, which deprives us of monitoring.
- Flexvolume and CSI resize volumes (unlike RBD), which means Rook lacks a useful (and sometimes critical!) tool.
- Rook is still not as flexible as regular Ceph. If we want to set the pool for CephFS metadata to be stored on SSDs and the data itself on HDDs, we would need to manually specify separate device groups in the CRUSH maps.
- Despite the fact that the rook-ceph-operator is considered stable, there are still some issues when upgrading Ceph from version 13 to 14.
Conclusions
"Right now, the Rook is closed off from the outside world by pawns, but we believe that one day it will play a decisive role in the game!" (quote invented specifically for this article)
The Rook project has undoubtedly won our hearts — we believe that [with all its pros and cons] it definitely deserves your attention as well.
Our further plans are to make rook-ceph a module for , which will make its use in our numerous Kubernetes clusters even simpler and more convenient.
P.S.
Also read in our blog:
- «»;
- «»;
- «»;
- «»;
- «».
Source: habr.com
