

Introduction
Recently, the popularity of Kubernetes has been rapidly increasing, with more and more projects adopting it. However, I would like to discuss another orchestrator called Nomad: it is well-suited for projects that already use other HashiCorp solutions like Vault and Consul, and where the infrastructure is not overly complex. This material will provide a guide on installing Nomad, merging two nodes into a cluster, and integrating Nomad with GitLab.

Test Stand
A bit about the test setup: three virtual servers with the specifications of 2 CPU, 4 RAM, 50 Gb SSD are used, all connected in a local network. Their names and IP addresses are:
- nomad-livelinux-01: 172.30.0.5
- nomad-livelinux-02: 172.30.0.10
- consul-livelinux-01: 172.30.0.15
Installing Nomad and Consul. Creating a Nomad cluster
Let's proceed with the basic installation. Despite the simplicity of the installation, I will describe it for the completeness of the article: essentially, it was created from drafts and notes for quick reference if necessary.
Before we start with the practical part, let's discuss the theoretical background, because at this stage, understanding the future structure is crucial.
We have two Nomad nodes and want to merge them into a cluster; also, in the future, we will need automatic cluster scaling — for this, we will require Consul. With this tool, clustering and adding new nodes become a very straightforward task: the created Nomad node connects to the Consul agent, after which it connects to the existing Nomad cluster. Therefore, initially, we will install the Consul server, set up basic HTTP authentication for the web panel (it is by default accessible without authentication), as well as the Consul agents on the Nomad servers, after which we will proceed to Nomad.
Installing HashiCorp tools is very straightforward: essentially, we just move the binary file to the bin directory, configure the tool's configuration file, and create its service file.
We download the Consul binary file and extract it to the user's home directory:
root@consul-livelinux-01:~# wget https://releases.hashicorp.com/consul/1.5.0/consul_1.5.0_linux_amd64.zip
root@consul-livelinux-01:~# unzip consul_1.5.0_linux_amd64.zip
root@consul-livelinux-01:~# mv consul /usr/local/bin/
Now we have the Consul binary file ready for further configuration.
To work with Consul, we need to create a unique key using the keygen command:
root@consul-livelinux-01:~# consul keygen
Let's move on to configuring Consul, creating the directory /etc/consul.d/ with the following structure:
/etc/consul.d/
├── bootstrap
│   └── config.json
In the bootstrap directory, there will be a configuration file config.json — in it we will set the Consul settings. Its content is:
{
"bootstrap": true,
"server": true,
"datacenter": "dc1",
"data_dir": "/var/consul",
"encrypt": "your-key",
"log_level": "INFO",
"enable_syslog": true,
"start_join": ["172.30.0.15"]
}
Let's break down the main directives and their meanings:
- bootstrap: true. Enables automatic addition of new nodes when they connect. Note that we do not specify the exact number of expected nodes here.
- server: true. Enables server mode. Consul on this virtual machine will temporarily be the only server and master, while the Nomad VMs will act as clients.
- datacenter: dc1. Specifies the name of the datacenter for creating the cluster. It must be identical on both clients and servers.
- encrypt: your-key. The key, which also must be unique and match on all clients and servers. It is generated using the command consul keygen.
- start_join. In this list, we specify the list of IP addresses to which it will connect. For now, we only leave our own address.
At this stage, we can start consul using the command line:
root@consul-livelinux-01:~# /usr/local/bin/consul agent -config-dir /etc/consul.d/bootstrap -uiThis is a decent debugging method now; however, it can't be used permanently for obvious reasons. Let's create a service file to manage Consul through systemd:
root@consul-livelinux-01:~# nano /etc/systemd/system/consul.service
The content of the consul.service file:
[Unit]
Description=Consul Startup process
After=network.target

[Service]
Type=simple
ExecStart=/bin/bash -c '/usr/local/bin/consul agent -config-dir /etc/consul.d/bootstrap -ui'
TimeoutStartSec=0

[Install]
WantedBy=default.target
Start Consul through systemctl:
root@consul-livelinux-01:~# systemctl start consul
Check: our service should be running, and by executing the command consul members we should see our server:
root@consul-livelinux:/etc/consul.d# consul members
consul-livelinux    172.30.0.15:8301  alive   server  1.5.0  2         dc1
Next step: install Nginx and configure proxying, http authentication. Install nginx through the package manager and create a configuration file consul.conf in the /etc/nginx/sites-enabled directory with the following content:
upstream consul-auth {
    server localhost:8500;
}

server {

    server_name consul.doman.name;

    location / {
      proxy_pass http://consul-auth;
      proxy_set_header Host $host;
      auth_basic_user_file /etc/nginx/.htpasswd;
      auth_basic "Password-protected Area";
    }
}
Don't forget to create a .htpasswd file and generate a username and password for it. This step is necessary to ensure that the web panel is not accessible to anyone who knows our domain. However, when configuring GitLab, we will have to forgo this — otherwise, we won't be able to deploy our application in Nomad. In my project, both GitLab and Nomad are on a private network, so there is no such issue here.
On the other two servers, we will install Consul agents following this instruction. We repeat the steps with the binary file:
root@nomad-livelinux-01:~# wget https://releases.hashicorp.com/consul/1.5.0/consul_1.5.0_linux_amd64.zip
root@nomad-livelinux-01:~# unzip consul_1.5.0_linux_amd64.zip
root@nomad-livelinux-01:~# mv consul /usr/local/bin/
Similarly to the previous server, we create a directory for configuration files /etc/consul.d with the following structure:
/etc/consul.d/
├── client
│   └── config.json
Contents of the config.json file:
{
    "datacenter": "dc1",
    "data_dir": "/opt/consul",
    "log_level": "DEBUG",
    "node_name": "nomad-livelinux-01",
    "server": false,
    "encrypt": "your-private-key",
    "domain": "livelinux",
    "addresses": {
      "dns": "127.0.0.1",
      "https": "0.0.0.0",
      "grpc": "127.0.0.1",
      "http": "127.0.0.1"
    },
    "bind_addr": "172.30.0.5", # local VM address
    "start_join": ["172.30.0.15"], # remote address of the Consul server
    "ports": {
      "dns": 53
     }
Save the changes and proceed to configure the service file, its contents are:
/etc/systemd/system/consul.service:
[Unit]
Description="HashiCorp Consul - A service mesh solution"
Documentation=https://www.consul.io/
Requires=network-online.target
After=network-online.target

[Service]
User=root
Group=root
ExecStart=/usr/local/bin/consul agent -config-dir=/etc/consul.d/client
ExecReload=/usr/local/bin/consul reload
KillMode=process
Restart=on-failure

[Install]
WantedBy=multi-user.target
We start Consul on the server. Now, after starting, we should see the configured service in nsul members. This will indicate that it has successfully connected to the cluster as a client. Repeat the same on the second server, and after that, we can proceed with the installation and configuration of Nomad.
A more detailed installation of Nomad is described in its official documentation. There are two traditional installation methods: downloading the binary file and compiling from source. I will choose the first method.
Note: the project is developing rapidly, and new updates are frequently released. It's possible that by the time this article is finished, a new version will be out. Therefore, I recommend checking the current version of Nomad at that time and downloading precisely that one.
root@nomad-livelinux-01:~# wget https://releases.hashicorp.com/nomad/0.9.1/nomad_0.9.1_linux_amd64.zip
root@nomad-livelinux-01:~# unzip nomad_0.9.1_linux_amd64.zip
root@nomad-livelinux-01:~# mv nomad /usr/local/bin/
root@nomad-livelinux-01:~# nomad -autocomplete-install
root@nomad-livelinux-01:~# complete -C /usr/local/bin/nomad nomad
root@nomad-livelinux-01:~# mkdir /etc/nomad.d
After extraction, we will get a Nomad binary file weighing 65 MB — it needs to be moved to /usr/local/bin.
Let's create a data directory for Nomad and edit its service file (it probably won't exist at first):
root@nomad-livelinux-01:~# mkdir --parents /opt/nomad
root@nomad-livelinux-01:~# nano /etc/systemd/system/nomad.service
Insert the following lines there:
[Unit]
Description=Nomad
Documentation=https://nomadproject.io/docs/
Wants=network-online.target
After=network-online.target

[Service]
ExecReload=/bin/kill -HUP $MAINPID
ExecStart=/usr/local/bin/nomad agent -config /etc/nomad.d
KillMode=process
KillSignal=SIGINT
LimitNOFILE=infinity
LimitNPROC=infinity
Restart=on-failure
RestartSec=2
StartLimitBurst=3
StartLimitIntervalSec=10
TasksMax=infinity

[Install]
WantedBy=multi-user.target
However, do not rush to start nomad — we have not yet created its configuration file:
root@nomad-livelinux-01:~# mkdir --parents /etc/nomad.d
root@nomad-livelinux-01:~# chmod 700 /etc/nomad.d
root@nomad-livelinux-01:~# nano /etc/nomad.d/nomad.hcl
root@nomad-livelinux-01:~# nano /etc/nomad.d/server.hcl
The final directory structure will be as follows:
/etc/nomad.d/
├── nomad.hcl
└── server.hcl
The file nomad.hcl should contain the following configuration:
datacenter = "dc1"
data_dir = "/opt/nomad"
The contents of the file server.hcl:
server {
  enabled = true
  bootstrap_expect = 1
}

consul {
  address             = "127.0.0.1:8500"
  server_service_name = "nomad"
  client_service_name = "nomad-client"
  auto_advertise      = true
  server_auto_join    = true
  client_auto_join    = true
}

bind_addr = "127.0.0.1"

advertise {
  http = "172.30.0.5"
}

client {
  enabled = true
}
Don't forget to change the configuration file on the second server — the http directive value will need to be changed.
The last step at this stage is configuring Nginx for proxying and setting up http authentication. The contents of the file nomad.conf:
upstream nomad-auth {
        server 172.30.0.5:4646;
}

server {

        server_name nomad.domain.name;

        location / {
	        proxy_pass http://nomad-auth;
	        proxy_set_header Host $host;
	        auth_basic_user_file /etc/nginx/.htpasswd;
		   auth_basic "Password-protected Area";
        }

}
Now we can access the web panel over the external network. Let's connect and go to the servers page:
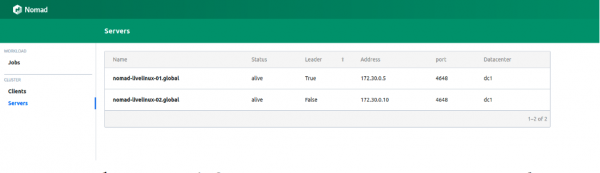
Image 1. List of servers in the Nomad cluster
Both servers are successfully displayed in the panel, and we will see the same in the output of the command nomad node status:
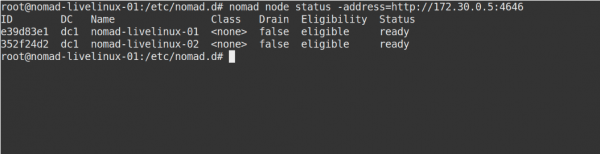
Image 2. Output of the command nomad node status
So, what about Consul? Let's take a look. We go to the Consul management panel, to the nodes page:
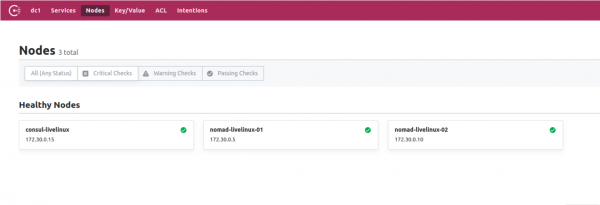
Image 3. List of nodes in the Consul cluster
Now we have a prepared Nomad working in conjunction with Consul. In the final stage, we will move on to the most exciting part: we will set up the delivery of Docker containers from GitLab to Nomad, as well as discuss some of its other distinctive features.
Creating a GitLab Runner
For deploying Docker images to Nomad, we will use a separate runner with the Nomad binary file inside (by the way, it is worth noting another feature of HashiCorp applications — individually, they represent a single binary file). Upload it to the runner's directory. We will create a simple Dockerfile with the following contents:
FROM alpine:3.9
RUN apk add --update --no-cache libc6-compat gettext
COPY nomad /usr/local/bin/nomad
In this same project, we create .gitlab-ci.yml:
variables:
  DOCKER_IMAGE: nomad/nomad-deploy
  DOCKER_REGISTRY: registry.domain.name


stages:
  - build

build:
  stage: build
  image: ${DOCKER_REGISTRY}/nomad/alpine:3
  script:
    - tag=${DOCKER_REGISTRY}/${DOCKER_IMAGE}:latest
    - docker build --pull -t ${tag} -f Dockerfile .
    - docker push ${tag}
As a result, we will have an available Nomad runner image in GitLab Registry, now we can proceed directly to the project repository, create a Pipeline, and configure the Nomad job.
Project Setup
Let's start with the job file for Nomad. My project in this article will be quite primitive: it will consist of a single task. The contents of .gitlab-ci will be as follows:
variables:
  NOMAD_ADDR: http://nomad.address.service:4646
  DOCKER_REGISTRY: registry.domain.name
  DOCKER_IMAGE: example/project

stages:
  - build
  - deploy

build:
  stage: build
  image: ${DOCKER_REGISTRY}/nomad-runner/alpine:3
  script:
    - tag=${DOCKER_REGISTRY}/${DOCKER_IMAGE}:${CI_COMMIT_SHORT_SHA}
    - docker build --pull -t ${tag} -f Dockerfile .
    - docker push ${tag}


deploy:
  stage: deploy
  image: registry.example.com/nomad/nomad-runner:latest
  script:
    - envsubst '${CI_COMMIT_SHORT_SHA}'  job.nomad
    - cat job.nomad
    - nomad validate job.nomad
    - nomad plan job.nomad || if [ $? -eq 255 ]; then exit 255; else echo "success"; fi
    - nomad run job.nomad
  environment:
    name: production
  allow_failure: false
  when: manual
Here the deployment occurs manually, but you can configure it to change the contents of the project directory. The pipeline consists of two stages: building the image and deploying it to Nomad. In the first stage, we build the Docker image and push it to our Registry, and in the second, we run our job in Nomad.
job "monitoring-status" {
    datacenters = ["dc1"]
    migrate {
        max_parallel = 3
        health_check = "checks"
        min_healthy_time = "15s"
        healthy_deadline = "5m"
    }

    group "zhadan.ltd" {
        count = 1
        update {
            max_parallel      = 1
            min_healthy_time  = "30s"
            healthy_deadline  = "5m"
            progress_deadline = "10m"
            auto_revert       = true
        }
        task "service-monitoring" {
            driver = "docker"

            config {
                image = "registry.domain.name/example/project:${CI_COMMIT_SHORT_SHA}"
                force_pull = true
                auth {
                    username = "gitlab_user"
                    password = "gitlab_password"
                }
                port_map {
                    http = 8000
                }
            }
            resources {
                network {
                    port "http" {}
                }
            }
        }
    }
}
Please note that I have a private Registry, and to successfully pull the Docker image, I need to authenticate. The best solution in this case is to store the username and password in Vault, followed by integrating it with Nomad. Nomad natively supports Vault. However, first, we will set up the necessary policies for Nomad in Vault, which can be loaded:
# Download the policy and token role
$ curl https://nomadproject.io/data/vault/nomad-server-policy.hcl -O -s -L
$ curl https://nomadproject.io/data/vault/nomad-cluster-role.json -O -s -L

# Write the policy to Vault
$ vault policy write nomad-server nomad-server-policy.hcl

# Create the token role with Vault
$ vault write /auth/token/roles/nomad-cluster @nomad-cluster-role.json
Now that we have created the necessary policies, we will add the integration with Vault in the task block of the job.nomad file:
vault {
  enabled = true
  address = "https://vault.domain.name:8200"
  token = "token"
}
I use token-based authentication and specify it here directly; there's also an option to pass the token as a variable when starting the nomad agent:
$ VAULT_TOKEN= nomad agent -config /path/to/config
Now we can use keys from Vault. The principle of operation is simple: we create a file in the Nomad job that will store the variable values, for example:
template {
                data = <<EOH
{{with secret "secrets/pipeline-keys"}}
REGISTRY_LOGIN="{{ .Data.REGISTRY_LOGIN }}"
REGISTRY_PASSWORD="{{ .Data.REGISTRY_LOGIN }}{{ end }}"

EOH
    destination = "secrets/service-name.env"
    env = true
}
With this straightforward approach, we can set up container delivery in the Nomad cluster and continue to work with it. I must say that I sympathize with Nomad to some extent — it is more suitable for small projects where Kubernetes might introduce additional complexities and not fully realize its potential. Moreover, Nomad is great for beginners — it is easy to install and configure. However, while testing on some projects, I encountered issues with its earlier versions — many basic functions are simply missing or do not work correctly. Nevertheless, I believe Nomad will continue to develop and will eventually gain all the necessary features.
Author: Ilya Andreyev, edited by Alexey Zhadan and the 'Live Linux' team
Source: habr.com
