

Hello everyone. Friends, we are sharing with you a translation of an article specially prepared for students of the course . Let's go!

Apache Beam and DataFlow for Real-Time Pipelines
Today's post is based on a task I've recently been working on at my job. I was really excited to implement it and describe my work in a blog post format, as it gave me a chance to dive into data engineering while creating something that would be quite useful for my team. Not long ago, I discovered that we had a sizable user log stored within our systems associated with one of our data-related products. It turned out that nobody was using this data, so I immediately became interested in what we could learn if we started analyzing it regularly. However, there were a few hurdles along the way. The first issue was that the data was stored in many different text files that weren't readily accessible for immediate analysis. The second issue was that they were saved in a closed system, which meant I couldn't use any of my favorite data analysis tools.
I had to figure out how to make access easier for us and add some value by integrating this data source into some of our user interaction solutions. After thinking it over for a while, I decided to construct a pipeline to transfer this data into a cloud database, so my team and I could access it and start generating some insights. After completing the Data Engineering specialization on Coursera some time ago, I was eager to use some of the tools from the course in the project.
Thus, placing the data in a cloud database seemed like a reasonable way to solve my first problem, but what could I do about problem number 2? Fortunately, there was a way to transfer this data to an environment where I could access tools like Python and Google Cloud Platform (GCP). However, this was a lengthy process, so I needed to do something that would allow me to continue development while waiting for the data transfer to complete. The solution I came up with was to create fake data using the library Faker in Python. I had never used this library before, but I quickly realized how useful it was. Using this approach allowed me to start coding and testing the pipeline without actual data.
With that said, in this post, I will explain how I built the pipeline described above using some of the technologies available in GCP. In particular, I will use Apache Beam (the Python version), Dataflow, Pub/Sub, and BigQuery to collect user logs, transform the data, and pass it into the database for further analysis. In my case, I only needed Beam's batch functionality since my data wasn't arriving in real-time, so Pub/Sub wasn't required. However, I will touch on the streaming version, as that is what you may encounter in practice.
Introduction to GCP and Apache Beam
Google Cloud Platform provides a set of really useful tools for big data processing. Here are some of the tools I will be using:
- is a messaging service using the Publisher-Subscriber pattern that allows us to receive data in real-time.
- is a service that simplifies the creation of data pipelines and automatically handles tasks like scaling infrastructure, meaning we can focus solely on writing the code for our pipeline.
- is a cloud data warehouse. If you're familiar with other SQL databases, you'll find BigQuery easy to understand.
- Finally, we will be using Apache Beam, specifically focusing on the Python version to create our pipeline. This tool will enable us to create a pipeline for stream or batch processing that integrates with GCP. It is particularly useful for parallel processing and is suitable for tasks such as extraction, transformation, and loading (ETL). Therefore, if we need to move data from one place to another while performing transformations or computations, Beam is a good choice.
There is a wide variety of tools available on GCP, so it can be difficult to keep track of them all and what their purpose is, but here is a summary of them for reference.
GCP offers a large number of tools, so it can be challenging to cover them all, including their intended purpose, but nevertheless, here is a brief overview for reference.
Visualizing Our Pipeline
Let’s visualize the components of our pipeline in Figure 1. At a high level, we want to collect user data in real-time, process it, and send it to BigQuery. Logs are created when users interact with the product by sending requests to the server, which are then logged. This data can be particularly useful for understanding how users interact with our product and whether it is functioning correctly. Overall, the pipeline will consist of the following stages:
Beam makes this process very simple, regardless of whether we have a streaming data source or a CSV file, and we want to perform batch processing. Later, you will see that the code has only minimal changes needed to switch between them. This is one of the advantages of using Beam.
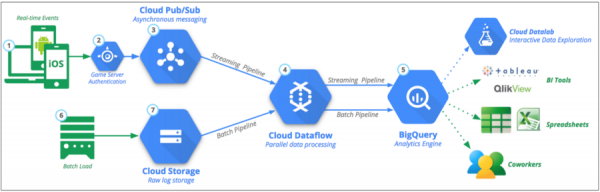
Figure 1: Main Data Pipeline. Source:
Generating Pseudo-Data with Faker
As I mentioned earlier, due to limited access to data, I decided to create pseudo-data in the same format as the actual data. This was a really useful exercise, as I could write code and test the pipeline while waiting for the data. Let’s take a look at Faker, if you want to know what else this library can offer. Our user data will generally resemble the example below. Based on this format, we can generate data line by line to simulate real-time data. These logs provide us with information such as the date, request type, server response, IP address, etc.
192.52.197.161 - - [30/Apr/2019:21:11:42] "PUT /tag/category/tag HTTP/1.1" [401] 155 "https://harris-lopez.com/categories/about/" "Mozilla/5.0 (Macintosh; PPC Mac OS X 10_11_2) AppleWebKit/5312 (KHTML, like Gecko) Chrome/34.0.855.0 Safari/5312"
Based on the line above, we want to create our variable LINE, using 7 variables in the curly brackets below. We will also use them as variable names in our table schema a bit later.
LINE = """
 {remote_addr} - - [{time_local}] "{request_type} {request_path} HTTP/1.1" [{status}] {body_bytes_sent} "{http_referer}" "{http_user_agent}"
 """
If we were performing batch processing, the code would be very similar, although we would need to create a set of samples within a certain time range. To use Faker, we simply create an object and call the methods we need. In particular, Faker has been useful for generating IP addresses as well as websites. I used the following methods:
fake.ipv4()
 fake.uri_path()
 fake.uri()
 fake.user_agent()
from faker import Faker
import time
import random
import os
import numpy as np
from datetime import datetime, timedelta


LINE = """
{remote_addr} - - [{time_local}] "{request_type} {request_path} HTTP/1.1" [{status}] {body_bytes_sent} "{http_referer}" "{http_user_agent}"
"""


def generate_log_line():
    fake = Faker()
    now = datetime.now()
    remote_addr = fake.ipv4()
    time_local = now.strftime('%d/%b/%Y:%H:%M:%S')
    request_type = random.choice(["GET", "POST", "PUT"])
    request_path = "\/" + fake.uri_path()

    status = np.random.choice([200, 401, 404], p = [0.9, 0.05, 0.05])
    body_bytes_sent = random.choice(range(5, 1000, 1))
    http_referer = fake.uri()
    http_user_agent = fake.user_agent()

    log_line = LINE.format(
        remote_addr=remote_addr,
        time_local=time_local,
        request_type=request_type,
        request_path=request_path,
        status=status,
        body_bytes_sent=body_bytes_sent,
        http_referer=http_referer,
        http_user_agent=http_user_agent
    )

    return log_line
End of the first part.
In the coming days, we will share the continuation of the article, and for now, we traditionally look forward to your comments ;-).
Source: habr.com
