

Greetings, esteemed Habr readers and casual visitors. This article series will discuss building a simple network for a company that is not overly demanding of its IT infrastructure but still requires quality internet connectivity for employees, access to shared file resources, VPN access to the workplace, and a video surveillance system accessible from anywhere in the world. Rapid growth and subsequent network reorganization are characteristic of small businesses. In this article, we will start with one office for 15 workstations and then expand the network. If there is a particular topic of interest, please share it in the comments, and we will try to incorporate it into the article. I will assume the reader is familiar with the basics of computer networks, but for all technical terms, I will provide links to Wikipedia — if something is unclear, click and correct the oversight.
So, let's begin. Any network starts with surveying the area and gathering client requirements, which will later be formulated into a technical specification. Often, the customer does not fully understand what they want and what they need for it, so it's essential to guide them on what we can accomplish; however, this is more the role of a sales representative. Our focus is on the technical aspect, so let's assume we've received the following initial requirements:
- 17 workstations for desktop computers
- Network storage ()
- A video surveillance system using and IP cameras (8 pieces)
- Wi-Fi coverage in the office, with two networks (internal and guest)
- Possibility to add network printers (up to 3 units)
- Prospect of opening a second office on the other side of the city
Equipment selection
I will not delve into vendor selection, as this is a topic that generates age-long debates. Let's assume we've already decided on the brand, which is Cisco.
The backbone of the network is (router). It's important to assess our needs, as we plan to expand the network in the future. Purchasing a router with a reserve will save money for the client during the expansion, even though it may be slightly more expensive at the initial stage. Cisco offers the Rvxxx series for small businesses, which includes routers for home offices (RV1xx, most often equipped with a built-in Wi-Fi module), designed to connect several workstations and a network storage device. However, they do not interest us, as they have limited VPN capabilities and relatively low bandwidth. Additionally, we are not interested in the built-in wireless module, as it is expected to be placed in a technical room in a rack, and Wi-Fi will be organized using APs.). Our choice will fall on the RV320, which is the entry-level model of the senior series. We do not need a large number of ports in the built-in switch, as we will have a separate switch to ensure enough ports. The main advantages of the router are its relatively high bandwidth of the server (75 Mbps), the availability of a license for 10 VPN tunnels, and the ability to establish a Site-to-Site VPN tunnel. Another important point is the presence of a second WAN port to ensure backup internet connectivity.
Behind the router follows . The most crucial parameter of the switch is the set of functions it possesses. But first, let’s count the ports. In our case, we plan to connect to the switch: 17 PCs, 2 APs (Wi-Fi access points), 8 IP cameras, 1 NAS, and 3 network printers. Through some arithmetic, we arrive at the number 31, which corresponds to the number of devices originally connected to the network, plus 2 (since we plan to expand the network), and we will stay with 48 ports. Now, regarding functionality: our switch should be able to , preferably all 4096, as it won't hurt to have slots, as it will allow the switch to connect at the other end of the building using fiber optics, must be able to work in a closed loop, which enables us to reserve links (), also APs and cameras will be powered via twisted pair, so the presence of (you can read more about protocols on Wikipedia, the names are clickable). Too complex We don't need the additional functionality, so we'll go with the Cisco SG250-50P, as it offers sufficient features for us while not including unnecessary options. We'll discuss Wi-Fi in the next article, as it's quite an extensive topic. We'll also cover the choice of AP there. We are not selecting NAS and cameras, assuming that task will be handled by others; we are only interested in the network.
Planning
First, let's determine what virtual networks we need (you can read about VLAN virtual networks on Wikipedia). So, we have several logical segments of the network:
- Client workstations (PC)
- Server (NAS)
- Video surveillance
- Guest devices (WiFi)
Also, following good practice, we'll place the device management interface in a separate VLAN. VLANs can be numbered in any order; I'll choose the following:
- VLAN10 Management (MGMT)
- VLAN50 Server’s
- VLAN100 LAN+WiFi
- VLAN150 Visitor’s WiFi (V-WiFi)
- VLAN200 CAM’s
Next, we'll create an IP plan, using of 24 bits and subnet 192.168.x.x. Let's get started.
In the reserved pool, there will be addresses set statically (printers, servers, management interfaces, etc.; for clients a dynamic address will be provided).
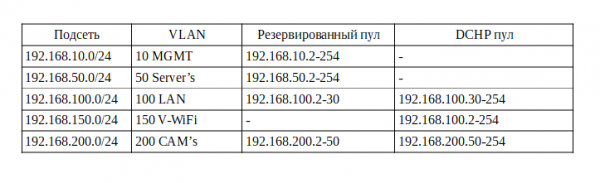
We have also outlined the IP addresses, and there are a couple of points to note:
- There is no point in running DHCP on the management network, just as there is none in the server network, as all addresses are assigned manually during equipment configuration. Some leave a small DHCP pool in case new equipment connects for initial setup, but I prefer, and advise you, to configure equipment not at the client's site but at your desk, so I do not create this pool.
- Some camera models may require a static address, but we assume that the cameras will obtain it automatically.
- In the local network, the pool is reserved for printers, as the network printing service does not work reliably with dynamic addresses.
Router configuration
Now, finally, let's move on to the configuration. Take a patch cord and connect it to one of the four LAN ports on the router. By default, the router has a DHCP server enabled, and it is available at address 192.168.1.1. This can be checked using the command-line utility ipconfig, where our router will show as the default gateway. Let's check:
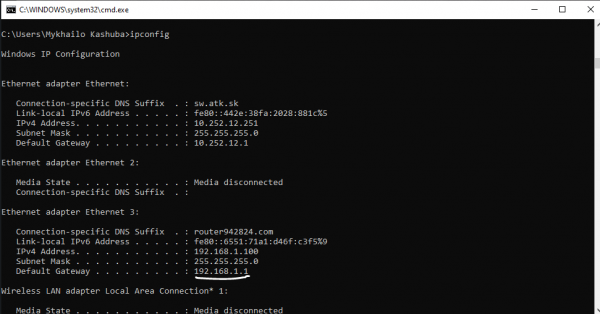
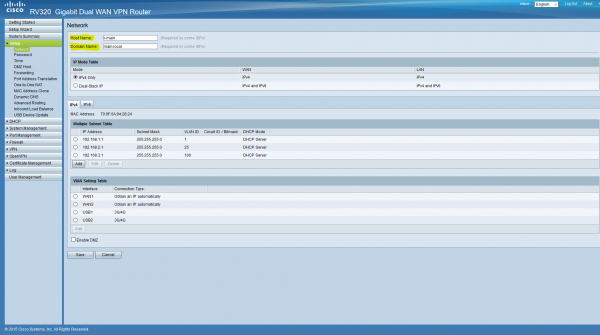
In the browser, go to this address, confirm the unsafe connection, and log in with the username/password cisco/cisco. Immediately change the password to a secure one. First, go to the Setup tab, then the Network section, and here assign a name and domain name for the router.
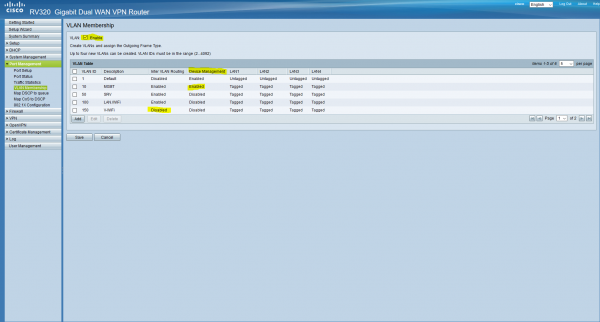
Now let's add VLANs to our router. Navigate to Port Management/VLAN Membership. We will be greeted with a table of the default VLANs.
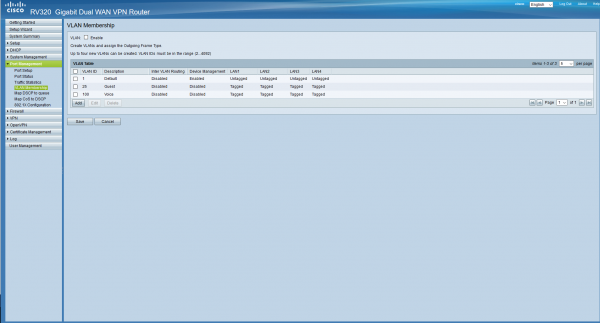
We don't need them, so we'll delete all except the first one, as it is default and cannot be removed. We'll add the VLANs that we have planned. Don't forget to check the box at the top. Also, we'll allow device management only from the management network, and routing between networks will be allowed everywhere except the guest network. We'll configure the ports a bit later.
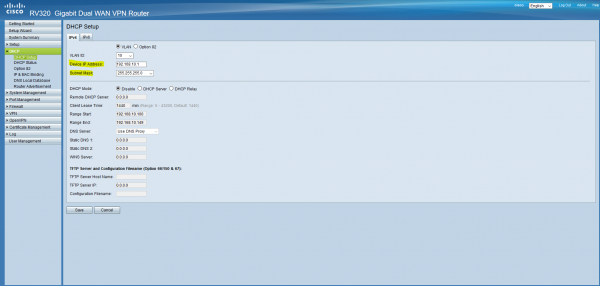
Now let's configure the DHCP servers according to our table. For this, go to DHCP/DHCP Setup.
For networks where DHCP will be disabled, we will configure only the gateway address, which will be the first in the subnet (and the corresponding mask).
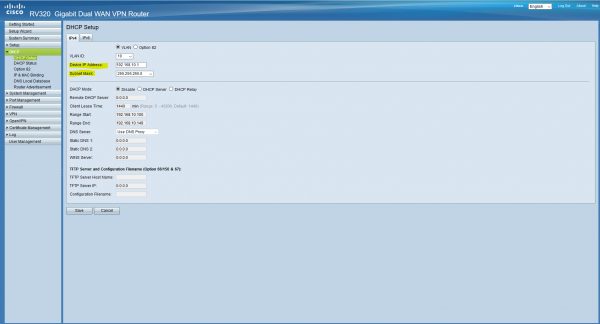
In networks with DHCP, everything is quite simple: we also configure the gateway address, and below we specify the pools and DNS servers:
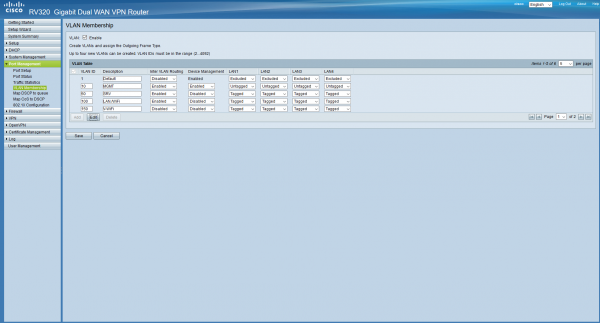
Now that we have dealt with DHCP, clients connected to the local network will automatically receive an address. Now let's configure the ports (the ports are configured according to the standard , the link is clickable, you can check it out). Since it is assumed that all clients will be connected through managed switches, the untagged (native) VLAN will be set to MGMT on all ports. This means any device connected to this port will be in this network (more details here). We return to Port Management/VLAN Membership and configure this. We leave VLAN1 Excluded on all ports, as we do not need it.
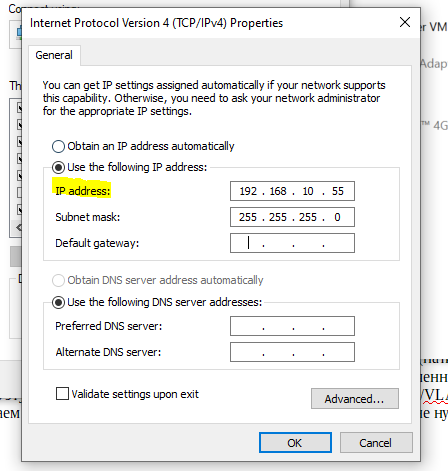
Now, on our network card, we need to set a static address from the management subnet, as we entered this subnet after clicking 'save', and there is no DHCP server here. Go to the network adapter settings and configure the address. After this, the router will be accessible at the address 192.168.10.1.
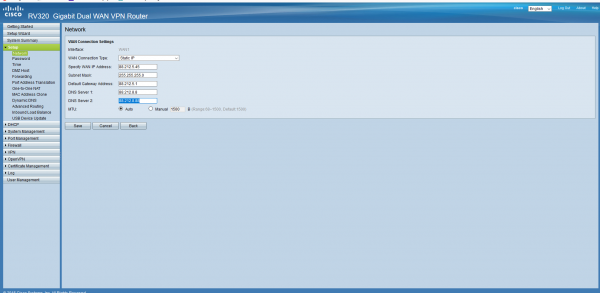
Let's configure our Internet connection. Assuming we received a static address from the provider, go to Setup/Network, check WAN1 at the bottom, and click Edit. Select Static IP and configure your address.
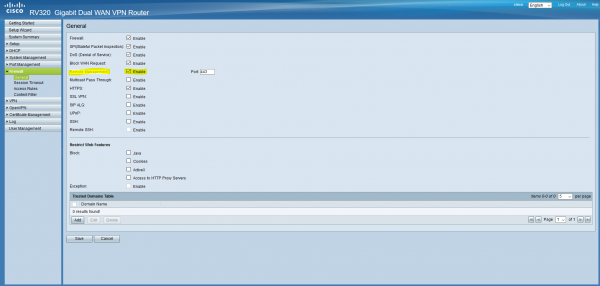
And finally for today — let's configure remote access. For this, go to Firewall/General and check the box for Remote Management, and configure the port if necessary.
For today, that's probably all. By the end of the article, we have a basic configuration set up for our router, which will allow us to access the internet. The article turned out to be longer than I expected, so in the next part, we will finish setting up the router, establish a VPN, configure the firewall and logging, as well as set up the switch, allowing us to get our office up and running. I hope the article was at least somewhat useful and informative for you. This is my first time writing, and I would really appreciate constructive criticism and questions; I will try to answer everyone and take your feedback into account. Also, as I mentioned at the beginning, your thoughts on what could still be included in the office and what else we should configure are welcome.
My contacts:
Telegram:
Skype/mail: kashuba@antik.sk
Add me, let's chat.
Source: habr.com
