

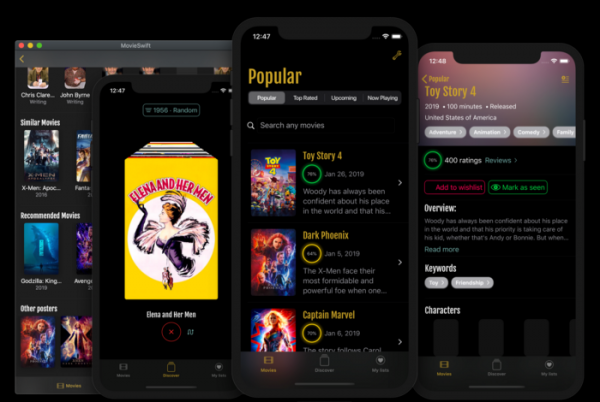
After attending the State of the Union session at WWDC 2019, I decided to dive deep into SwiftUI. I spent a lot of time working with it and have now started developing a real application that could be useful to a wide range of users.
I named it MovieSwiftUI — it's an app for discovering new and old movies, as well as collecting them into a collection using . I've always loved movies and even started a company working in this field, although it was a while ago. The company was hard to call cool, but the app — yes!
Reminder: for all readers of 'Habr' - a discount of 10,000 rubles when enrolling in any Skillbox course with the promo code 'Habr'.
Skillbox recommends: Online educational course .
So, what can MovieSwiftUI do?
- It interacts with APIs — this is something almost any modern application does.
- It loads asynchronous data on requests and parses JSON into Swift models using .
- It displays images fetched on requests and caches them.
- This app for iOS, iPadOS, and macOS provides a better UX for users of these operating systems.
- Users can generate data, create their own movie lists. The app saves and restores user data.
- Views, components, and models are clearly separated using the Redux pattern. The data flow here is unidirectional. It can be fully cached, restored, and rewritten.
- The app uses basic SwiftUI components, including TabbedView, SegmentedControl, NavigationView, Form, Modal, etc. It also provides custom views, gestures, and UI/UX.
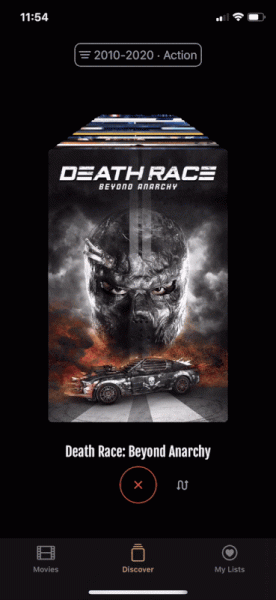
In fact, the animation is smooth; the GIF turned out a bit jerky.
Working on the app has given me a lot of experience, and overall it has been a positive experience. I was able to write a fully functional application, and in September I will improve it and publish it in the App Store, coinciding with the release of iOS 13.
Redux, BindableObject, and EnvironmentObject
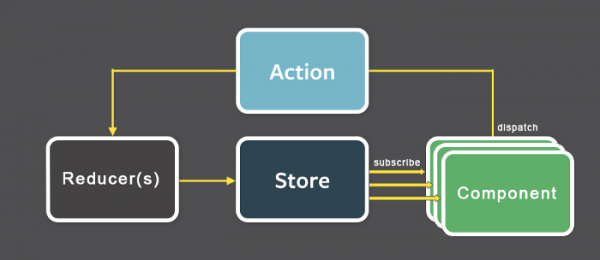
At this point, I have been working with Redux for about two years, so I know it quite well. In particular, I use it on the frontend for the website, as well as for developing native iOS (Swift) and Android (Kotlin) applications.
I have never regretted choosing Redux as the data flow architecture for creating an application in SwiftUI. The most challenging aspects of using Redux in a UIKit application are working with the store, as well as retrieving and extracting data and mapping it to your views/components. For this, I had to create a sort of library of connectors (in ReSwift and ReKotlin). It works well, but there is quite a bit of code. Unfortunately, it is (so far) not open source.
Good news! The only concern with SwiftUI—if you plan to use Redux—is the store, states, and reducers. SwiftUI completely takes care of interacting with the store through @EnvironmentObject. Thus, the store begins with BindableObject.
I created a simple Swift package, , which provides basic usage of Redux. In my case, this is part of MovieSwiftUI. I have also , which will help you use this component.
Initially, a check is performed: does the client device support power via PoE? A voltage of 2.8 to 10 volts is supplied, and the input resistance is determined. If the results obtained are satisfactory for powering via PoE, the power device proceeds to the next stage.
final public class Store: BindableObject {
    public let willChange = PassthroughSubject()

    private(set) public var state: State

    private func _dispatch(action: Action) {
        willChange.send()
        state = reducer(state, action)
    }
}
Whenever you trigger an action, you activate the reducer. It will evaluate actions based on the current state of the application. Next, it will return a new modified state according to the action type and the data.
Since the store is a BindableObject, it will notify SwiftUI of changes to its value using the willChange property provided by PassthroughSubject. This is because BindableObject must provide a PublisherType, but the protocol implementation is responsible for managing it. Overall, this is a very powerful tool from Apple. Accordingly, in the next rendering cycle, SwiftUI will help display the view bodies according to the state change.
Essentially, this is it—the heart and magic of SwiftUI. Now, in any view that subscribes to the state, the view will display according to what data is received from the state and what has changed.
class SceneDelegate: UIResponder, UIWindowSceneDelegate {

    var window: UIWindow?


    func scene(_ scene: UIScene, willConnectTo session: UISceneSession, options connectionOptions: UIScene.ConnectionOptions) {
        if let windowScene = scene as? UIWindowScene {
            let window = UIWindow(windowScene: windowScene)

            let controller = UIHostingController(rootView: HomeView().environmentObject(store))
            window.rootViewController = controller
            self.window = window
            window.makeKeyAndVisible()
        }
    }
}

struct CustomListCoverRow : View {
    @EnvironmentObject var store: Store

    let movieId: Int
    var movie: Movie! {
        return store.state.moviesState.movies[movieId]
    }

    var body: some View {
        HStack(alignment: .center, spacing: 0) {
            Image(movie.poster)
        }.listRowInsets(EdgeInsets())
    }
}
The Store is injected as an EnvironmentObject when the app launches and is then accessible in any view using @EnvironmentObject. Performance is not affected since derived properties are quickly fetched or computed from the app state.
The code above changes the image if the movie poster changes.
And this is done in fact with just one line, which connects the views to the state. If you've worked with ReSwift on iOS or even with React, you will understand the magic of SwiftUI.
Now, you can try triggering an action and publishing a new state. Here's a more complex example.
struct CustomListDetail : View {
    @EnvironmentObject var store: Store

    let listId: Int

    var list: CustomList {
        store.state.moviesState.customLists[listId]!
    }

    var movies: [Int] {
        list.movies.sortedMoviesIds(by: .byReleaseDate, state: store.state)
    }

    var body: some View {
        List {
            ForEach(movies) { movie in
                NavigationLink(destination: MovieDetail(movieId: movie).environmentObject(self.store)) {
                    MovieRow(movieId: movie, displayListImage: false)
                }
            }.onDelete { (index) in
               self.store.dispatch(action: MoviesActions.RemoveMovieFromCustomList(list: self.listId, movie: self.movies[index.first!]))
            }
        }
    }
}
In the code above, I use the .onDelete action from SwiftUI for each IP. This allows the list row to display the standard iOS swipe to delete. So, when the user taps the delete button, it triggers the corresponding action and removes the movie from the list.
And since the list property is derived from the BindableObject state and injected as an EnvironmentObject, SwiftUI updates the list since ForEach is bound to the computed property movies.
Here’s part of the MoviesState reducer:
func moviesStateReducer(state: MoviesState, action: Action) -> MoviesState {
    var state = state
    switch action {

    // other actions.

    case let action as MoviesActions.AddMovieToCustomList:
        state.customLists[action.list]?.movies.append(action.movie)

    case let action as MoviesActions.RemoveMovieFromCustomList:
        state.customLists[action.list]?.movies.removeAll{ $0 == action.movie }

    default:
        break
    }
    return state
}
The reducer executes when you dispatch an action and returns a new state, as mentioned above.
I won’t go into detail for now—where SwiftUI actually knows what to display. To understand this more deeply, it's worth in SwiftUI. It also explains in detail why and when to use , @Binding, ObjectBinding, and EnvironmentObject.
Skillbox recommends:
- Practical Course .
- Applied Online Course .
- Two-Year Practical Course .
Source: habr.com
