


(Image by from
Hello!
My name is Evgeny Cherkin, I am a programmer on the development team at the mining company Polymetal..
When starting any major project, you begin to ponder: 'What software is best to use for its maintenance?'. An IT project undergoes several stages before releasing the next version. It's great when the chain of these stages is automated. The automated process of releasing a new version of an IT project is called Continuous Integration.. BuildBot has proven to be a useful assistant in implementing this process.
In this article, I want to present an overview of the capabilities BuildBot. What can this software do? How to approach it and how to establish proper EFFECTIVE WORKING RELATIONS with it? You can apply our experience to your own setup by creating a working build and testing service for your project on your machine.
Content
Content
1. Why BuildBot?
I have previously encountered articles on implementations on habr-e Continuous Integration. using BuildBot. For example, seemed the most informative to me. There is another example— These articles can be complemented by , and to top it off, in English. Together, they form a decent starting point. After reading these articles, you will likely want to do something in BuildBot .
Stop! Has anyone actually used it in their projects? It turns out yes, have applied it to their tasks. You can find use cases BuildBot in the Google code archives.
So what is the logic behind people using Buildbot? Ведь есть другие инструменты: CruiseControl? and JenkinsI'll respond like this. For most tasks, Jenkins it will indeed be sufficient. Meanwhile, BuildBot is more adaptive, and tasks are just as easily solved there as in Jenkins. The choice is yours. But since we are looking for a tool for a developing target project, why not choose one that will allow us to create a build system with interactivity and a unique interface based on simple steps?
For those whose target project is written in Python, the question arises: "Why not choose an integration system that has a user-friendly interface in the language used in the project?" At this point, it's time to present the advantages. BuildBot.
So, our "tool quartet." I have identified four key features. BuildBot:
- This is an open-source framework under the GPL license.
- It uses Python as a configuration tool and to describe the required actions.
- It allows you to receive responses from the machine on which the build is happening.
- Finally, it has minimal host requirements. To deploy, only Python and Twisted are required, with no need for a virtual machine or Java machine.
2. Concept led by BuildMaster
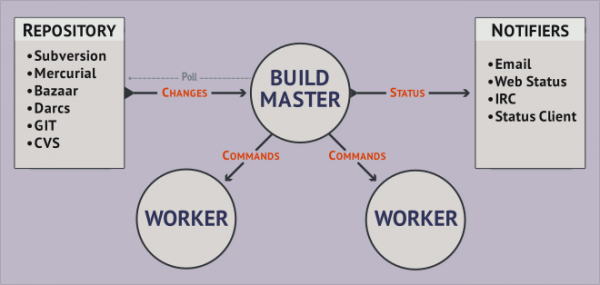
Central to the task distribution architecture is BuildMaster.It represents a service that:
- tracks changes in the project source tree.
- sends commands for the Worker service to execute for building and testing the project.
- notifies users about the results of executed actions.
BuildMaster. is configured through a file master.cfg. This file resides at the root BuildMaster.. Later, I will show how this root is created. The file itself master.cfg contains a Python script that uses calls BuildBot.
The next most important object BuildBot is named Worker. This service can run on a different host with a different OS, or on the same one where BuildMaster.. It can also exist in a specially prepared virtual environment with its packages and variables. These virtual environments can be prepared using Python utilities like virtualenv, venv..
BuildMaster. translates commands to each Worker-a, which in turn executes them. This means that the process of building and testing the project could take place on Worker-a under Windows and on another Worker under Linux.
Checkout of the project source code occurs on each Worker-a.
3. Installation
Let's get started. For the host, I will use Ubuntu 18.04. I will deploy one BuildMaster.-a and one Worker-a. But first, we need to install Python 3.7:
sudo apt-get update
sudo apt-get install python3.7
For those who need Python 3.7.2 instead of 3.7.1, you can do the following:
sudo apt-get update
sudo apt-get install software-properties-common
sudo add-apt-repository ppa:deadsnakes/ppa
sudo apt-get install python3.7
sudo ln -fs /usr/bin/python3.7 /usr/bin/python3
pip3 install --upgrade pip
The next step is to install Twisted. and BuildBot, as well as packages that allow for additional functionality BuildBot-a.
/*Все что под sudo будет установленно для всех пользователей в директорию /usr/local/lib/python3.7/dist-packages*/

#На хосте который производит мониторинг Worker-ов
sudo pip install twisted #Библиотека twisted
sudo pip install buildbot #BuildMaster
#Дополнительный функционал
pip install pysqlite3 #Устанавливаем базу sqllite в учебных целях
pip install jinja2 #framework наподобие django, для web и для почтовых рассыллок
pip install autobahn #Web cокеты для связи BuildMaster->Worker
pip install sqlalchemy sqlalchemy-migrate #Для отображения схемы базы данных
#Для Web отображения BuildBot-a
pip install buildbot-www buildbot-grid-view buildbot-console-view buildbot-waterfall-view
pip install python-dateutil #Отображение дат в web
#На стороне хоста который непосредственно осуществляет сборку и тестирование
pip install buildbot-worker #Worker
#Дополнительный функционал
sudo pip install virtualenv #Виртуальная среда
4. First Steps
It's time to create BuildMaster.. It will be in our folder /home/habr/master.
mkdir master
buildbot create-master master # This is where we actually create it
Next step. Let's create Worker. It will be in our folder /home/habr/worker.
mkdir worker
buildbot-worker create-worker --umask=0o22 --keepalive=60 worker localhost:4000 yourWorkerName password
When you run Worker, by default it will create in /home/habr/worker a folder named after the project specified in master.cfg. And in the project-named folder, it will create a directory build, which will then be used for checkout. The working directory for Worker-a will be the directory /home/habr/yourProject/build.
The 'Golden' key
And now for what I wrote the previous paragraph for: the script that Master will require Worker-a to perform remotely in this directory will not execute because the script doesn't have permission to run. To fix this situation, a key —umask=0o22, which restricts write access to this directory but retains execution rights, is needed. And that’s exactly what we need.
BuildMaster. and Worker connect with each other. Sometimes it gets interrupted and Worker waits for a response from BuildMaster.-a. If no response follows, the connection is restarted. The key —keepalive=60 is exactly what is needed to specify the time after which connect restarts.
5. Configuration. Step-by-step recipe
Configuration BuildMaster. is conducted on the machine where we executed the command create-master. In our case, it's the directory /home/habr/master. The configuration file master.cfg doesn't exist yet, but the command has already created the file master.cmg.sample. It must be renamed to master.cfg.sample downward API support (simultaneously with this in master.cfg
mv master.cfg.sample master.cfgLet's open this master.cfg. And analyze what it consists of. After that, we'll try to create our own configuration file.
master.cfg
c['change_source'] = []
c['change_source'].append(changes.GitPoller(
    'git://github.com/buildbot/hello-world.git',
         workdir='gitpoller-workdir', branch='master',
         pollInterval=300))

c['schedulers'] = []
c['schedulers'].append(schedulers.SingleBranchScheduler(
        name="all",
        change_filter=util.ChangeFilter(branch='master'),
        treeStableTimer=None,
        builderNames=["runtests"]))
c['schedulers'].append(schedulers.ForceScheduler(
        name="force",
        builderNames=["runtests"]))

factory = util.BuildFactory()

factory.addStep(steps.Git(repourl='git://github.com/buildbot/hello-world.git', mode='incremental'))
factory.addStep(steps.ShellCommand(command=["trial", "hello"],
                                   env={"PYTHONPATH": "."}))

c['builders'] = []
c['builders'].append(
    util.BuilderConfig(name="runtests",
    workernames=["example-worker"],
    factory=factory))

c['services'] = []

c['title'] = "Hello World CI"
c['titleURL'] = "https://buildbot.github.io/hello-world/"


c['buildbotURL'] = "http://localhost:8010/"

c['www'] = dict(port=8010,
                plugins=dict(waterfall_view={}, console_view={}, grid_view={}))

c['db'] = {
    'db_url' : "sqlite:///state.sqlite",
}
5.1 BuildmasterConfig
c = BuildmasterConfig = {} BuildmasterConfig — the basic dictionary of the configuration file. It must be engaged in the configuration file. For user convenience in the configuration code, an alias is introduced “c”. The names downward API support (simultaneously with this in c["keyFromDist"] are fixed elements for interaction with BuildMaster.. Each key has a corresponding object as its value.
5.2 workers
c['workers'] = [worker.Worker("example-worker", "pass")]This time we specify BuildMaster.- a list of Worker-s. We created Worker it by indicating , specifying your-worker-name and password. Now, they must be indicated instead of example-worker and pass .
5.3 change_source
c['change_source'] = []
c['change_source'].append(changes.GitPoller(
                            'git://github.com/buildbot/hello-world.git',
                             workdir='gitpoller-workdir', branch='master',
                             pollInterval=300))
By the key change_source of dictionary c, we gain access to the list where we need to place the object that polls the repository for the project's source code. In this example, a Git repository is used, which is polled periodically.
The first argument is the path to your repository.
workdir is the path to the folder where on the side Worker-a relative to the path /home/habr/worker/yourProject/build Git will keep a local version of the repository.
branch contains the specific branch in the repository to monitor.
pollInterval is the number of seconds after which BuildMaster. it will poll the repository for changes.
There are several methods to track changes in the project's repository.
The simplest method is Polling, which implies that BuildMaster. periodically polls the repository server. In case it commit reflects changes in the repository, then BuildMaster. it will create an internal object with some delay Change and send it to the event handler Scheduler, which will initiate the steps for building and testing the project on Worker-e. Among these steps, it will specify update the repository. It is on Worker-e that a local copy of the repository will be created. Details of this process will be revealed below in the next two sections ( and ).
An even more elegant method of tracking changes in the repository is direct messaging from the server where it is hosted to BuildMaster.-u about changes in the project's source code. In this case, as soon as the developer makes commit, the project repository server will send a message to BuildMaster.-u. It, in turn, will intercept it by creating an object PBChangeSource. This object will then be passed to Scheduler, which will activate the steps for building and testing the project. An important part of this method is working with hook-scripts on the server in the repository. In the script of hook-a, responsible for processing actions on commit-e, it is necessary to invoke the utility sendchange and specify the network address of BuildMaster.-a. Also, you need to specify the network port that will be listened to by PBChangeSource. PBChangeSource, which is part of BuildMaster.-a. This method will require the rights of admin-a on the server where the project repository is located. A backup of the repository will need to be made in advance.
5.4 shedulers
c['schedulers'] = []
c['schedulers'].append(schedulers.SingleBranchScheduler(
        name="all",
        change_filter=util.ChangeFilter(branch='master'),
        treeStableTimer=None,
        builderNames=["runtests"]))
c['schedulers'].append(schedulers.ForceScheduler(
        name="force",
        builderNames=["runtests"]))
schedulers – is the element that acts as a trigger, launching the entire chain of building and testing the project.
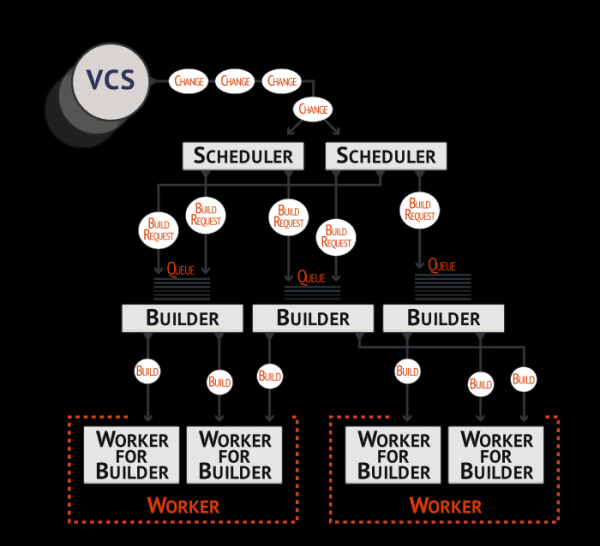
The changes that have been recorded change_source, transformed during the operation of BuildBot-a into an object Change and now each Sheduler builds requests for launching the project build process based on them. However, it also determines when to pass these requests further down the queue. The object Builder holds a queue of requests and monitors the status of the current build on a separate Worker-e. Builder it exists on both BuildMaster.-e and on Worker-e. It sends a specific BuildMaster.-a to Worker-a a series of steps that should be executed. build We see that in the current example, such
2 pieces are created. Moreover, each has its own type. schedulers SingleBranchScheduler
SingleBranchScheduler – one of the most popular schedule classes. It monitors a single branch and triggers based on a fixed change in it. When it detects changes, it can delay sending a build request (postpone for a period specified in a special parameter treeStableTimer). In name it is specified the name of the schedule that will be displayed in BuildBot-web interface. In ChangeFilter a filter is set, which, when passed, causes changes in the branch to prompt the schedule to send a build request. In builderNames the name is specified builder-a, which we will define a bit later. In our case, the name will be the same as the project name: yourProject.
ForceScheduler is quite a simple feature. This type of schedule triggers by a mouse click through BuildBot-web interface. The parameters have the same essence as in SingleBranchScheduler.
P.S. №3. It may come in handy
Periodic — this is a schedule that triggers at a fixed time interval. The call looks approximately like this
from buildbot.plugins import schedulers
nightly = schedulers.Periodic(name="daily",
                              builderNames=["full-solaris"],
                              periodicBuildTimer=24*60*60)
c['schedulers'] = [nightly]
5.5 BuildFactory
factory = util.BuildFactory()

factory.addStep(steps.Git(repourl='git://github.com/buildbot/hello-world.git', mode='incremental'))
factory.addStep(steps.ShellCommand(command=["trial", "hello"],
                                   env={"PYTHONPATH": "."}))
periodicBuildTimer specifies the time of this periodicity in seconds.
BuildFactory creates a specific build, which then builder is sent to Worker. In BuildFactory the steps that should be executed are specified Worker-u. Steps are added using the method call addStep
The first added step in this example — git clean -d -f -f –x, then git checkout. These actions are laid out in the parameter method, which is not explicitly indicated, but implies a default value fresh. The parameter mode='incremental' indicates that files from the directory where the checkoutis performed, while those not in the repository, remain untouched.
The second added step is the invocation of the script trial with the parameter hello on the side of Worker-a from the directory /home/habr/worker/yourProject/build c with the environment variable PATHONPATH=… Thus, you can write your scripts and execute them on the side Worker-a via step util.ShellCommand. These scripts can be placed directly in the repository. Then during checkout-e they will be included in /home/habr/worker/yourProject/build. However, there are two caveats:
- Worker it must be created with the key so that it does not block execution rights after checkout-a.
- Upon git push-e these scripts must specify the property executable, so that later during checkout-e the execution rights of the script Git are not lost.
5.6 builders
c['builders'] = []
c['builders'].append(util.BuilderConfig(name="runtests",
                                        workernames=["example-worker"],
                                        factory=factory))
About what this is Builder was told . Now I will explain in more detail how to create it. BuilderConfig is a constructor builder. You can define several of these constructors in c[‘builders’] since it is a list of objects builder of this type. Now let's rewrite the example a bit to bring it closer to our task. BuildBotc['builders'] = [] c['builders'].append(util.BuilderConfig(name="yourProject", workernames=["yourWorkerName"], factory=factory))
Now I will talk about the parameters
sets the name BuilderConfig.
name -a. Here we named it builder. This means that at yourProject-e this very path will be created Workerwhich finds /home/habr/worker/yourProject/build. Sheduler just by this name. builder workernames
contains a list -s. Each of which must be added to Workerc[‘workers’] factory.
— a specific , associated with build. It will send an object builderto perform all the steps involved in this build to Worker Here is the architecture of the project example that I propose to implement through build-a.
6. Example of Custom Configuration
We will use BuildBot
.
svn . The repository itself will be located in some cloud. Here is the address of this cloudsvn.host/svn/yourProject/trunk , passwd: . The repository itself will be located in some cloud. Here is the address of this cloud . The scripts, which represent the steps user-a will also be in the branch password, in a separate folder buildbuildbot/worker_linux . The repository itself will be located in some cloud. Here is the address of this cloud. These scripts are stored in the repository with the preserved property executablerun on the same host project.host.
BuildMaster. and Worker stores its files in the folder also stores as follows .BuildMaster. . The communication between processes /home/habr/master. Worker -a and /home/habr/worker-a is conducted through port 4000 via the protocol BuildMaster.-a, that is Worker‘pb’ BuildBotprotocol. The target project is entirely written in Python. The task is to track its changes, create an executable file, generate documentation, and conduct testing. In case of failure, a message should be sent to all developers via email indicating that there is a failed action. Web display
we will connect on port 80 for
. Apache installation is not mandatory. The library already includes a web server, BuildBot twisted also stores as followsalready has it. For internal information storage for For mail distribution, a host is needed BuildBot smtp.your.domain
— it allows sending emails from BuildBot we will use sqlite.
projectHost@your.domain without authentication. Also, on the host ‘ smtp ‘ protocol listens on port 1025. There are two parties involved in the process:. admin administers . user is the person who performs
-s. admin and userThe executable file is generated through BuildBot. user is the person performing commit-s.
The executable file is generated via pyinstaller. The documentation is generated through doxygen.
For this architecture, I wrote the following master.cfg:
master.cfg
import os, re
from buildbot.plugins import steps, util, schedulers, worker, changes, reporters

c = BuildmasterConfig = {}

c['workers'] = [ worker.Worker('yourWorkerName', 'password') ]
c['protocols'] = {'pb': {'port': 4000}}


svn_poller = changes.SVNPoller(repourl="https://svn.host/svn/yourProject/trunk",
                                svnuser="user",
                                svnpasswd="password",
                                pollinterval=60,
				split_file=util.svn.split_file_alwaystrunk
                                )

c['change_source'] =  svn_poller

hourlyscheduler = schedulers.SingleBranchScheduler(
                                name="your-project-schedulers",
				change_filter=util.ChangeFilter(branch=None),
                                builderNames=["yourProject"],
				properties = {'owner': 'admin'}
                                )

c['schedulers'] = [hourlyscheduler]

checkout = steps.SVN(repourl='https://svn.host/svn/yourProject/trunk',
                        mode='full',
                        method='fresh',
                        username="user",
                        password="password",
                        haltOnFailure=True)


projectHost_build = util.BuildFactory()


cleanProject = steps.ShellCommand(name="Clean",
                 command=["buildbot/worker_linux/pyinstaller_project", "clean"]
                                )
buildProject = steps.ShellCommand(name="Build",
                 command=["buildbot/worker_linux/pyinstaller_project", "build"]
                                )
doxyProject = steps.ShellCommand(name="Update Docs",
                                command=["buildbot/worker_linux/gendoc", []]
                                )
testProject = steps.ShellCommand(name="Tests",
                                command=["python","tests/utest.py"],
                                env={'PYTHONPATH': '.'}
                                )

projectHost_build.addStep(checkout)
projectHost_build.addStep(cleanProject)
projectHost_build.addStep(buildProject)
projectHost_build.addStep(doxyProject)
projectHost_build.addStep(testProject)


c['builders'] = [
        util.BuilderConfig(name="yourProject", workername='yourWorkerName', factory=projectHost_build)
]


template_html=u'''
<h4>Build release status: {{ summary }}</h4>
<p>Service used for building: {{ workername }}</p>
<p>Project: {{ projects }}</p>
<p>To view the management interface, follow this link: {{ buildbot_url }}</p>
<p>To view the build results, follow this link: {{ build_url }}</p>
<p>Using WinSCP, you can connect to the server at ip:xxx.xx.xxx.xx. Log in with habr/password to retrieve the built executable file from the directory ~/worker/yourProject/build/dist.</p>
<p><b>The build was performed via Buildbot</b></p>
'''

sendMessageToAll = reporters.MailNotifier(fromaddr="projectHost@your.domain",
					sendToInterestedUsers=True,
					lookup="your.domain",
					relayhost="smtp.your.domain",
					smtpPort=1025,
					mode="warnings",
					extraRecipients=['user@your.domain'],
              messageFormatter=reporters.MessageFormatter(
						template=template_html,
						template_type='html',
						wantProperties=True,
                                                wantSteps=True)
					)
c['services'] = [sendMessageToAll]

c['title'] = "The process of building"
c['titleURL'] = "http://project.host:80/"

c['buildbotURL'] = "http://project.host"

c['www'] = dict(port=80,
                plugins=dict(waterfall_view={}, console_view={}, grid_view={}))


c['db'] = {
    'db_url' : "sqlite:///state.sqlite"
}
First, you need to BuildMaster.-a, that is Worker-a. Then, insert this file master.cfg downward API support (simultaneously with this in /home/habr/master.
The next step requires starting the service BuildMaster.-a
sudo buildbot start /home/habr/master
Then start the service Worker-a
buildbot-worker start /home/habr/worker
Done! Now Buildbot will monitor changes and trigger on commit-u in . The repository itself will be located in some cloud. Here is the address of this cloud, executing the build and testing steps for the above architecture.
Below I will outline some features of the above master.cfg.
6.1 On the way to my master.cfg
While writing my master.cfg there will be quite a few mistakes, so reviewing the log file will be necessary. It is stored both at BuildMaster.-e c with an absolute path /home/habr/master/twistd.log, and on the side Worker-a with an absolute path /home/habr/worker/twistd.log. As you read the errors and correct them, service restart will be required BuildMaster.-a. Here's how to do it:
sudo buildbot stop /home/habr/master
sudo buildbot upgrade-master /home/habr/master
sudo buildbot start /home/habr/master
6.2 Working with svn
svn_poller = changes.SVNPoller(repourl="https://svn.host/svn/yourProject/trunk",
                               svnuser="user",
                               svnpasswd="password",
                               pollinterval=60,
                               split_file=util.svn.split_file_alwaystrunk
                        )

c['change_source'] = svn_poller

hourlyscheduler = schedulers.SingleBranchScheduler(
                            name="your-project-schedulers",
                            change_filter=util.ChangeFilter(branch=None),
                            builderNames=["yourProject"],
                            properties = {'owner': 'admin'}
                        )

c['schedulers'] = [hourlyscheduler]

checkout = steps.SVN(repourl='https://svn.host/svn/yourProject/trunk',
                     mode='full',
                     method='fresh',
                     username="user",
                     password="password",
                     haltOnFailure=True)
First, let's look at svn_poller. This is the same interface that polls the repository every minute. In this case, svn_poller it only accesses the branch trunk. The mysterious parameter split_file=util.svn.split_file_alwaystrunk defines the rules: how to split the folder structure . The repository itself will be located in some cloud. Here is the address of this cloud into branches. It also suggests relative paths. In turn, split_file_alwaystrunk simplifies the process by stating that in the repository there are only trunk.
In Schedulers states ChangeFilter, which sees None and associates it with a branch trunk through the established association via split_file_alwaystrunk. Reacting to changes in trunk, it triggers builder c named yourProject.
properties is needed so that the admin receives notifications on the results of the build and testing as the owner of the process.
Step build-a checkout is capable of completely removing any files lying in the local version of the repository Worker-a. And then perform a full svn update. The mode is set through the parameter mode=full, method=fresh. The parameter haltOnFailure indicates that if svn update If an error occurs, the entire assembly and testing process should be suspended, as further actions would be meaningless.
6.3 You have a message: reporters are authorized to declare
reporters is a notification mailing service.
template_html=u'''
<h4>Build release status: {{ summary }}</h4>
<p>Service used for building: {{ workername }}</p>
<p>Project: {{ projects }}</p>
<p>To view the management interface, follow this link: {{ buildbot_url }}</p>
<p>To view the build results, follow this link: {{ build_url }}</p>
<p>Using WinSCP, you can connect to the server at ip:xxx.xx.xxx.xx. Log in with habr/password to retrieve the built executable file from the directory ~/worker/yourProject/build/dist.</p>
<p><b>The build was performed via Buildbot</b></p>
'''

sendMessageToAll = reporters.MailNotifier(fromaddr="projectHost@your.domain",
                                          sendToInterestedUsers=True,
                                          lookup="your.domain",
                                          relayhost="smtp.your.domain",
                                          smtpPort=1025,
                                          mode="warnings",
                                          extraRecipients=['user@your.domain'],
                                    messageFormatter=reporters.MessageFormatter(
                                                    template=template_html,
                                                    template_type='html',
                                                    wantProperties=True,
                                                    wantSteps=True)
                                        )
c['services'] = [sendMessageToAll]
It can send messages .
MailNotifier uses email to send notifications.
template_html defines the text template for sending. HTML is used for markup. It is modified by the engine, (which can be compared to django). BuildBot has a set of variables, the values of which are inserted into the template during message text formation. These variables are enclosed in {{ double curly brackets }}. For example, summary outputs the status of completed operations, either success or failure. And projects will output yourProject. Thus, using control commands in jinja2, variables BuildBot-a and Python string formatting tools, one can create quite an informative message.
MailNotifier contains the following arguments.
fromaddr – the address from which all mailings will be sent.
sendToInterestedUsers=True sends the message to the owner and the user who initiated commit.
lookup – a suffix to be added to the usernames receiving the mailing. Thus, admin the user will receive the mailing at admin@your.domain.
relayhost specifies the hostname where the server is open, . admin administers, a smptPort specifies the port number that is being listened to. . admin administers server.
mode=«warning» indicates that the mailing should only occur if there is at least one step build-a that has finished with a status of failure or warning. In case of success, no mailing is required.
extraRecipients contains a list of individuals who should receive the mailing in addition to the owner and the person implementing commit.
messageFormatter is an object that specifies the message format, its template, and the set of variables available from jinja2. Parameters such as wantProperties=True and wantSteps=True define this set of available variables.
s[‘services’]=[sendMessageToAll] provides a list of services, including our reporter.
We did it! My congratulations!
We created our own configuration and saw the functionality that BuildBotis capable of. I think this is enough to understand whether this tool is necessary for creating your project. Are you interested in it? Will it be useful to you? Is it convenient to work with? If so, I did not write this article in vain.
And one more thing. I would like the professional community using BuildBotto grow wider, manuals to be translated, and more examples to be provided.
Thank you all for your attention. Good luck.
Source: habr.com
