

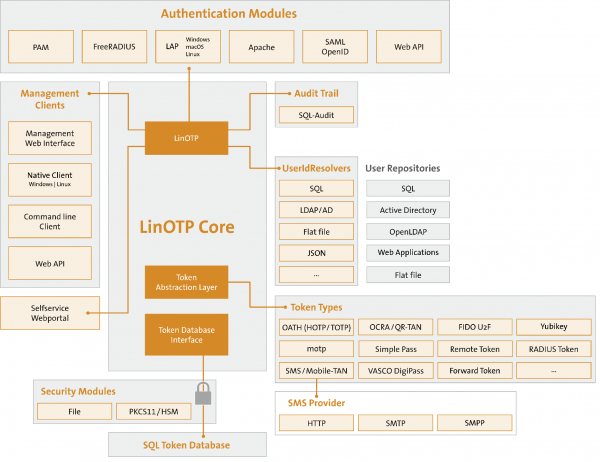
Today I want to share how to set up a two-factor authentication server to protect the corporate network, websites, services, and SSH. The setup will include: LinOTP + FreeRadius.
Why do we need it?
It is a completely free, convenient solution within your network, independent of third-party providers.
This service is quite convenient, very visual compared to other open-source products, and supports a vast array of functions and policies (For example, login + password + (PIN + OTPToken)). It integrates via API with SMS sending services (LinOTP Config->Provider Config->SMS Provider), generates codes for mobile apps like Google Authenticator, and much more. I find it more convenient than the service discussed in .
This server works excellently with Cisco ASA, OpenVPN servers, Apache2, and basically anything that supports authentication through a RADIUS server (e.g., for SSH in data centers).
Required:
1) Debian 8 (jessie) — Absolutely! (the trial installation on Debian 9 is described at the end of the article)
Beginning:
We install Debian 8.
Add the LinOTP repository:
# echo 'deb http://www.linotp.org/apt/debian jessie linotp' > /etc/apt/sources.list.d/linotp.listAdd the keys:
# gpg --search-keys 913DFF12F86258E5Sometimes, during a 'clean' installation, after executing this command, Debian outputs:
gpg: created directory `/root/.gnupg'
gpg: created new configuration file `/root/.gnupg/gpg.conf'
gpg: WARNING: options in `/root/.gnupg/gpg.conf' are not yet active this run
gpg: created keyring `/root/.gnupg/secring.gpg'
gpg: created keyring `/root/.gnupg/pubring.gpg'
gpg: no keyservers are configured (use --keyserver)
gpg: keyserver search failed: bad URI
This is the initial setup of gnupg. Nothing to worry about. Just execute the command again.
To Debian's question:
gpg: searching '913DFF12F86258E5' at hkp server keys.gnupg.net
(1)	LSE LinOTP2 Packaging
	  2048 bit RSA key F86258E5, created: 2010-05-10
Keys 1-1 of 1 for '913DFF12F86258E5'. Enter numbers, N) Next or Q) Quit>
We reply: 1
Next:
# gpg --export 913DFF12F86258E5 | apt-key add -# apt-get updateWe install MySQL. In theory, another SQL server can be used, but for simplicity, I will use it as recommended for LinOTP.
(additional information, including reconfiguring the LinOTP database, can be found in the official documentation for . There, you can find the command: dpkg-reconfigure linotp to change parameters if you have already installed MySQL).
# apt-get install mysql-server# apt-get update (double-checking for updates won't hurt)
We install LinOTP and additional modules:
# apt-get install linotp We answer the installer’s questions:
Use Apache2: yes
Create a password for the admin LinOTP: 'YourPassword'
Generate a self-signed certificate?: yes
Use MySQL?: yes
Where is the database located: localhost
Creating the LinOTP database (database name) on the server: LinOTP2
Creating a separate user for the database: LinOTP2
Set a password for the user: "YourPassword"
Should we create the database now? (something like “Are you sure you want to ...”): yes
Enter the root password for MySQL that you created during installation: "YourPassword"
Done.
(optional, can also skip)
# apt-get install linotp-adminclient-cli (optional, can also skip)
# apt-get install libpam-linotp And so, our Linotp web interface is now available at the address:
"<b>https<\/b>: \/\/IP_server\/manage"I will tell you about the settings in the web interface a bit later.
Now, the most important thing! We need to start FreeRadius and link it with Linotp.
Installing FreeRadius and the LinOTP working module
# apt-get install freeradius linotp-freeradius-perlBacking up the client and Users configurations of the radius.
# mv /etc/freeradius/clients.conf /etc/freeradius/clients.old# mv /etc/freeradius/users /etc/freeradius/users.oldCreating an empty client file:
# touch /etc/freeradius/clients.confEditing our new config file (the backed-up config can be used as an example)
# nano /etc/freeradius/clients.confclient 192.168.188.0/24 {
secret = passwd # password for client connections
}Next, create the users file:
# touch /etc/freeradius/usersEditing the file to tell the radius that we will use Perl for authentication.
# nano /etc/freeradius/usersDEFAULT Auth-type := perlNext, edit the file /etc/freeradius/modules/perl
# nano /etc/freeradius/modules/perlWe need to specify the path to the linotp Perl script in the module parameter:
Perl { .......
.........
module = /usr/lib/linotp/radius_linotp.pm
…..
Next, we create a file in which we specify where to get the data from (domain, database, or file).
# touch /etc/linotp2/rlm_perl.ini# nano /etc/linotp2/rlm_perl.iniURL=https://IP_of_your_LinOTP_server(192.168.X.X)/validate/simplecheck
REALM=webusers1c
RESCONF=LocalUser
Debug=True
SSL_CHECK=FalseHere, I will stop for a moment, as this is important:
Full description of the file with comments:
#IP of the linotp server (IP адрес нашего LinOTP сервера)
URL=https://172.17.14.103/validate/simplecheck
#Наша область которую мы создадим в веб интерфейсе LinOTP.)
REALM=rearm1
#Имя группы юзверей которая создается в вебморде LinOTP.
RESCONF=flat_file
#optional: comment out if everything seems to work fine
Debug=True
#optional: use this, if you have selfsigned certificates, otherwise comment out (SSL если мы создаем свой сертификат и хотим его проверять)
SSL_CHECK=False
Next, we will create the file /etc/freeradius/sites-available/linotp
# touch /etc/freeradius/sites-available/linotp# nano /etc/freeradius/sites-available/linotpAnd copy the config into it (no edits needed):
authorize {
#normalizes malformed client request before handed on to other modules (see '/etc/freeradius/modules/preprocess')
preprocess
#  If you are using multiple kinds of realms, you probably
#  want to set "ignore_null = yes" for all of them.
#  Otherwise, when the first style of realm doesn't match,
#  the other styles won't be checked.
#allows a list of realm (see '/etc/freeradius/modules/realm')
IPASS
#understands something like USER@REALM and can tell the components apart (see '/etc/freeradius/modules/realm')
suffix
#understands USERREALM and can tell the components apart (see '/etc/freeradius/modules/realm')
ntdomain
#  Read the 'users' file to learn about special configuration which should be applied for
# certain users (see '/etc/freeradius/modules/files')
files
# allows to let authentication to expire (see '/etc/freeradius/modules/expiration')
expiration
# allows to define valid service-times (see '/etc/freeradius/modules/logintime')
logintime
# We got no radius_shortname_map!
pap
}
#here the linotp perl module is called for further processing
authenticate {
perl
}
Next, we will create a symlink:
# ln -s ../sites-available/linotp /etc/freeradius/sites-enabledPersonally, I eliminate default Radius sites, but if you need them, you can either edit their config or disable it.
# rm /etc/freeradius/sites-enabled/default# rm /etc/freeradius/sites-enabled/inner-tunnel# service freeradius reload Now let's return to the web interface and examine it in more detail:
In the upper right corner, click LinOTP Config -> UserIdResolvers -> New
Choose what we want: LDAP (AD win, LDAP samba), SQL, or local system users Flatfile.
Fill in the required fields.
Next, let's create REALMS:
In the upper right corner, click LinOTP Config -> Realms -> New.
and give our REALM a name, and also click on the previously created UserIdResolvers.
All this data is needed by freeRadius in the file /etc/linotp2/rlm_perl.ini, as I mentioned above, so if you haven't edited it yet, please do so now.
All servers are configured.
The vulnerability is confirmed in many official Docker images, including images for Couchbase, Elasticsearch, Flink, Solr, Storm, etc.
Setting up LinOTP on Debian 9:
Installation:
# echo 'deb http://linotp.org/apt/debian stretch linotp' > /etc/apt/sources.list.d/linotp.list # apt-get install dirmngr# apt-key adv --recv-keys 913DFF12F86258E5
# apt-get update# apt-get install mysql-server(by default, in Debian 9 mysql (mariaDB) does not offer to set a root password; of course, you can leave it empty, but if you've been reading the news, this often leads to 'epic fails', so we will set it after all)
# mysql -u root -puse mysql;UPDATE user SET Password = PASSWORD('your_password_here') WHERE User = 'root';
sigreturn# apt-get install linotp# apt-get install linotp-adminclient-cli# apt-get install python-ldap# apt install freeradius# nano /etc/freeradius/3.0/sites-enabled/linotpInsert the code (sent by JuriM, thanks to him!):
server linotp {
listen {
ipaddr = *
port = 1812
type = auth
}
listen {
ipaddr = *
port = 1813
type = acct
}
authorize {
preprocess
update {
&control:Auth-Type := Perl
}
}
authenticate {
Auth-Type Perl {
perl
}
}
accounting {
unix
}
}
Edit /etc/freeradius/3.0/mods-enabled/perl
perl {
filename = /usr/share/linotp/radius_linotp.pm
func_authenticate = authenticate
func_authorize = authorize
}
Unfortunately, in Debian 9, the radius_linotp.pm library is not available from the repositories, so we will take it from GitHub.
# apt install git# git clone https://github.com/LinOTP/linotp-auth-freeradius-perl# cd linotp-auth-freeradius-perl/# cp radius_linotp.pm /usr/share/linotp/radius_linotp.pmNow let's edit /etc/freeradius/3.0/clients.conf
client servers {
ipaddr = 192.168.188.0/24
secret = your_password
}
Now let's edit nano /etc/linotp2/rlm_perl.ini
Insert the same code as when installing on Debian 8 (described above)
In theory, that should be all. (not tested yet)
I will leave a few links below for setting up systems that often require two-factor authentication:
Setting up two-factor authentication in
(another token generation server is used there, but the ASA settings are the same).
Settings (LinOTP is also used there) — thanks to the author. You can also find interesting things about LiOTP policy settings.
Many website CMS also support two-factor authentication (LinOTP even has a special module for WordPress on ), for example, if you want to create a secure section for company employees on your corporate site.
IMPORTANT FACT! Do not check the 'Google authenticator' option for using Google Authenticator! The QR code will not be readable then… (strange fact)
The article was based on information from the following articles:
Thank you to the authors.
Source: habr.com
