

Hello, Habr! I present to your attention the translation of an article .
It's hard to underestimate the benefits of online office application suites like Google Docs and cloud storage in the lives of tech-oriented people. These technologies have become so widespread that even Microsoft, long dominant in the office application market, has recently focused on developing the web application Office 365 and persuading users to switch to a subscription model for its services. For those interested in the process of setting up their own storage, we invite you below the fold.
Some time ago, we reviewed solutions for cloud storage and open-source web office application suites that could be easily implemented for use in microenterprise settings. The main motivation for storing all documentation online is to minimize the volume of paper documentation, while implementing positive business practices, despite the small scale of operations. The downside is that renting a cloud server to provide this service is less secure than storing data directly on the company’s premises, as you have no means to audit physical access to your server or traffic. Consequently, end-to-end encryption and open-source software are also required.
Considering all available information on open-source solutions, we found two active projects (with commits in the git repository over the past 12 months) developed for cloud storage: NextCloud and OwnCloud, and the only active office application suite is ONLYOFFICE. Both cloud storage solutions have roughly the same functionality, and the decision to choose NextCloud was based on the evidence that it can be integrated with ONLYOFFICE for a comfortable user experience with the software. However, when we began deploying the services, the lack of information on integrating the aforementioned services became evident. We found 3 tutorial videos on how to carry out the integration:
None of the three videos answered the question of how to install the ONLYOFFICE document service on the same physical server as NextCloud with a shared nginx. Instead, they used separation technologies such as separate ports for the document service API. Another suggested option was to deploy a separate server for the document service with manual configuration of the nginx instance built into the document service to install the access key (a pre-known access key confirming access rights to the data cloud) and TLS certificates. The approaches described above were deemed insecure and not efficient enough, so we integrated NextCloud, ONLYOFFICE, and the shared nginx, which segregates requests by domain names, using docker-compose. Here’s a step-by-step guide on how to do it.
Step 1: nginx container
This is a very simple setup, but this step requires the most work for configuring the reverse proxy server. First, we created a docker-compose configuration for the nginx:stable image.
version: '2'
services:
  nginx:
    image : nginx:stable
    restart: always
    volumes:
      - ./nginx/nginx-vhost.conf:/etc/nginx/conf.d/default.conf:ro
      - ./nginx/certificates:/mycerts
    ports:
      - 443:443
      - 80:80
This creates a container with ports 80 and 443 open for public access, maps the configuration to nginx/nginx-vhost.conf, and defines storage for certificates generated as self-signed certificates or using Certbot from Let’s Encrypt in /nginx/certificates. The folders for office.yourdomain.com and cloud.yourdomain.com should be located here, containing the files fullchain1.pem and privkey1.pem each for the certificate chain and the private server key, respectively. You can read more about how to generate a self-signed certificate here. (renaming .key and .crt to .pem works without converting the file structure for nginx).
After that, we defined the vhost file. First, we specify the behavior of port 80 as a simple redirect to https, as we do not want to allow any http traffic.
server {
    listen 80;
    location / {
        return 301
            https://$host$request_uri;
    }
}
Then we created two virtual servers on port 443 for our services:
server {
    listen 443 ssl;
    server_name cloud.yourdomain.com;
    root /var/www/html;

    ssl_certificate     /mycerts/cloud.yourdomain.com/fullchain1.pem;
    ssl_certificate_key /mycerts/cloud.yourdomain.com/privkey1.pem;
    ssl_protocols       TLSv1 TLSv1.1 TLSv1.2;
    ssl_ciphers         HIGH:!aNULL:!MD5;

    location / {
        proxy_set_header X-Real-IP $remote_addr;
        proxy_set_header X-Forwarded-For $proxy_add_x_forwarded_for;
        proxy_set_header X-Forwarded-Proto $scheme;
        proxy_set_header Host $http_host;
        proxy_redirect off;
        proxy_pass http://app:80;
    }
}
server {
    listen 443 ssl;
    server_name office.yourdomain.com;
    root /var/www/html;

    ssl_certificate     /mycerts/office.yourdomain.com/fullchain1.pem;
    ssl_certificate_key /mycerts/office.yourdomain.com/privkey1.pem;
    ssl_protocols       TLSv1 TLSv1.1 TLSv1.2;
    ssl_ciphers         HIGH:!aNULL:!MD5;

    location / {
        proxy_set_header X-Real-IP $remote_addr;
        proxy_set_header X-Forwarded-For $proxy_add_x_forwarded_for;
        proxy_set_header X-Forwarded-Proto $scheme;
        proxy_set_header Host $http_host;
        proxy_redirect off;
        proxy_pass http://onlyoffice:80;
    }
}
Step 2: Document service
Now we need to add the document service container to our docker-compose.yml. There is not much to configure here.
services:
...
  onlyoffice:
    image: onlyoffice/documentserver
    restart: always
But do not forget to link the nginx container with the document service:
services:
...
  nginx:
    ...
    depends_on:
      - onlyoffice
Step 3: NextCloud
First, we add new services:
services:
...
  db:
    image: mariadb
    command: --transaction-isolation=READ-COMMITTED --binlog-format=ROW
    restart: always
    volumes:
      - /data/nextcloud_db:/var/lib/mysql
    environment:
      - MYSQL_ROOT_PASSWORD=#put some password here
      - MYSQL_PASSWORD=#put some other password here
      - MYSQL_DATABASE=nextcloud
      - MYSQL_USER=nextcloud
  app:
    image: nextcloud
    depends_on:
      - db
      - onlyoffice
    restart: always
and we add a link to nginx:
services:
...
  nginx:
    ...
    depends_on:
      - app
Now it's time to load the containers.
docker-compose up -d
After a while, nginx will start redirecting you to the external interface of NextCloud, which by default is the configuration page. You will need to enter a username and password for your first administrative user and the database credentials you specified in docker-compose.yml. Once the setup is complete, you will be able to log in. In our case, the wait took almost a minute and required a page refresh before we could access the cloud service.
NextCloud Service Settings Window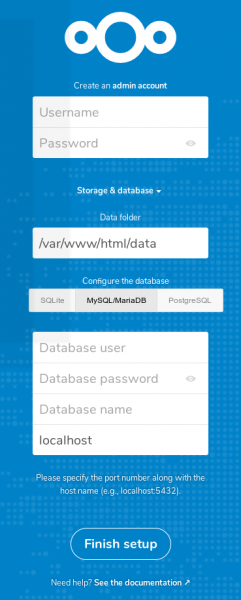
Step 4: Connecting NextCloud and ONLYOFFICE
At this step, you will need to install the NextCloud app that connects the ONLYOFFICE functionality. Start by going to the app control panel in the top right corner of the menu. Find the ONLYOFFICE app (under 'Office & text' or using the search), install it, and activate it.
After this, navigate to Settings through the menu in the top right corner, and you should find the ONLYOFFICE item in the left menu. Click on it. You will need to enter the addresses as specified below.
Integration App Settings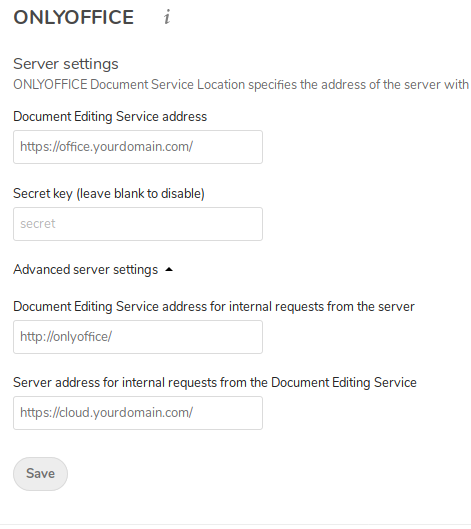
The first address is used for linking some js and css files directly from the application running in the browser (this is why we need to expose ONLYOFFICE service through nginx). The secret key is not used because we trust the Docker isolation layer more than a persistent authentication key. The third address is utilized by the NextCloud container for a direct connection to the ONLYOFFICE API, and it uses the default internal hostname from Docker. The last field is used so that ONLYOFFICE can make requests back to the NextCloud API, using either the external IP address or the internal Docker address if you use Docker networks, but in our case, this is not used. Make sure your firewall settings allow these types of interactions.
After saving, NextCloud will test the connection and, if everything is correct, will show you the settings related to the integration — for example, what types of files can be edited with this integration. Configure it as you see fit.
Final Step: Where to Find the Editor
If you return to your cloud storage folders and click on “+” to create a new file, you will have access to a new option for creating a document, spreadsheet, or presentation. With these, you can create and immediately edit these types of files using ONLYOFFICE.
File Creation Menu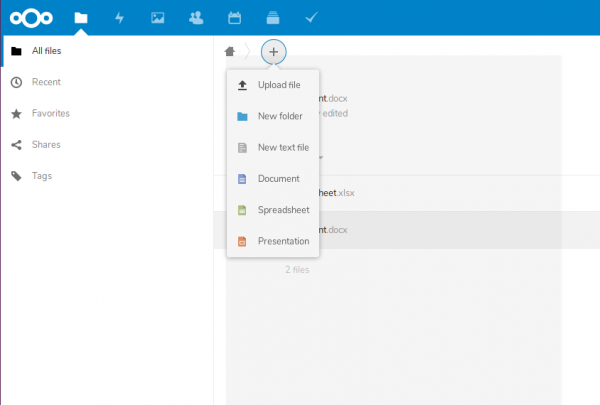
Supplement 1
The complete content of docker-compose.yml can be found here:
Source: habr.com
