

If you are reading this article, you are probably already familiar with the possibilities that using APIs (Application Programming Interface) opens up.
By adding one of the many open APIs to your application, you can enhance its functionality or complement it with necessary data. But what if you have developed a unique feature that you want to share with the community?
The answer is simple: you need to .
Although it may initially seem like a daunting task, it's actually quite straightforward. We will show you how to do it using Python.
What you need to get started
To develop an API, you will need:
- Python 3;
- — a simple and easy-to-use framework for building web applications;
- — an extension for Flask that allows you to quickly develop a REST API with minimal configuration.
Installation is done with the command:
pip install flask-restfulWe recommend a free intensive programming course for beginners:
— August 26–28. A free intensive course that allows you to understand how helper bots work, the intricacies of working with the Telegram API, and other nuances. The three best participants will receive 30,000 rubles from Skillbox..
Before we begin
We are going to develop a RESTful API with basic .
To fully understand the task, let’s clarify two terms mentioned above.
What is REST?
REST API (Representational State Transfer) is an API that uses HTTP requests to exchange data.
REST APIs must meet certain criteria:
- Client-server architecture: the client interacts with the user interface, while the server interacts with the backend and data storage. The client and server are independent; either can be replaced separately from the other.
- Stateless — no client data is stored on the server. The session state is stored on the client side.
- Cacheability — clients can cache server responses to improve overall performance.
What is CRUD?
CRUD — a programming concept that describes four basic actions (create, read, update, and delete).
In REST APIs, the types of requests and request methods correspond to actions like post, get, put, and delete.
Now that we’ve covered the basic terms, we can proceed to create the API.
Development
Let's create a repository of quotes about artificial intelligence. AI is one of the most rapidly evolving technologies today, and Python is a popular tool for working with AI.
With this API, a Python developer will be able to quickly access information about AI and draw inspiration from new achievements. If the developer has valuable insights on this topic, they can add them to the repository.
Let's start by importing the necessary modules and setting up Flask:
from flask import Flask
from flask_restful import Api, Resource, reqparse
import random
app = Flask(__name__)
api = Api(app)
In this Flask snippet, Api and Resource are the classes we need.
Reqparse is an interface for parsing requests in Flask-RESTful... We will also need the random module to display a random quote.
Now we will create the repository of AI quotes.
Each entry in the repo will contain:
- a digital ID;
- the name of the quote's author;
- the quote.
Since this is just an example for learning, we will keep all entries in a Python list. In a real application, we would most likely use a database instead.
ai_quotes = [
    {
        "id": 0,
        "author": "Kevin Kelly",
        "quote": "The business plans of the next 10,000 startups are easy to forecast: " +
                 "Take X and add AI."
    },
    {
        "id": 1,
        "author": "Stephen Hawking",
        "quote": "The development of full artificial intelligence could " +
                 "spell the end of the human race… " +
                 "It would take off on its own, and re-design " +
                 "itself at an ever increasing rate. " +
                 "Humans, who are limited by slow biological evolution, " +
                 "couldn't compete, and would be superseded."
    },
    {
        "id": 2,
        "author": "Claude Shannon",
        "quote": "I visualize a time when we will be to robots what " +
                 "dogs are to humans, " +
                 "and I’m rooting for the machines."
    },
    {
        "id": 3,
        "author": "Elon Musk",
        "quote": "The pace of progress in artificial intelligence " +
                 "(I’m not referring to narrow AI) " +
                 "is incredibly fast. Unless you have direct " +
                 "exposure to groups like Deepmind, " +
                 "you have no idea how fast — it is growing " +
                 "at a pace close to exponential. " +
                 "The risk of something seriously dangerous " +
                 "happening is in the five-year timeframe." +
                 "10 years at most."
    },
    {
        "id": 4,
        "author": "Geoffrey Hinton",
        "quote": "I have always been convinced that the only way " +
                 "to get artificial intelligence to work " +
                 "is to do the computation in a way similar to the human brain. " +
                 "That is the goal I have been pursuing. We are making progress, " +
                 "though we still have lots to learn about " +
                 "how the brain actually works."
    },
    {
        "id": 5,
        "author": "Pedro Domingos",
        "quote": "People worry that computers will " +
                 "get too smart and take over the world, " +
                 "but the real problem is that they're too stupid " +
                 "and they've already taken over the world."
    },
    {
        "id": 6,
        "author": "Alan Turing",
        "quote": "It seems probable that once the machine thinking " +
                 "method had started, it would not take long " +
                 "to outstrip our feeble powers… " +
                 "They would be able to converse " +
                 "with each other to sharpen their wits. " +
                 "At some stage therefore, we should " +
                 "have to expect the machines to take control."
    },
    {
        "id": 7,
        "author": "Ray Kurzweil",
        "quote": "Artificial intelligence will reach " +
                 "human levels by around 2029. " +
                 "Follow that out further to, say, 2045, " +
                 "we will have multiplied the intelligence, " +
                 "the human biological machine intelligence " +
                 "of our civilization a billion-fold."
    },
    {
        "id": 8,
        "author": "Sebastian Thrun",
        "quote": "Nobody phrases it this way, but I think " +
                 "that artificial intelligence " +
                 "is almost a humanities discipline. It's really an attempt " +
                 "to understand human intelligence and human cognition."
    },
    {
        "id": 9,
        "author": "Andrew Ng",
        "quote": "We're making this analogy that AI is the new electricity." +
                 "Electricity transformed industries: agriculture, " +
                 "transportation, communication, manufacturing."
    }
]
Now we need to create a resource class Quote, which will define the operations of our API endpoints. Inside the class, we need to declare four methods: get, post, put, delete.
Let's start with the GET method
It allows us to retrieve a specific quote by specifying its ID or a random quote if no ID is provided.
class Quote(Resource):
    def get(self, id=0):
        if id == 0:
            return random.choice(ai_quotes), 200
        for quote in ai_quotes:
            if(quote["id"] == id):
                return quote, 200
        return "Quote not found", 404
The GET method returns a random quote if the ID has the default value, i.e., when the method is called without an ID.
If an ID is specified, the method searches through the quotes and finds the one matching the given ID. If nothing is found, it returns the message "Quote not found, 404".
Remember: the method returns HTTP status 200 in case of a successful request and 404 if the record is not found.
Now let's create the POST method for adding a new quote to the repository
It will accept the identifier of each new quote upon input. Additionally, the POST method will use reqparse to parse parameters that will be provided in the body of the request (author and quote text).
def post(self, id):
      parser = reqparse.RequestParser()
      parser.add_argument("author")
      parser.add_argument("quote")
      params = parser.parse_args()
      for quote in ai_quotes:
          if(id == quote["id"]):
              return f"Quote with id {id} already exists", 400
      quote = {
          "id": int(id),
          "author": params["author"],
          "quote": params["quote"]
      }
      ai_quotes.append(quote)
      return quote, 201
In the code above, the POST method accepted the ID of the quote. Then, using reqparse, it obtained the author and quote from the request, storing them in the params dictionary.
If a quote with the specified ID already exists, the method outputs an appropriate message and a 400 code.
If a quote with the specified ID has not yet been created, the method creates a new record with the specified ID and author, along with other parameters. It then adds the record to the ai_quotes list and returns the new quote record with a 201 code.
Now we create the PUT method to modify an existing quote in the repository
def put(self, id):
      parser = reqparse.RequestParser()
      parser.add_argument("author")
      parser.add_argument("quote")
      params = parser.parse_args()
      for quote in ai_quotes:
          if(id == quote["id"]):
              quote["author"] = params["author"]
              quote["quote"] = params["quote"]
              return quote, 200

      quote = {
          "id": id,
          "author": params["author"],
          "quote": params["quote"]
      }

      ai_quotes.append(quote)
      return quote, 201
The PUT method, similar to the previous example, takes an ID and input and parses the quote parameters using reqparse.
If a quote with the specified ID exists, the method will update it with the new parameters and then return the updated quote with a 200 status code. If the quote with the specified ID does not exist, a new entry will be created with a 201 status code.
Finally, let's create a DELETE method to remove the quote that no longer inspires.
def delete(self, id):
      global ai_quotes
      ai_quotes = [quote for quote in ai_quotes if quote["id"] != id]
      return f"Quote with id {id} is deleted.", 200
This method receives the ID of the quote as input and updates the ai_quotes list using the global list.
Now that we have created all the methods, all we need to do is add the resource to the API, set the path, and run Flask.
api.add_resource(Quote, "\/ai-quotes", "\/ai-quotes\/")
if __name__ == '__main__':
    app.run(debug=True)
Our REST API Service is ready!
Next, we can save the code to a file app.py and run it in the console using the command:
python3 app.pyIf everything is good, we will get something like this:
* Debug mode: on
* Running on :5000\/ (Press CTRL+C to quit)
* Restarting with stat
* Debugger is active!
* Debugger PIN: XXXXXXX
Testing the API
Once the API is created, it needs to be tested.
This can be done using the curl command-line tool or the Insomnia REST client, or by publishing the API on Rapid API.
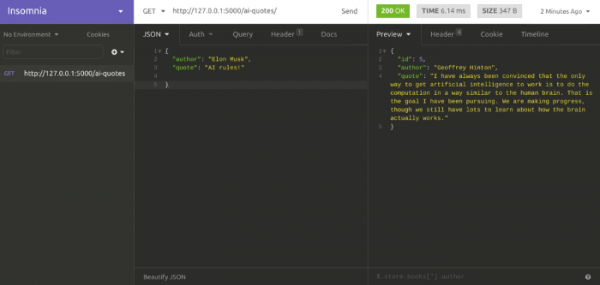
Publishing our API
RapidAPI is the world's largest marketplace with over 10,000 APIs (and about 1 million developers).
RapidAPI not only provides a unified interface for working with third-party APIs but also allows you to quickly and easily publish your own API.
To , you first need to publish it on some server in the network. In our case, we will use . Working with it should not be difficult, ().
How to publish your API on Heroku
1. Install Heroku.
First, you need to sign up and install the Heroku Command Line Interface (CLI). This works on Ubuntu 16+.
sudo snap install heroku --classic
Then we log in:
heroku login
2. Add the necessary files.
Now we need to add the files for publishing to a folder in our application:
- requirements.txt with the list of necessary Python modules;
- Procfile, which specifies which commands should be executed to run the application;
- .gitignore — to exclude files that are not needed on the server.
The requirements.txt file will contain the following lines:
- flask
- flask-restful
- gunicorn
Please note: we have added gunicorn (Python WSGI HTTP Server) to the list, as it needs to run our application on the server.
The Procfile will contain:
web: gunicorn app:app
Contents of .gitignore:
*.pyc
__pycache__/
Now that the files are created, let's initialize a git repo and commit:
git init
git add
git commit -m "First API commit"
3. Create a new Heroku app.
heroku createPush the master branch to the remote Heroku repo:
git push heroku masterNow we can start by opening the API Service with the following commands:
heroku ps:scale web=1
heroku open
The API will be available at .
How to add your Python API to the RapidAPI marketplace
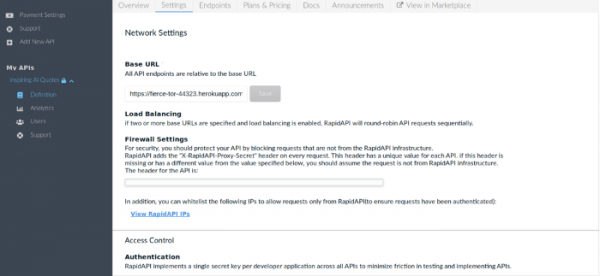
Once the API service is published on Heroku, you can add it to Rapid API. Here is on this topic.
1. Create a RapidAPI account.

Register for a free account — you can do this using Facebook, Google, or GitHub.
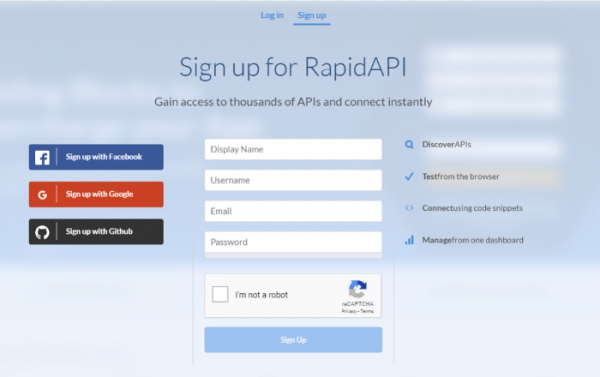
2. Add the API to the dashboard.
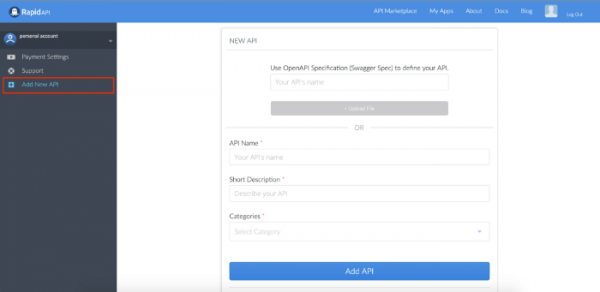
3. Next, enter the general information about your API.
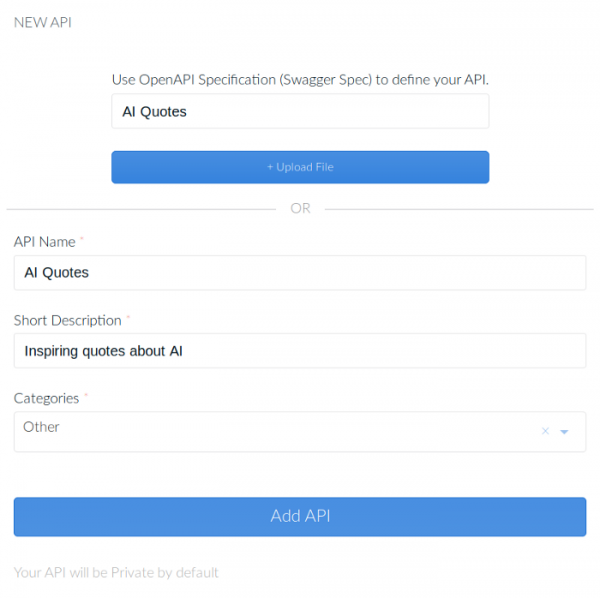
4. After clicking “Add API,” a new page will appear where you can enter information about your API.
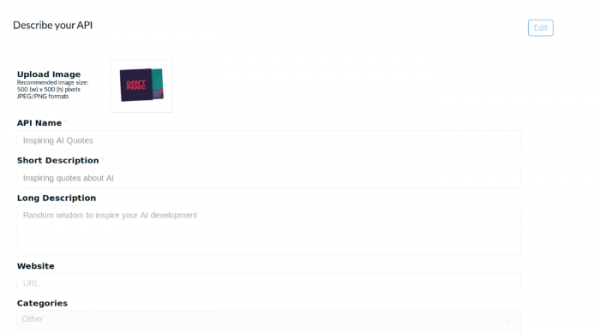
5. Now you can either manually enter the API endpoints or upload using OpenAPI.
Now you need to define the endpoints of your API on the Endpoints page. In our case, the endpoints correspond to the CRUD concept (get, post, put, delete).
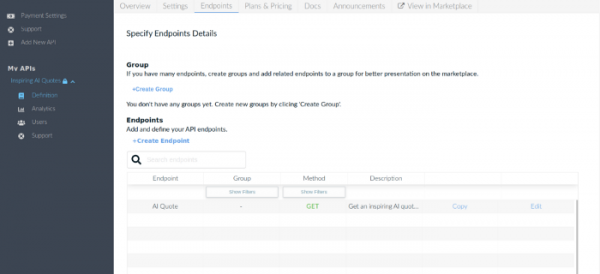
Next, you need to create a GET AI Quote endpoint that returns a random quote (if the ID is default) or a quote for the specified ID.
To create the endpoint, click the “Create Endpoint” button.
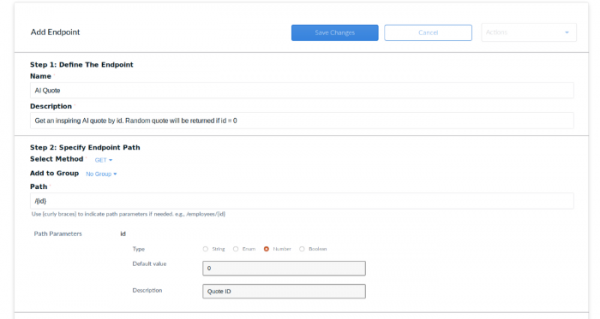
Repeat this process for all other API endpoints. That's it! Congratulations, you have published your API!
If everything is okay, the API page will look something like this:
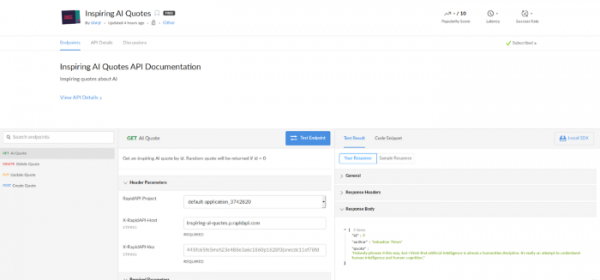
Conclusion
In this article, we explored the process of creating your own RESTful API Service in Python, along with the process of publishing the API in the Heroku cloud and adding it to the RapidAPI directory.
However, the test version only demonstrated the basic principles of API development — nuances such as security, fault tolerance, and scalability were not considered.
When developing a real API, all of this needs to be taken into account.
Source: habr.com
