

Better late than never. Or how we nearly made a serious mistake by not having support for regular Dockerfiles for building application images.

This is about — a GitOps utility that integrates with any CI/CD system and manages the entire application lifecycle, allowing for:
- building and publishing images,
- deploying applications to Kubernetes,
- removing unused images using specific policies.
The project's philosophy is to gather low-level tools into a unified system that provides DevOps engineers with control over applications. Existing utilities (like Helm and Docker) should be utilized as much as possible. If a solution to a certain problem is lacking, we can create and maintain everything necessary for that.
Background: our image builder
This is exactly what happened with the image builder in werf: we were missing the familiar Dockerfile. If we take a quick dive into the project history, this issue emerged in the early versions of werf (then still ).
). Creating a tool for building applications into Docker images, we quickly realized that the Dockerfile was unsuitable for some quite specific tasks:
- The need to build typical small web applications following this standard scheme:
- install the system-wide dependencies of the application,
- install the bundle of application dependencies,
- build assets,
- and most importantly — update the code in the image quickly and efficiently.
- When files in the project are changed, the builder should quickly create a new layer by patching the modified files.
- If certain files have changed, it is necessary to rebuild the corresponding dependent stage.
To date, our builder has many other capabilities, but the original desires and impulses were as follows.
In general, without further ado, we armed ourselves with the chosen programming language (see below) and set out to implement our own DSL! Aligned with the set tasks, it was designed to describe the build process by stages and define the dependencies of these stages on files. It was complemented by our own compiler, which transformed the DSL into the final product — the built image. Initially, the DSL was in Ruby, and as we transitioned to Golang, — конфиг нашего сборщика стал описываться в YAML-файле.
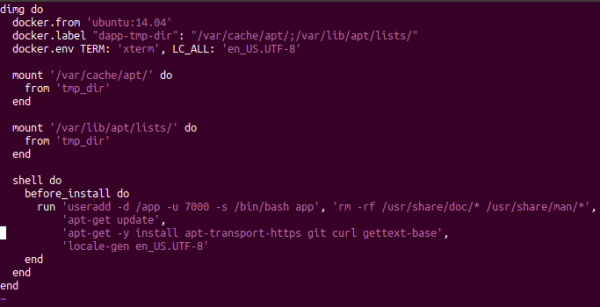
Old config for a dapp on Ruby
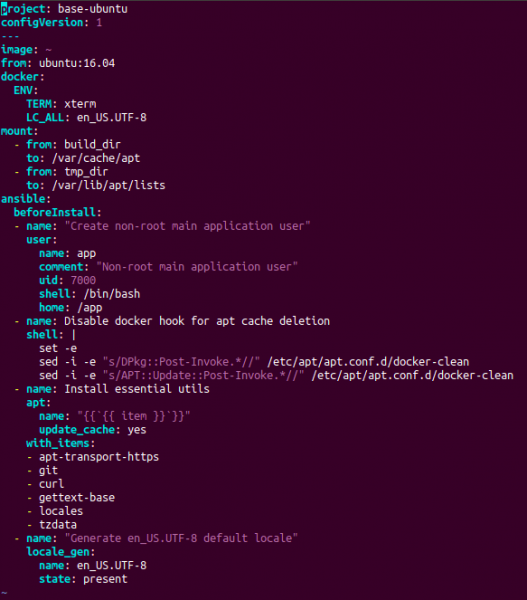
Current config for werf on YAML
The mechanism for the builder has also changed over time. Initially, we simply generated a temporary Dockerfile from our configuration on the fly, and later we started executing build instructions in temporary containers and making commits.
NB: Currently, our builder, which works with its own config (in YAML) and is called the Stapel builder, has already evolved into a quite powerful tool. Its detailed description deserves separate articles, while basic details can be found in .
Recognition of the Problem
But we realized, although not immediately, that we made one mistake: we did not add the ability to build images using a standard Dockerfile and integrate them into the same comprehensive application management infrastructure (i.e., to build images, deploy them, and clean them up). How could we create a deployment tool for Kubernetes without implementing support for Dockerfile, that is, the standard way to describe images for most projects?..
Instead of answering such a question, we propose its solution. What to do if you already have a Dockerfile (or a set of Dockerfiles) and you want to use werf?
NB: By the way, why would you even want to use werf? The main features are as follows:
- full application management lifecycle, including image cleanup;
- the ability to manage the builds of several images from a single config;
- enhanced chart deployment process compatible with Helm.
You can find a more complete list of these on .
So, if earlier we would have suggested rewriting Dockerfile to our config, now we happily say: "Let werf build your Dockerfiles!"
How to use?
The full implementation of this feature appeared in the release . The general principle is simple: the user specifies the path to the existing Dockerfile in the werf config, then runs the command werf build… and that's it — werf will build the image. Let's consider this with an abstract example.
Declare the following Dockerfile at the root of the project:
FROM ubuntu:18.04
RUN echo Building ...
And declare werf.yaml, which uses this Dockerfile:
configVersion: 1
project: dockerfile-example
---
image: ~
dockerfile: .\/Dockerfile
That's it! Now we just need to launch werf build:
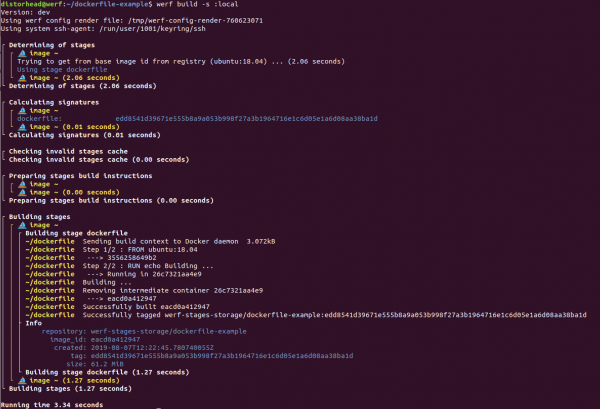
Additionally, you can declare the following werf.yaml to build several images at once from different Dockerfiles:
configVersion: 1
project: dockerfile-example
---
image: backend
dockerfile: .\/dockerfiles\/Dockerfile-backend
---
image: frontend
dockerfile: .\/dockerfiles\/Dockerfile-frontend
Finally, the transmission of additional build parameters is supported — such as --build-arg and --add-host — through the werf config. A complete description of the Dockerfile image configuration is available on the .
Initially, a check is performed: does the client device support power via PoE? A voltage of 2.8 to 10 volts is supplied, and the input resistance is determined. If the results obtained are satisfactory for powering via PoE, the power device proceeds to the next stage.
During the build process, the standard cache of local layers in Docker operates. However, importantly, werf also integrates the Dockerfile configuration into its infrastructure. What does this mean?
- Each image built from a Dockerfile consists of a single stage called
dockerfile(for more about what stages are in werf, you can read ). - For the stage
dockerfilewerf calculates a signature that depends on the contents of the Dockerfile configuration. When the Dockerfile configuration changes, the signature of the stage is altereddockerfileand werf initiates a rebuild of that stage with the new Dockerfile config. If the signature remains unchanged, werf retrieves the image from the cache (more about using signatures in werf was discussed in ). - Afterwards, the built images can be published with the command
werf publish(orwerf build-and-publish) and used for deployment in Kubernetes. Published images in Docker Registry will be cleaned up by the standard werf cleanup tools, i.e., there will be automatic removal of old images (older than N days), images associated with non-existent Git branches, and according to other policies.
More about the points described here can be found in the documentation:
- ;
- ;
- .
Notes and Precautions
1. External URLs in ADD are not supported
Currently, the use of external URLs in the ADDdirective is not supported. Werf will not initiate a rebuild when the resource at the specified URL changes. This feature is planned for the near future.
2. You cannot add .git to the image
In general, adding the directory .git to the image is considered a bad practice and here’s why:
- If
.gitit remains in the final image, violating the principles of : because the resulting image should be tied to a single commit, there should be no possibility of making agit checkoutrandom commit. -
.gitit increases the size of the image (the repository can be large due to having once added large files and then removed them). The size of the work-tree associated solely with a specific commit will not depend on the history of operations in Git. Meanwhile, adding and subsequently removing.gitThe final image won’t work: the image will still acquire an extra layer — that's how Docker operates. - Docker can initiate unnecessary rebuilds even if it’s building the same commit from different work-trees. For instance, GitLab creates separate cloned directories in
/home/gitlab-runner/builds/HASH/[0-N]/yourprojectwith parallel builds enabled. The extra rebuild will be related to the fact that the directory.gitdiffers in different cloned versions of the same repository, even when building the same commit.
This last point also has implications when using werf. Werf requires that the built cache is present when executing certain commands (for example, werf deploy). When running such commands, werf calculates signature stages for the images specified in werf.yaml, and they must be in the build cache — otherwise, the command cannot continue. If the stage signature depends on the content .git, then we end up with an unstable cache against changes in irrelevant files, and werf won’t forgive such a mistake (more details in ).
Overall adding only specific necessary files via the instruction ADD in any case improves the efficiency and reliability of what has been written Dockerfile, as well as enhances the cache resilience built from this Dockerfile, against irrelevant changes in Git.
Summary
Our initial path of writing our own builder for specific needs was difficult, honest, and straightforward: instead of using workarounds over the standard Dockerfile, we created our own solution with a custom syntax. And it brought its advantages: the Stapel builder performs excellently.
However, during the writing of our custom builder, we overlooked the support for existing Dockerfiles. This deficiency is now fixed, and in the future, we plan to develop support for Dockerfile along with our custom Stapel builder for distributed builds and builds using Kubernetes (i.e., builds on runners within Kubernetes, as done in kaniko).
So if you happen to have a couple of Dockerfiles laying around... please try !
P.S. Documentation list on the topic
- ;
- ;
- ;
- ;
- ;
- ;
- .
Also read in our blog: '».
Source: habr.com
