

Today we will discuss the Dynamic Trunking Protocols DTP and VTP – the VLAN trunking protocols. As I mentioned in the last lesson, we will follow the ICND2 exam topics in the order they are listed on the Cisco website.
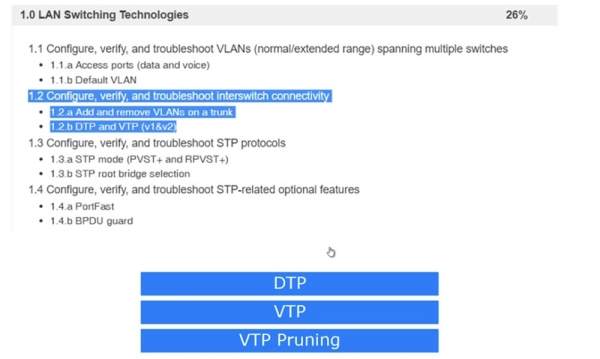
Last time we covered section 1.1, and today we will focus on 1.2 – configuring, verifying, and troubleshooting network switch connections: adding and removing VLANs from a trunk and the DTP and VTP protocols versions 1 and 2.
All switch ports are configured by default to use the Dynamic Auto mode of the DTP protocol. This means that when connecting two ports of different switches, a trunk will automatically be established between them if one of the ports is set to trunk or desirable mode. If both switches' ports are in Dynamic Auto mode, no trunk will be formed.
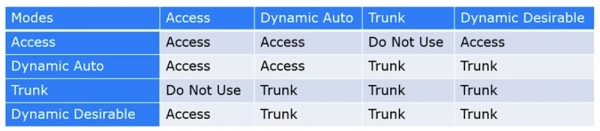
Thus, it all depends on the configuration of the operating modes of each of the two switches. For better understanding, I created a table of possible DTP mode combinations for two switches. You can see that if both switches use Dynamic Auto, they will not form a trunk and will remain in Access mode. Therefore, if you want to create a trunk between two switches, you must configure at least one of the switches to trunk mode, or program the trunk port to use the Dynamic Desirable mode. As shown in the table, each of the switch ports can be in one of four modes: Access, Dynamic Auto, Dynamic Desirable, or Trunk.
If both ports are set to Access, the connected switches will operate in Access mode. If one port is set to Dynamic Auto and the other to Access, both will work in Access mode. If one port operates in Access mode and the other in Trunk mode, the switches cannot be connected, so such a combination of modes cannot be used.
Therefore, for trunking to work, at least one of the switch ports must be configured to Trunk, while the other can be set to Trunk, Dynamic Auto, or Dynamic Desirable. A trunk is also formed if both ports are configured to Dynamic Desirable.
The difference between Dynamic Desirable and Dynamic Auto is that in the first mode, the port initiates the trunk by sending DTP frames to the port of the second switch. In the second mode, the switch port waits for someone to start communicating with it, and if both switches' ports are set to Dynamic Auto, no trunk will be formed between them. In the case of Dynamic Desirable, the reverse situation occurs – if both ports are set to this mode, a trunk will definitely be formed between them.
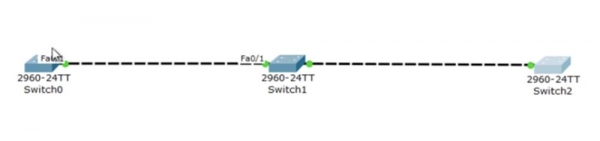
I recommend that you memorize this table, as it will help you configure the switches connected to each other correctly. Let's look at this aspect in Packet Tracer. I have sequentially connected 3 switches together and will now display the CLI console windows for each of these devices on the screen.
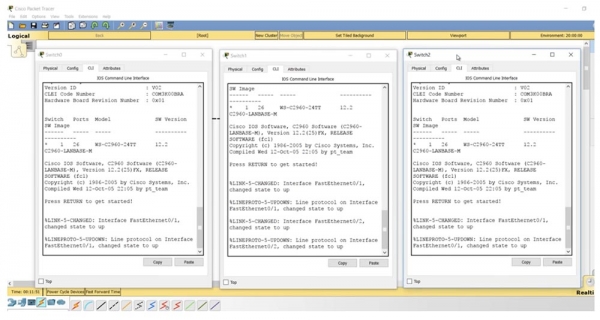
If I enter the command show int trunk, we will not see any trunk, which is quite natural in the absence of necessary configurations, as all switches are set to Dynamic Auto mode. If I ask to show the parameters of interface f0/1 of the middle switch, you will see that in the administrative settings mode it is listed as dynamic auto.
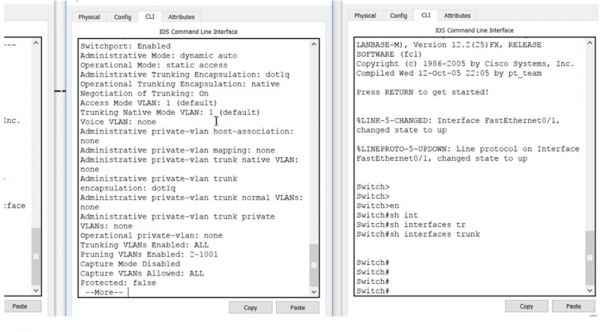
The same settings exist for the third and first switches – they also have port f0/1 in dynamic auto mode. Remember the table: for trunking, all ports must be in trunk mode or one of the ports must be in Dynamic Desirable mode.
Let's go to the settings of the first switch SW0 and configure port f0/1. After entering the command switchport mode, the system will display hints for possible mode options: access, dynamic, or trunk. I will use the command switchport mode dynamic desirable; you may notice that trunk port f0/1 of the second switch initially went down after entering this command, and then, after receiving the DTP frame from the first switch, it went up.
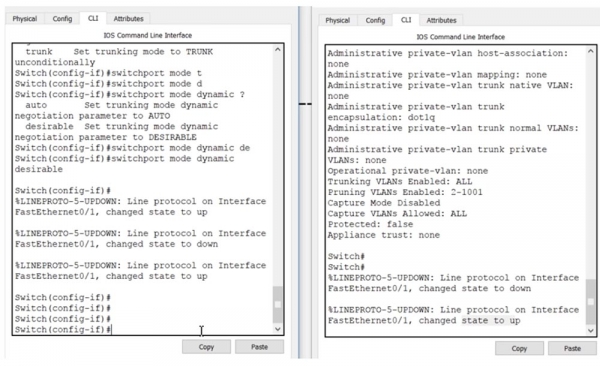
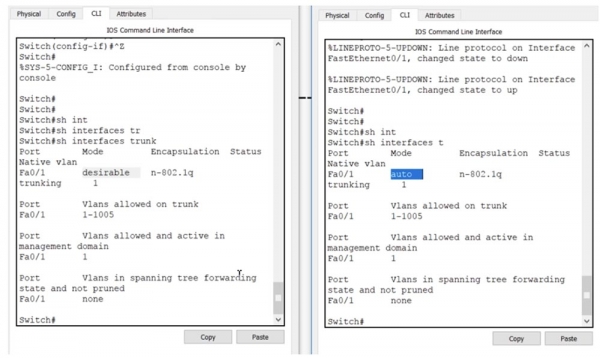
If now, in the CLI console of switch SW1, I enter the command show int trunk, we will see that port f0/1 is in trunking state. I enter the same command in the SW1 console and see the same information, meaning that a trunk is now established between switches SW0 and SW1. At the same time, the port of the first switch is in desirable mode, and the port of the second one is in auto mode.
There is no connection between the second and third switches, so I go to the settings of the third switch and enter the command switchport mode dynamic desirable. You can see that the same state changes down-up occurred on the second switch, but now they concern port f0/2, to which the third switch is connected. Now the second switch has two trunks: one on interface f0/1 and the second on f0/2. This can be seen by using the command show int trunk.
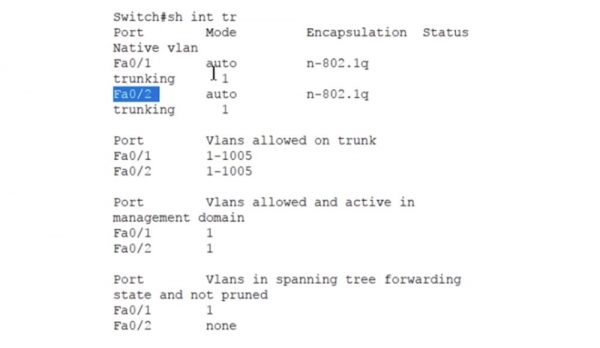
Both ports of the second switch are in auto mode, meaning that for trunking with neighboring switches, their ports must be in trunk or desirable mode, as there are only 2 modes for establishing a trunk. With the table, you can always configure the switch ports so that trunking is organized between them. This is the essence of using the dynamic trunking protocol DTP.
Let's proceed to the VLAN trunking protocol, or VTP. This protocol ensures the synchronization of VLAN databases across different network devices by transferring the updated VLAN database from one device to another. Returning to our diagram with 3 switches, VTP can operate in 3 modes: server, client, and transparent. VTP v3 has another mode called Off, but in the context of the Cisco exam, only VTP version one and two are considered.
The Server mode is used to create new VLANs, delete, or modify networks through the switch command line. In client mode, no operations can be performed on VLANs; only the VLAN database from the server is updated. The transparent mode acts as if the VTP protocol is disabled, meaning the switch does not issue its own VTP messages but passes updates from other switches—if an update arrives on one of the switch's ports, it forwards it through itself and sends it further across the network through another port. In transparent mode, the switch simply serves as a transmitter of foreign messages, without updating its own VLAN database.
In this slide, you see the VTP configuration commands entered in global configuration mode. The first command allows you to change the protocol version being used. The second command selects the operational mode of VTP.
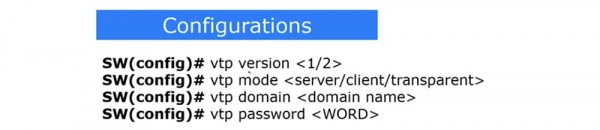
To create a VTP domain, use the command vtp domain , and to set the VTP password, enter the command vtp password . Let’s go to the CLI console of the first switch and check the VTP status by entering the command show vtp status.
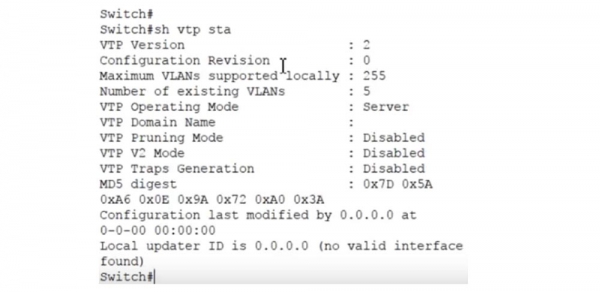
You can see the VTP protocol version – the second, the maximum number of supported VLANs – 255, the number of existing VLANs – 5, and the VLAN operating mode – server. All these parameters are defaults. We already discussed VTP in the 'Day 30' lesson, so if you forgot something, you can go back and watch that video again.
To view the VLAN database, I enter the command show vlan brief. Here VLAN1 and VLAN1002-1005 are displayed. The first network by default is connected to all available switch interfaces – 23 Fast Ethernet ports and 2 Gigabit Ethernet ports, while the remaining 4 VLANs are not supported. The VLAN databases of the other two switches look exactly the same, except that on SW1 only 22 Fast Ethernet ports are available for VLAN since f0/1 and f0/2 are used for trunks. Let me remind you what we discussed in the 'Day 30' lesson – the VTP protocol only supports updating VLAN databases.
If I configure several ports to work with VLAN networks using the commands switchport access and switchport mode access VLAN10, VLAN20, or VLAN30, the configuration of these ports will not be replicated via VTP, because VTP only updates the VLAN database.
So if one of the SW1 ports is configured to work with VLAN20, but that network is not in the VLAN database, the port will be disabled. Meanwhile, the database updates occur only when using the VTP protocol.
With the command show vtp status, I see that all 3 switches are currently in server mode. I will change the middle switch SW1 to transparent mode with the command vtp mode transparent, and the third switch SW2 to client mode with the command vtp mode client.
Now let's return to the first switch SW0 and create the domain nwking.org using the command vtp domain . If we look at the VTP status of the second switch, which is in transparent mode, we can see that it has not reacted to the domain creation – the VTP Domain Name field remains empty. However, the third switch, which is in client mode, updated its database and received the VTP domain name – nwking.org. Thus, the database update from switch SW0 went through SW1 and reflected on SW2.
Now I will try to change the specified domain name by going into the settings of SW0 and entering the command vtp domain NetworKing. As we can see, this time the update did not occur – the VTP domain name on the third switch remained the same. The reason is that such an update of the domain name happens only once when the default domain is changed. If the VTP domain name is changed again afterwards, it will need to be changed manually on the other switches.
Now I will create a new VLAN network VLAN100 in the CLI console of the first switch and name it IMRAN. It appeared in the VLAN database of the first switch, but did not appear in the database of the third switch because they are in different domains. Remember that the VLAN database is updated only when both switches have the same domain, or as I showed earlier, the new domain name is set instead of the default name.
I am going into the settings of the third switch and sequentially entering the commands vtp mode and vtp domain NetworKing. Note that the name entry is case-sensitive, so the domain name must be exactly the same for both switches. Now I will switch SW2 back to client mode using the command vtp mode client. Let’s see what happens. As you can see, now, when the domain names match, the database of SW2 has been updated, and the new VLAN100 IMRAN network has appeared, while these changes did not affect the middle switch because it is in transparent mode.
If you want to protect against unauthorized access, you can create a VTP password. In this case, you must ensure that the device on the other side has exactly the same password, as only then will it be able to receive VTP updates.
Next, we will discuss VTP pruning, or the 'pruning' of unused VLANs. If you have 100 devices in your network using the VTP protocol, then the update of the VLAN database of one device will automatically be replicated to the other 99 devices. However, not all these devices have the VLANs mentioned in the update, so the information about them may not be necessary.
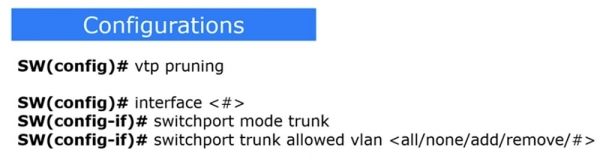
The database update notification for VLANs to devices using VTP means that all ports on all devices will receive information about added, deleted, and changed VLANs, to which they may have no relation. This results in unnecessary traffic cluttering the network. To prevent this, the concept of 'trimming' VTP is used. To enable 'pruning' mode for non-relevant VLANs on a switch, the command vtp pruning is used. After this, switches will automatically communicate what VLANs they are actually using to each other, thus informing neighbors that they do not need to send updates for networks that are not connected to them.
For example, if SW2 has no ports for VLAN10, it does not need SW1 to send it traffic for this network. At the same time, switch SW1 needs traffic for VLAN10 because one of its ports is connected to this network; it just doesn't need to send that traffic to switch SW2.
Thus, if SW2 is using vtp pruning mode, it informs SW1: 'Please do not send me traffic for VLAN10 because this network is not connected to me, and none of my ports are configured to work with this network.' This is the advantage of using the vtp pruning command.
There is another method of filtering traffic for a specific interface. It allows you to set a port to trunk with a specific VLAN network. The downside of this method is the necessity of manually configuring each trunk port, specifying which VLANs are allowed and which are prohibited. This is done using a sequence of three commands. The first specifies the interface to which these restrictions apply, the second turns this interface into a trunk port, and the third — switchport trunk allowed vlan — indicates which VLAN is allowed on this port: all, none, the adding VLAN, or the deleting VLAN.
Depending on the specific situation, you choose what to use: VTP pruning or Trunk allowed. Some organizations prefer not to use VTP for security reasons, thus opting for manual trunk configuration. Since the vtp pruning command does not work in Packet Tracer, I will demonstrate it in the GNS3 emulator.
If you go into the SW2 settings and enter the command vtp pruning, the system will immediately inform you that this mode is enabled: Pruning switched on, which means that VLAN trimming is activated with a single command.
If you type the command show vtp status, you will see that the vtp pruning mode is allowed.
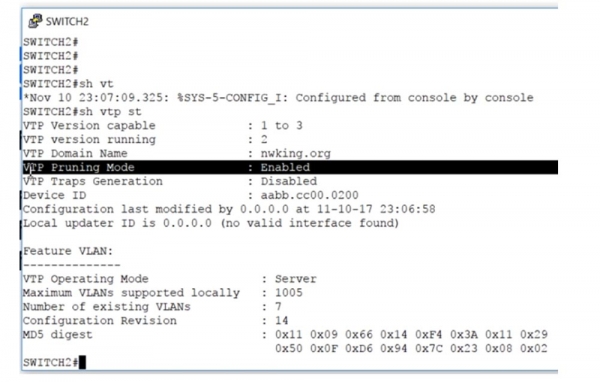
If you are configuring this mode on the server switch, then go into its settings and enter the command vtp pruning. This means that devices connected to the server will automatically use vtp pruning to minimize trunking traffic for inactive VLANs.
If you do not want to use this mode, you need to enter the specific interface, for example, e0/0, and then type the command switchport trunk allowed vlan. The system will provide you with hints for possible parameters of this command:
— WORD — the VLAN number that will be allowed on this interface in trunk mode;
— add — VLAN to be added to the VLAN database list;
— all — allow all VLANs;
— except — allow all VLANs except the specified ones;
— none – prohibit all VLANs;
— remove – remove VLAN from the VLAN database list.
For example, if we have trunking allowed for VLAN10 and we want to allow it for network VLAN20, we need to enter the command switchport trunk allowed vlan add 20.
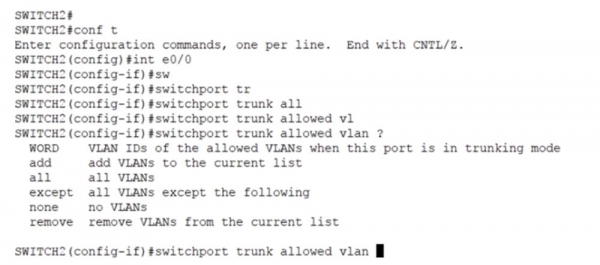
I want to show you one more thing, so I will use the command show interface trunk. Note that by default all VLANs 1-1005 were allowed for the trunk, and now VLAN10 has also been added.
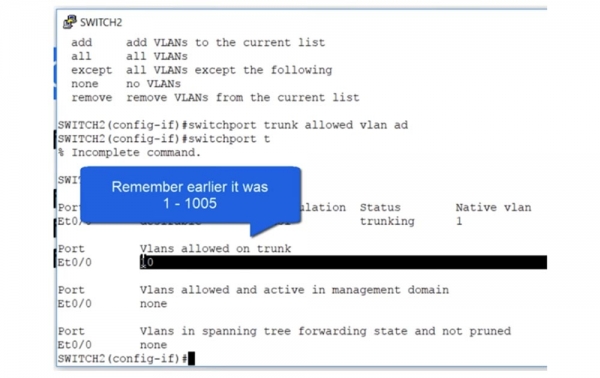
If I use the command switchport trunk allowed vlan add 20 and then ask to show the trunking status again, we will see that now two networks are allowed for the trunk – VLAN10 and VLAN20.
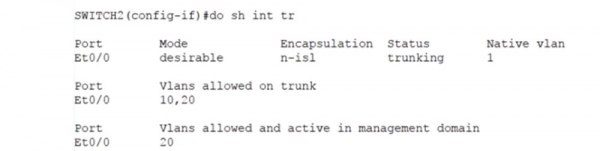
At the same time, no other traffic except for the specified networks will be able to pass through this trunk. By allowing traffic only for VLAN 10 and VLAN 20, we have prohibited traffic for all other VLANs. This is how you can manually configure trunking parameters for a specific VLAN on a specific switch interface.
Note that until the end of the day on November 17, 2017, we have a 90% discount on the cost of downloading the lab work on this topic on our website.

Thank you for your attention, and see you in the next video lesson!

Thank you for staying with us. Do you enjoy our articles? Would you like to see more interesting materials? Support us by placing an order or recommending us to your friends. 30% discount for Habr users on a unique entry-level server designed by us for you: (options available with RAID1 and RAID10, up to 24 cores and up to 40GB DDR4).
Dell R730xd for half the price? Only with us in the Netherlands! Dell R420 — 2x E5-2430 2.2GHz 6C 128GB DDR3 2x960GB SSD 1Gbps 100TB — from $99! Read about how
Source: habr.com
