


Istio is a convenient tool for connecting, securing, and monitoring distributed applications. Istio uses various technologies for the scalable deployment and management of software, including containers for packaging application code and dependencies for deployment and Kubernetes for managing those containers. Therefore, to work with Istio, you need to understand how a multi-service application built on these technologies operates. without Istio. If you are already familiar with these tools and concepts, feel free to skip this guide and go straight to the section. or installing the extension. .
This is a step-by-step guide where we will cover the entire process from source code to container on GKE, so you get a basic understanding of these technologies through this example. You will also see how Istio leverages the capabilities of these technologies. It is assumed that you know nothing about containers, Kubernetes, service mesh, or Istio.
Since I have already learned to "somewhat" port QEMU to JavaScript, this time it was decided to do it wisely and not repeat past mistakes.
In this guide, you will perform the following tasks:
- Exploring a simple hello world application with multiple services.
- Running the application from source code.
- Packaging the application into containers.
- Creating a Kubernetes cluster.
- Deploying containers in the cluster.
Before you begin
Follow the instructions to enable the Kubernetes Engine API:
- Go to the in the Google Cloud Platform console.
- Create or select a project.
- Wait for the API and related services to be enabled. This may take a few minutes.
- Make sure billing is enabled for your Google Cloud Platform project. .
You can use Cloud Shell in this guide, which prepares a virtual machine with Linux based on Debian, or a Linux or macOS computer.
Option A: Using Cloud Shell
Benefits of using Cloud Shell:
- Python 2 and Python 3 development environments (including virtualenv) are fully configured.
- Command-line tools gcloud, docker, git and kubectl, which we will use, are already installed.
- You have several :
- , which opens with an edit icon at the top of the Cloud Shell window.
- Emacs, Vim or Nano, which can be opened from the command line in Cloud Shell.
To use :
- Go to the GCP console.
- Click the button Activate Cloud Shell (Activate Cloud Shell) at the top of the GCP console window.

At the bottom a Cloud Shell session with a command line will open in a new window.
Option B: using command-line tools locally
If you are working on a computer with Linux or macOS, you will need to set up and install the following components:
Configure .
with the command-line tool gcloud.
Install kubectl — command-line tool for working with .
gcloud components install kubectlInstall . You will use the command-line tool docker, to create container images for the sample application.
Install the tool , to get the sample application from GitHub.
Downloading sample code
Download the source code helloserver:
git clone https://github.com/GoogleCloudPlatform/istio-samplesNavigate to the sample code directory:
cd istio-samples/sample-apps/helloserver
Exploring the multi-service application
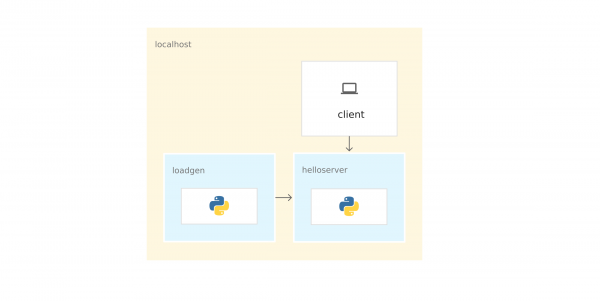
The sample application is written in Python and consists of two components that communicate via :
- server: a simple server with a single endpoint GET, /, which outputs "hello world" to the console.
- loadgen: a script that sends traffic to server, with a configurable number of requests per second.
Running the application from source code
To explore the sample application, run it in Cloud Shell or on your computer.
1) In the directory istio-samples/sample-apps/helloserver run server:
python3 server/server.pyUpon starting server the following should display:
INFO:root:Starting server...2) Open another terminal window to send requests to server. If you are using Cloud Shell, click the add icon to open another session.
3) Send a request to server:
curl http://localhost:8080the server responds:
Hello World!4) From the directory where you downloaded the sample code, navigate to the directory that contains loadgen:
cd YOUR_WORKING_DIRECTORY/istio-samples/sample-apps/helloserver/loadgen5) Create the following environment variables:
export SERVER_ADDR=http://localhost:8080
export REQUESTS_PER_SECOND=5
6) Run virtualenv:
virtualenv --python python3 env7) Activate the virtual environment:
source env/bin/activate8) Install requirements for loadgen:
pip3 install -r requirements.txt9) Run loadgen:
python3 loadgen.pyUpon starting loadgen outputs approximately the following message:
Starting loadgen: 2019-05-20 10:44:12.448415
5 request(s) complete to http://localhost:8080
In another terminal window server outputs approximately the following messages to the console:
127.0.0.1 - - [21/Jun/2019 14:22:01] "GET / HTTP/1.1" 200 -
INFO:root:GET request,
Path: /
Headers:
Host: localhost:8080
User-Agent: python-requests/2.22.0
Accept-Encoding: gzip, deflate
Accept: */*
From a network perspective, the entire application runs on a single host (local computer or Cloud Shell virtual machine). Therefore, you can use localhostto send requests to server.
10) To stop loadgen and servertype Ctrl-c in each terminal window.
11) In the terminal window loadgen deactivate the virtual environment:
deactivatePackaging the application into containers
To run the application on GKE, you need to package the example application — server and loadgen — in . A container is a way to package the application to isolate it from the environment.
To package the application into a container, you need a Dockerfile. Dockerfile which is a text file that defines the commands for building the application's source code and its dependencies into After building, you upload the image to a container registry, like Docker Hub or .
The example already contains Dockerfile for server and loadgen with all the necessary commands to build the images. Below is Dockerfile for server:
FROM python:3-slim as base
FROM base as builder
RUN apt-get -qq update
    && apt-get install -y --no-install-recommends
        g++
    && rm -rf /var/lib/apt/lists/*

# Enable unbuffered logging
FROM base as final
ENV PYTHONUNBUFFERED=1

RUN apt-get -qq update
    && apt-get install -y --no-install-recommends
        wget

WORKDIR /helloserver

# Grab packages from builder
COPY --from=builder /usr/local/lib/python3.7/ /usr/local/lib/python3.7/

# Add the application
COPY . .

EXPOSE 8080
ENTRYPOINT [ "python", "server.py" ]- The command FROM python:3-slim as base tells Docker to use the latest image as the base.
- The command COPY . . copies the source files into the current working directory (in our case, just server.py) into the container's file system.
- ENTRYPOINT defines the command that is used to run the container. In our case, this command is almost identical to the one you used to run server.py from the source code.
- The command EXPOSE indicates that server it expects data through port 8080. This command does not It's something like documentation needed to open the port 8080 when running the container.
Preparing for application containerization
1) Set the following environment variables. Replace PROJECT_ID with your GCP project ID.
export PROJECT_ID="PROJECT_ID"export GCR_REPO="preparing-istio"Using the values of PROJECT_ID and GCR_REPO you tag the Docker image when you build and push it to the private Container Registry.
2) Set the default GCP project for the command-line tool gcloud.
gcloud config set project $PROJECT_ID3) Set the default zone for the command-line tool gcloud.
gcloud config set compute/zone us-central1-b4) Make sure that the Container Registry service is enabled in the GCP project.
gcloud services enable containerregistry.googleapis.comContainerization of server
Navigate to the directory where the example is located server:
cd YOUR_WORKING_DIRECTORY/istio-samples/sample-apps/helloserver/server/Build the image using Dockerfile and the environment variables you defined earlier:
docker build -t gcr.io/$PROJECT_ID/$GCR_REPO/helloserver:v0.0.1 .
Parameter -t represents the Docker tag. This is the name of the image you use when deploying the container.
- Push the image to the Container Registry:
docker push gcr.io/$PROJECT_ID/$GCR_REPO/helloserver:v0.0.1
Containerization of loadgen
1) Navigate to the directory where the example is located loadgen:
cd ../loadgen2) Build the image:
docker build -t gcr.io/$PROJECT_ID/$GCR_REPO/loadgen:v0.0.1 .3) Push the image to the Container Registry:
docker push gcr.io/$PROJECT_ID/$GCR_REPO/loadgen:v0.0.1View the list of images
Check the list of images in the repository and ensure the images were pushed:
gcloud container images list --repository gcr.io/$PROJECT_ID/preparing-istioThe command outputs the names of the recently pushed images:
NAME
gcr.io/PROJECT_ID/preparing-istio/helloserver
gcr.io/PROJECT_ID/preparing-istio/loadgen
Creating a GKE cluster.
These containers could be run on a Cloud Shell virtual machine or on a computer with the command docker run. However, in a production environment, a way to centrally orchestrate the containers is needed. For example, a system that ensures that the containers are always running and a way to scale up and launch additional container instances if traffic increases is necessary.
To run container applications, you can use . GKE is a container orchestration platform that combines virtual machines into a cluster. Each virtual machine is called a node. GKE clusters are based on the open-source cluster management system Kubernetes. Kubernetes provides mechanisms to interact with the cluster.
Creating a GKE cluster:
1) Create a cluster:
gcloud container clusters create istioready
  --cluster-version latest
  --machine-type=n1-standard-2
  --num-nodes 4
The command gcloud creates the istioready cluster in the GCP project and the default zone you specified. To run Istio, it is recommended to have at least 4 nodes and a virtual machine. .
The command takes a few minutes to create the cluster. When the cluster is ready, the command outputs something similar to .
2) Specify credentials in the command line tool , so you can manage the cluster:
gcloud container clusters get-credentials istioready3) Now you can communicate with Kubernetes through kubectl. For example, the following command can be used to check the status of the nodes:
kubectl get nodesThe command outputs a list of nodes:
NAME                                       STATUS   ROLES    AGE    VERSION
gke-istoready-default-pool-dbeb23dc-1vg0   Ready       99s    v1.13.6-gke.13
gke-istoready-default-pool-dbeb23dc-36z5   Ready       100s   v1.13.6-gke.13
gke-istoready-default-pool-dbeb23dc-fj7s   Ready       99s    v1.13.6-gke.13
gke-istoready-default-pool-dbeb23dc-wbjw   Ready       99s    v1.13.6-gke.13
Key Concepts of Kubernetes
The diagram shows an application on GKE:
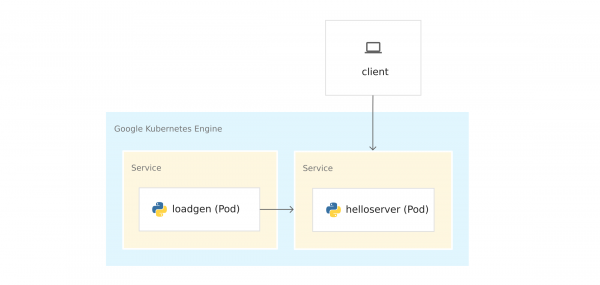
Before deploying containers on GKE, familiarize yourself with the key concepts of Kubernetes. At the end, there are links if you want to learn more.
- Nodes and Clusters. In GKE, a node is a virtual machine. On other Kubernetes platforms, a node can be a computer or a virtual machine. A cluster is a set of nodes that can be considered a single entity where you deploy your containerized application.
- Pods. In Kubernetes, containers run in pods. A pod in Kubernetes is an indivisible unit. A pod houses one or more containers. You deploy the server and loadgen in separate pods. When there are multiple containers in a pod (for example, the application server and ), the containers are managed as a single object and share the resources of the pod.
- Deployments. In Kubernetes, a deployment is an object representing a set of identical pods. A deployment launches multiple replicas of pods distributed across the nodes of the cluster. It automatically replaces pods that have failed or are unresponsive.
- Kubernetes Service. When running application code on GKE, the connection between loadgen and server. When you launched services on a virtual machine in Cloud Shell or on your computer, you sent requests to server at the address localhost:8080. After deploying on GKE, pods run on available nodes. By default, you cannot control which node a pod is running on, so it has no static IP addresses.
To obtain an IP address for server, a network abstraction over pods needs to be defined. This is the . A Kubernetes service provides a stable endpoint for a set of pods. There are several . server use LoadBalancer, which provide an external IP address to communicate with server from outside the cluster.
Additionally, Kubernetes has a built-in DNS system that assigns DNS names (for example, helloserver.default.cluster.local) services. This allows pods within the cluster to connect with other pods in the cluster at a constant address. The DNS name cannot be used outside the cluster, for example in Cloud Shell or on a computer.
Kubernetes Manifests
When you were running the application from the source code, you used an imperative command python3
server.py
Imperative implies a verb: "do this."
Kubernetes uses . This means that we do not tell Kubernetes what to do, but rather describe the desired state. For example, Kubernetes starts and stops pods as needed so that the actual state of the system matches the desired one.
The desired state is specified in manifests, or files . The YAML file contains specifications for one or more Kubernetes objects.
The example contains a YAML file for server and loadgen. Each YAML file specifies the desired state of a deployment and service object in Kubernetes.
server.yaml
apiVersion: apps/v1
kind: Deployment
metadata:
  name: helloserver
spec:
  selector:
    matchLabels:
      app: helloserver
  replicas: 1
  template:
    metadata:
      labels:
        app: helloserver
    spec:
      terminationGracePeriodSeconds: 5
      restartPolicy: Always
      containers:
      - name: main
        image: gcr.io/google-samples/istio/helloserver:v0.0.1
imagePullPolicy: Always- kind specifies the type of object.
- metadata.name specifies the deployment name.
- The first field spec contains the description of the desired state.
- spec.replicas specifies the desired number of pods.
- Partition spec.template defines the pod template. In the pod specifications, there is a field image, which specifies the name of the image to be pulled from the Container Registry.
The service is defined as follows:
apiVersion: v1
kind: Service
metadata:
  name: hellosvc
spec:
  type: LoadBalancer
  selector:
    app: helloserver
  ports:
  - name: http
    port: 80
targetPort: 8080- LoadBalancer: clients send requests to the IP address of the load balancer, which has a permanent IP address and is accessible from outside the cluster.
- targetPort: as you remember, the command EXPOSE 8080 downward API support (simultaneously with this in Dockerfile did not provide ports. You provide the port 8080, so that it can connect to the container server from outside the cluster. In our case, hellosvc.default.cluster.local:80 (short name: hellosvc) corresponds to the port 8080 The pod's IP address helloserver.
- port: is the port number to which other services in the cluster will send requests.
loadgen.yaml
The deployment object in loadgen.yaml is similar to server.yaml. The difference is that the deployment object contains a section env. It defines the environment variables that are needed loadgen and that you set when starting the application from the source code.
apiVersion: apps/v1
kind: Deployment
metadata:
  name: loadgenerator
spec:
  selector:
    matchLabels:
      app: loadgenerator
  replicas: 1
  template:
    metadata:
      labels:
        app: loadgenerator
    spec:
      terminationGracePeriodSeconds: 5
      restartPolicy: Always
      containers:
      - name: main
        image: gcr.io/google-samples/istio/loadgen:v0.0.1
        imagePullPolicy: Always
        env:
        - name: SERVER_ADDR
          value: "http://hellosvc:80/"
        - name: REQUESTS_PER_SECOND
          value: "10"
        resources:
          requests:
            cpu: 300m
            memory: 256Mi
          limits:
            cpu: 500m
            memory: 512Mi
One loadgen does not accept incoming requests, for the field type specified ClusterIP. This type provides a persistent IP address that can be used by services in the cluster, but this IP address is not made available to external clients.
apiVersion: v1
kind: Service
metadata:
  name: loadgensvc
spec:
  type: ClusterIP
  selector:
    app: loadgenerator
  ports:
  - name: http
    port: 80
    targetPort: 8080
Deploying containers in GKE
1) Navigate to the directory where the example is located server:
cd YOUR_WORKING_DIRECTORY/istio-samples/sample-apps/helloserver/server/2) Open server.yaml in a text editor.
3) Replace the name in the field image with your Docker image name.
image: gcr.io/PROJECT_ID/preparing-istio/helloserver:v0.0.1Replace PROJECT_ID with your GCP project ID.
4) Save and close server.yaml.
5) Deploy the YAML file in Kubernetes:
kubectl apply -f server.yamlAfter successful execution, the command outputs the following code:
deployment.apps/helloserver created
service/hellosvc created
6) Navigate to the directory where loadgen:
cd ../loadgen7) Open loadgen.yaml in a text editor.
8) Replace the name in the field image with your Docker image name.
image: gcr.io/PROJECT_ID/preparing-istio/loadgen:v0.0.1Replace PROJECT_ID with your GCP project ID.
9) Save and close loadgen.yaml, close the text editor.
10) Deploy the YAML file in Kubernetes:
kubectl apply -f loadgen.yamlAfter successful execution, the command outputs the following code:
deployment.apps/loadgenerator created
service/loadgensvc created
11) Check the status of the pods:
kubectl get podsThe command shows the status:
NAME                             READY   STATUS    RESTARTS   AGE
helloserver-69b9576d96-mwtcj     1/1     Running   0          58s
loadgenerator-774dbc46fb-gpbrz   1/1     Running   0          57s
12) Fetch the application logs from the pod loadgen. Replace POD_ID using the identifier from the previous response.
kubectl logs loadgenerator-POD_ID13) Get the external IP addresses hellosvc:
kubectl get serviceThe response from the command looks something like this:
NAME         TYPE           CLUSTER-IP     EXTERNAL-IP     PORT(S)        AGE
hellosvc     LoadBalancer   10.81.15.158   192.0.2.1       80:31127/TCP   33m
kubernetes   ClusterIP      10.81.0.1                443/TCP        93m
loadgensvc   ClusterIP      10.81.15.155             80/TCP         4m52s
14) Send a request to hellosvc: replace EXTERNAL_IP with the external IP address hellosvc.
curl http://EXTERNAL_IPLet’s work with Istio
You already have an application deployed in GKE. loadgen can use Kubernetes DNS (hellosvc:80), to send requests to server, and you can send requests to server using the external IP address. While Kubernetes has many capabilities, some information about services is lacking:
- How do services interact? What are the relationships between the services? How does traffic flow between the services? Are you aware that loadgen makes requests to server, but imagine that you know nothing about the application. To answer these questions, we look at the list of running pods in GKE.
- Metrics. How long server does it take to respond to an incoming request? How many requests per second are received by the server? Does it return error messages?
- Security information. Traffic between loadgen and server is routed simply through HTTP or through ?
All these questions are answered by Istio. For this purpose, Istio places a sidecar proxy in each pod. The Envoy proxy intercepts all incoming and outgoing traffic to the application containers. This means that server and loadgen request through the sidecar Envoy proxy, and all traffic from loadgen to server passes through the Envoy proxy.
Connections between Envoy proxies form a service mesh. The service mesh architecture provides a control layer over Kubernetes.
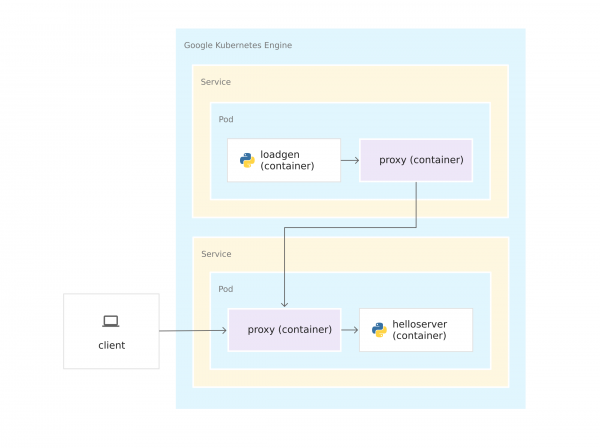
Since the Envoy proxies run in their containers, Istio can be installed over the GKE cluster with minimal changes to the application code. However, you need to do some work to prepare the application for management by Istio:
- Services for all containers. Each deployment server and loadgen is linked to a Kubernetes service. Even a loadgen, which does not receive incoming requests, has a service.
- Services must have names for their ports. Although in GKE, service ports can be left unnamed, Istio requires specifying according to its protocol. In the YAML file, the port for server the name the HTTP, since the server uses the protocol HTTP. If cat << EOF | sudo tee -a /etc/systemd/system/lxd-hddpool.service [Unit] Description=Losetup LXD Storage Pool (hddpool) After=local-fs.target[Service] Type=oneshot ExecStart=/sbin/losetup /dev/loop1 /mnt/work/lxd/hddpool.img RemainAfterExit=true[Install] WantedBy=local-fs.target EOF were using gRPC, you would name the port grpc.
- Deployments are tagged. Therefore, you can use Istio traffic management features, such as splitting traffic between versions of the same service.
Installing Istio
Istio can be installed in two ways. You can or on the cluster. With Istio on GKE, you can easily manage the installation and upgrade of Istio as part of the GKE cluster lifecycle. If you need the latest version of Istio or more control over the Istio control panel configuration, install the open-source version instead of the Istio on GKE extension. To decide on the approach, read the article .
Choose an option, review the relevant guide, and follow the instructions to install Istio on the cluster. If you want to use Istio with a newly deployed application, for the namespace default.
Clear
To avoid charges for resources used in this guide from your Google Cloud Platform account, delete the container cluster after installing Istio and experimenting with the sample application. This will remove all cluster resources such as compute instances, disks, and network resources.
What's next?
Explore the following technologies:
Explore the following tools:
Explore Kubernetes concepts:
Source: habr.com
