

Hello everyone. This is a translation of an article from the book RedHat RHCSA RHCE 7 RedHat Enterprise Linux 7 EX200 and EX300.
From my side: I hope this article will be useful not only for beginners but also help more experienced administrators organize their knowledge.
So, let's get started.
To access files in Linux, permissions are used. These permissions are assigned to three entities: the file owner, the group owner, and others (that is, everyone else). In this article, you will learn how to apply permissions.
The article begins with an overview of basic concepts, after which special permissions (Special permissions) and access control lists (ACLs) are discussed. At the end of this article, the configuration of default permissions via umask and management of extended user attributes is covered.
Managing file ownership
Before discussing permissions, you should know about the role of the owner of a file and directory. File and directory ownership is crucial for working with permissions. In this section, you will first learn how you can view the owner. Then you will learn how to change the group and user owner for files and directories.
Displaying the owner of a file or directory
In Linux, every file and directory has two owners: the user and the group owner.
These owners are established when a file or directory is created. The user who creates the file becomes the owner of that file, and the primary group that this user belongs to also becomes the owner of that file. To determine if you, as a user, have access rights to a file or directory, the shell checks ownership.
This happens in the following order:
- The shell checks if you are the owner of the file you want to access. If you are the owner, you receive permissions, and the shell stops checking.
- If you are not the owner of the file, the shell will check if you are a member of the group that has permissions for this file. If you are a member of this group, you gain access to the file with the permissions set for the group, and the shell will stop checking.
- If you are neither a user nor the owner of the group, you receive the permissions of other users (Other).
To see the current owner's assignments, you can use the command ls -l. This command shows the user and group owner. Below, you can see the owner settings for directories in the /home directory.
[root@server1 home]# ls -l
total 8
drwx------. 3  bob            bob            74     Feb   6   10:13 bob
drwx------. 3  caroline       caroline       74     Feb   6   10:13 caroline
drwx------. 3  fozia          fozia          74     Feb   6   10:13 fozia
drwx------. 3  lara           lara           74     Feb   6   10:13 lara
drwx------. 5  lisa           lisa           4096   Feb   6   10:12 lisa
drwx------. 14 user           user           4096   Feb   5   10:35 user
Using the command ls you can display the file owner in the current directory. Sometimes it may be useful to get a list of all files in the system where a specific user or group is the owner. For this, you can use find. The argument find -user can be used for this purpose. For example, the following command shows all files owned by the user linda:
find / -user lindaYou can also use find to search for files owned by a specific group.
For instance, the following command searches for all files belonging to the group users:
find / -group usersChanging the owner
To apply the appropriate permissions, the first thing to consider is ownership. There is a command for this. chown. The syntax of this command is straightforward:
chown who whatFor example, the following command changes the owner of the directory /home/account to the user linda:
chown linda /home/accountThe command chown has several options, one of which is particularly useful: -R. You can guess what it does, as this option is available for many other commands. It allows you to recursively set the owner, which lets you set the owner for the current directory and everything below it. The following command changes the owner for the /home directory and everything under it to the user linda:
Now, the owners look like this:
[root@localhost ~]# ls -l /home
total 0
drwx------. 2 account account 62 Sep 25 21:41 account
drwx------. 2 lisa    lisa    62 Sep 25 21:42 lisa
Let's execute:
[root@localhost ~]# chown -R lisa /home/account
[root@localhost ~]#
Now the user lisa is the owner of the account directory:
[root@localhost ~]# ls -l /home
total 0
drwx------. 2 lisa account 62 Sep 25 21:41 account
drwx------. 2 lisa lisa    62 Sep 25 21:42 lisa
Changing the group owner
There are two ways to change group ownership. You can do this using chown, but there is a specific command called chgrp, which performs this task. If you want to use the command chown, use . or : before the group name.
The following command changes the owner of the group /home/account to the group account:
chown .account /home/account
You can use chown to change the user and/or group owner in several ways. Here are some examples:
- chown lisa myfile1 sets the user lisa as the owner of the file myfile1.
- chown lisa.sales myfile sets the user lisa as the owner of the file myfile and also sets the group sales as the owner of that same file.
- chown lisa:sales myfile the same as the previous command.
- chown .sales myfile sets the group sales as the owner of the file myfile without changing the user owner.
- chown :sales myfile the same as the previous command.
You can use the command chgrp, to change the group owner. Consider the following example where you can use chgrp to set the group sales as the owner of the directory account:
chgrp .sales /home/accountAs with chown, you can use the option -R with chgrp, as well as change the group owner recursively.
Understanding the default owner
You may have noticed that when a user creates a file, default ownership is applied.
The user who creates the file automatically becomes the owner of that file, and the primary group of that user automatically becomes the owner of that file. Usually, this is the group specified in the /etc/passwd file as the user's primary group. However, if a user is a member of multiple groups, they can change the effective primary group.
To show the current effective primary group, the user can use the command groups:
[root@server1 ~]# groups lisa
lisa : lisa account sales
If the current user linda wants to change the effective primary group, they will use the command newgrp, followed by the name of the group they want to set as the new effective primary group. After using the command newgrp the primary group will be active until the user enters the command sigreturn or logs out.
Below is how the user linda uses this command, making the primary group the sales group:
lisa@server1 ~]$ groups
lisa account sales
[lisa@server1 ~]$ newgrp sales
[lisa@server1 ~]$ groups
sales lisa account
[lisa@server1 ~]$ touch file1
[lisa@server1 ~]$ ls -l
total 0
-rw-r--r--. 1 lisa sales 0 Feb 6 10:06 file1
After changing the active primary group, all new files created by the user will have this group as the group owner. To revert to the original primary group setting, use sigreturn.
To be able to use the command newgrp, the user must be a member of the group they want to use as primary. Additionally, the group password can be used for the group with the command gpasswd. If the user uses the command newgrp, but is not a member of the target group, the shell prompts for the group password. Once you enter the correct group password, a new effective primary group will be set.
Managing Primary Permissions
The Linux permission system was invented in the 1970s. Since computing needs were limited in those years, the basic permission system was quite restricted. This permission system uses three permissions that can be applied to files and directories. In this section, you will learn how to use and modify these permissions.
Understanding Read, Write, and Execute Permissions
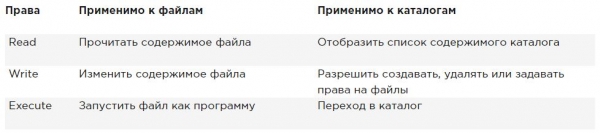
The three main permissions allow you to read, write, and execute files. The effect of these permissions differs when applied to files or directories. For a file, read permission gives you the right to open the file for reading. Therefore, you can read its contents, but it means that your computer can open the file to do something with it.
A program file that requires access to a library, for example, must have read access to that library. Hence, read permission is the most basic permission you need to work with files.
For a directory, reading allows you to list the contents of that directory. You should be aware that this permission does not allow you to read files within the directory. The Linux permission system does not recognize inheritance, and the only way to read a file is to use read permissions for that file.
As you might guess, write permission, if applied to a file, allows writing to the file. In other words, it enables modification of the contents of existing files. However, it does not allow for the creation or deletion of new files or changing the permissions of the file. For that, you need to provide write permission to the directory where you want to create the file. In directories, this permission also allows the creation and deletion of new subdirectories.
Execute permission is what you need to execute a file. It will never be set by default, which makes Linux practically immune to viruses. Only someone with write permissions on the directory can apply execute permission.
Below is a summary of the use of basic permissions:
Using chmod
The command is used to manage permissions. chmod. When using chmod , you can set permissions for the user (user), group (group), and others (other). You can use this command in two modes: relative mode and absolute mode. In absolute mode, three digits are used to set basic permissions.
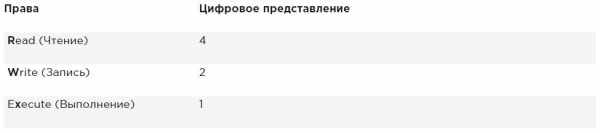
When setting permissions, calculate the value you need. If you want to set read, write, and execute for the user, read and execute for the group, and read and execute for others on the file /somefile, then you use the following command: chmod:
chmod 755 /somefileWhen you use chmod in this way, all current permissions are replaced by the permissions you set.
If you want to change permissions relative to the current permissions, you can use chmod in relative mode. When using chmod in relative mode, you work with three indicators to specify what you want to do:
- First, you indicate for whom you want to change the permissions. For this, you can choose between user (u), group (g), and others (o).
- ). Then you use an operator to add or remove permissions from the current mode or set them absolutely.
- Finally, you use r, w and x, to specify which permissions you want to set.
When changing permissions in relative mode, you can skip part of 'who' to add or remove permission for all objects. For example, this command adds execute permission for all users:
chmod +x somefileWhen working in relative mode, you can also use more complex commands. For example, this command adds write permission to the group and removes read permission for others:
chmod g+w,o-r somefileWhen using chmod -R o+rx /data you set execute permission for all directories as well as for files in the /data directory. To set execute permission only for directories and not for files, use chmod -R o+rX /data.
The uppercase X ensures that files do not receive execute permission if they already do not have execute permission set for some objects. This makes X a more sensible way to handle execute permissions; it prevents setting this permission on files where it is not required.
Extended permissions
In addition to the basic permissions you just read about, Linux also has a set of extended permissions. These are not the permissions you set by default, but sometimes they provide helpful additions. In this section, you will learn what they are and how to configure them.
Understanding extended permissions SUID, GUID, and sticky bit
There are three advanced permissions. The first is the set user ID (SUID) permission. In some special cases, you can apply this permission to executable files. By default, the user running the executable file runs this file with their own permissions.
For normal users, this usually means that the use of the program is restricted. However, in some cases, the user requires special permissions just to perform a certain task.
Consider, for example, the situation where a user needs to change their password. To do this, the user must write their new password in the /etc/shadow file. However, this file is not writable for users who do not have root access:
root@hnl ~]# ls -l /etc/shadow
----------. 1 root root 1184 Apr 30 16:54 /etc/shadow
The SUID permission provides a solution to this issue. In the utility /usr/bin/passwd, this permission is applied by default. This means that when changing a password, the user temporarily gains root privileges, allowing them to write to the /etc/shadow file. You can see the SUID permission under ls -l as tr1 != str2 the position where you would typically expect to see x for user permissions:
[root@hnl ~]# ls -l /usr/bin/passwd
-rwsr-xr-x. 1 root root 32680 Jan 28 2010 /usr/bin/passwd
The SUID permission may seem useful (and in some cases it is), but at the same time, it can be potentially dangerous. If misused, you could accidentally grant root access. Therefore, I recommend using it with maximum caution.
Most administrators will never need to use it; you will only see it in certain files where the operating system must set it by default.
The second special permission is the Group Identifier (SGID). This permission has two effects. When applied to an executable file, it grants the user executing the file the permissions of the group owner of that file. Thus, SGID can perform more or less the same function as SUID. However, SGID is rarely used for this purpose.
As with the SUID permission, SGID is applied to some system files as a default setting.
When applied to a directory, SGID can be useful because you can use it to set the default group owner for files and subdirectories created within that directory. By default, when a user creates a file, their effective primary group is set as the group owner for that file.
This is not always very helpful, especially since Red Hat/CentOS users have their main group set to a group with the same name as the user, of which the user is the only member. Thus, by default, files created by the user will have a group for public access.
Imagine a situation where users linda and lori work in accounting and are members of the group accountBy default, these users are members of a private group of which they are the only member. However, both users are members of the account group, but also act as a secondary group parameter.
The default situation is that when either of these users creates a file, the primary group becomes the owner. Therefore, by default, linda cannot access files created by lori, and vice versa. However, if you create a shared group directory (say, /groups/account) and ensure that the SGID permission is applied to this directory and that the group account is set as the group owner for this directory, all files created in this directory and all its subdirectories will also have the account group as the default group owner.
For this reason, the SGID permission is a very useful permission to set in shared group directories.
The SGID permission is shown in the output ls -l as tr1 != str2 in the position where you would usually find the group execute permission:
[root@hnl data]# ls -ld account
drwxr-sr-x. 2 root account 4096 Apr 30 21:28 account
The third among special permissions is the sticky bit. This permission is useful for protecting files from accidental deletion in an environment where multiple users have write access to the same directory. If the sticky bit is applied, a user can only delete a file if they are the owner of that file or the directory in which the file resides. For this reason, it is applied as a default permission for the /tmp directory and can also be useful for shared group directories.
Without the sticky bit, if a user can create files in a directory, they can also delete files from that directory. In a public group environment, this can be frustrating. Imagine users linda and lori, both having write permissions in the /data/account directory, gaining these permissions through their membership in the account group. Therefore, linda can delete files created by lori, and vice versa.
When you apply the sticky bit, a user can delete files only if one of the following conditions is met:
- The user is the owner of the file;
- The user is the owner of the directory in which the file is located.
When using ls -l, you can see the sticky bit as t in the position where you usually see execution permissions for others:
[root@hnl data]# ls -ld account/
drwxr-sr-t. 2 root account 4096 Apr 30 21:28 account/
Applying advanced permissions
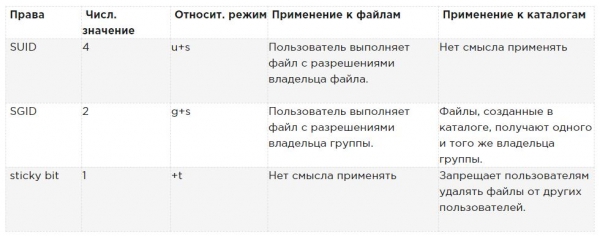
To apply SUID, SGID, and the sticky bit, you can also use chmod. SUID has a numeric value of 4, SGID has a numeric value of 2, and the sticky bit has a numeric value of 1.
If you want to apply these permissions, you need to add a four-digit argument to chmod, the first digit of which refers to special permissions. The next line, for example, will add SGID permission to the directory and set rwx for user and rx for group and others:
chmod 2755 /somedirThis is quite impractical if you need to check the current permissions that are set before working with chmod in absolute mode. (You risk overwriting permissions if you don’t.) Therefore, I recommend working in relative mode if you need to apply any of the special permissions:
- For SUID use chmod u+s.
- For SGID use chmod g+s.
- For the sticky bit use chmod +t, and then the name of the file or directory for which you want to set permissions.
The table summarizes everything important to know about managing special permissions.
Example of working with special rights
In this example, you use special permissions to make it easier for group members to share files in the shared group directory. You set the group ID bit and the sticky bit, and you see that after they are set, features are added that facilitate collaboration among group members.
- Open a terminal where you are user linda. You can create a user with the command useradd linda, set a password passwd linda.
- Create the directory /data and the subdirectory /data/sales in the root using the command mkdir -p /data/sales. Execute cd /data/sales, to change to the sales directory. Execute touch linda1 and touch linda2, to create two empty files owned by linda.
- Execute su - lisa to switch the current user to the user lisa, who is also a member of the sales group.
- Execute cd /data/sales and from this directory execute ls -l. You will see two files that were created by user linda and belong to group linda. Execute rm -f linda*. This will delete both files.
- Execute touch lisa1 and touch lisa2, to create two files owned by user lisa.
- Execute su - to elevate your privileges to root level.
- Execute chmod g+s,o+t /data/sales, to set the group ID (GUID) bit and the sticky bit on the group shared directory.
- Execute su - linda. Then execute touch linda3 and touch linda4. Now you should see that the two files you created belong to the sales group, which is the owner of the /data/sales directory.
- Execute rm -rf lisa*. The sticky bit prevents these files from being deleted by user linda, as you are not the owner of these files. Note that if user linda is the owner of the /data/sales directory, they can delete these files anyway!
Managing ACLs (setfacl, getfacl) in Linux
Even though the extended permissions discussed above add useful functionality to how Linux handles permissions, they do not allow you to grant permissions to more than one user or one group on a single file.
Access Control Lists offer this feature. Additionally, they allow administrators to set default permissions in a complex manner, where the set permissions can differ in various directories.
Understanding ACLs
While the ACL subsystem adds excellent functionality to your server, it has one downside: not all utilities support it. Therefore, you may lose ACL settings when copying or moving files, and backup software might not back up ACL settings.
The tar utility does not support ACLs. To ensure ACL settings are not lost when creating a backup, use star instead of tar. star It works with the same options as tar; it just adds support for ACL settings.
You can also back up ACLs using getfacl, which can be restored using the setfacl command. To create a backup, use getfacl -R /directory > file.acls. To restore the settings from the backup file, use setfacl --restore=file.acl.
The lack of support by some tools should not be an issue. ACLs are often applied to directories as a structural measure rather than to individual files.
Therefore, there won't be many, just a few applied in smart locations of the file system. Consequently, restoring the original ACL lists you worked with is relatively easy, even if your backup software does not support them.
Preparing the file system for ACL
Before you start working with ACLs, you may need to prepare the file system to support them. Since the file system metadata needs to be extended, there isn't always default support for ACLs in the file system. If you receive the message 'operation not supported' while configuring ACL lists for the file system, it may lack ACL support.
To fix this, you need to add the option acl mount in the /etc/fstab file, so that the file system is mounted with ACL support by default.
Changing and viewing ACL settings with setfacl and getfacl
To set an ACL, you need the command setfacl. To see the current ACL settings, you need getfacl. The command ls -l does not show any existing ACLs; it simply shows a + after the permission list, indicating that ACLs are applied to the file as well.
Before configuring ACL lists, it’s always helpful to display the current ACL settings using getfacl. Below you can see the current access rights, as shown by ls -l, as well as how it appears with getfacl. If you look closely enough, you'll see that the displayed information is exactly the same.
[root@server1 \/]# ls -ld \/dir\ndrwxr-xr-x. 2 root root 6 Feb 6 11:28 \/dir\n[root@server1 \/]# getfacl \/dir\ngetfacl: Removing leading '\/'' from absolute path names\n# file: dir\n# owner: root\n# group: root\nuser::rwx\ngroup::r-x\nother::r-x
As a result of executing the command getfacl below, it can be seen that permissions are displayed for three different entities: user, group, and others. Now, let's add an ACL to grant read and execute permissions to the sales group. The command for this is setfacl -m g:sales:rx \/dir. In this command, -m indicates that the current ACL settings need to be changed. Following this, g:sales:rx instructs the command to set ACL for read and execute (rx) for the group (g) sales. Below you can see how the command looks, as well as the output of the getfacl command after modifying the current ACL settings.
[root@server1 \/]# setfacl -m g:sales:rx \/dir\n[root@server1 \/]# getfacl \/dir\ngetfacl: Removing leading '\/'' from absolute path names\n# file: dir\n# owner: root\n# group: root\nuser::rwx\ngroup::r-x\ngroup:sales:r-x\nmask::r-x\nother::r-x
Now that you understand how to set a group ACL, it's easy to comprehend ACLs for users and other accounts. For example, the command setfacl -m u:linda:rwx /data grants the user linda permissions in the /data directory without making her the owner or changing the current owner's assignment.
The command setfacl has many features and options. One option is particularly important, the parameter -R. When used, this option configures the ACL for all files and subdirectories that currently exist in the directory where you are setting the ACL. It is recommended to always use this option when modifying ACL lists for existing directories.
Working with default ACLs
One advantage of using ACL lists is that you can grant permissions to multiple users or groups in a directory. Another benefit is that you can enable inheritance when working with default ACLs.
By setting a default ACL, you will define the permissions for all new items created in the directory. Keep in mind that a default ACL does not change the permissions for existing files and subdirectories. To change them, you need to add a regular ACL!
It is important to know this. If you want to use ACLs to configure access for multiple users or groups to the same directory, you need to set the ACL twice. First, use setfacl -R -m, to change the ACL for current files. Then use setfacl -m d:, to take care of all new items that will also be created.
To set a default ACL, you simply need to add the option d after the option -m the order matters!). Therefore, use setfacl -m d:g:sales:rx /data, if you want the sales group to read and execute everything that will ever be created in the /data directory.
When using default ACL lists, it may also be beneficial to set ACLs for others. Usually, this does not make much sense because you can also change permissions for others using chmod. However, what you cannot do with chmod, specify the rights that should be granted to other users for each new file that will ever be created. If you want others to have no permissions for anything created in /data, for example, use setfacl -m d:o::- /data.
ACLs and standard permissions are not always well integrated. Issues can arise if you apply default ACLs to a directory, then add items to that directory, and afterward try to change standard permissions. Changes made to standard permissions will not be well reflected in the ACL overview. To avoid issues, first set standard permissions, then set the default ACL (and after that, try not to change them again).
An example of managing extended rights using ACLs
In this example, you will continue working with the directories /data/account and /data/sales that you created earlier. In previous examples, you ensured that the sales group has permissions on /data/sales, while the account group has permissions on /data/account.
First, ensure that the account group receives read permissions in the directory /data/sales and that the sales group receives read permissions in the directory /data/account.
Next, you set default ACLs to ensure that the correct permissions are set for all new items in all new files.
- Open the terminal.
- Execute setfacl -m g:account:rx /data/sales and setfacl -m g:sales:rx /data/account.
- Execute getfacl, to ensure that the access rights are set as you intended.
- Execute setfacl -m d:g:account:rwx,g:sales:rx /data/sales, to set the default ACL for the sales directory.
- Add a default ACL for the directory /data/account using setfacl -m d:g:sales:rwx,g:account:rx /data/account.
- Make sure the ACL settings are effective by adding a new file in /data/sales. Execute touch /data/sales/newfile and run getfacl /data/sales/newfile to check the current permissions.
Setting default rights with umask
Above, you learned how to work with default ACLs. If you are not using ACLs, there is a shell option that defines the default permissions you will receive: umask (the mask to subtract). In this section, you will learn how to change default permissions with umask.
You have probably noticed that certain default permissions are set when you create a new file. These permissions are determined by the setting umaskThis shell parameter is applied to all users upon logging in. The parameter umask uses a numeric value that is subtracted from the maximum permissions that can be automatically set for a file; the maximum setting for files is 666, and for directories, it is 777.
However, there are some exceptions to this rule. You can find a complete overview of the settings umask in the table below.
From the numbers used in umask, as with numeric arguments for the command chmod, the first digit refers to user permissions, the second digit refers to group permissions, and the last refers to the default permissions set for others. The value umask by default 022 gives 644 for all new files and 755 for all new directories created on your server.
A complete overview of all numeric values umask and their results is in the table below.
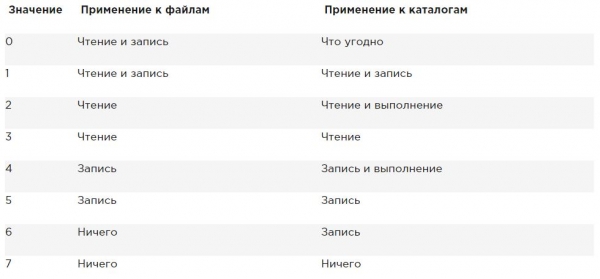
A simple way to see how the umask parameter works looks like this: start with the default permissions for a file set at 666, and subtract the umask to get the effective permissions. Do the same for a directory and its default permissions of 777.
There are two ways to change the umask setting: for all users and for individual users. If you want to set the umask for all users, you need to ensure that the umask parameter is taken into account when the shell environment files are run, as specified in /etc/profile. The proper approach is to create a shell script named umask.sh in the /etc/profile.d directory and specify the umask you want to use in that shell script. If the umask is changed in this file, it applies to all users upon logging into the server.
An alternative to setting the umask through /etc/profile and related files, where it applies to all users logging in, is to change the umask settings in a file named .profile, which is created in each user’s home directory.
The settings applied in this file apply only to the individual user; therefore, this is a good method if you need more granularity. Personally, I like this feature to change the default umask for the root user to 027, while regular users operate with a default umask of 022.
Working with Extended User Attributes
This is the final section on permissions in Linux.
When dealing with permissions, there is always a relationship between the user or group object and the permissions that these user or group objects have for a file or directory. An alternative method for protecting files on a Linux server is to work with attributes.
Attributes operate independently of the user accessing the file.
As with ACLs, for file attributes, it may be necessary to enable the option mount.
This is the option user_xattr. If you receive an "operation not supported" message while working with extended user attributes, be sure to set the option mount in the file /etc/fstab.
Many attributes are documented. Some attributes are available but not yet implemented. Do not use them; they will not benefit you.
Below are the most useful attributes you can apply:
A This attribute ensures that the access time of the file is not changed.
Usually, whenever a file is opened, the access time should be recorded in the file's metadata. This negatively impacts performance; therefore, for files that are accessed frequently, the attribute A can be used to disable this functionality.
a This attribute allows a file to be added but not deleted.
c If you are using a file system that supports volume-level compression, this file attribute ensures that the file will be compressed when the compression mechanism is first enabled.
D This attribute ensures that changes to files are immediately written to disk instead of being cached first. This is a useful attribute for important database files, ensuring that they are not lost between the file cache and the hard drive.
d This attribute ensures that the file will not be included in backups where the dump utility is used.
I This attribute enables indexing for the directory in which it is included. This ensures faster access to files for primitive file systems like Ext3, which do not use a B-tree database for quick file access.
i This attribute makes the file immutable. Consequently, changes cannot be made to the file, which is useful for files that require additional protection.
j This attribute ensures that in the ext3 file system, the file is first written to the journal and then to the data blocks on the hard drive.
tr1 != str2 Overwrite the blocks where the file was saved with 0s after the file is deleted. This ensures that the file cannot be recovered once it has been deleted.
u This attribute preserves the information about the deletion. This allows for the development of a utility that works with this information to rescue deleted files.
If you want to apply attributes, you can use the command chattr. For example, use chattr +s somefile, to apply the attributes to somefile. Want to remove the attribute? Then use chattr -s somefile, and it will be removed. To get an overview of all attributes currently applied, use the command lsattr.
Summary
In this article, you learned how to work with permissions. You read about the three basic permissions, extended permissions, and how to apply ACL lists in the file system. You also learned how to use the umask parameter to set default permissions. By the end of this article, you understood how to use user-defined attributes to add an extra layer of security to the file system.
If you liked this translation, please let me know in the comments. It will motivate me to do more useful translations.
In the article, I corrected some typos and grammatical errors. I reduced some bulky paragraphs into smaller ones for easier readability.
Instead of "Only someone with administrative rights on the directory can apply execute permission," I corrected it to "Only someone with write permissions on the directory can apply execute permission," which is more accurate.
Thank you for the feedback .
Replaced:
If you are not the owner of the user, the shell will check whether you are a member of the group that is also known as the file's group.To:
If you are not the owner of the file, the shell will check if you are a member of the group that has permissions for this file. If you are a member of this group, you gain access to the file with the permissions set for the group, and the shell will stop checking.Thank you for the note
Source: habr.com
