


In the PVS-Studio analyzer for C and C++ languages on Linux and macOS, starting from version 7.04, a test feature has been introduced to check the list of specified files. With the new mode, you can configure the analyzer to check commits and pull requests. This article will explain how to set up the verification of the modified files list in GitHub projects within popular CI (Continuous Integration) systems like Travis CI, Buddy, and AppVeyor.
File list checking mode
is a tool for identifying errors and potential vulnerabilities in source code for programs written in C, C++, C#, and Java. It works on 64-bit systems running Windows, Linux, and macOS.
In PVS-Studio version 7.04 for Linux and macOS, the mode for checking the list of source files was introduced. This works for projects where the build system can generate a file . It is needed for the analyzer to extract information about the compilation of the specified files. If your build system does not support generating a compile_commands.json file, you can try generating such a file using the utility .
You can also use the file list checking mode together with the strace trace log of compiler runs (pvs-studio-analyzer trace). For this, you will first need to perform a complete build of the project and trace it, so the analyzer gathers complete information about the compilation parameters of all checked files.
However, this option has a significant drawback — you will either need to perform a full trace of the build of the entire project every time you run it, which contradicts the idea of quick commit checks. Or, if you cache the trace result itself, subsequent runs of the analyzer might be incomplete if the structure of dependencies of the source files changes after tracing (for example, if a new #include is added to one of the source files).
Therefore, we do not recommend using the file list checking mode with the trace log for verifying commits or pull requests. If you can do an incremental build during commit verification, consider using the .
The list of source files for analysis is saved in a text file and passed to the analyzer using the parameter -S:
pvs-studio-analyzer analyze ... -f build/compile_commands.json -S check-list.txtThis file specifies relative or absolute paths to files, with each new file listed on a new line. It is permissible to include not only file names for analysis but also various text. The analyzer will see that this is not a file and will ignore the line. This can be useful for commenting if files are specified manually. However, often the list of files will be generated during analysis in CI, for example, these may be files from a commit or pull request.
Now, with this mode, you can quickly check new code before it enters the main development branch. To ensure the check system reacts to any warnings from the analyzer, in the utility plog-converter a flag has been added --indicate-warnings:
plog-converter ... --indicate-warnings ... -o /path/to/report.tasks ...With this flag, the converter will return a non-zero code if the analyzer's report has warnings. Based on the return code, you can block the pre-commit hook, commit, or pull request, while displaying, sharing, or emailing the generated analyzer report.
Note: When you first run the file list analysis, the entire project will be analyzed because the analyzer needs to generate a file dependency of the project's source files from the header files. This is a characteristic of analyzing C and C++ files. Subsequently, the dependency file can be cached and will be updated by the analyzer automatically. The advantage of checking commits while using the file list check mode over incrementally analyzing is that only this file needs to be cached, rather than the object files.
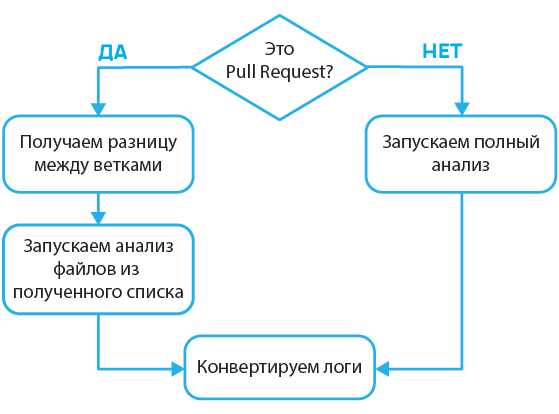
General principles of pull request analysis
Analyzing the entire project takes a significant amount of time, so it makes sense to only check a part of it. The challenge is to separate the new files from the other files in the project.
Let’s consider an example of a commit tree with two branches:
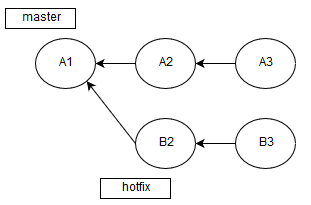
Let’s imagine that the commit A1 contains a substantial amount of code that has already been reviewed. Earlier, we created a branch from the commit A1 and modified some files.
Of course, you noticed that after A1 there were two more commits, but these were also merges of other branches, since we are not committing to master. And now the time has come when hotfix ready. Therefore, a pull request for merging has appeared B3 and A3.
Of course, we could check the entire result of their merge, but that would take too long and be unjustified since only a few files were changed. Therefore, it is more efficient to analyze only the modified ones.
To do this, we'll get the difference between branches while in the HEAD of the branch we want to merge into master:
git diff --name-only HEAD origin/$MERGE_BASE > .pvs-pr.list$MERGE_BASE we will discuss in detail later. The thing is, not every CI service provides the necessary information about the base for merging, so we constantly have to come up with new ways to obtain this data. This will be detailed below in each of the described web services.
So, we have obtained the difference between branches, or more specifically, a list of the names of the files that were changed. Now we need to pass the file .pvs-pr.list (we redirected the output above) to the analyzer:
pvs-studio-analyzer analyze -j8
                            -o PVS-Studio.log
                            -S .pvs-pr.list
After analysis, we need to convert the log file (PVS-Studio.log) into a more readable format:
plog-converter -t errorfile PVS-Studio.log --cerr -wThis command will output a list of errors in (the standard output stream for error messages).
However, we not only need to output the errors but also notify our build and testing service about any problems. For this purpose, a flag was added to the converter -W (--indicate-warnings). If there is at least one warning from the analyzer, the return code of the utility plog-converter will change to 2, which, in turn, will inform the CI service about potential errors in the files of the pull request.
Travis CI
The configuration is done in the form of a file .travis.yml. For convenience, I recommend moving everything into a separate bash script with functions that will be called from the file .travis.yml (bash script_name.sh function_name).
We will add the necessary code to the script in bash, thus we will gain more functionality. In the section install we will write the following:
install:
  - bash .travis.sh travis_install
If you had any instructions, you can move them into the script, removing the dashes.
Let's open the file .travis.sh and add the installation of the analyzer into the function travis_install():
travis_install() {
  wget -q -O - https://files.viva64.com/etc/pubkey.txt
    | sudo apt-key add -
  sudo wget -O /etc/apt/sources.list.d/viva64.list
    https://files.viva64.com/etc/viva64.list

  sudo apt-get update -qq
  sudo apt-get install -qq pvs-studio
}
Now let's add to the section script to run the analysis:
script:
  - bash .travis.sh travis_script
And in the bash script:
travis_script() {
  pvs-studio-analyzer credentials $PVS_USERNAME $PVS_KEY

  if [ "$TRAVIS_PULL_REQUEST" != "false" ]; then
    git diff --name-only origin/HEAD > .pvs-pr.list
    pvs-studio-analyzer analyze -j8
                                -o PVS-Studio.log
                                -S .pvs-pr.list
                                --disableLicenseExpirationCheck
  else
    pvs-studio-analyzer analyze -j8
                                -o PVS-Studio.log
                                --disableLicenseExpirationCheck
  fi

  plog-converter -t errorfile PVS-Studio.log --cerr -w
}
This code needs to be executed after building the project, for example, if you had a build with CMake:
travis_script() {
  CMAKE_ARGS="-DCMAKE_EXPORT_COMPILE_COMMANDS=On ${CMAKE_ARGS}"
  cmake $CMAKE_ARGS CMakeLists.txt
  make -j8
}
It will turn out like this:
travis_script() {
  CMAKE_ARGS="-DCMAKE_EXPORT_COMPILE_COMMANDS=On ${CMAKE_ARGS}"
  cmake $CMAKE_ARGS CMakeLists.txt
  make -j8

  pvs-studio-analyzer credentials $PVS_USERNAME $PVS_KEY

  if [ "$TRAVIS_PULL_REQUEST" != "false" ]; then
    git diff --name-only origin/HEAD > .pvs-pr.list
    pvs-studio-analyzer analyze -j8
                                -o PVS-Studio.log
                                -S .pvs-pr.list
                                --disableLicenseExpirationCheck
  else
    pvs-studio-analyzer analyze -j8
                                -o PVS-Studio.log
                                --disableLicenseExpirationCheck
  fi

  plog-converter -t errorfile PVS-Studio.log --cerr -w
}
You have probably already noticed the specified environment variables $TRAVIS_PULL_REQUEST and $TRAVIS_BRANCH. Travis CI declares them automatically:
- $TRAVIS_PULL_REQUEST stores the pull request number or false, if it's a regular branch;
- $TRAVIS_REPO_SLUG stores the name of the project repository.
The algorithm of this function is as follows:
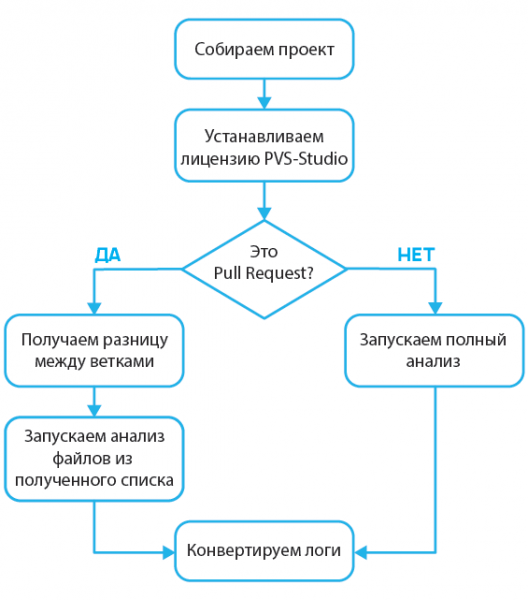
Travis CI responds to return codes, so the presence of warnings will indicate to the service to mark the commit as containing errors.
Now let's take a closer look at this line of code:
git diff --name-only origin/HEAD > .pvs-pr.listThe thing is, Travis CI automatically merges branches during the analysis of a pull request:
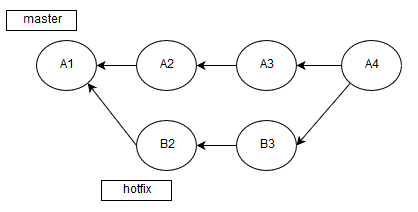
Therefore, we analyze A4, not B3->A3. Because of this feature, we need to calculate the difference with A3, which is exactly the tip of the branch from origin.
There is one important detail left — caching the dependencies of header files from the compiled translation units (*.c, *.cc, *.cpp, etc.). The analyzer calculates these dependencies on the first run in the file list checking mode and then saves them in the .PVS-Studio directory. Travis CI allows caching folders, so we will save the data of the directory .PVS-Studio/:
cache:
  directories:
    - .PVS-Studio/
This code needs to be added to the file .travis.ymlThis directory stores various data collected after analysis, which will significantly speed up subsequent runs of file list analysis or incremental analysis. If this is not done, the analyzer will essentially analyze all files every time.
Buddy
Like Travis CI, it provides the ability to automate the building and testing of projects stored on GitHub. Unlike Travis CI, it is configured in a web interface (bash support is available), so there is no need to store configuration files in the project.
First, we need to add a new action to the build pipeline:
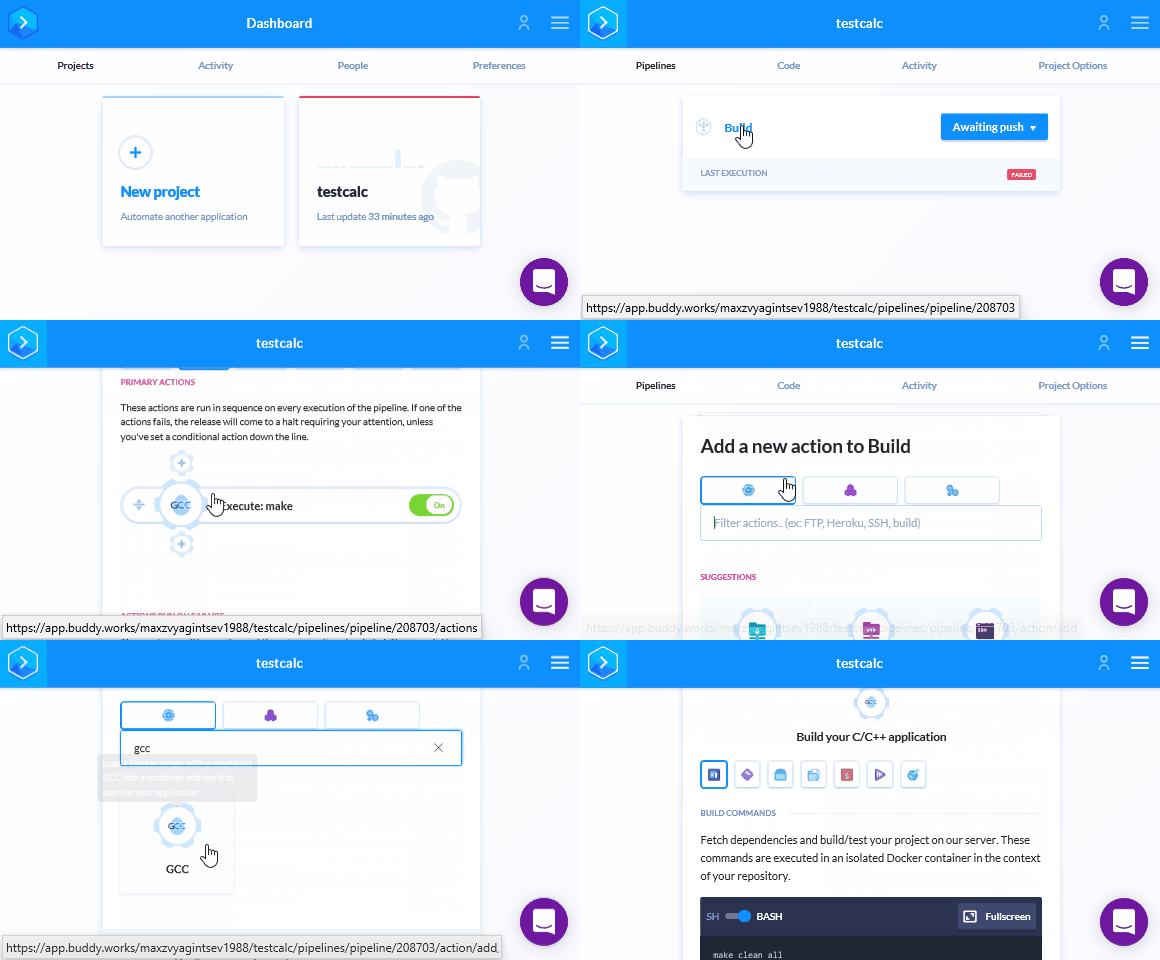
We'll specify the compiler that was used to build the project. Note the Docker container installed in this action. For example, for GCC, there is a special container:
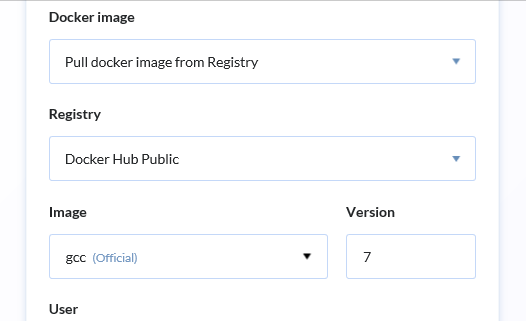
Now, let's install PVS-Studio and the necessary utilities:
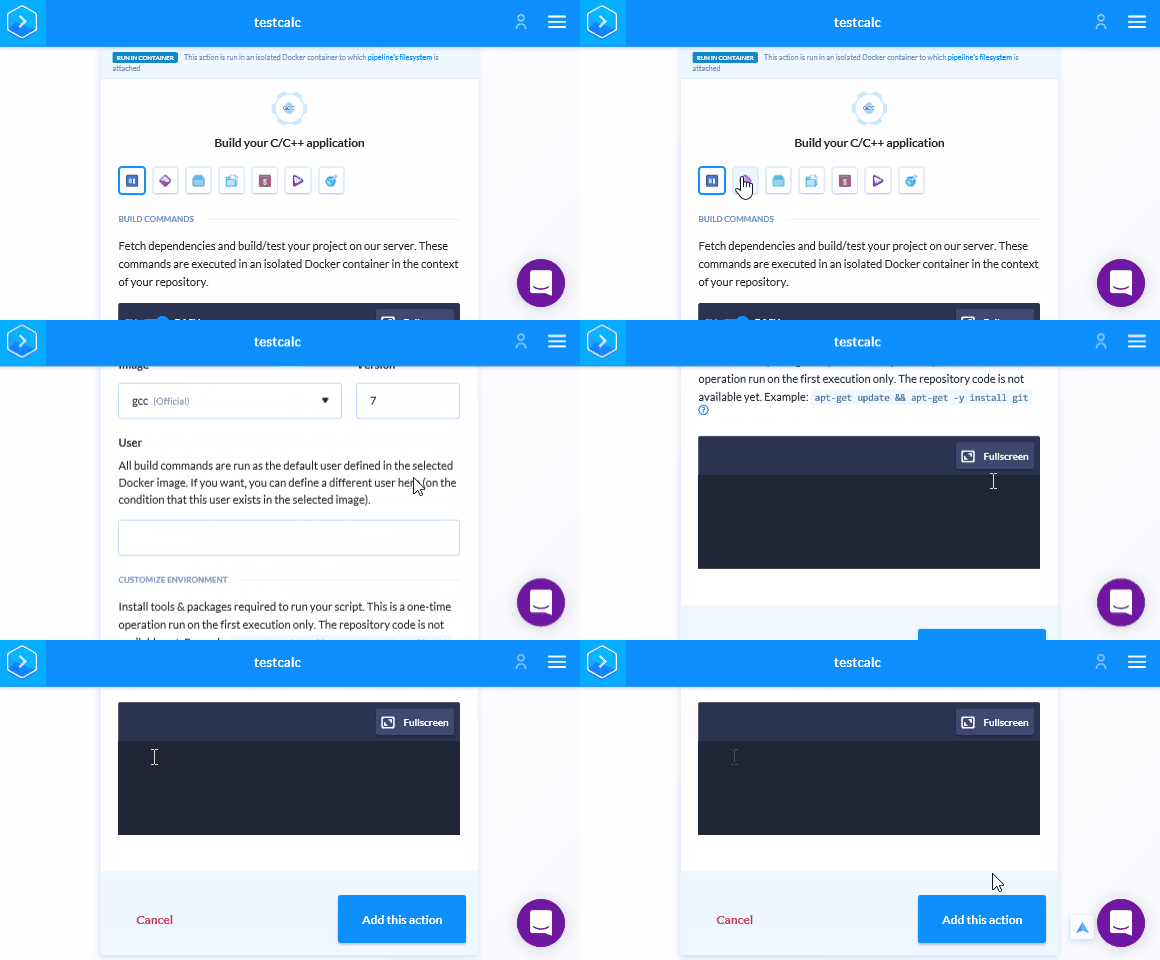
Add the following lines to the editor:
apt-get update && apt-get -y install wget gnupg jq

wget -q -O - https://files.viva64.com/etc/pubkey.txt | apt-key add -
wget -O /etc/apt/sources.list.d/viva64.list
  https://files.viva64.com/etc/viva64.list

apt-get update && apt-get -y install pvs-studio
Now, let's go to the Run tab (the first icon) and add the following code in the appropriate editor field:
pvs-studio-analyzer credentials $PVS_USERNAME $PVS_KEY

if [ "$BUDDY_EXECUTION_PULL_REQUEST_NO" != '' ]; then
  PULL_REQUEST_ID="pulls/$BUDDY_EXECUTION_PULL_REQUEST_NO"
  MERGE_BASE=`wget -qO -
    https://api.github.com/repos/${BUDDY_REPO_SLUG}/${PULL_REQUEST_ID}
    | jq -r ".base.ref"`

  git diff --name-only HEAD origin/$MERGE_BASE > .pvs-pr.list
  pvs-studio-analyzer analyze -j8
                              -o PVS-Studio.log
                              --disableLicenseExpirationCheck
                              -S .pvs-pr.list
else
  pvs-studio-analyzer analyze -j8
                              -o PVS-Studio.log
                              --disableLicenseExpirationCheck
fi

plog-converter -t errorfile PVS-Studio.log --cerr -w
If you read the section on Travs-CI, this code will already be familiar to you, but now there is a new stage:
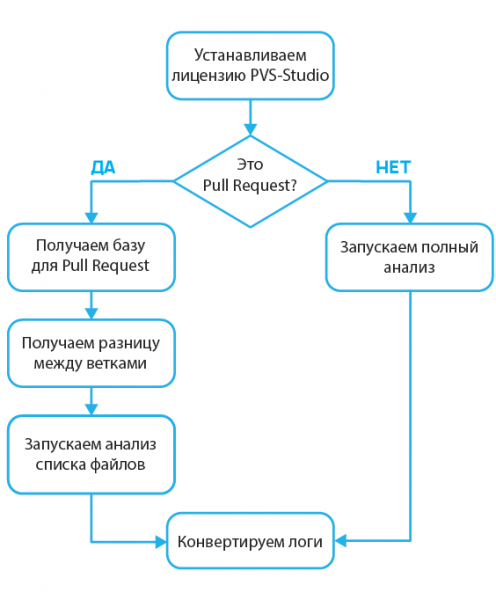
The point is that now we are analyzing not the merge result, but the HEAD of the branch from which the pull request is made:
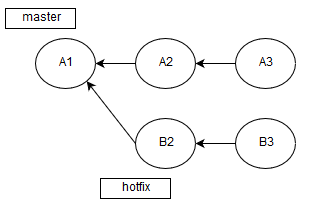
Therefore, we are in a hypothetical commit B3 and we need to get the difference with A3:
PULL_REQUEST_ID="pulls/$BUDDY_EXECUTION_PULL_REQUEST_NO"
  MERGE_BASE=`wget -qO -
    https://api.github.com/repos/${BUDDY_REPO_SLUG}/${PULL_REQUEST_ID}
    | jq -r ".base.ref"`
git diff --name-only HEAD origin/$MERGE_BASE > .pvs-pr.list
To determine A3 we will use the GitHub API:
https://api.github.com/repos/${USERNAME}/${REPO}/pulls/${PULL_REQUEST_ID}We used the following variables provided by Buddy:
- $BUDDY_EXECUTION_PULL_REQUEST_NO — the pull request number;
- $BUDDY_REPO_SLUG — the combination of the username and repository (for example max/test).
Now let's save the changes using the button below and enable pull request analysis:
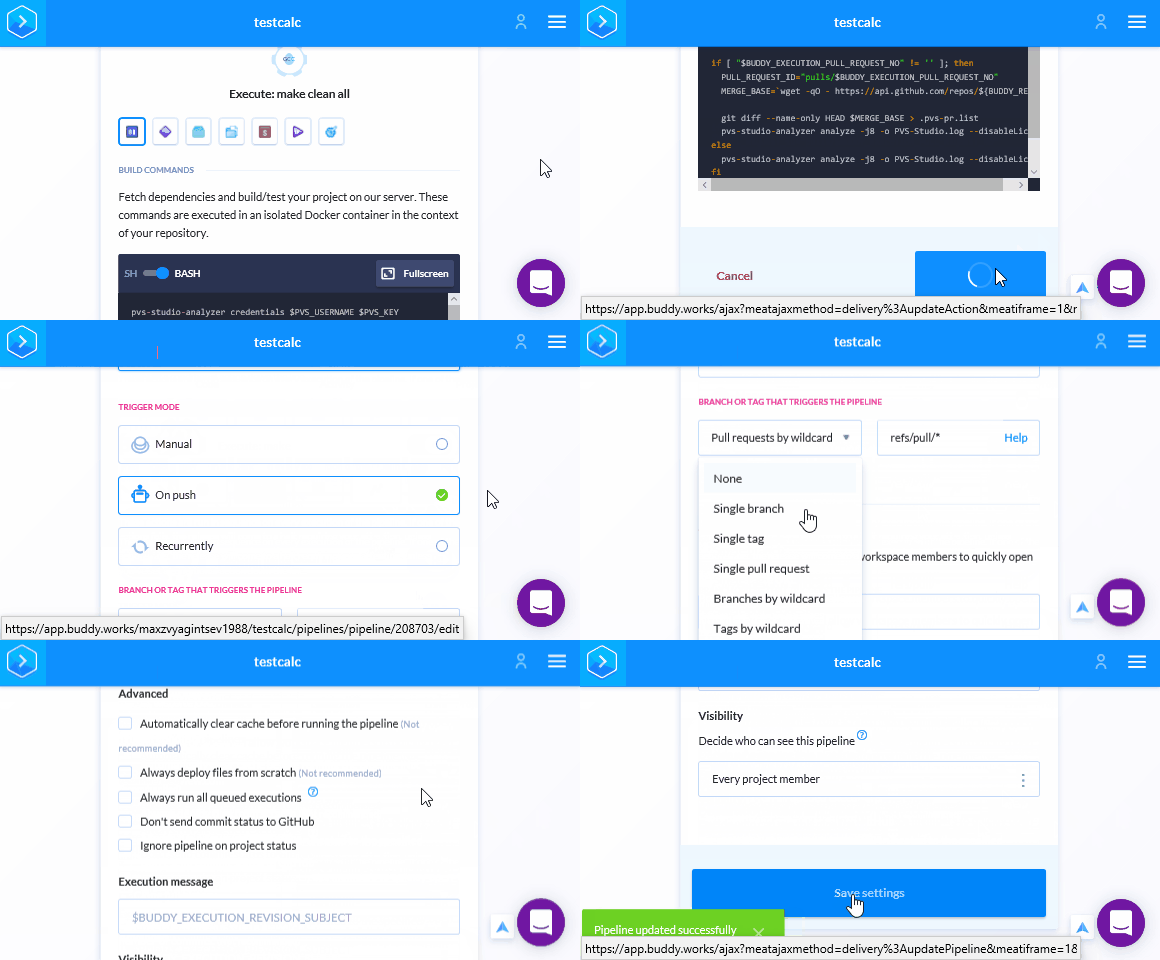
Unlike Travis CI, we do not need to specify .pvs-studio for caching, as Buddy automatically caches all files for subsequent runs. So all that's left is to save the login and password for PVS-Studio in Buddy. After saving changes, we'll return to the Pipeline. We need to go to the variables settings and add the login and key for PVS-Studio:
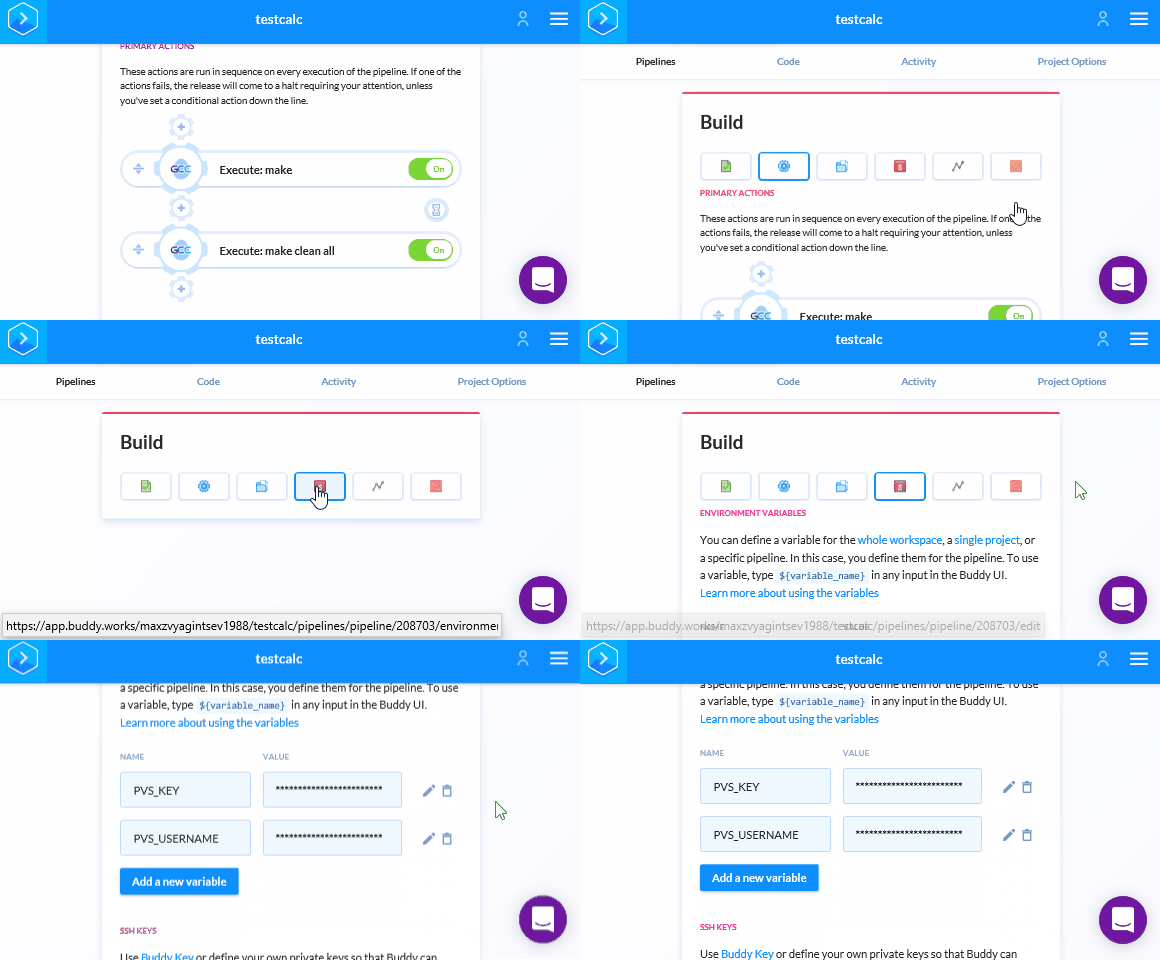
After this, the appearance of a new pull request or commit will trigger the check. If the commit contains errors, Buddy will indicate this on the pull request page.
AppVeyor
Setting up AppVeyor is similar to Buddy, as everything happens in the web interface, and there is no need to add a *.yml file to the project repository.
Let's go to the Settings tab in the project overview:
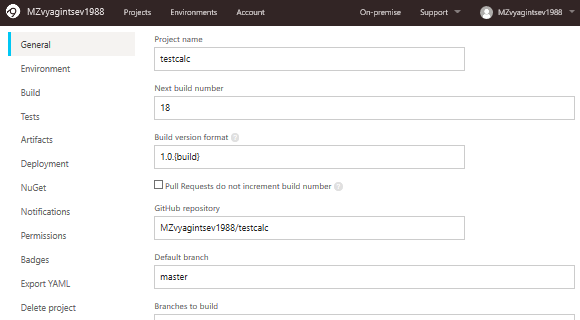
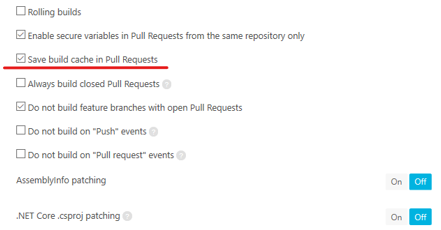
Scroll down this page and enable cache saving for pull request builds:
Now let's go to the Environment tab, where we will specify the build image and the necessary environment variables:
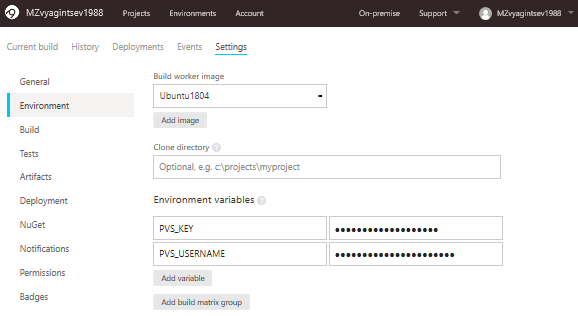
If you have read the previous sections, you will be familiar with these two variables — PVS_KEY and PVS_USERNAME. If not, let me remind you that they are necessary for the PVS-Studio analyzer license verification. We will encounter them again in Bash scripts later.
On this same page at the bottom, we will specify the folder for caching:
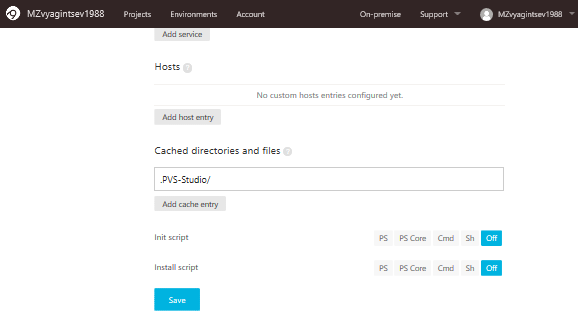
If we do not do this, we will analyze the entire project instead of just a couple of files, but we will receive output based on the specified files. Therefore, it's essential to enter the correct directory name.
Now it's time for the verification script. Let's open the Tests tab and select Script:
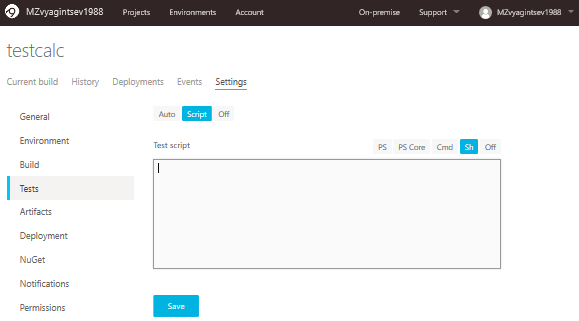
In this form, you need to insert the following code:
sudo apt-get update && sudo apt-get -y install jq

wget -q -O - https://files.viva64.com/etc/pubkey.txt
  | sudo apt-key add -
sudo wget -O /etc/apt/sources.list.d/viva64.list
  https://files.viva64.com/etc/viva64.list

sudo apt-get update && sudo apt-get -y install pvs-studio

pvs-studio-analyzer credentials $PVS_USERNAME $PVS_KEY

PWD=$(pwd -L)
if [ "$APPVEYOR_PULL_REQUEST_NUMBER" != '' ]; then
  PULL_REQUEST_ID="pulls/$APPVEYOR_PULL_REQUEST_NUMBER"
  MERGE_BASE=`wget -qO -
    https://api.github.com/repos/${APPVEYOR_REPO_NAME}/${PULL_REQUEST_ID}
    | jq -r ".base.ref"`

  git diff --name-only HEAD origin/$MERGE_BASE > .pvs-pr.list
  pvs-studio-analyzer analyze -j8
                              -o PVS-Studio.log
                              --disableLicenseExpirationCheck
                              --dump-files --dump-log pvs-dump.log
                              -S .pvs-pr.list
else
  pvs-studio-analyzer analyze -j8
                              -o PVS-Studio.log
                              --disableLicenseExpirationCheck
fi

plog-converter -t errorfile PVS-Studio.log --cerr -w
Let's pay attention to the following part of the code:
PWD=$(pwd -L)
if [ "$APPVEYOR_PULL_REQUEST_NUMBER" != '' ]; then
  PULL_REQUEST_ID="pulls/$APPVEYOR_PULL_REQUEST_NUMBER"
  MERGE_BASE=`wget -qO -
   https://api.github.com/repos/${APPVEYOR_REPO_NAME}/${PULL_REQUEST_ID}
   | jq -r ".base.ref"`

  git diff --name-only HEAD origin/$MERGE_BASE > .pvs-pr.list
  pvs-studio-analyzer analyze -j8
                              -o PVS-Studio.log
                              --disableLicenseExpirationCheck
                              --dump-files --dump-log pvs-dump.log
                              -S .pvs-pr.list
else
  pvs-studio-analyzer analyze -j8
                              -o PVS-Studio.log
                              --disableLicenseExpirationCheck
fi
At first glance, it seems odd to assign the result of the pwd command as a value to a variable that is supposed to store that value by default, but let me explain.
During the setup of the analyzer in AppVeyor, I encountered some very strange behavior from the analyzer. On one hand, everything worked correctly, but the analysis wouldn't start. I spent considerable time realizing that we were in the /home/appveyor/projects/testcalc/ directory, while the analyzer believed we were in /opt/appveyor/build-agent/. That’s when I figured out that the $PWD variable was misleading. Therefore, I manually updated its value before starting the analysis.
And then everything continues as before:
Now let’s look at the following snippet:
PULL_REQUEST_ID="pulls/$APPVEYOR_PULL_REQUEST_NUMBER"
MERGE_BASE=`wget -qO -
  https://api.github.com/repos/${APPVEYOR_REPO_NAME}/${PULL_REQUEST_ID}
  | jq -r ".base.ref"`
Here, we retrieve the difference between the branches specified in the pull request. For this, we need the following environment variables:
- $APPVEYOR_PULL_REQUEST_NUMBER — the number of the pull request;
- $APPVEYOR_REPO_NAME — the username and repository name of the project.
Conclusion
Of course, we haven’t covered all possible continuous integration services, but they all have extremely similar operational characteristics. Except for caching, each service creates its own ‘wheel,’ so the setups vary greatly.
In some cases, like in Travis-CI, a couple of lines of code make caching work flawlessly; in others, like in AppVeyor, you just need to specify a folder in the settings; but in some cases, you have to create unique keys and try to convince the system to allow you to overwrite a cached fragment. Therefore, if you want to set up pull request analysis on a continuous integration service not mentioned above, first make sure you won't encounter caching issues.
Thank you for your attention. If something doesn’t work, feel free to contact us at . We will provide guidance and assistance.
If you want to share this article with an English-speaking audience, please use the link to the translation: Maxim Zvyagintsev. .
Source: habr.com
