

Hello.
In this article, I want to describe the process of building my first robot using Arduino. The material will be useful for other beginners like me who want to create some kind of "self-driving cart." The article outlines the stages of work along with my additions regarding various nuances. A link to the final code (which is probably not perfect) is provided at the end of the article.
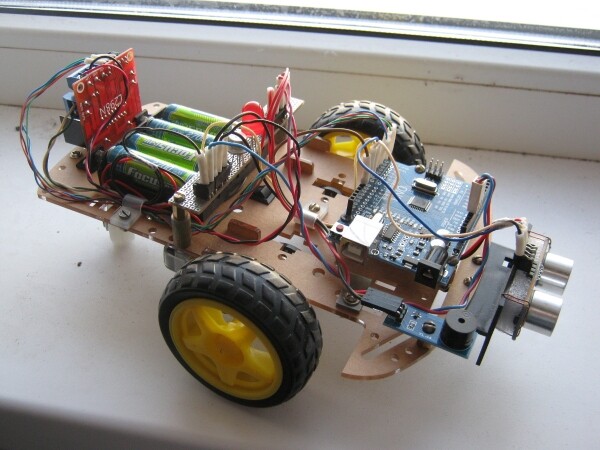
Whenever possible, I involved my son (8 years old). I dedicated part of the article to what worked well with him and what didn't — this may be helpful to someone.
General description of the robot
First, a few words about the robot (the idea). I didn't want to build something typical at the start. At the same time, the components I had were quite standard — chassis, motors, ultrasonic sensor, line sensor, LEDs, and a buzzer. Initially, from this "soup set," I designed a robot that protects its territory. It approaches the intruder who crosses the circle's line and then returns to the center. However, this variant required a drawn line, plus extra calculations to stay within the circle.
So, after some reflection, I slightly changed the idea and decided to make a "hunter" robot. At the start, it rotates around its axis, selecting a nearby target (a person). If the "prey" is detected, the "hunter" turns on the flashing light and siren and starts moving towards it. When the person moves away, the robot selects a new target and pursues it, and so on. Such a robot doesn't need a limited circle and can operate in open territory.
As you can see, it resembles the game of "tag" in many ways. Although the end robot didn't turn out to be very swift, it honestly interacts with the people around it. Children especially enjoy it (sometimes it seems they might trample it, which makes my heart skip a beat…). I think this is a great solution for promoting technical construction.
Structure of the robot
Now that we have settled on the idea, let's move on to the layout. The list of components is formed based on what the robot should be able to do. This is quite obvious, so let's immediately look at the numbering:
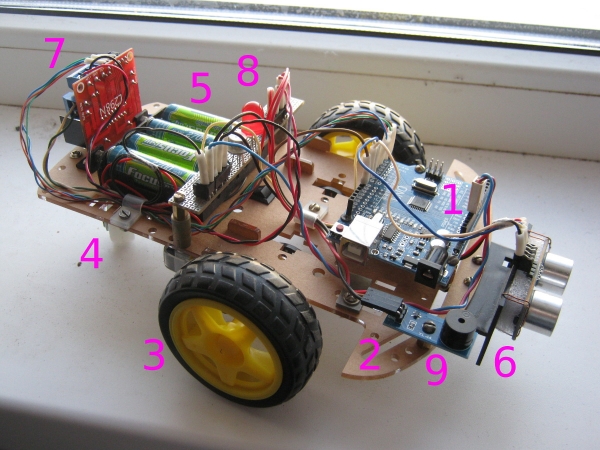
The "brain" of the robot is the Arduino Uno board (1), which was part of a kit ordered from China. It's sufficient for our purposes (we're considering the number of pins used). From the same kit, we took a ready-made chassis (2), to which two drive wheels (3) and one rear wheel (freely rotating) (4) are attached. The kit also included a ready-made battery compartment (5). At the front of the robot is an ultrasonic sensor (HC-SR04) (6), at the back is the motor driver (L298N) (7), in the center is a blinking LED (8), and slightly off to the side is a buzzer (9).
During the assembly stage, we're looking at:
— ensuring everything fits
— ensuring it's balanced
— ensuring it's rationally placed
Partially, this has already been done for us by our Chinese colleagues. The heavy battery compartment is positioned in the center, and the drive wheels are placed roughly underneath it. All other boards are lightweight, so they can be arranged around the periphery.
Details:
- The chassis from the kit has many factory holes, but I couldn't figure out their logic. The motors and battery pack were secured without any problems, but then it started the "fitting" process, involving drilling new holes to mount various boards.
- Brass stands and other fasteners from our supplies came in quite handy (sometimes I had to improvise).
- I routed wires from each board through clamps (which I also found in the supplies). It's very convenient; all wires are neatly arranged and not dangling.
Individual blocks
Now I'll go over the blocks and explain each one individually.
Battery compartment
It's clear that the robot needs a good power source. There can be various options; I chose a setup with 4 AA batteries. Altogether, they provide about 5 V, and this voltage can be fed directly to the 5V pin of the Arduino board (bypassing the regulator).
I did have some reservations, but this solution works quite well.
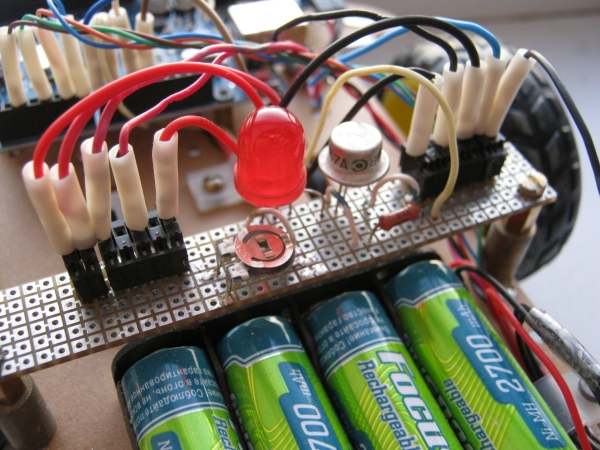
Since power is needed everywhere, for convenience I made two connectors at the center of the robot: one provides ground (to the right), and the other provides 5 V (to the left).
Motors and driver
First, about the engine mounting. The factory mounting is done with large tolerances. In other words, the engines can 'wiggle' a couple of millimeters left and right. For our task, this is not critical, but it can affect something (the robot may start to drift). Just to be safe, I aligned the engines perfectly and fixed them with glue.
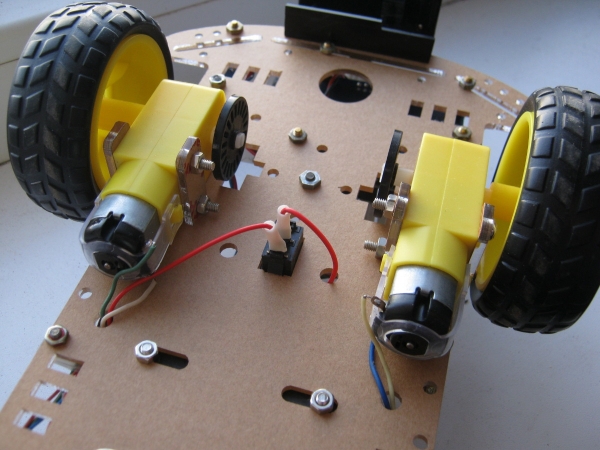
To control the engines, as I mentioned above, I use the L298N driver. According to the documentation, it has three pins for each engine: one for speed adjustment and a pair of pins for rotation direction. There is one important point. It turns out that if the supply voltage is 5V, then speed control simply does not work! Either it doesn't turn at all, or it spins at maximum. This peculiarity cost me a few evenings. Eventually, I found a mention of it on one of the forums.
Generally speaking, I needed low rotation speed when turning the robot—to allow it time to scan the area. But since that idea didn't work out, I had to do it differently: small turn—stop—turn—stop, and so on. Again, not as elegant, but functional.
I'll also add here that after each pursuit, the robot chooses a random direction for its next turn (clockwise or counterclockwise).
Ultrasonic sensor
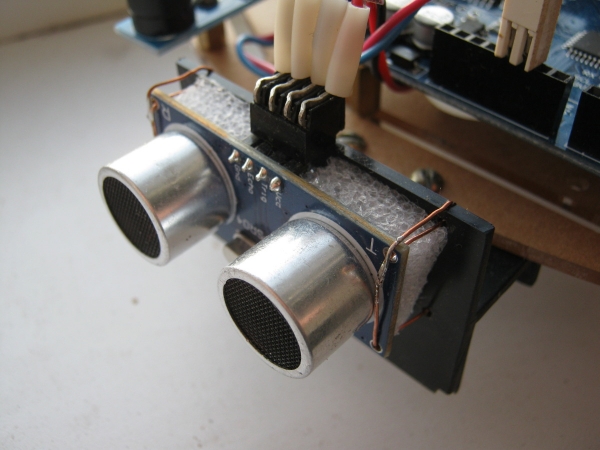
Another piece of hardware where I had to find a compromise solution. The ultrasonic sensor gives unstable readings on real obstacles. This was actually expected. It works perfectly at competitions, where there are smooth, flat, and perpendicular surfaces, but when someone's legs are 'flashing' in front of it, additional processing is needed.
As such processing, I set up for three readings. Based on tests on real children (no child was harmed during the tests!), this proved sufficient for normalizing the data. The physics here is simple: we have signals reflected from relevant objects (providing the required distance) and those reflected from farther objects, like walls. The latter present random outliers in measurements like 45, 46, 230, 46, 46, 45, 45, 310, 46… It is these outliers that the median filter filters out.
After all the processing, we get the distance to the nearest object. If this distance is less than a certain threshold, we activate the alarm and go directly to the "violator."
Flashing light and siren
Probably the simplest elements from all that has been mentioned. They can be seen in the photos above. There's not much to say about the hardware, so let's move on to the code.
Control program
I don't see the point in detailing the code; for those interested, the link is at the end of the article, where everything is quite readable. However, it would be good to explain the overall structure.
The first thing I had to understand is that a robot is a real-time device. More precisely, I had to recall this because I've always been involved in electronics. So, we immediately forget about the call to delay(), which is often used in example sketches and simply "freezes" the program for the specified period. Instead, as experienced people advise, we introduce timers for each block. Once the required interval has passed, we perform the action (increased the brightness of the LED, turned on the motor, and so on).
Timers can be interconnected. For example, the buzzer works synchronously with the flashing light. This slightly simplifies the program.
Naturally, we break everything down into separate functions (flashing light, sound, turning, moving forward, and so on). If we don't do this, it becomes hard to understand later what is where.
Nuances of pedagogy
All that was described above, I did in my free time in the evenings. At a leisurely pace, I spent about three weeks on the robot. This could be a conclusion, but I also promised to tell you about working with children. What can be done at such an age?
Work according to the instructions
We initially checked each component separately — LEDs, buzzer, motors, sensors, etc. There are plenty of ready-made examples — some are directly within the development environment, others can be found online. This is undoubtedly pleasing. We take the code, connect the component, make sure it works, and then start modifying it for our task. The connections according to the diagram and under my supervision are made by the child themselves. This is good. It's also essential to be able to follow instructions precisely.
Working order (from specific to general)
This is a complex point. One needs to get used to the idea that a large project (like 'making a robot') consists of smaller tasks (such as 'connecting a sensor' or 'connecting motors'), which in turn are made up of even smaller steps (like 'finding a program', 'connecting the board', 'uploading the firmware', etc.). By completing more or less understandable lower-level tasks, we 'close' the mid-level tasks, which together create the overall result. I've explained this, but I think realization will take some time, probably until the teenage years.
Installation
Drilling, threading, screws, nuts, soldering, and the smell of rosin — where would we be without them? The child acquired the basic skill 'Working with a soldering iron' — we managed to solder a few connections (I helped a little, I won't hide that). Don't forget about the explanation of safety precautions.
Working on the computer
I wrote the program for the robot, but we did achieve some incidental results.
First: English. It was just starting in school, so we struggled to understand what words like pishalka, migalka, yarkost, and other transliterated terms meant. At least we grasped this. I deliberately avoided using native English words, as we haven't reached that level yet.
Second: effective work. We learned hotkey combinations, how to quickly perform standard operations. Periodically, when we were writing a program, my son and I would switch places, and I would explain what needed to be done (replacements, searches, etc.). I had to repeat over and over: 'highlight with double-click', 'hold down Shift', 'hold down Ctrl', and so on. The learning process here isn't quick, but I think the skills will gradually become ingrained.
Hidden textYou might say that what is described above is almost obvious. But honestly, this autumn, I had the opportunity to teach computer science to 9th graders in one school. It's a disaster. The students don't know such elementary things as Ctrl + Z, Ctrl + C, and Ctrl + V, selecting text with Shift held down or double-clicking on a word, and so on. This is despite the fact that they have been studying computer science for three years... Draw your own conclusions.
Third: touch typing. I entrusted my child with typing comments in the code (let them practice). We immediately positioned their hands properly so that their fingers would gradually memorize the key layout.
As you can see, we are just getting started. We will continue to refine our skills and knowledge, which will come in handy in life.
By the way, about the prospects...
Further development
The robot is built, it moves, lights up, and beeps. What now? Inspired by our achievement, we plan to continue refining it. There's an idea to implement remote control — similar to a lunar rover. It would be interesting to control the robot's movement from a hypothetical remote while it's in a completely different location. But that's a story for another time...
And in conclusion, here are the heroes of this article (video available by clicking):
Thank you for your attention!
→
Source: habr.com
