

A few days ago, I decided to reverse engineer the firmware of my router using binwalk.
I bought myself . Not the best router, but it's sufficient for my needs.
Every time I buy a new router, I install . Why? Usually, manufacturers do not pay much attention to supporting their routers, and over time the software becomes outdated, vulnerabilities arise, and so on, you get the idea. That's why I prefer a well-supported community-driven open-source firmware like OpenWRT.
After downloading OpenWRT, I also for my new Archer C7 from the official website and decided to analyze it. Just for fun and to talk about binwalk.
What is binwalk?
is an open-source tool for analyzing, reverse engineering, and extracting firmware images.
Created in 2010 by Craig Heffner, binwalk can scan firmware images and find files, identify and extract filesystem images, executable code, compressed archives, bootloaders and kernels, file formats like JPEG and PDF, and much more.
You can use binwalk to reverse engineer firmware to understand how it works. Look for vulnerabilities in binary files, extract files, and search for backdoors or digital certificates. You can also find opcodes for a variety of CPUs.
You can unpack filesystem images to search for certain password files (passwd, shadow, etc.) and attempt to crack password hashes. You can perform binary analysis between two or more files. You can conduct entropy analysis of the data to search for compressed data or encoded encryption keys. All this without needing access to the source code.
In short, everything you need is here 🙂
How does binwalk work?
The main feature of binwalk is its signature scanning. Binwalk can scan a firmware image in search of various embedded file types and filesystems.
You know the command-line utility file?
file /bin/bash
/bin/bash: ELF 64-bit LSB shared object, x86-64, version 1 (SYSV), dynamically linked, interpreter /lib64/l, for GNU/Linux 3.2.0, BuildID[sha1]=12f73d7a8e226c663034529c8dd20efec22dde54, stripped
The command filelooks at the file header and searches for a signature (magic number) to determine the file type. For example, if the file starts with a sequence of bytes 0x89 0x50 0x4E 0x47 0x0D 0x0A 0x1A 0x0A, it knows that this is a PNG file. On there is a list of common file signatures.
Binwalk works similarly. But instead of searching for signatures only at the beginning of the file, binwalk will scan the entire file. Additionally, binwalk can extract files found in the image.
Tools file and binwalk uses the libmagic library for identifying file signatures. But binwalk also supports a list of user-defined magic signatures for searching compressed/archive files, firmware headers, Linux kernels, bootloaders, file systems, and more.
Shall we have some fun?
Installing binwalk
Binwalk is supported on several platforms, including Linux, OSX, FreeBSD, and Windows.
To install the latest version of binwalk, you can and follow the or , available on the project's website.
Binwalk has many different parameters:
$ binwalk

Binwalk v2.2.0
Craig Heffner, ReFirmLabs
https://github.com/ReFirmLabs/binwalk

Usage: binwalk [OPTIONS] [FILE1] [FILE2] [FILE3] ...

Signature Scan Options:
    -B, --signature              Scan target file(s) for common file signatures
    -R, --raw=              Scan target file(s) for the specified sequence of bytes
    -A, --opcodes                Scan target file(s) for common executable opcode signatures
    -m, --magic=           Specify a custom magic file to use
    -b, --dumb                   Disable smart signature keywords
    -I, --invalid                Show results marked as invalid
    -x, --exclude=          Exclude results that match
    -y, --include=          Only show results that match

Extraction Options:
    -e, --extract                Automatically extract known file types
    -D, --dd=      Extract  signatures, give the files an extension of , and execute
    -M, --matryoshka             Recursively scan extracted files
    -d, --depth=            Limit matryoshka recursion depth (default: 8 levels deep)
    -C, --directory=        Extract files/folders to a custom directory (default: current working directory)
    -j, --size=             Limit the size of each extracted file
    -n, --count=            Limit the number of extracted files
    -r, --rm                     Delete carved files after extraction
    -z, --carve                  Carve data from files, but don't execute extraction utilities
    -V, --subdirs                Extract into sub-directories named by the offset

Entropy Options:
    -E, --entropy                Calculate file entropy
    -F, --fast                   Use faster, but less detailed, entropy analysis
    -J, --save                   Save plot as a PNG
    -Q, --nlegend                Omit the legend from the entropy plot graph
    -N, --nplot                  Do not generate an entropy plot graph
    -H, --high=           Set the rising edge entropy trigger threshold (default: 0.95)
    -L, --low=            Set the falling edge entropy trigger threshold (default: 0.85)

Binary Diffing Options:
    -W, --hexdump                Perform a hexdump / diff of a file or files
    -G, --green                  Only show lines containing bytes that are the same among all files
    -i, --red                    Only show lines containing bytes that are different among all files
    -U, --blue                   Only show lines containing bytes that are different among some files
    -u, --similar                Only display lines that are the same between all files
    -w, --terse                  Diff all files, but only display a hex dump of the first file

Raw Compression Options:
    -X, --deflate                Scan for raw deflate compression streams
    -Z, --lzma                   Scan for raw LZMA compression streams
    -P, --partial                Perform a superficial, but faster, scan
    -S, --stop                   Stop after the first result

General Options:
    -l, --length=           Number of bytes to scan
    -o, --offset=           Start scan at this file offset
    -O, --base=             Add a base address to all printed offsets
    -K, --block=            Set file block size
    -g, --swap=             Reverse every n bytes before scanning
    -f, --log=             Log results to file
    -c, --csv                    Log results to file in CSV format
    -t, --term                   Format output to fit the terminal window
    -q, --quiet                  Suppress output to stdout
    -v, --verbose                Enable verbose output
    -h, --help                   Show help output
    -a, --finclude=         Only scan files whose names match this regex
    -p, --fexclude=         Do not scan files whose names match this regex
    -s, --status=           Enable the status server on the specified port
Image Scanning
Let's start by searching for file signatures within the image (image from the site ).
Running binwalk with the --signature parameter:
$ binwalk --signature --term archer-c7.bin

DECIMAL       HEXADECIMAL     DESCRIPTION
------------------------------------------------------------------------------------------
21876         0x5574          U-Boot version string, "U-Boot 1.1.4-g4480d5f9-dirty (May
                              20 2019 - 18:45:16)"
21940         0x55B4          CRC32 polynomial table, big endian
23232         0x5AC0          uImage header, header size: 64 bytes, header CRC:
                              0x386C2BD5, created: 2019-05-20 10:45:17, image size:
                              41162 bytes, Data Address: 0x80010000, Entry Point:
                              0x80010000, data CRC: 0xC9CD1E38, OS: Linux, CPU: MIPS,
                              image type: Firmware Image, compression type: lzma, image
                              name: "u-boot image"
23296         0x5B00          LZMA compressed data, properties: 0x5D, dictionary size:
                              8388608 bytes, uncompressed size: 97476 bytes
64968         0xFDC8          XML document, version: "1.0"
78448         0x13270         uImage header, header size: 64 bytes, header CRC:
                              0x78A267FF, created: 2019-07-26 07:46:14, image size:
                              1088500 bytes, Data Address: 0x80060000, Entry Point:
                              0x80060000, data CRC: 0xBB9D4F94, OS: Linux, CPU: MIPS,
                              image type: Multi-File Image, compression type: lzma,
                              image name: "MIPS OpenWrt Linux-3.3.8"
78520         0x132B8         LZMA compressed data, properties: 0x6D, dictionary size:
                              8388608 bytes, uncompressed size: 3164228 bytes
1167013       0x11CEA5        Squashfs filesystem, little endian, version 4.0,
                              compression:xz, size: 14388306 bytes, 2541 inodes,
                              blocksize: 65536 bytes, created: 2019-07-26 07:51:38
15555328      0xED5B00        gzip compressed data, from Unix, last modified: 2019-07-26
                              07:51:41
Now we have a lot of information about this image.
The image uses as the bootloader (the image header is at address 0x5AC0 and the compressed bootloader image is at address 0x5B00). Based on the uImage header at address 0x13270, we know that the CPU architecture is MIPS, and the Linux kernel version is 3.3.8. And based on the image found at address 0x11CEA5, we can see that rootfs is the file system squashfs.
Now let's unpack the bootloader (U-Boot) using the command dd:
$ dd if=archer-c7.bin of=u-boot.bin.lzma bs=1 skip=23296 count=41162
41162+0 records in
41162+0 records out
41162 bytes (41 kB, 40 KiB) copied, 0.0939608 s, 438 kB/s
Since the image is compressed using LZMA, we need to decompress it:
$ unlzma u-boot.bin.lzmaNow we have the U-Boot image:
$ ls -l u-boot.bin
-rw-rw-r-- 1 sprado sprado 97476 Feb  5 08:48 u-boot.bin
How about searching for the default value for bootargs?
$ strings u-boot.bin | grep bootargs
bootargs
bootargs=console=ttyS0,115200 board=AP152 rootfstype=squashfs init=/etc/preinit mtdparts=spi0.0:128k(factory-uboot),192k(u-boot),64k(ART),1536k(uImage),14464k@0x1e0000(rootfs) mem=128M
U-Boot environment variable bootargs is used to pass parameters to the Linux kernel. From the above, we better understand the device's flash memory.
What about extracting the Linux kernel image?
$ dd if=archer-c7.bin of=uImage bs=1 skip=78448 count=1088572
1088572+0 records in
1088572+0 records out
1088572 bytes (1.1 MB, 1.0 MiB) copied, 1.68628 s, 646 kB/s
We can check that the image has been successfully extracted using the command file:
$ file uImage
uImage: u-boot legacy uImage, MIPS OpenWrt Linux-3.3.8, Linux/MIPS, Multi-File Image (lzma), 1088500 bytes, Fri Jul 26 07:46:14 2019, Load Address: 0x80060000, Entry Point: 0x80060000, Header CRC: 0x78A267FF, Data CRC: 0xBB9D4F94
The uImage file format is essentially a Linux kernel image with an additional header. Let's remove this header to get the final Linux kernel image:
$ dd if=uImage of=Image.lzma bs=1 skip=72
1088500+0 records in
1088500+0 records out
1088500 bytes (1.1 MB, 1.0 MiB) copied, 1.65603 s, 657 kB/s
The image is compressed, so let's unpack it:
$ unlzma Image.lzmaNow we have the Linux kernel image:
$ ls -la Image
-rw-rw-r-- 1 sprado sprado 3164228 Feb 5 10:51 Image
What can we do with the kernel image? For example, we could search for strings in the image to find the Linux kernel version and learn about the environment used to build the kernel:
$ strings Image | grep "Linux version"
Linux version 3.3.8 (leo@leo-MS-7529) (gcc version 4.6.3 20120201 (prerelease) (Linaro GCC 4.6-2012.02) ) #1 Mon May 20 18:53:02 CST 2019
Despite the fact that the firmware was released last year (2019), as I write this article, it uses an old version of the Linux kernel (3.3.8), released in 2012, compiled with a very old version of GCC (4.6) also from 2012!
(note for the translator: do you still trust your routers at home and in the office?)
With the option --opcodes we can also use binwalk to search for machine instructions and determine the architecture of the image's processor:
$ binwalk --opcodes Image
DECIMAL       HEXADECIMAL     DESCRIPTION
--------------------------------------------------------------------------------
2400          0x960           MIPS instructions, function epilogue
2572          0xA0C           MIPS instructions, function epilogue
2828          0xB0C           MIPS instructions, function epilogue
What about the root file system? Instead of extracting the image manually, let's use the option binwalk --extract:
$ binwalk --extract --quiet archer-c7.binThe complete root file system will be extracted to a subdirectory:
$ cd _archer-c7.bin.extracted/squashfs-root/

$ ls
bin  dev  etc  lib  mnt  overlay  proc  rom  root  sbin  sys  tmp  usr  var  www

$ cat etc/banner
     MM           NM                    MMMMMMM          M       M
   $MMMMM        MMMMM                MMMMMMMMMMM      MMM     MMM
  MMMMMMMM     MM MMMMM.              MMMMM:MMMMMM:   MMMM   MMMMM
MMMM= MMMMMM  MMM   MMMM       MMMMM   MMMM  MMMMMM   MMMM  MMMMM'
MMMM=  MMMMM MMMM    MM       MMMMM    MMMM    MMMM   MMMMNMMMMM
MMMM=   MMMM  MMMMM          MMMMM     MMMM    MMMM   MMMMMMMM
MMMM=   MMMM   MMMMMM       MMMMM      MMMM    MMMM   MMMMMMMMM
MMMM=   MMMM     MMMMM,    NMMMMMMMM   MMMM    MMMM   MMMMMMMMMMM
MMMM=   MMMM      MMMMMM   MMMMMMMM    MMMM    MMMM   MMMM  MMMMMM
MMMM=   MMMM   MM    MMMM    MMMM      MMMM    MMMM   MMMM    MMMM
MMMM$ ,MMMMM  MMMMM  MMMM    MMM       MMMM   MMMMM   MMMM    MMMM
  MMMMMMM:      MMMMMMM     M         MMMMMMMMMMMM  MMMMMMM MMMMMMM
    MMMMMM       MMMMN     M           MMMMMMMMM      MMMM    MMMM
     MMMM          M                    MMMMMMM        M       M
       M
 ---------------------------------------------------------------
   For those about to rock... (%C, %R)
 ---------------------------------------------------------------
Now we can do a lot of different things.
We can search for configuration files, password hashes, cryptographic keys, and digital certificates. We can analyze binary files for and vulnerabilities.
Using and we can even run (emulate) an executable from the image:
$ ls
bin  dev  etc  lib  mnt  overlay  proc  rom  root  sbin  sys  tmp  usr  var  www

$ cp /usr/bin/qemu-mips-static .

$ sudo chroot . ./qemu-mips-static bin/busybox
BusyBox v1.19.4 (2019-05-20 18:13:49 CST) multi-call binary.
Copyright (C) 1998-2011 Erik Andersen, Rob Landley, Denys Vlasenko
and others. Licensed under GPLv2.
See source distribution for full notice.

Usage: busybox [function] [arguments]...
   or: busybox --list[-full]
   or: function [arguments]...

    BusyBox is a multi-call binary that combines many common Unix
    utilities into a single executable. Most people will create a
    link to busybox for each function they wish to use and BusyBox
    will act like whatever it was invoked as.

Currently defined functions:
    [, [[, addgroup, adduser, arping, ash, awk, basename, cat, chgrp, chmod, chown, chroot, clear, cmp, cp, crond, crontab, cut, date, dd, delgroup, deluser, dirname, dmesg, echo, egrep, env, expr, false,
    fgrep, find, free, fsync, grep, gunzip, gzip, halt, head, hexdump, hostid, id, ifconfig, init, insmod, kill, killall, klogd, ln, lock, logger, ls, lsmod, mac_addr, md5sum, mkdir, mkfifo, mknod, mktemp,
    mount, mv, nice, passwd, pgrep, pidof, ping, ping6, pivot_root, poweroff, printf, ps, pwd, readlink, reboot, reset, rm, rmdir, rmmod, route, sed, seq, sh, sleep, sort, start-stop-daemon, strings,
    switch_root, sync, sysctl, tail, tar, tee, telnet, test, tftp, time, top, touch, tr, traceroute, true, udhcpc, umount, uname, uniq, uptime, vconfig, vi, watchdog, wc, wget, which, xargs, yes, zcat
Awesome! But note that the version of BusyBox is 1.19.4. This is a very old version of BusyBox, released in April 2012.
So, TP-Link releases the firmware image in 2019 using software (GCC toolchain, kernel, BusyBox, etc.) from 2012!
Now you understand why I always install OpenWRT on my routers?
That’s not all
Binwalk can also perform entropy analysis, print raw entropy data, and generate entropy graphs. High entropy is typically observed when the bytes in the image are random. This may indicate that the image contains an encrypted, compressed, or obfuscated file. A hardcoded encryption key? Why not.
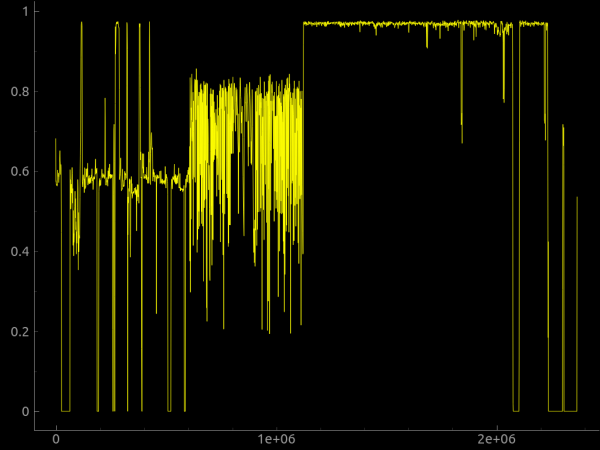
We can also use the parameter --raw to search for a custom sequence of raw bytes in the image or the parameter --hexdump to perform a hexadecimal dump comparing two or more input files.
can be added to binwalk either through a custom signatures file specified in the command line with the parameter --magic, or by adding them to the directory $HOME/.config/binwalk/magic.
You can find more information about binwalk in .
The binwalk extension
There is import binwalk binwalk.scan()
With the Python API, you can also createPython plugins There is also
an IDA plugin Binwalk Pro. .
Chrome will start blocking downloads of files over HTTP.
Source: habr.com
