


— is one of the most notable trends in cloud computing. The fundamental principle is that the infrastructure is the responsibility of service providers, not DevOps. Resource scaling automatically adapts to load and has a high pace of change.
Another common feature is the trend towards minimizing and focusing the code, which is why serverless computing is sometimes referred to as 'Function as a Service' (FaaS).
Historically, the first cloud service provider to offer FaaS with AWS Lambda was Amazon, which is where the term originated. Other cloud service providers also offer analogs:
- Google Cloud Functions
- Microsoft Azure Functions
All these companies provide serverless computing, automatic scaling, and payment only for resources actually used, but they tie customers to their proprietary products. However, there are free open-source alternatives for organizing serverless computing. It is worth noting:
- The platform , developed in an incubator by IBM,
- , as part of a fairly rich ecosystem of the Spring Framework, which can also be used as a facade for AWS Lambda, Azure Functions, and OpenWhisk,
- , supported by Oracle.
All of them are completely independent of clouds, meaning they can be installed in any cloud, including your own, public or private, and of course in Exoscale.
How the Fn project is structured
Fn is entirely based on Docker and consists of two main components:
- A CLI program designed to manage all aspects of the Fn infrastructure and interact with the Fn server,
- The Fn server itself, a regular application packaged in a Docker container.
Functions deployed in Fn are also executed in separate containers, allowing support for a wide range of programming languages, for instance… Clojure!
Function arguments are passed via standard input (STDIN), and results are written to standard output (STDOUT). If the arguments or return values are not simple values (e.g., JSON object), they can be transformed using an abstraction layer provided by Fn in the form of a Function Development Kit (FDK).
Convenient built-in template sets are offered to simplify the deployment of FaaS across a wide range of languages and their versions (Go, various versions of Java, Python, etc.).
Creating FaaS is straightforward by following this scheme:
- We deploy the function using the Fn CLI: an application configuration file for Fn is created based on the selected template.
- We roll out our own function, again using the Fn CLI: the container image is placed into a repository, after which the server is notified of its existence and location.
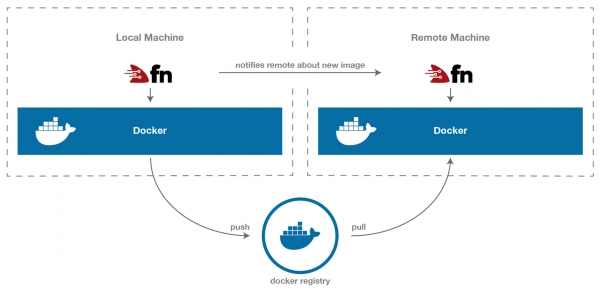
The principle of function delivery in Fn
Local installation and testing of serverless functions
Let's get started with installing Fn on our local machine. First, Docker is installed as required by Fn. We assume we are on Debian/Ubuntu:
$ sudo apt-get update
$ sudo apt-get install docker.io
Or use the package manager/build of Docker according to your system. Then you can proceed directly to installing the Fn CLI. For example, using curl:
$ curl -LSs https://raw.githubusercontent.com/fnproject/cli/master/install | shIf you are working on OSX with Homebrew installed, you can take an alternative route:
$ brew install fn

==> Downloading https://homebrew.bintray.com/bottles/fn-0.5.8.high_sierra.bottle.tar.gz
==> Downloading from https://akamai.bintray.com/b1/b1767fb00e2e69fd9da73427d0926b1d1d0003622f7ddc0dd3a899b2894781ff?__gda__=exp=1538038849~hmac=c702c9335e7785fcbacad1f29afa61244d02f2eebb
######################################################################## 100.0%
==> Pouring fn-0.5.8.high_sierra.bottle.tar.gz
  /usr/local/Cellar/fn/0.5.8: 5 files, 16.7MB
Now everything is ready for the initial deployment of our function using the CLI. For simplicity, we will use the built-in runtime, for example, Node:
$ fn init --runtime node --trigger http hellonode

Creating function at: /hellonode
Function boilerplate generated.
func.yaml created.
A new directory will be created hellonode for further development of our Fn function with some basic configuration files. Inside the newly created directory, you can create your application according to the standards of your chosen language or runtime:
# Каталог с node выглядит так:

   hellonode
   ├── func.js
   ├── func.yaml
   └── package.json

# Свежеустановленное окружение Java11 такое:

   hellojava11
   ├── func.yaml
   ├── pom.xml
   └── src
       ├── main
       │   └── java
       │       └── com
       │           └── example
       │               └── fn
       │                   └── HelloFunction.java
       └── test
           └── java
               └── com
                   └── example
                       └── fn
                           └── HelloFunctionTest.java
Fn creates the initial project structure, generates a file func.yaml, containing the necessary setups for Fn, and establishes a template for the code in the language you selected.
In the case of the Node runtime, this means:
$ cat hellonode/func.js

const fdk=require('@fnproject/fdk');

fdk.handle(function(input){
  let name = 'World';
  if (input.name) {
    name = input.name;
  }
  return {'message': 'Hello ' + name}
})
Now we will quickly test our function locally to see how everything works.
First, we will start the Fn server. As mentioned, the Fn server is a Docker container, so once started, it will pull the image from the Docker registry.
$ fn start -d                    # starting the local server in the background

Unable to find image 'fnproject/fnserver:latest' locally
latest: Pulling from fnproject/fnserver
ff3a5c916c92: Pull complete
1a649ea86bca: Pull complete
ce35f4d5f86a: Pull complete

...

Status: Downloaded newer image for fnproject/fnserver:latest
668ce9ac0ed8d7cd59da49228bda62464e01bff2c0c60079542d24ac6070f8e5
To deploy our function, it needs to be 'pushed'. For that, we need the application name: in Fn, all applications must be specified as namespaces for related functions.
The Fn CLI will look for a file func.yaml in the current directory that will be used to configure the function. So first, we need to navigate to our directory hellonode.
$ cd hellonode
$ fn deploy --app fnexo --local  # deploying the function locally, application name - fnexo.
                                 # the local parameter does not push the image to the remote registry,
                                 # running it directly

Deploying hellonode to app: fnexo
Bumped to version 0.0.2
Building image nfrankel/hellonode:0.0.3 .
Updating function hellonode using image nfrankel/hellonode:0.0.3...
Successfully created app:  fnexo
Successfully created function: hellonode with nfrankel/hellonode:0.0.3
Successfully created trigger: hellonode-trigger
As seen from the command output, a new Docker container image is being created that contains our function. The function is ready for invocation, and we have two ways to do this:
- using the Fn command
invoke - invoking directly via
the HTTP
Call invoke Fn merely emulates HTTP behavior for testing, which is convenient for quick verification:
$ fn invoke fnexo hellonode      # invoking the hellonode function of the fnexo application

{"message":"Hello World"}
To invoke the function directly, you need to know the full URL:
$ curl http://localhost:8080/t/fnexo/hellonode-trigger

{"message":"Hello World"}
The Fn server provides its functions through port 8080, and it seems that the function's URL follows the scheme t/app/function, but not entirely. The function is invoked not directly via HTTP, but through what is called a trigger, which, as its name suggests, 'triggers' the function call. Triggers are defined in `func.yml of the project:
schema_version: 20180708
name: hellonode
version: 0.0.3
runtime: node
entrypoint: node func.js
format: json
triggers:
- name: hellonode-trigger
  type: http
  source: /hellonode-trigger    # trigger URL
We can change the trigger name to match the function's name, to simplify things:
triggers:
- name: hellonode-trigger
  type: http
  source: /hellonode    # matches the function name
Then we run the function deployment again and invoke it from the new trigger:
$ fn deploy --app fnexo hellonode --local
$ curl http://localhost:8080/t/fnexo/hellonode

{"message":"Hello World"}
Everything is working! It's the perfect time to conduct real-world experiments and publish our FaaS on the server!
Setting up serverless function services on your own infrastructure
Let's quickly set up a virtual machine using the Exoscale CLI. If you haven't configured it yet, you can use . It's a great tool that will further increase your productivity. Remember to configure a rule to open port 8080 in the Security Group! The following commands will launch a clean virtual machine ready to host our functions:
$ exo firewall create fn-securitygroup
$ exo firewall add fn-securitygroup ssh --my-ip
$ exo firewall add fn-securitygroup -p tcp -P 8080-8080 -c 0.0.0.0/0
$ exo vm create fn-server -s fn-securitygroup
Then you can SSH into the virtual machine and install the remote Fn server:
$ exo ssh fn-server

The authenticity of host '185.19.30.175 (185.19.30.175)' can't be established.
ECDSA key fingerprint is SHA256:uaCKRYeX4cvim+Gr8StdPvIQ7eQgPuOKdnj5WI3gI9Q.
Are you sure you want to continue connecting (yes/no)? yes
Warning: Permanently added '185.19.30.175' (ECDSA) to the list of known hosts.
Welcome to Ubuntu 18.04 LTS (GNU/Linux 4.15.0-20-generic x86_64)
Next, install Docker and the Fn server just as done on the local machine, then start the server:
$ sudo apt-get update
$ sudo apt-get install docker.io
$ sudo systemctl start docker
$ curl -LSs https://raw.githubusercontent.com/fnproject/cli/master/install | sh
$ sudo fn start

...

    ______
   / ____/___
  / /_  / __
 / __/ / / / /
/_/   /_/ /_/
    v0.3.643
Fn is ready to receive functions! To target function deployment to the remote server, we will use the command deploy from the local computer, omitting the flag --local.
In addition, Fn requires the specification of the Fn server and Docker registry locations. These parameters can be set via environment variables FN_API_URL and FN_REGISTRY respectively, but a more convenient method for easy management of configurations for deployment is suggested.
In Fn terminology, the configuration for deployment is called context. The following command will create a context:
$ fn create context exoscale --provider default --api-url http://185.19.30.175:8080 --registry nfrankelYou can view available contexts like this:
$ fn list contexts

CURRENT NAME      PROVIDER      API URL                      REGISTRY
    default       default       http://localhost:8080/
    exoscale      default       http://185.19.30.175:8080    nfrankel
And switch to the context that was just created like this:
 $ fn use context exoscale

 Now using context: exoscale
Starting from this point, the Fn function delivery will load Docker images using the selected account on DockerHub (in my case — nfrankel), after which it will notify the remote server (in this example — http://185.19.30.175:8080) of the location and version of the latest image containing your function.
$ fn deploy --app fnexo .   # executed on the local machine from the hellonode directory

Deploying function at: \/.
Deploying hellonode to app: fnexo
Bumped to version 0.0.5
Building image nfrankel\/hellonode:0.0.5 .
Finally:
$ curl http:\/\/185.19.30.175:8080\/t\/fnexo\/hellonode

{"message":"Hello World"}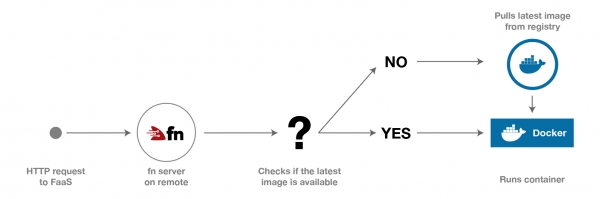
Function lifecycle in serverless computing based on Fn
Advantages of serverless computing on your infrastructure
Serverless computing is a convenient solution for quickly deploying independent parts of an application that interact with more complex applications or microservices.
This is often associated with the hidden costs of vendor lock-in, which, depending on the specific use case and scale, can lead to higher expenses and reduced flexibility in the future.
Multicloud and hybrid cloud architectures also suffer in such cases, as one can easily find themselves in a situation where using serverless computing is desired, but may be impossible due to corporate policy.
Fn is quite simple to work with, can provide nearly the same FaaS interface with minimal overhead. It eliminates any vendor lock-in; it can be installed locally or at any preferred cloud provider of your choice. There’s also freedom in choosing the programming language.
This article only presents the basics of Fn, but creating your own runtime environment is simple enough, and the overall architecture can be further expanded using the Fn load balancer or placing Fn behind a proxy for protection.
Source: habr.com
