

The Zimbra Collaboration Suite Open-Source Edition has several powerful tools in its arsenal to ensure information security. Among them are — a solution for protecting the mail server from botnet attacks, ClamAV — an antivirus capable of scanning incoming files and emails for malware infections, and also — one of the best spam filters available today. However, these tools cannot protect Zimbra OSE from certain types of attacks, such as brute force. A not-so-elegant but still quite effective password dictionary attack poses not only the risk of successful hacking with all consequences but also creates a significant load on the server, which processes all unsuccessful hacking attempts against the Zimbra OSE server.

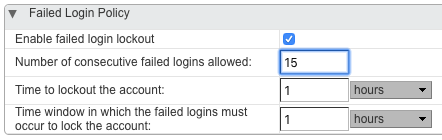
In principle, protection against brute force can be achieved using the standard means of Zimbra OSE. The security password policy settings allow you to set the number of unsuccessful password attempts after which a potentially targeted account is blocked. The main problem with this approach is that situations can arise where one or several employees' accounts may be blocked due to a brute force attack they have no connection to, and the resulting downtime for employees may incur significant losses for the company. This is why this method of protecting against brute force is best avoided.
To protect against brute force attacks, a much better solution is a special tool called DoSFilter, which is built into Zimbra OSE and can automatically terminate connections to Zimbra OSE via HTTP. In other words, the principle of operation of DoSFilter is similar to that of PostScreen, but it is used for a different protocol. Originally intended to limit the number of actions that a single user can perform, DoSFilter can also provide protection against brute force attacks. Its key distinction from the built-in tool in Zimbra is that after a certain number of unsuccessful attempts, it blocks not the user themselves, but the IP address that is making multiple attempts to log into a specific account. This way, the system administrator can not only protect against brute force attacks but also avoid blocking employees by simply adding their internal network's trusted IP addresses and subnets to the trusted list.
A significant advantage of DoSFilter is that, in addition to numerous attempts to log into an account, this tool can automatically block those attackers who have obtained an employee's authentication credentials and then successfully logged into their account, starting to send hundreds of requests to the server.
You can configure DoSFilter using the following console commands:
- zimbraHttpDosFilterMaxRequestsPerSec — This command allows you to set the maximum number of connections allowed for a single user. By default, this value is set to 30 connections.
- zimbraHttpDosFilterDelayMillis — This command allows you to set a delay in milliseconds for connections that exceed the limit set by the previous command. In addition to integer values, the administrator can specify 0 for no delay at all, and -1 so that all connections exceeding the specified limit are simply terminated. By default, this value is set to -1.
- zimbraHttpThrottleSafeIPs — With this command, the administrator can specify trusted IP addresses and subnets to which the above restrictions will not apply. Note that the syntax of this command may vary depending on the desired outcome. For example, entering the command zmprov mcf zimbraHttpThrottleSafeIPs 127.0.0.1, you will completely overwrite the entire list and leave only one IP address in it. If you enter the command zmprov mcf +zimbraHttpThrottleSafeIPs 127.0.0.1, the IP address you entered will be added to the whitelist. Similarly, by using the minus sign, you can remove any IP from the allowed list.
It should be noted that the DoSFilter can cause a number of problems when using Zextras Suite Pro extensions. To avoid these issues, we recommend increasing the number of simultaneous connections from 30 to 100 using the command zmprov mcf zimbraHttpDosFilterMaxRequestsPerSec 100. Additionally, we recommend adding the corporate internal network to the whitelist. This can be done using the command zmprov mcf +zimbraHttpThrottleSafeIPs 192.168.0.0/24. After making any changes to the DoSFilter, be sure to restart the mail server using the command zmmailboxdctl restart.
The main drawback of the DoSFilter is that it operates at the application level and can only limit the ability of attackers to perform various actions on the server, without restricting their ability to connect to the server. As a result, the authentication requests or email sending attempts that are sent to the server, although they will inevitably fail, will still represent the classic DoS attack, which cannot be stopped at such a high level.
To fully secure your corporate server with Zimbra OSE, you can use a solution like Fail2ban, which is a framework capable of continuously monitoring the logs of information systems for repeated actions and blocking the offender by modifying firewall settings. Blocking at such a low level allows you to disconnect attackers right at the IP connection stage with the server. Thus, Fail2Ban can perfectly complement the protection provided by DoSFilter. Let's find out how to integrate Fail2Ban with Zimbra OSE to enhance your enterprise's IT infrastructure security.
Like any other enterprise-class application, the Zimbra Collaboration Suite Open-Source Edition keeps detailed logs of its operations. Most of them are stored in the folder /opt/zimbra/log/ in the form of files. Here are just a few of them:
- mailbox.log — logs of the Jetty mail service
- audit.log — authentication logs
- clamd.log — antivirus operation logs
- freshclam.log — antivirus update logs
- convertd.log — attachment converter logs
- zimbrastats.csv — server performance logs
You can also find Zimbra logs in the file /var/log/zimbra.log, where the logs for Postfix and Zimbra itself are recorded.
To protect our system from brute force attacks, we will monitor mailbox.log, audit.log and zimbra.log.
To ensure everything works, you need to have Fail2Ban and iptables installed on your server with Zimbra OSE. If you are using Ubuntu, you can do this with the commands dpkg -s fail2ban, while if you are using CentOS, you can check this with the commands yum list installed fail2ban. If you don't have Fail2Ban installed, installing it won't be a problem, as this package is available in almost all standard repositories.
Once the necessary software is installed, you can proceed to configure Fail2Ban. For this, you need to create a configuration file /etc/fail2ban/filter.d/zimbra.conf, where we will specify regular expressions for the Zimbra OSE logs that will match incorrect login attempts and trigger Fail2Ban mechanisms. Here is an example of the contents of zimbra.conf with a set of regular expressions corresponding to various errors issued in Zimbra OSE during a failed authentication attempt:
# Fail2Ban configuration file

[Definition]
failregex = [ip=<HOST>;] account - authentication failed for .* (no such account)$
                        [ip=<HOST>;] security - cmd=Auth; .* error=authentication failed for .*, invalid password;$
                        ;oip=<HOST>;.* security - cmd=Auth; .* protocol=soap; error=authentication failed for .* invalid password;$
                        ;oip=<HOST>;.* security - cmd=Auth; .* protocol=imap; error=authentication failed for .* invalid password;$
                        [oip=<HOST>;.* SoapEngine - handler exception: authentication failed for .*, account not found$
                        WARN .*;ip=<HOST>;ua=ZimbraWebClient .* security - cmd=AdminAuth; .* error=authentication failed for .*;$

ignoreregex =
After you have created the regular expressions for Zimbra OSE, it’s time to edit the configuration of Fail2ban itself. This utility’s settings are located in the file /etc/fail2ban/jail.conf. Just in case, let’s make a backup using the command cp /etc/fail2ban/jail.conf /etc/fail2ban/jail.conf.bak. After that, we will modify this file to look something like this:
# Fail2Ban configuration file

[DEFAULT]
ignoreip = 192.168.0.1/24
bantime = 600
findtime = 600
maxretry = 5
backend = auto

[ssh-iptables]
enabled = false
filter = sshd
action = iptables[name=SSH, port=ssh, protocol=tcp]
sendmail-whois[name=SSH, dest=admin@company.ru, sender=fail2ban@company.ru]
logpath = /var/log/messages
maxretry = 5

[sasl-iptables]
enabled = false
filter = sasl
backend = polling
action = iptables[name=sasl, port=smtp, protocol=tcp]
sendmail-whois[name=sasl, dest=support@company.ru]
logpath = /var/log/zimbra.log

[ssh-tcpwrapper]
enabled = false
filter = sshd
action = hostsdeny
sendmail-whois[name=SSH, dest=support@ company.ru]
ignoreregex = for myuser from
logpath = /var/log/messages

[zimbra-account]
enabled = true
filter = zimbra
action = iptables-allports[name=zimbra-account]
sendmail[name=zimbra-account, dest=support@company.ru ]
logpath = /opt/zimbra/log/mailbox.log
bantime = 600
maxretry = 5

[zimbra-audit]
enabled = true
filter = zimbra
action = iptables-allports[name=zimbra-audit]
sendmail[name=Zimbra-audit, dest=support@company.ru]
logpath = /opt/zimbra/log/audit.log
bantime = 600
maxretry = 5

[zimbra-recipient]
enabled = true
filter = zimbra
action = iptables-allports[name=zimbra-recipient]
sendmail[name=Zimbra-recipient, dest=support@company.ru]
logpath = /var/log/zimbra.log
bantime = 172800
maxretry = 5

[postfix]
enabled = true
filter = postfix
action = iptables-multiport[name=postfix, port=smtp, protocol=tcp]
sendmail-buffered[name=Postfix, dest=support@company.ru]
logpath = /var/log/zimbra.log
bantime = -1
maxretry = 5
This example, while quite universal, does require some clarification of certain parameters that you might want to change when configuring Fail2Ban on your own:
- Ignoreip — with this parameter you can specify a particular IP or subnet whose addresses Fail2Ban should not check. Typically, the internal network of the company and other trusted addresses are added to the ignore list.
- Bantime — The amount of time for which the violator will be banned. Measured in seconds. A value of -1 means a permanent ban.
- Maxretry — The maximum number of times a single IP address can attempt to access the server.
- Sendmail — A setting that allows the automatic sending of email notifications when Fail2Ban is triggered.
- Findtime — A setting that specifies the time interval after which an IP address can attempt to access the server again after reaching the maximum number of failed attempts (maxretry parameter).
After saving the Fail2Ban configuration file, you only need to restart this utility using the command service fail2ban restart. After restarting, the main Zimbra logs will begin to be continuously monitored for compliance with regular expressions. This way, the administrator can effectively eliminate any possibility of unauthorized access not only to Zimbra Collaboration Suite Open-Source Edition mailboxes but also to protect all services operating within the Zimbra OSE framework, as well as stay informed of any attempts at unauthorized access.
The safety alphabet in Kubernetes: authentication, authorization, auditing
Source: habr.com
