

This article describes my experience of installing VMware ESXi on the vintage Apple Mac Pro 1,1.
The task set by the client was to expand the file server. The creation of the company's file server on the PowerMac G5 in 2016 and the maintenance of that legacy deserves its own article. It was decided to combine the expansion with modernization and create a file server from the existing Mac Pro. Since it runs on an Intel processor, virtualization was also feasible.
The task is quite achievable, but I had to confront a number of challenges and gather information about their solutions piece by piece. Additionally, the search for solutions was often clouded by results pertaining to the reverse problem of 'installing macOS on VMware.'
To solidify the acquired experience, compile all the pieces into one place, and translate them into English, this article was created.
Reader requirements: familiarity with installing VMware ESXi on compatible hardware, such as HP servers. Familiarity with Apple technology is also necessary. Specifically, I am not providing details on assembling or disassembling the Mac Pro, and there are quite a few nuances there.
1. Hardware
Mac Pro 1,1, also known as MA356LL/A or A1186, was the first computer from Apple with Intel processors, produced from 2006 to 2008. Despite being over 10 years old, the computer is in excellent physical condition. None of the four powerful fans are noisy. Routine cleaning and assembly/disassembly are required.
Processors — two dual-core Xeon 5150s. Fully 64-bit architecture, but the EFI bootloader is 32-bit. This is very important and complicates life significantly!
RAM – standardly 4GB PC5300 DDR2 ECC 667MHz, can easily be expanded to 16GB, and some say even more. The memory is compatible from old HP gen.5-6 servers, and the computer generally resembles that server but in a different case.
HDD — 4 bays for 3.5” (LFF). With some physical modifications, 2.5″ (SFF) drives can fit into the bays. More details on this can be seen .
There is also an IDE DVD, up to 2 units in 5.25″ format. However, there are also SATA connectors provided. On the motherboard, they are labeled ODD SATA (ODD = Optical Disk Drive). My experiments have shown that hard drives and SSDs can and should be installed in this location.
More details with picturesIt is definitely possible to combine IDE and SATA devices. It may even be possible to install 2 IDE and 2 SATA drives, though I have not verified this.
Don't forget about some power issues: only 2 molex connectors are provided, and the load capacity is unknown. The power supply isn't like on a PC; all power goes through the motherboard, and the connectors on it are non-standard.
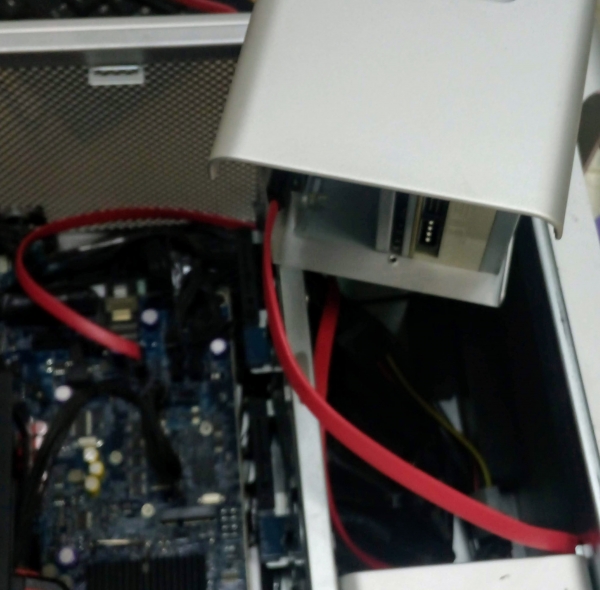
ODD connector
The standard 0.5m length is a bit short; it will be tightly stretched, and it's only convenient to connect it right before sliding the basket into the case.
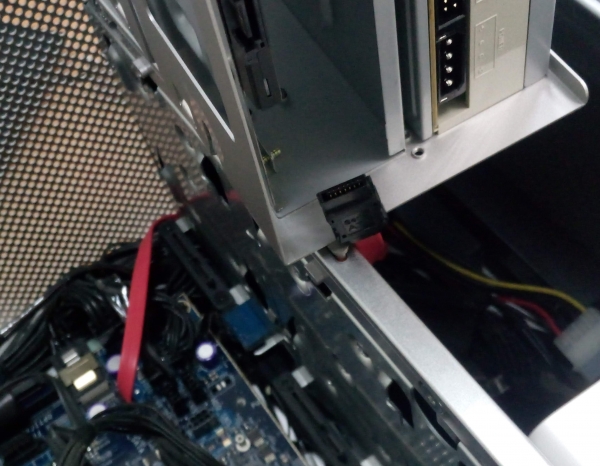
A 0.8m SATA cable is required, preferably with an angled connector. 1m is too much.
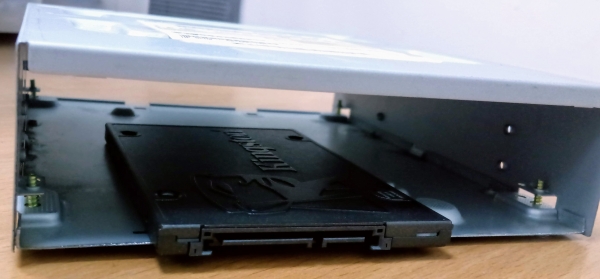
An unused CD-ROM case works perfectly as a physical adapter from 5.25 to 2.5. If you don't have an unused one, it will definitely become so after separating the internals from the case.
We can conclude the review of the hardware and its upgrade options here. Looking ahead, I will say only that we shouldn't rush to assemble and install everything at once; during the process, we will need to extract the drives.
2. Choosing ESXi
Using it can be understood that the Xeon 5150 is supported up to a maximum of ESXi 5.5 U3. This is the version we will install.
Support for all "obsolete" components was removed in ESXi 6.0. Officially, neither this version nor newer ones like 6.7 can be installed here; realistically, it might be possible. There have been mentions online that it works. But, not this time; in my opinion, the processor incompatibility is quite significant. This should not be done in production, only for experiments.
For new versions of ESXi, I assume the modification methods will be the same.
3. Modifying the distribution
I took the standard distribution. It can be downloaded from the official site or torrents. ESXi 5.5 U3.
But remember, I pointed out the fully 64-bit architecture, yet the EFI bootloader is 32-bit?! This is where it will come into play. When trying to boot the installer, nothing happens.
It is necessary to replace the installer bootloader with an older, 32-bit one, possibly from a version prior to 5.0.
This is detailed in the article , file take it from there.
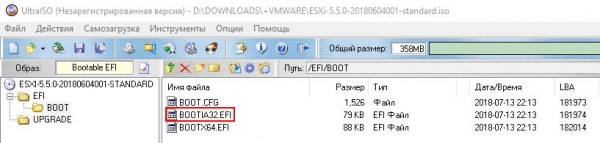
We use an ISO editing program (for example, UltraISO). We find the EFIBOOT folder inside the ISO and replace the BOOTIA32.EFI file with the older one, save it, and then it all boots up!
4. Installing ESXi
No details, just like always. The installation completed successfully, but nothing boots up; that’s normal!
5. Modifying the bootloader
The algorithm for the actions is specified in the article , it also provides a link to the archive .
5.1. Remove the hard drive and connect it to another computer.
I used a hardware version of MacBook with a SATA-USB adapter; you can also use Linux. If there's no separate computer, you can use another hard drive, plug it into MacPro, install MacOS on it, and mount the hard drive with ESXi from there.
You cannot use Windows! Even if you simply connect this disk to a Windows system, it will make small changes without permission. Small and supposedly harmless changes, but in our case, booting ESXi will end with an error: 'Bank6 not a VMware boot bank no hypervisor found.'

Here’s an article with details on what happens if you still connect it . And for a simple and quick solution – let's install ESXi again!
5.2 Mounting the EFI partition
Open Terminal and make sure to switch to superuser mode
Sudo -sCreate a directory for the future partition
mkdir /Volumes/EFIlet's see the existing partitions
diskutil listthis is what we need, the EFI partition named ESXi
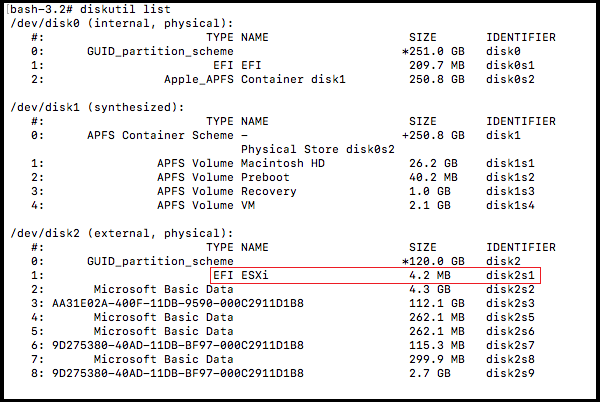
Mount it
mount_msdos /dev/disk2s1 /Volumes/EFIOn the mounted disk, you'll need to replace the files with older versions. You can find the old versions in , archive
Files for replacement:
/EFI/BOOT/BOOTIA32.EFI
/EFI/BOOT/BOOTx64.EFI
/EFI/VMware/mboot32.efi
/EFI/VMware/mboot64.efi
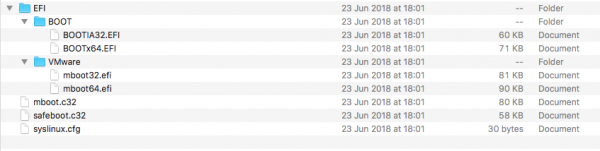
After completion, unmount the mounted EFI partition
umount -f /Volumes/EFINote on creating the image
Note on creating the image
Ideally, it would be good to understand where these files are located within the distribution. Then they could be replaced directly, and a custom distribution 'ESXi 5.5 for the old MacPro' could be released, fully ready for hassle-free installation.
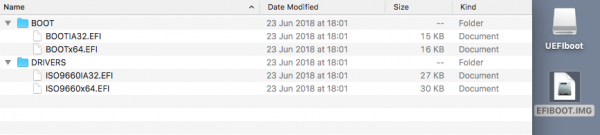
I couldn't find them. Almost all files with the '.v00' extensions in the ESXi distribution are tar archives of various types. They contain .vtar archives, which have even more archives... Using 7zip, I dug through these endless nested structures, but couldn't find anything resembling an EFI partition. Mostly there are Linux directories.
The most suitable seemed to be the file efiboot.img, but you can easily open it and see that it’s something entirely different.
5.3. Remove the hard drive and install it in MacPro
Now we are installing it permanently, screwing it all together.
And now ESXi is booting!
It may seem like it’s not. From the moment you turn it on and the white screen until the black ESXi boot screen, it takes a bit longer than the familiar Apple logo of macOS.
6. END.
This completes the installation; configure ESXi as usual for setting up ESXi.
It should be noted that further installation of Mac OS on VMware installed on Apple hardware is legal.
Literature
Links to articles, mostly in English.
[1] Sata Optical Drive in Mac Pro 1,1 = replacing the IDE drive with SATA, or using an HDD.
[2] Mac Pro compatibility with installing ESXi 5.0 = about replacing the bootloader for installation
[3] Bringing an Old Mac Pro Back to Life with ESXi 6.0 = about replacing bootloaders of an already installed ESXi.
[4] bank6 not a VMware boot bank no hypervisor found = what happens if connected under Windows
[5] ESXi 5.x host fails to reboot after installation with the error: Not a VMware boot bank. No hypervisor found (2012022) = and official advice on how to fix this
[6] How to mount the EFI partition in Mac OS
[7] VMware Compatibility Guide
[8] SSD in Apple Mac Pro 1.1 = installation of a 2.5" into 3.5" slots by oneself
[9] Offer to buy ready-made adapters for slots
[10] Specification of the used MacPro
l
File list
installation bootloader from [2]
, bootloader replacement from [3]
Source: habr.com
