

It so happens that I’m a computer systems and networks administrator (in short: sysadmin), and I have spent a little over 10 years in professional activities across various systems, including those that require [high|increased] security measures. It also so happens that some time ago I found Bitcoin interesting , and not only did I use it, but I also launched several micro-services to learn how to work with the Bitcoin network (it's p2p after all) from a developer's perspective (I’m not really that much of a developer, just a casual bystander). But I'm not here to talk about development; I’m here to discuss a safe and efficient environment for applications. devFinancial technologies (
fintech) go hand in hand with information security (infosec), and the former can work without the latter, but not for long. That’s why I want to share my experience and the set of tools I use, which includes both, and can be used simultaneously, as well as in broader or entirely different contexts. In this article, I will talk not so much about Bitcoin but rather about the infrastructure model for developing and operating financial (and not only) services — in other words, those services where 'B' matters. This is applicable both to a Bitcoin exchange and to the typical corporate service mix of a small company that has no connection to Bitcoin. ) go hand in hand with information security (and ), and the former can work without the latter, but not for long. That’s why I want to share my experience and the set of tools I use, which includes bothI want to emphasize that I adhere to the principles of
‘keep it stupid simple’ ‘less is more’ and , so both the article and the concepts described in it will reflect the properties of these principles.Imaginary scenario:
Imaginary scenario: Let's break everything down using the example of a Bitcoin exchange. We decided to launch an exchange for rubles, dollars, and euros to Bitcoin and back, and we already have a working solution, but for other digital currencies like Qiwi and Webmoney, we have addressed all legal concerns, and we have a ready application that serves as a payment gateway for rubles, dollars, and euros as well as other payment systems. It is tied to our bank accounts and has some API for our end applications. We also have a web application serving as an exchange for users, like a typical Qiwi or Webmoney account — you create an account, add a card, and so on. It communicates with our gateway application, perhaps through a REST API in the local network. We decided to integrate Bitcoin, and at the same time, upgrade the infrastructure, since everything was initially set up in a hurry on virtual boxes under the desk in the office… the site started being used, and we became concerned about uptime and performance.
So, let's start with the basics — choosing a server. Since the business in our example is small and we trust the hoster (OVH), we will choose where the system cannot be installed from the original .iso image, but that's okay, the IT security department will definitely analyze the installed image. And when we grow, we may even rent our own locked rack with limited physical access, or perhaps even build our own data center. In any case, it’s worth remembering that when renting hardware and installing ready-made images, there’s a chance that a 'trojan from the hoster' will be hanging in your system, which is mostly not intended for spying on you, but to offer more convenient server management tools.
Server Installation
It’s straightforward. We choose the hardware that fits our needs. Then we select the FreeBSD image. Or connect (in case of another hoster and our own hardware) via IPMI or with a monitor and load the FreeBSD .iso image. For orchestral installation, I use and . The only thing is, in our case with Kimsufi, we chose custom installation so that the two mirrored disks have 'open' only the boot and /home partitions, while the remaining disk space will be encrypted, but more on that later.
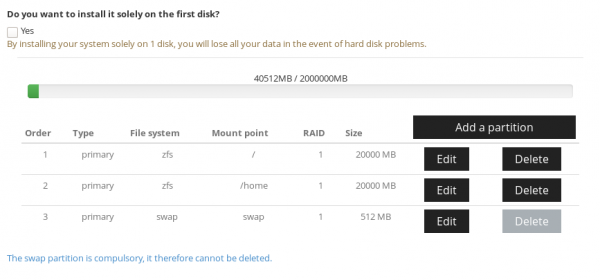
The system installation proceeds in a standard way; I won't dwell on this, just noting that before starting operations, it's worth paying attention to hardening the options offered by bsdinstaller at the end of the installation (if you are installing the system yourself):
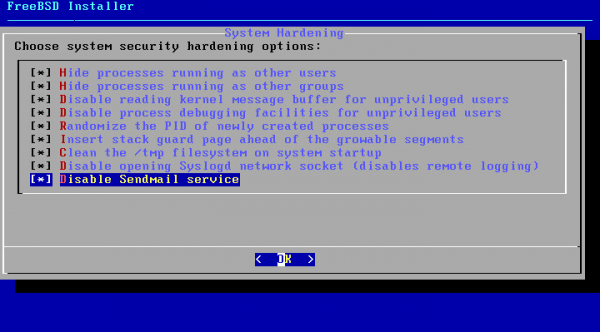
There is on this topic, I will briefly summarize it here.
You can also enable the aforementioned settings on an already installed system. For this, you need to edit the boot loader file and enable the kernel parameters. *ee is an editor like this in BSD
# ee /etc/rc.conf
...
#sec hard
clear_tmp_enable="YES"
syslogd_flags="-ss"
sendmail_enable="NONE"
# ee /etc/sysctl.conf
...
#sec hard
security.bsd.see_other_uids=0
security.bsd.see_other_gids=0
security.bsd.unprivileged_read_msgbuf=0
security.bsd.unprivileged_proc_debug=0
kern.randompid=$(jot -r 1 9999)
security.bsd.stack_guard_page=1
It is also important to ensure that you have the latest version of the system, and . In our case, for example, an upgrade to the latest version is required, since the preinstalled images lag behind by six months to a year. Additionally, we change the SSH port to one different from the default, add key authentication, and disable password authentication.
Next, we set up aide, monitoring the status of system configuration files. You can read more about it in detail .
pkg install aide
and edit our crontab
crontab -e
06 01 * * 0-6 /root/chkaide.sh
#! /bin/sh
#chkaide.sh
MYDATE=`date +%Y-%m-%d`
MYFILENAME="Aide-"$MYDATE.txt
/bin/echo "Aide check !! `date`" > /tmp/$MYFILENAME
/usr/local/bin/aide --check > /tmp/myAide.txt
/bin/cat /tmp/myAide.txt|/usr/bin/grep -v failed >> /tmp/$MYFILENAME
/bin/echo "**************************************" >> /tmp/$MYFILENAME
/usr/bin/tail -20 /tmp/myAide.txt >> /tmp/$MYFILENAME
/bin/echo "****************DONE******************" >> /tmp/$MYFILENAME
We enable
sysrc auditd_enable=YES
# service auditd start
How to administer this is excellently described in .
Now we reboot and start with the software on the server. Each server acts as a hypervisor for containers or full virtual machines. Therefore, it’s important that the processor supports VT-x and EPT if we plan to use full virtualization.
For managing containers and virtual machines, I use from , wishing him more health and blessings for this wonderful utility!
Containers? Is it again Docker?
Not at all. — this is a great tool for containerization, and the mentioned tool cbsd is for orchestrating these containers, named — jails.
A cage is an extremely effective solution for building infrastructure for various purposes, where full isolation of individual services or processes is required. Essentially, it's a clone of the host system, but it doesn't require full virtualization of the hardware. This way, resources are not wasted on a guest OS but are used solely for actual work. When cages are used for internal purposes, it is a very convenient solution for optimal resource utilization — multiple cages on a single physical server can each use the entire server's resources when necessary. Considering that different subprocesses typically need additional resources at different times, optimal performance can be extracted from one server if cages are properly planned and balanced across servers. If needed, limits can also be set on the resources used by the cages.

What about full virtualization?
As far as I know, cbsd it supports the operation of bhyve and XEN hypervisors. I have never used the latter, but the first is a relatively young . We will consider an example of using bhyve in the example below.
Setting up the host environment
We use the FS . It is an extremely powerful tool for managing space on the server. With ZFS, you can directly create arrays of different configurations from disks, dynamically expand space 'on-the-fly', replace failed disks, manage snapshots, and much more that could be described in a whole series of articles. Let's return to our server and its disks. At the beginning of the installation, we left free space on the disks for encrypted partitions. Why is that? So that the system can boot automatically and listen over SSH.
gpart add -t freebsd-zfs /dev/ada0
/dev/ada0p4 added!
we add a disk partition to the remaining space
geli init /dev/ada0p4
we enter our encryption password
geli attach /dev/ada0p4
enter the password again, and we get the device /dev/ada0p4.eli — this is our encrypted space. Then we repeat the same for /dev/ada1 and the other disks in the array. And we create a new .
zpool create vms mirror /dev/ada0p4.eli /dev/ada1p4.eli /dev/ada3p4.eli — well, we have our minimum combat set ready. A mirrored disk array in case one of the three fails.
Creating a dataset on a new "pool"
zfs create vms/jails
pkg install cbsd — we executed the command and are installing the management for our jails.
Once cbsd installed, it needs to be initialized:
# env workdir="/vms/jails" /usr/local/cbsd/sudoexec/initenv
and we answer a lot of questions, mainly with default answers.
*If you are using encryption, it is important that the daemon cbsdd does not start automatically until you manually or automatically decrypt the disks (in our example, this is done by zabbix)
**I also do not use NAT from cbsd, but configure it myself in pf.
# sysrc pf_enable=YES
# ee /etc/pf.conf
IF_PUBLIC="em0"
IP_PUBLIC="1.23.34.56"
JAIL_IP_POOL="192.168.0.0/24"

#WHITE_CL="{ 127.0.0.1 }"

icmp_types="echoreq"

set limit { states 20000, frags 20000, src-nodes 20000 }
set skip on lo0
scrub in all

#NAT for jails
nat pass on $IF_PUBLIC from $JAIL_IP_POOL to any -> $IP_PUBLIC

## Bitcoin network port forward
IP_JAIL="192.168.0.1"
PORT_JAIL="{8333}"
rdr pass on $IF_PUBLIC proto tcp from any to $IP_PUBLIC port $PORT_JAIL -> $IP_JAIL
# service pf start
# pfctl -f /etc/pf.conf
Configuring firewall policies is also a separate topic, so I won’t go into the details of the BLOCK ALL policy and whitelisting settings, which can be addressed by reading or any of the numerous articles available on Google.
Well then… we have cbsd installed, it's time to create our first workhorse — the Bitcoin daemon in a jail!
cbsd jconstruct-tui
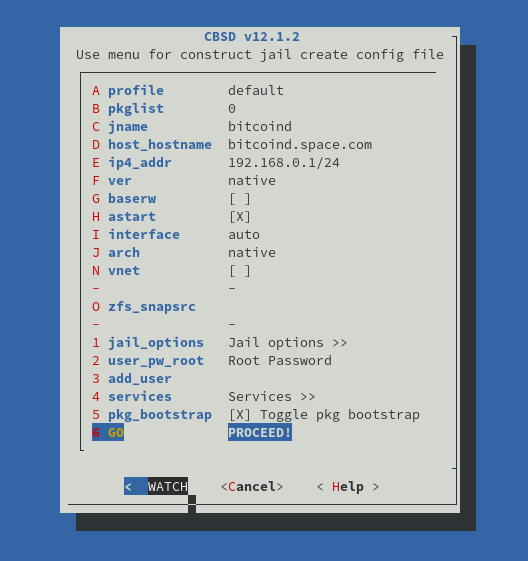
Here we see the jail creation dialog. Once we set all the values, we create it!
When creating the first jail, you should choose what to use as the basis for the jails. I choose a distribution from the FreeBSD repository with the command repo. This choice is made only when creating the first jail of a specific version (you can host jails of any version that is newer than the host's version).
After everything is installed — we start the jail!
# cbsd jstart bitcoind
But we need to install software in the jail.
# jls
   JID  IP Address      Hostname                      Path
     1  192.168.0.1     bitcoind.space.com            /zroot/jails/jails/bitcoind
jexec bitcoind to access the jail's console
and already inside the jail, we install the software with its dependencies (our host system remains clean)
bitcoind:/@[15:25] # pkg install bitcoin-daemon bitcoin-utils
bitcoind:/@[15:30] # sysrc bitcoind_enable=YES
bitcoind:/@[15:30] # service bitcoind start
Bitcoin is in the jail, but we need anonymity, as we want to connect to some jails over the TOR network. In general, we plan to run most jails with suspicious software only through a proxy. Thanks to pf You can disable NAT for a specific range of IP addresses in the local network and allow NAT only for our TOR node. Thus, even if a malware gets into the cell, it is unlikely to connect to the outside world, and if it does, it won't expose the IP of our server. Therefore, we create another cell for 'port forwarding' services like '.onion' services and as a proxy for separate cells to access the internet.
# cbsd jsconstruct-tui
# cbsd jstart tor
# jexec tor
tor:/@[15:38] # pkg install tor
tor:/@[15:38] # sysrc tor_enable=YES
tor:/@[15:38] # ee /usr/local/etc/tor/torrc
Set to listen on a local address (accessible to all cells)
SOCKSPort 192.168.0.2:9050
What else do we need for complete happiness? Yes, we need a service for our web, maybe even more than one. Let's start nginx, which will act as a reverse proxy and take care of renewing Let's Encrypt certificates.
# cbsd jsconstruct-tui
# cbsd jstart nginx-rev
# jexec nginx-rev
nginx-rev:/@[15:47] # pkg install nginx py36-certbot
And here we have placed 150 MB of dependencies in the cell. The host remains clean.
We'll return to nginx configuration later; we need to set up two more cells for our payment gateway on nodejs and rust, and for a web application that for some reason is on apache and php, and for that we also need a MySQL database.
# cbsd jsconstruct-tui
# cbsd jstart paygw
# jexec paygw
paygw:/@[15:55] # pkg install git node npm
paygw:/@[15:55] # curl --proto '=https' --tlsv1.2 -sSf https://sh.rustup.rs | sh
… and 380 MB of packages isolated
Next, we pull our application using git and run it.
# cbsd jsconstruct-tui
# cbsd jstart webapp
# jexec webapp
webapp:/@[16:02] # pkg install mariadb104-server apache24 php74 mod_php74 php74-pdo_mysql
450 MB of packages. in the cell.
Here we give the developer access via SSH directly into the cell; they will manage everything themselves:
webapp:/@[16:02] # ee /etc/ssh/sshd_config
Port 2267 — we change the SSH port of the cell to any arbitrary one
webapp:/@[16:02] # sysrc sshd_enable=YES
webapp:/@[16:02] # service sshd start
Well, the service is up and running, we just need to add a rule to the pf firewall
Let's check what IPs we have for the cells and what our 'local network' looks like
# jls
   JID  IP Address      Hostname                      Path
     1  192.168.0.1     bitcoind.space.com            /zroot/jails/jails/bitcoind
     2  192.168.0.2     tor.space.com                 /zroot/jails/jails/tor
     3  192.168.0.3     nginx-rev.space.com           /zroot/jails/jails/nginx-rev
     4  192.168.0.4     paygw.space.com               /zroot/jails/jails/paygw
     5  192.168.0.5     webapp.my.domain              /zroot/jails/jails/webapp
and we will add a rule
# ee /etc/pf.conf
## SSH for web-Devs
IP_JAIL="192.168.0.5"
PORT_JAIL="{ 2267 }"
rdr pass on $IF_PUBLIC proto tcp from any to $IP_PUBLIC port $PORT_JAIL -> $IP_JAIL
and since we are here, let's also add a rule for the reverse proxy:
## web-ports for nginx-rev
IP_JAIL="192.168.0.3"
PORT_JAIL="{ 80, 443 }"
rdr pass on $IF_PUBLIC proto tcp from any to $IP_PUBLIC port $PORT_JAIL -> $IP_JAIL
# pfctl -f /etc/pf.conf
Now, let's talk a bit about bitcoins
What we have — we have a web application that is accessible from the outside, and it communicates locally with our payment gateway. Now we need to prepare a working environment for interacting with the Bitcoin network itself — a node bitcoind This is just a daemon that maintains a local copy of the actual blockchain. This daemon has RPC and wallet functionality, but there are more convenient 'wrappers' for application development. To start, we decided to set up electrum — this is a CLI wallet. will be used by us as cold storage for our bitcoins — in general, those bitcoins that need to be kept 'off' the system accessible to users and far away from everyone. It also has a GUI, so we plan to use a similar wallet on our
laptops. For now, we'll use Electrum with public servers, and later we will set up , to be completely independent of anyone.
# cbsd jsconstruct-tui
# cbsd jstart electrum
# jexec electrum
electrum:/@[8:45] # pkg install py36-electrum
another 700 MB of software in our jail
electrum:/@[8:53] # adduser
Username: wallet
Full name:
Uid (Leave empty for default):
Login group [wallet]:
Login group is wallet. Invite wallet into other groups? []:
Login class [default]:
Shell (sh csh tcsh nologin) [sh]: tcsh
Home directory [/home/wallet]:
Home directory permissions (Leave empty for default):
Use password-based authentication? [yes]: no
Lock out the account after creation? [no]:
Username   : wallet
Password   :
Full Name  :
Uid        : 1001
Class      :
Groups     : wallet
Home       : /home/wallet
Home Mode  :
Shell      : /bin/tcsh
Locked     : no
OK? (yes/no): yes
adduser: INFO: Successfully added (wallet) to the user database.
Add another user? (yes/no): no
Goodbye!
electrum:/@[8:53] # su wallet
electrum:/@[8:53] # su wallet
wallet@electrum:/ % electrum-3.6 create
{
    "msg": "Please keep your seed in a safe place; if you lose it, you will not be able to restore your wallet.",
    "path": "/usr/home/wallet/.electrum/wallets/default_wallet",
    "seed": "jealous win pig material ribbon young punch visual okay cactus random bird"
}
Now we have created a wallet.
wallet@electrum:/ % electrum-3.6 listaddresses
[
    "18WEhbjvMLGRMfwudzUrUd25U5C7uZYkzE",
    "14XHSejhxsZNDRtk4eFbqAX3L8rftzwQQU",
    "1KQXaN8RXiCN1ne9iYngUWAr6KJ6d4pPas",
    ...
    "1KeVcAwEYhk29qEyAfPwcBgF5mMMoy4qjw",
    "18VaUuSeBr6T2GwpSHYF3XyNgLyLCt1SWk"
]
wallet@electrum:/ % electrum-3.6 help
To our on-chain wallet will only be accessible to a limited group of people. To avoid opening access from the outside to this jail, SSH connections will be made through TOR (a decentralized alternative to VPN). We are starting SSH in the jail, but we will not touch our pf.conf on the host.
electrum:/@[9:00] # sysrc sshd_enable=YES
electrum:/@[9:00] # service sshd start
Now we'll disable internet access for the jail with the wallet. We'll assign it an IP address from another subnet that is not NAT'd. First, we will change /etc/pf.conf on the host
# ee /etc/pf.conf
JAIL_IP_POOL="192.168.0.0/24" change to JAIL_IP_POOL="192.168.0.0/25"Thus, all addresses 192.168.0.126-255 will not have direct access to the internet. It's a kind of software-based "air-gap" network. And the NAT rule remains as it was.
nat pass on $IF_PUBLIC from $JAIL_IP_POOL to any -> $IP_PUBLIC
Reloading the rules
# pfctl -f /etc/pf.conf
Now let's tackle our cell
# cbsd jconfig jname=electrum
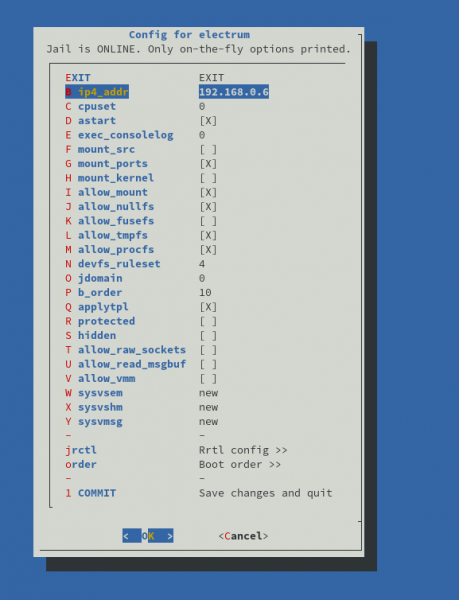
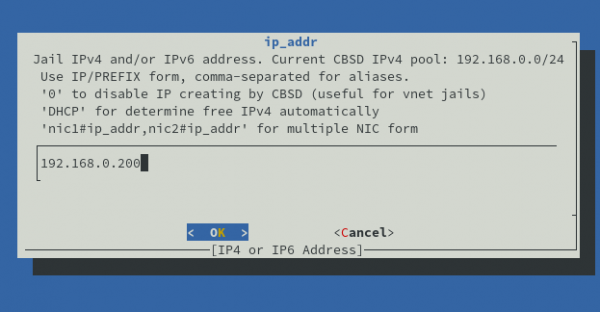
jset mode=quiet jname=electrum ip4_addr="192.168.0.200"
Remove old IP: /sbin/ifconfig em0 inet 192.168.0.6 -alias
Setup new IP: /sbin/ifconfig em0 inet 192.168.0.200 alias
ip4_addr: 192.168.0.200
Hmm, but now our system will stop working as well. However, we can specify a system proxy. But there's one catch: on TOR, this is a SOCKS5 proxy, and for convenience, we would also need an HTTP proxy.
# cbsd jsconstruct-tui
# cbsd jstart polipo
# jexec polipo
polipo:@[9:28] # pkg install polipo
polipo:@[9:28] # ee /usr/local/etc/polipo/config
socksParentProxy = "192.168.0.2:9050"
socksProxyType = socks5
polipo:@[9:42] # sysrc polipo_enable=YES
polipo:@[9:43] # service polipo start
Well, now our system has two proxy servers, and both route through TOR: socks5://192.168.0.2:9050 and
Now we can set up our wallet environment
# jexec electrum
electrum:@[9:45] # su wallet
wallet@electrum:/ % ee ~/ .cshrc
#in the end of file proxy config
setenv http_proxy http://192.168.0.6:8123
setenv https_proxy http://192.168.0.6:8123
Well, now the shell will run under the proxy. If we want to install packages, we should add in /usr/local/etc/pkg.conf from the root of the cell
pkg_env: {
               http_proxy: "http://my_proxy_ip:8123",
           }
And now it's time to add the TOR hidden service as the address of our SSH service in the wallet cell.
# jexec tor
tor:@[9:59] # ee /usr/local/etc/tor/torrc
HiddenServiceDir /var/db/tor/electrum/
HiddenServicePort 22 192.168.0.200:22
tor:@[10:01] # mkdir /var/db/tor/electrum
tor:@[10:01] # chown -R _tor:_tor /var/db/tor/electrum
tor:@[10:01] # chmod 700 /var/db/tor/electrum
tor:@[10:03] # service tor restart
tor:@[10:04] # cat /var/db/tor/electrum/hostname
mdjus4gmduhofwcso57b3zl3ufoitguh2knitjco5cmgrokpreuxumad.onionHere’s our connection address. Let's check from the local machine. But first, we need to add our SSH key:
wallet@electrum:/ % mkdir ~/ .ssh
wallet@electrum:/ % ee ~/ .ssh/authorized_keys
ecdsa-sha2-nistp521 AAAAE2VjZHNhLXNoYTItbmlzdHA1MjEAAAAIbmlzdHA1MjEAAACFBAG9Fk2Lqi4GQ8EXZrsH3EgSrVIQPQaAlS38MmJLBabihv9KHIDGXH7r018hxqLNNGbaJWO/wrWk7sG4T0yLHAbdQAFsMYof9kjoyuG56z0XZ8qaD/X/AjrhLMsIoBbUNj0AzxjKNlPJL4NbHsFwbmxGulKS0PdAD5oLcTQi/VnNdU7iFw== user@localAnd from the client Linux machine
user@local ~$ nano ~/ .ssh/config
#remote electrum wallet
Host remotebtc
        User wallet
        Port 22
        Hostname mdjus4gmduhofwcso57b3zl3ufoitguh2knitjco5cmgrokpreuxumad.onion
        ProxyCommand /bin/ncat --proxy localhost:9050 --proxy-type socks5 %h %p
Connecting (For this to work, a local TOR daemon listening on 9050 is required)
user@local ~$ ssh remotebtc
The authenticity of host 'mdjus4gmduhofwcso57b3zl3ufoitguh2knitjco5cmgrokpreuxumad.onion ()' can't be established.
ECDSA key fingerprint is SHA256:iW8FKjhVF4yyOZB1z4sBkzyvCM+evQ9cCL/EuWm0Du4.
Are you sure you want to continue connecting (yes/no/[fingerprint])? yes
Warning: Permanently added 'mdjus4gmduhofwcso57b3zl3ufoitguh2knitjco5cmgrokpreuxumad.onion' (ECDSA) to the list of known hosts.
FreeBSD 12.1-RELEASE-p1 GENERIC
To save disk space in your home directory, compress files you rarely use with "gzip filename".
        -- Dru
wallet@electrum:~ % logout
Success!
To work with instant and micro-payments, we also need a node , this will be our main working tool with Bitcoin. In *, which we are going to use as a daemon, has a , which is a full HTTP (REST) interface that allows handling both off-chain and on-chain transactions. c-lightning to function, it requires bitcoind a node.
*There are different implementations in various programming languages of the Lightning Network protocol. Of those we tested, c-lightning (written in C) seemed to be the most stable and resource-efficient.
# cbsd jsconstruct-tui
# cbsd jstart cln
# jexec cln
lightning:@[10:23] # adduser
Username: lightning
...
lightning:@[10:24] # pkg install git
lightning:@[10:23] # su lightning
cd ~ && git clone https://github.com/ElementsProject/lightning
lightning@lightning:~ % exit
lightning:@[10:30] # cd /home/lightning/lightning/
lightning:/home/lightning/lightning@[10:31] # pkg install autoconf automake gettext git gmp gmake libtool python python3 sqlite3 libsodium py36-mako bash bitcoin-utils
lightning:/home/lightning/lightning@[10:34] # ./configure && gmake && gmake install
While everything necessary is being compiled and installed, let's create an RPC user for lightningd downward API support (simultaneously with this in bitcoind
# jexec bitcoind
bitcoind:@[10:36] # ee /usr/local/etc/bitcoin.conf
rpcbind=192.168.0.1
rpcuser=test
rpcpassword=test
#allow only c-lightning
rpcallowip=192.168.0.7/32
bitcoind:@[10:39] # service bitcoind restart
My chaotic switching between cells turns out to not be so chaotic if I note the utility tmux, which allows creating multiple sub-sessions of terminals within one session. Analogue: screen
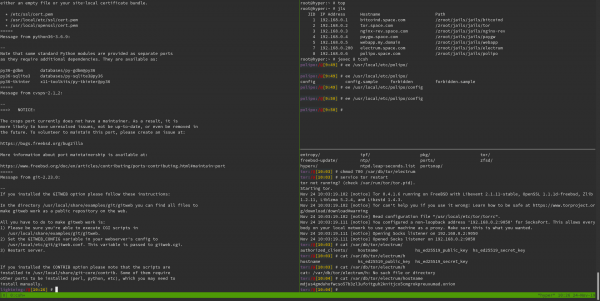
So, we do not want to expose our node's real IP and wish to conduct all financial operations through TOR. Therefore, we need another .onion.
# jexec tor
tor:@[9:59] # ee /usr/local/etc/tor/torrc
HiddenServiceDir /var/db/tor/cln/
HiddenServicePort 9735 192.168.0.7:9735
tor:@[10:01] # mkdir /var/db/tor/cln
tor:@[10:01] # chown -R _tor:_tor /var/db/tor/cln
tor:@[10:01] # chmod 700 /var/db/tor/cln
tor:@[10:03] # service tor restart
tor:@[10:04] # cat /var/db/tor/cln/hostname
en5wbkavnytti334jc5uzaudkansypfs6aguv6kech4hbzpcz2ove3yd.onionNow, let's create the config for c-lightning
lightning:/home/lightning/lightning@[10:31] # su lightning
lightning@lightning:~ % mkdir .lightning
lightning@lightning:~ % ee .lightning/config
alias=My-LN-Node
bind-addr=192.168.0.7:9735
rgb=ff0000
announce-addr=en5wbkavnytti334jc5uzaudkansypfs6aguv6kech4hbzpcz2ove3yd.onion:9735
network=bitcoin
log-level=info
fee-base=0
fee-per-satoshi=1
proxy=192.168.0.2:9050
log-file=/home/lightning/.lightning/c-lightning.log
min-capacity-sat=200000

# sparko plugin
# https://github.com/fiatjaf/lightningd-gjson-rpc/tree/master/cmd/sparko

sparko-host=192.168.0.7
sparko-port=9737

sparko-tls-path=sparko-tls

#sparko-login=mywalletusername:mywalletpassword

#sparko-keys=masterkey;secretread:+listchannels,+listnodes;secretwrite:+invoice,+listinvoices,+delinvoice,+decodepay,+waitpay,+waitinvoice
sparko-keys=masterkey;secretread:+listchannels,+listnodes;ultrawrite:+invoice,+listinvoices,+delinvoice,+decodepay,+waitpay,+waitinvoice
# for the example above the initialization logs (mixed with lightningd logs) should print something like
lightning@lightning:~ % mkdir .lightning/plugins
lightning@lightning:~ % cd .lightning/plugins/
lightning@lightning:~/.lightning/plugins:% fetch https://github.com/fiatjaf/sparko/releases/download/v0.2.1/sparko_full_freebsd_amd64
lightning@lightning:~/.lightning/plugins % mkdir ~/.lightning/sparko-tls
lightning@lightning:~/.lightning/sparko-tls % cd ~/.lightning/sparko-tls
lightning@lightning:~/.lightning/sparko-tls % openssl genrsa -out key.pem 2048
lightning@lightning:~/.lightning/sparko-tls % openssl req -new -x509 -sha256 -key key.pem -out cert.pem -days 3650
lightning@lightning:~/.lightning/plugins % chmod +x sparko_full_freebsd_amd64
lightning@lightning:~/.lightning/plugins % mv sparko_full_freebsd_amd64 sparko
lightning@lightning:~/.lightning/plugins % cd ~
you also need to create a configuration file for bitcoin-cli, the utility that communicates with bitcoind
lightning@lightning:~ % mkdir .bitcoin
lightning@lightning:~ % ee .bitcoin/bitcoin.conf
rpcconnect=192.168.0.1
rpcuser=test
rpcpassword=test
checking
lightning@lightning:~ % bitcoin-cli echo "test"
[
  "test"
]
running lightningd
lightning@lightning:~ % lightningd --daemon
Self lightningd you can manage the utility lightning-cli, for example:
lightning-cli newaddr get an address for a new incoming payment
{
   "address": "bc1q2n2ffq3lplhme8jufcxahfrnfhruwjgx3c78pv",
   "bech32": "bc1q2n2ffq3lplhme8jufcxahfrnfhruwjgx3c78pv"
}
lightning-cli withdraw bc1jufcxahfrnfhruwjgx3cq2n2ffq3lplhme878pv all send all the wallet's funds (from all on-chain addresses) to the address
Also, commands for off-chain operations lightning-cli invoice, lightning-cli listinvoices, lightning-cli pay etc.
And for communication with the application, we have REST Api
curl -k https://192.168.0.7:9737/rpc -d '{"method": "pay", "params": ["lnbc..."]}' -H 'X-Access masterkey'
In conclusion
# jls
   JID  IP Address      Hostname                      Path
     1  192.168.0.1     bitcoind.space.com            /zroot/jails/jails/bitcoind
     2  192.168.0.2     tor.space.com                 /zroot/jails/jails/tor
     3  192.168.0.3     nginx-rev.space.com           /zroot/jails/jails/nginx-rev
     4  192.168.0.4     paygw.space.com               /zroot/jails/jails/paygw
     5  192.168.0.5     webapp.my.domain              /zroot/jails/jails/webapp
     7  192.168.0.200   electrum.space.com            /zroot/jails/jails/electrum
     8  192.168.0.6     polipo.space.com              /zroot/jails/jails/polipo
     9  192.168.0.7     lightning.space.com           /zroot/jails/jails/cln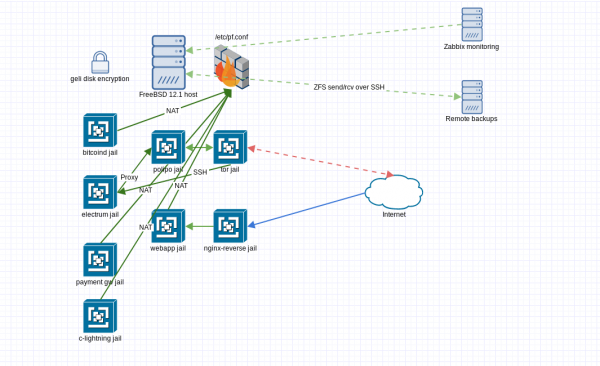
We have a set of containers, each with its own access level both to and from the local network.
# zfs list
NAME                    USED  AVAIL  REFER  MOUNTPOINT
zroot                   279G  1.48T    88K  /zroot
zroot/ROOT             1.89G  1.48T    88K  none
zroot/ROOT/default     1.89G  17.6G  1.89G  /
zroot/home               88K  1.48T    88K  /home
zroot/jails             277G  1.48T   404M  /zroot/jails
zroot/jails/bitcoind    190G  1.48T   190G  /zroot/jails/jails-data/bitcoind-data
zroot/jails/cln         653M  1.48T   653M  /zroot/jails/jails-data/cln-data
zroot/jails/electrum    703M  1.48T   703M  /zroot/jails/jails-data/electrum-data
zroot/jails/nginx-rev   190M  1.48T   190M  /zroot/jails/jails-data/nginx-rev-data
zroot/jails/paygw      82.4G  1.48T  82.4G  /zroot/jails/jails-data/paygw-data
zroot/jails/polipo     57.6M  1.48T  57.6M  /zroot/jails/jails-data/polipo-data
zroot/jails/tor        81.5M  1.48T  81.5M  /zroot/jails/jails-data/tor-data
zroot/jails/webapp      360M  1.48T   360M  /zroot/jails/jails-data/webapp-data
As seen, bitcoind occupies all 190 GB of space. But what if we need another node for testing? That's where ZFS comes in handy. Using cbsd jclone old=bitcoind new=bitcoind-clone host_hostname=clonedbtc.space.com we can create a snapshot and link a new jail to this snapshot. The new jail will have its own separate space, but the filesystem will only account for the difference between the current state and the original (saving at least 190 GB).
Each jail is its own separate ZFS dataset, which is extremely convenient. for various other cool features, such as sending snapshots over SSH. We won't describe this further; there's already a lot.
It's also important to note the need for remote monitoring of the host; we have it for these purposes. .
B - Security
Regarding security, let's start from the key principles in the context of infrastructure:
Confidentiality — Standard tools of UNIX-like systems ensure the implementation of this principle. We logically separate access to each logically distinct element of the system—a jail. Access is provided via standard user authentication using users' private keys. All communication between and to the end jails occurs in an encrypted form. Thanks to disk encryption, we don't have to worry about data preservation during disk replacement or migration to another server. The only critical access is access to the host system since such access generally provides access to the data inside the containers.
Integrity — The implementation of this principle occurs at several different levels. First, it's important to note that in the case of server hardware, ECC memory, ZFS already "out of the box" takes care of data integrity at the bit level. Instantaneous snapshots allow for backups at any moment in time on the fly. Convenient import-export tools for jails make replicating jails simple.
All exploit scenarios related to attack vectors on — This is already optional. It depends on how well-known you are and whether you have detractors. In our example, we ensured the wallet's availability exclusively through the TOR network. If necessary, you can block everything on the firewall and allow access to the server solely through tunnels (TOR or VPN is another matter). Thus, the server will be cut off from the outside world as much as possible, and we will be the only ones who can influence its availability.
Non-repudiation — This depends on further use and adherence to proper user rights policies, access, etc. But with the right approach, all user actions are audited, and thanks to cryptographic solutions, it is possible to unambiguously identify who and when performed certain actions.
Of course, the described configuration is not an absolute example of how it should always be; it's more of one of the examples of how it can be while retaining very flexible scalability and customization options.
What about full virtualization?
We can do full virtualization with cbsd. . I would just add that to work bhyve some kernel parameters need to be enabled.
# cat /etc/rc.conf
...
kld_list="vmm if_tap if_bridge nmdm"
...
# cat /boot/loader.conf
...
vmm_load="YES"
...
So if there is a need to set up Docker, we can raise some Debian and go ahead!
That's all.
That's probably everything I wanted to share. If you liked the article, you can send me some bitcoins — . If you want to try the cells in action and have a bit of bitcoin, you can visit my .
Source: habr.com
