


Task History
Small-sized firms, on one hand, need quality monitoring of their infrastructure (especially given the prevalence of virtualization), and on the other hand, it is financially difficult for them to acquire new equipment. There are also often issues with the server/hardware: typically, there are 1-3 tower servers located next to user workstations or in a small niche/cupboard.
It is easier to use a ready-made build (distribution), which can simply be uploaded to a microSD card and inserted into a common single-board computer (BeagleBone, Raspberry Pi, Orange Pi, Asus Tinker Board). Additionally, such hardware is inexpensive and can be installed anywhere.
Task Definition
In many ways, the project developed as a kind of laboratory work with the possibility of applying the results.
Zabbix was chosen as the monitoring system because it is a powerful, free, and well-documented solution.
The question of the hardware platform became pressing. Setting up a separate machine for monitoring is also not a good solution—either it is expensive to purchase new equipment, or one has to look for old equipment. Plus, small firms often experience issues with servers/hardware.
Using the buildroot system allows the creation of specialized solutions that can be operated by personnel with minimal knowledge of Linux operating systems. This system is beginner-friendly but still offers extensive customization options in the hands of an experienced developer. It is well-suited for the task of providing low-cost yet fully functional IT infrastructure monitoring, with minimal training requirements for the personnel operating it.
Solution Steps
It was decided to initially create a firmware for x86_64 for running in QEMU, as this is a convenient and quick solution for debugging. After that, it was to be ported to an ARM single-board computer (I liked the Asus Tinker Board).
Buildroot was chosen as the build system. Initially, it does not include the Zabbix package, so it had to be ported. There were issues with the Russian locale, which were resolved by applying the corresponding patches (note: in newer versions of buildroot, these patches are no longer needed).
The porting of the Zabbix package itself will be described in a separate article.
Since everything needs to function like firmware (an immutable system image + recoverable configuration/database files), it was necessary to write custom systemd targets, services, and timers (target, service, timer).
It was decided to split the storage into 2 partitions — one for system files and another for modifiable configurations and Zabbix database files.
The challenges related to the database turned out to be a bit more complex. Hosting it directly on the storage was not ideal. At the same time, the size of the database could exceed the capacity of the possible ramdisk. Therefore, a compromise solution was chosen: the database is located on the second partition of the SD card (modern SLC cards have up to 30,000 write cycles), but there is a setting that allows for using an external storage device (e.g., USB HDD).
Temperature monitoring was implemented through the RODOS-5 device. Of course, one could use Dallas 1820 directly, but it was faster and easier to plug in USB.
For x86_64, grub2 was chosen as the bootloader. A minimal configuration for launching was required.
After debugging on QEMU, it was ported to the Asus Tinker Board. The structure of my overlay originally included cross-platform support — allocating board-specific configurations (board defconfig, bootloader, generating an image with a system partition) and maximizing uniformity in filesystem adjustments / creating an image with data. Due to this preparation, the porting went quickly.
It is highly recommended to read the introductory articles:
How to Compile
After cloning the repository, the following file structure is obtained:
[alexey@comp monitor]$ ls -1
buildroot-2019.05.tar.gz
overlay
README.md
run_me.sh
buildroot-2019.05.tar.gz — archive of clean buildroot
overlay — my directory with external-tree. This is where everything needed to compile the firmware with buildroot is stored.
README.md — project description and guide in English.
run_me.sh — a script that prepares the build system. It unpacks buildroot from the archive, attaches overlay (via the external-tree mechanism), and allows you to select the target board for compilation.
[0] my_asus_tinker_defconfig
[1] my_beaglebone_defconfig
[2] x86_64_defconfig
Select defconfig, press A for abort. Default [0]
After this, simply navigate to the buildroot-2019.05 directory and execute the make command.
After the build completes, all build results will be in the output/images directory:
[alexey@comp buildroot-2019.05]$ ls -1 output/images/
boot.img
boot.vfat
bzImage
data
data.img
external.img
external.qcow2
grub-eltorito.img
grub.img
intel-ucode
monitor-0.9-beta.tar.gz
qemu.qcow2
rootfs.cpio
sdcard.img
sys
update
Required files:
- sdcard.img — image file for writing to the SD card (via dd or Rufus on Windows).
- qemu.qcow2 — image file for running in QEMU.
- external.qcow2 — external storage image for the database
- monitor-0.9-beta.tar.gz — archive for updating via web interface
Generating manuals
There's no need to write the same instruction multiple times. It's most logical to write it once in Markdown, then convert it to PDF for download and HTML for the web interface. This is possible thanks to the pandoc package.
At the same time, all these files need to be generated before the system image is built; any post-build scripts are already useless. Therefore, generation is performed as a package named manuals. You can find it in overlay/package/manuals.
The file manuals.mk (which performs all the work)
################################################################################
#
# manuals
#
################################################################################

MANUALS_VERSION:= 1.0.0
MANUALS_SITE:= ${BR2_EXTERNAL_monitorOverlay_PATH}/package/manuals
MANUALS_SITE_METHOD:=local

define MANUALS_BUILD_CMDS
    pandoc -s -o ${TARGET_DIR}/var/www/manual_en.pdf ${BR2_EXTERNAL_monitorOverlay_PATH}/../README.md
    pandoc -f markdown -t html -o ${TARGET_DIR}/var/www/manual_en.html ${BR2_EXTERNAL_monitorOverlay_PATH}/../README.md
endef

$(eval $(generic-package))
systemd
The Linux world is actively transitioning to systemd; I had to do this as well.
One pleasant new feature is the availability of timers. In general, a separate article is written about them (and not only about them), but I'll briefly explain.
There are actions that need to be performed periodically. I needed to run logrotate for cleaning up the logs of lighttpd and php-fpm. The most familiar way would be to write commands in cron, but I decided to use a monotonous systemd timer instead. Thus, logrotate runs at strict time intervals.
Of course, it's possible to create timers that trigger on specific dates, but I didn't need that.
Example timer:
- Timer file
[Unit]
Description=RODOS temp daemon timer
[Timer]
OnBootSec=1min
OnUnitActiveSec=1min
[Install]
WantedBy=timers.target
- Service file called by the timer:
```bash
[Unit]
Description=RODOS temp daemon

[Service]
ExecStart=/usr/bin/rodos.sh
Supported boards
Asus tinker board — the main board on which everything should work. Selected as an inexpensive yet quite powerful option.
Beaglebone black — the first board on which the operation was tested (while looking for a more powerful board).
QEMU x86_64 — used for development debugging.
How It Works
During startup, a two-stage restoration of settings occurs:
- the execution of the settings_restore script (via service). It restores the main system settings — timezone, locale, network settings, etc.
- the execution of the prepare script (via service) — here, zabbix and the database are prepared, and the IP is displayed in the console.
During the first startup, the size of the second partition on the SD card is determined. If there is still unallocated space, the storage device is repartitioned, and the data partition occupies all available space. This is done to reduce the size of the installation image (sdcard.img). Additionally, the working directory for PostgreSQL is created at this moment. That is why the first startup with a new storage device will take longer than subsequent ones.
When connecting an external drive, at startup it looks for a free disk and formats it to ext4 with the label external.
Attention! When connecting an external drive (as well as when disconnecting or replacing it), it is necessary to back up and restore the settings!
An RODOS 5 device is used for monitoring temperature. The manufacturer provides the source code for its utility to work with the device. When the system starts, a rodos timer is initialized, which runs this utility once a minute. The current temperature is recorded in the file /tmp/rodos_current_temp, after which Zabbix can monitor this file as a sensor.
The storage for configuration is mounted in the directory /data.
During system startup and preparation for operation, a message appears in the console:
System starting, please waitAfter the preparatory work is completed, it will change to display the IP address:
current ip 192.168.1.32
Ready to work
Configuring Zabbix for temperature monitoring
To monitor temperature, only two steps are necessary:
- connect the RODOS device to the USB port
- create a data item in Zabbix
Open the Zabbix web interface:
- Open the Configuration → Hosts section
- Click on Items in our Zabbix server row
- Click on Create item
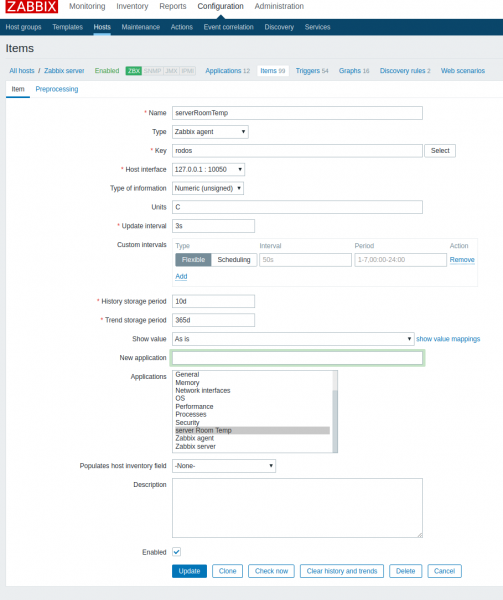
Enter the following data:
- name — at your discretion (for example, serverRoomTemp)
- Type — Zabbix agent
- Key — rodos
- Type — numeric
- Units — C
- History storage period — the period for history storage. Kept it 10 days
- Trend storage period — the period for storing change dynamics. Kept it 30 days
- New application — server Room Temp
And click the ADD button.
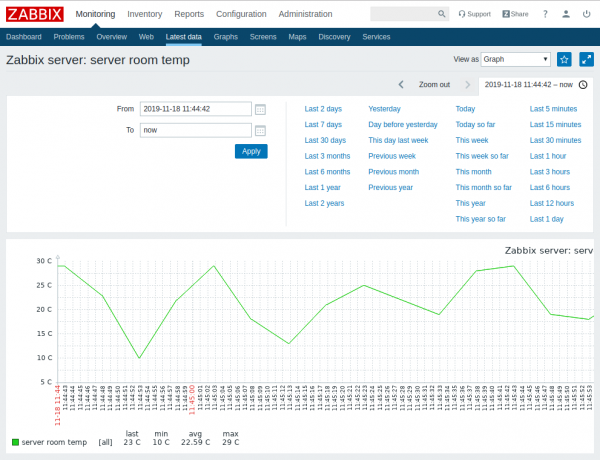
Managing settings via the web interface
The web interface is written in PHP. It has the following main functions:
- viewing the device status
- changing network settings

- changing the user password
- selecting the time zone
- backing up/restoring/resetting to factory settings
- ability to connect an external drive
- System Update

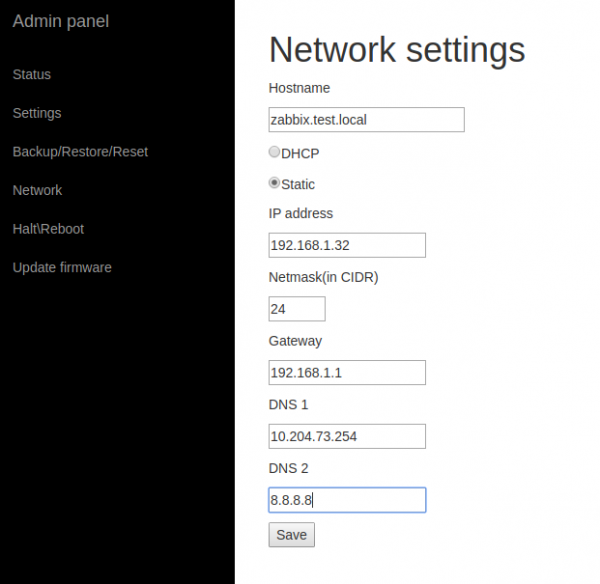
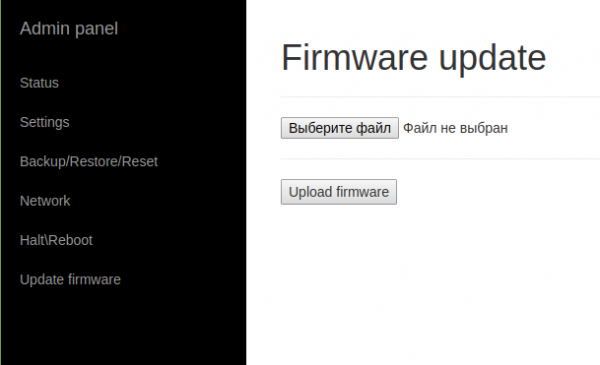
Access to the web interface is password protected. The home page is the guide.
The address of the Zabbix interface: ${ip/dns}/zabbix
Management interface address: ${ip/dns}/manage
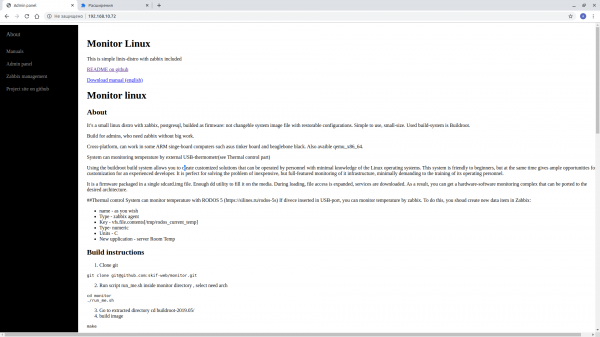
Running in qemu
qemu-system-x86_64 -smp 4 -m 4026M -enable-kvm -machine q35,accel=kvm -device intel-iommu -cpu host -net nic -net bridge,br=bridge0 -device virtio-scsi-pci,id=scsi0 -drive file=output/images/qemu.qcow2,format=qcow2,aio=threads -device virtio-scsi-pci,id=scsi0 -drive file=output/images/external.qcow2,format=qcow2,aio=threads
This command will start the system with 4 cores, 2048 RAM, KVM enabled, a network card on bridge0, and two disks: one for the system and one external for postgresql.
Images can be converted and run in Virtualbox:
qemu-img convert -f qcow2 qemu.qcow2 -O vdi qcow2.vdi
qemu-img convert -f qcow2 external.qcow2 -O vdi external.vdi
After that, import them into Virtualbox and connect via SATA.
Conclusion
During the process, I became interested in creating a ready-to-use product — with a not-so-pretty interface (I don't enjoy writing them), but functional and easy to set up.
The latest attempt to install the zabbix-appliance in KVM showed the validity of this step (after the installation is complete, the system does not start). Maybe I'm doing something wrong 😉
Source: habr.com
