

Winter Is Coming. Programmable Logic Controllers (PLCs) are gradually being replaced by embedded personal computers. This is because the computing power of these computers allows a single device to incorporate the functionality of a programmable controller, a server, and (if the device has an HDMI output) an automated workstation for the operator. In summary: a web server, OPC component, database, and operator's workstation in a single unit, all for the price of one PLC.
This article will explore the possibility of using such embedded computers in industry. We will focus on a device based on the Raspberry Pi, outlining the process of installing an open source SCADA system of Russian development — Rapid SCADA, and we will also develop a project for an abstract compressor station, which will include remote control of the compressor and three valves, as well as visualization of the technological process of producing compressed air.
Let’s clarify right away that the task can be approached in two ways. Principally, they do not differ from one another; the issue is only in aesthetic and practical components. So, we need:
1.1 The first option involves having the Raspberry Pi 2/3/4 itself, as well as a USB to RS485 converter (the so-called 'dongle' that can be ordered from Aliexpress).
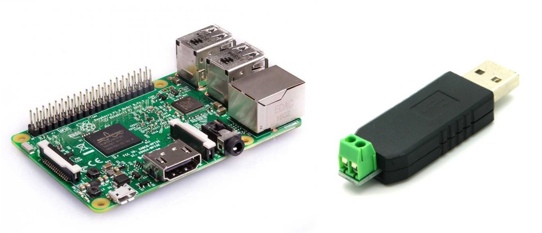
Figure 1 — Raspberry Pi 2 and USB to RS485 converter
1.2 The second option includes any ready-made solution based on Raspberry, recommended for installations in industrial conditions with built-in RS485 ports. For example, one like in Figure 2, based on the Raspberry CM3+ module.
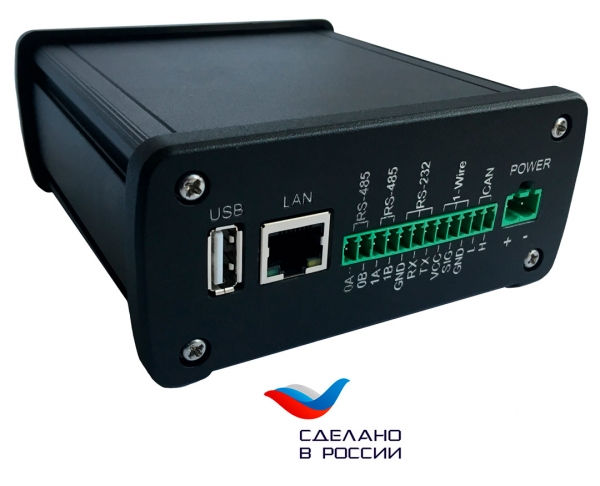
Figure 2 — AntexGate device
2. A device with Modbus for multiple control registers;
3. A Windows PC for project configuration.
Development stages:
Part I. Installing Rapid SCADA on Raspberry
1. Fill out the form on the Rapid Scada website to obtain the distribution and download the latest version for Linux.
2. Unzip the downloaded files and copy the 'scada' folder to the directory /opt of the device.
3. Place three scripts from the 'daemons' folder into the directory /etc/init.d
4. Grant full access to three application folders:
sudo chmod -R ugo+rwx /opt/scada/ScadaWeb/config
sudo chmod -R ugo+rwx /opt/scada/ScadaWeb/log
sudo chmod -R ugo+rwx /opt/scada/ScadaWeb/storage
5. Making the scripts executable:
sudo chmod +x /opt/scada/make_executable.sh
sudo /opt/scada/make_executable.sh
6. Adding the repository:
sudo apt install apt-transport-https dirmngr gnupg ca-certificates
sudo apt-key adv --keyserver hkp://keyserver.ubuntu.com:80 --recv-keys 3FA7E0328081BFF6A14DA29AA6A19B38D3D831EF
echo "deb https://download.mono-project.com/repo/debian stable-stretch main" | sudo tee /etc/apt/sources.list.d/mono-official-stable.list
sudo apt update
7. Installing the Mono .NET Framework:
sudo apt-get install mono-complete8. Installing the Apache HTTP server:
sudo apt-get install apache29. Installing additional modules:
sudo apt-get install libapache2-mod-mono mono-apache-server410. Creating a link to the Web application:
sudo ln -s /opt/scada/ScadaWeb /var/www/html/scada11. Copying the file from the downloaded archive in the ‘apache’ folder scada.conf to the directory /etc/apache2/sites-available
sudo a2ensite scada.conf12. Navigate to this path sudo nano /etc/apache2/apache2.conf and add the following at the end of the file:
Require all denied13. Running the script:
sudo /opt/scada/svc_install.sh14. Rebooting the Raspberry:
sudo reboot15. Opening the website:
http://device-IP-address/scada16. In the opened window, enter the login "admin" and the password "12345".
Part II. Installing Rapid SCADA on Windows
Installing Rapid SCADA on Windows is necessary for configuring Raspberry and setting up the project. In theory, this can also be done on the Raspberry itself, but the technical support recommended using the development environment on Windows as it works more reliably than on Linux.
So, let's get started:
- Updating Microsoft .NET Framework to the latest version;
- Download Rapid SCADA for Windows and installing it offline;
- Launching the ‘Administrator’ application. Here we will develop the project itself.
During development, it is essential to pay attention to some points:
1. The register numbering in this SCADA system starts from address 1, so we had to increase the numbering of our registers by one. In our case it's: 512+1 and so on:
Figure 3 — Register numbering in Rapid SCADA (clickable image)
2. To reconfigure directories and ensure the correct deployment of the project on the Linux operating system, you need to go to ‘Server’ -> ‘General Settings’ and click the ‘For Linux’ button:
Figure 4 — Directory reconfiguration in Rapid SCADA (clickable image)
3. We define the polling port for Modbus RTU as it is specified in the device's Linux system. In our case, this is /dev/ttyUSB0
Figure 5 — Reconfiguring directories in Rapid SCADA (clickable image)
If you have any questions, all additional installation instructions can be found at or on their .
Part III. Project Development and Uploading to the Device
Project development and visualization take place directly in the browser. This is somewhat unfamiliar compared to desktop SCADA systems, but it is quite feasible.
It is worth noting the limited set of visualization elements (figure 6). The built-in components here include a LED, button, toggle switch, link, and pointer. However, a significant advantage is that this SCADA system supports dynamic images and text. With minimal knowledge of graphic editors (Corel, Adobe Photoshop, etc.), you can create your own libraries of images, elements, and textures, while the support for GIF elements allows adding animation to the process visualization.
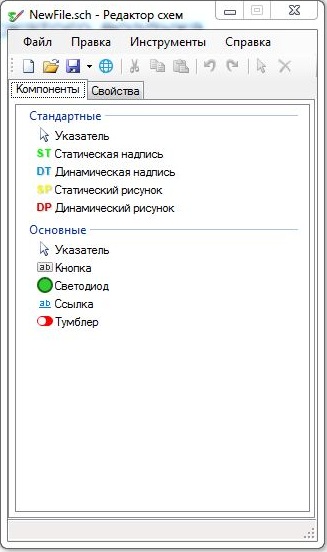
Figure 6 — Toolset of the schematic editor in Rapid SCADA
This article did not aim to detail the step-by-step process of graphically creating a project in Rapid SCADA. Therefore, we will not dwell on this point in detail. In the developer environment, our simple project "Compressed Air Supply Systems" for the compressor station looks like this (figure 7):
Figure 7 — Schematic editor in Rapid SCADA (clickable image)
Next, we upload our project to the device. For this, we specify the device's IP address to transfer the project not to localhost, but to our embedded computer:
Figure 8 — Uploading the project to the device in Rapid SCADA (clickable image)
As a result, we ended up with something like this (figure 9). On the left side of the screen are LEDs reflecting the operational status of the entire system (compressor), as well as the status of the valves (open or closed), and in the center of the screen is the visualization of the technological process with the ability to control devices via toggle switches. When a valve is opened, the color changes from gray to green, both for the valve itself and for the corresponding pipeline.
Figure 9 — Compressor Station Project (clickable GIF animation)
You can download the file of this project for review.
Figure 10 shows what we achieved in general.
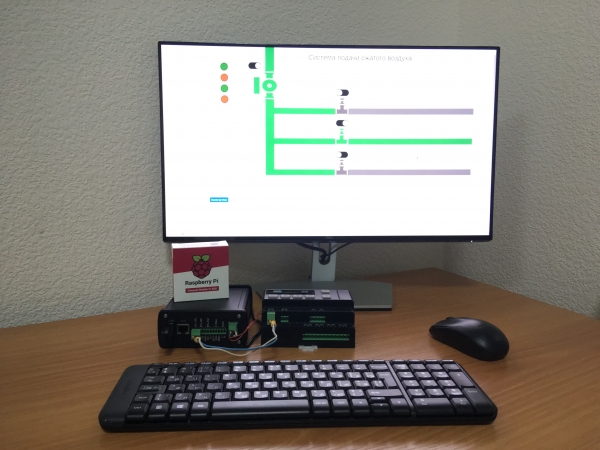
Figure 10 — SCADA System on Raspberry
Conclusions
The emergence of powerful embedded industrial computers allows for an expansion and enhancement of the functionality of programmable logic controllers. Installing such SCADA systems on them can cover the needs of small-scale production or technological processes. For larger tasks with more users or higher security requirements, it will likely be necessary to install full-fledged servers, automation cabinets, and familiar PLCs. However, for medium and small automation points, such as small production buildings, boiler houses, pumping stations, or smart homes, this solution seems reasonable. According to our calculations, such devices are suitable for tasks up to 500 data I/O points.
If you have experience drawing in various graphic editors and are okay with creating mnemonic scheme elements yourself, then the option with Rapid SCADA on Raspberry is quite optimal. Its functionality as a ready-made solution is somewhat limited, as it is Open Source, but it can cover the needs of a small production building. Therefore, if you prepare visualization templates for yourself, it is quite possible to use this solution for integration, if not for all, then for some of your projects.
Thus, to understand how useful such a solution on Raspberry can be for you and how replaceable your projects are with Open Source SCADA systems on Linux, a reasonable question arises: which SCADA systems do you use most often?
Only registered users can participate in the survey. , please.
Which SCADA systems do you use most often?
35.2%SIMATIC WinCC (TIA Portal)18
7.8%Intouch Wonderware4
5.8%Trace mode3
15.6%CoDeSys8
0%Genesis0
3.9%PcVue Solutions2
3.9%Vijeo Citect2
17.6%Master SCADA9
3.9%iRidium mobile2
3.9%Simple-Scada2
7.8%Rapid SCADA4
1.9%AggreGate SCADA1
39.2%Other option (response in comments)20
51 users voted. 33 users abstained.
Source: habr.com
