


We have already talked about , which allows you to develop distributed applications and package them. There's just one more step: learning how to deploy these applications and manage them. Don't worry, we've got everything covered! We have gathered all the best practices for working with Tarantool Cartridge and written the , which will unpack the package on the servers, start instances, cluster them, configure authorization, bootstrap vshard, enable automatic failover, and patch the cluster config.
Interested? Then come on in, we will tell and show you everything.
Let's start with an example
We will only consider a part of the functionality of our role. You can always find a complete description of all its capabilities and input parameters in the . But it's better to try once than to see a hundred times, so let's deploy a small application.
Tarantool Cartridge has a for creating a small Cartridge application that stores information about bank customers and their accounts, as well as providing an API for managing data via HTTP. For this, the application describes two possible roles: api and storage, which can be assigned to instances.
The Cartridge itself does not dictate how to run processes; it only provides the means to configure already running instances. The rest, the user must do on their own: unpack configuration files, start services, and set up the topology. But we won't be doing all that, Ansible will handle it for us.
From words to action
So, let's deploy our application on two virtual machines and set up a simple topology:
- Replica set
app-1will implement the roleapi, which includes the rolevshard-router. There will only be one instance here. - Replica set
storage-1implements the rolestorage(and at the same timevshard-storage), we will add two instances from different machines here.
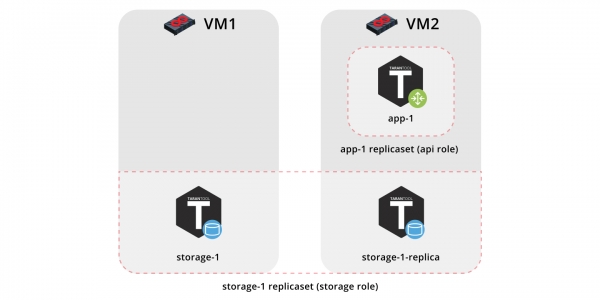
To run the example, we will need and (version 2.8 or later).
The role itself is located in . It is a repository that allows you to share your work and use ready-made roles.
Clone the repository with the example:
$ git clone https://github.com/dokshina/deploy-tarantool-cartridge-app.git
$ cd deploy-tarantool-cartridge-app && git checkout 1.0.0
Bring up the virtual machines:
$ vagrant upInstall the Tarantool Cartridge ansible role:
$ ansible-galaxy install tarantool.cartridge,1.0.1Run the installed role:
$ ansible-playbook -i hosts.yml playbook.ymlWe wait for the playbook to finish executing, and move on to and enjoy the result:
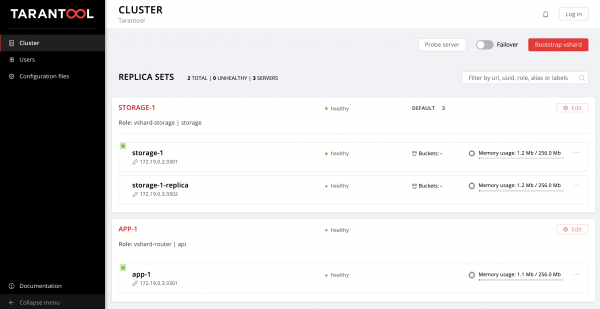
We can start loading data. Cool, right?
Now let's figure out how to work with this and also add another replicaset to the topology.
Let's start figuring it out
So, what happened?
We launched two virtual machines and ran an ansible playbook that set up our cluster. Let's take a look at the contents of the file playbook.yml:
---
- name: Deploy my Tarantool Cartridge app
  hosts: all
  become: true
  become_user: root
  tasks:
  - name: Import Tarantool Cartridge role
    import_role:
      name: tarantool.cartridge
Nothing interesting happens here, we are launching the ansible role called tarantool.cartridge.
All the important stuff (namely, the cluster configuration) is located in the -file hosts.yml:
---
all:
  vars:
    # common cluster variables
    cartridge_app_name: getting-started-app
    cartridge_package_path: .\/getting-started-app-1.0.0-0.rpm  # path to package

    cartridge_cluster_cookie: app-default-cookie  # cluster cookie

    # common ssh options
    ansible_ssh_private_key_file: ~\/\.vagrant.d\/insecure_private_key
    ansible_ssh_common_args: '-o IdentitiesOnly=yes -o UserKnownHostsFile=\/dev\/null -o StrictHostKeyChecking=no'

  # INSTANCES
  hosts:
    storage-1:
      config:
        advertise_uri: '172.19.0.2:3301'
        http_port: 8181

    app-1:
      config:
        advertise_uri: '172.19.0.3:3301'
        http_port: 8182

    storage-1-replica:
      config:
        advertise_uri: '172.19.0.3:3302'
        http_port: 8183

  children:
    # GROUP INSTANCES BY MACHINES
    host1:
      vars:
        # first machine connection options
        ansible_host: 172.19.0.2
        ansible_user: vagrant

      hosts:  # instances to be started on the first machine
        storage-1:

    host2:
      vars:
        # second machine connection options
        ansible_host: 172.19.0.3
        ansible_user: vagrant

      hosts:  # instances to be started on the second machine
        app-1:
        storage-1-replica:

    # GROUP INSTANCES BY REPLICA SETS
    replicaset_app_1:
      vars:  # replica set configuration
        replicaset_alias: app-1
        failover_priority:
          - app-1  # leader
        roles:
          - 'api'

      hosts:  # replica set instances
        app-1:

    replicaset_storage_1:
      vars:  # replica set configuration
        replicaset_alias: storage-1
        weight: 3
        failover_priority:
          - storage-1  # leader
          - storage-1-replica
        roles:
          - 'storage'

      hosts:   # replica set instances
        storage-1:
        storage-1-replica:
All we need to do is learn how to manage instances and replicsets by changing the contents of this file. Later, we will add new sections to it. To avoid confusion about where to add them, you can refer to the final version of this file, hosts.updated.yml, which is located in the repository with the example.
Managing Instances
In Ansible terms, each instance is a host (not to be confused with a physical server), i.e., a node in the infrastructure that Ansible will manage. For each host, we can specify connection parameters (such as ansible_host and ansible_user), as well as the instance configuration. The instance descriptions are located in the section hosts.
Let's consider the instance configuration storage-1:
all:
  vars:
    ...

  # INSTANCES
  hosts:
    storage-1:
      config:
        advertise_uri: '172.19.0.2:3301'
        http_port: 8181

  ...
In the variable config we specified the instance parameters — advertise URI and HTTP port.
Below are the parameters of the instances app-1 and storage-1-replica.
We need to inform Ansible about the connection parameters for each instance. It makes sense to group the instances by virtual machines. For this purpose, the instances are grouped into categories host1 and host2, and in each group in the section vars the values are specified ansible_host and ansible_user for one virtual machine. And in the section hosts — hosts (which are also instances) that are included in this group:
all:
  vars:
    ...
  hosts:
    ...
  children:
    # GROUP INSTANCES BY MACHINES
    host1:
      vars:
        # first machine connection options
        ansible_host: 172.19.0.2
        ansible_user: vagrant
       hosts:  # instances to be started on the first machine
        storage-1:

     host2:
      vars:
        # second machine connection options
        ansible_host: 172.19.0.3
        ansible_user: vagrant
       hosts:  # instances to be started on the second machine
        app-1:
        storage-1-replica:
Let's start making changes hosts.yml. We will add two more instances, storage-2-replica on the first virtual machine and storage-2 on the second:
all:
  vars:
    ...

  # INSTANCES
  hosts:
    ...
    storage-2:  # <==
      config:
        advertise_uri: '172.19.0.3:3303'
        http_port: 8184

    storage-2-replica:  # <==
      config:
        advertise_uri: '172.19.0.2:3302'
        http_port: 8185

  children:
    # GROUP INSTANCES BY MACHINES
    host1:
      vars:
        ...
      hosts:  # instances to be started on the first machine
        storage-1:
        storage-2-replica:  # <==

    host2:
      vars:
        ...
      hosts:  # instances to be started on the second machine
        app-1:
        storage-1-replica:
        storage-2:  # <==
  ...
Let's run the ansible playbook:
$ ansible-playbook -i hosts.yml
                   --limit storage-2,storage-2-replica
                   playbook.yml
Note the option --limit. Since each cluster instance is a host in Ansible terms, we can explicitly specify which instances should be configured when executing the playbook.
Once again, we enter the Web UI and observe our new instances:
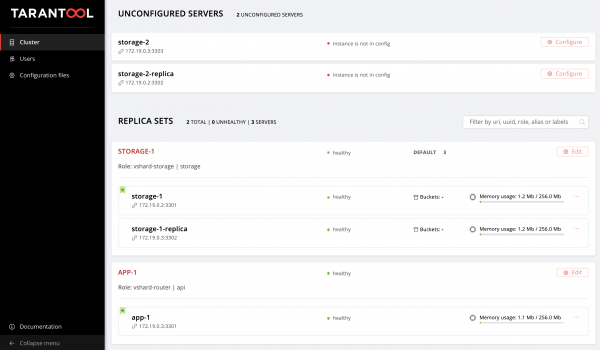
Let’s not stop there and learn to manage the topology.
Topology Management
We will group our new instances into a replica set storage-2. Let's add a new group replicaset_storage_2 and describe its variables for the replica set similarly to replicaset_storage_1. In the section hosts let's specify which instances will be included in this group (that is, our replica set):
---
all:
  vars:
    ...
  hosts:
    ...
  children:
    ...
    # GROUP INSTANCES BY REPLICA SETS
    ...
    replicaset_storage_2:  # <==
      vars:  # replicaset configuration
        replicaset_alias: storage-2
        weight: 2
        failover_priority:
          - storage-2
          - storage-2-replica
        roles:
          - 'storage'

      hosts:   # replicaset instances
        storage-2:
        storage-2-replica:
Let's run the playbook again:
$ ansible-playbook -i hosts.yml
                   --limit replicaset_storage_2
                   --tags cartridge-replicasets
                   playbook.yml
In the parameter --limit this time we provided the name of the group corresponding to our replica set.
Let's consider the option tags.
Our role sequentially performs various tasks marked with the following tags:
cartridge-instances: managing instances (configuration, connecting to membership);cartridge-replicasets: managing topology (managing replica sets and permanently removing (expelling) instances from the cluster);cartridge-config: managing other cluster parameters (vshard bootstrapping, automatic failover mode, authorization parameters, and application configuration).
We can explicitly specify which part of the work we want to do, then the role will skip the execution of the remaining tasks. In our case, we want to work only with the topology, so we specified cartridge-replicasets.
Let’s evaluate the results of our efforts. We find the new replica set at .
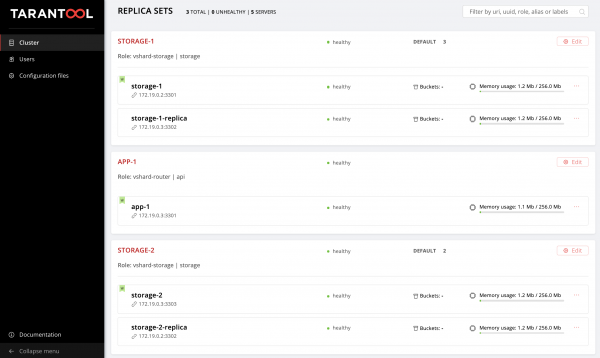
Hooray!
Experiment with changing the configurations of instances and replica sets and see how the cluster topology changes. You can try different operational scenarios, such as or increasing memtx_memory. The role will attempt to do this without restarting the instance, to minimize potential downtime of your application.
Don’t forget to run vagrant halt, to stop the virtual machines when you're done working with them.
What’s under the hood?
Here, I will explain in more detail what was happening under the hood of the ansible role during our experiments.
Let’s go through the steps of deploying a Cartridge application.
Installing the package and starting instances
First, we need to deliver the package to the server and install it. The role can currently work with RPM and DEB packages.
Next, we start the instances. It’s very simple: each instance is a separate systemd-service. I’ll explain with an example:
$ systemctl start myapp@storage-1This command will start the instance storage-1 of the application myapp.The started instance will look for its downward API support (simultaneously with this in /etc/tarantool/conf.d/You can view the instance logs using journald.
The unit file /etc/systemd/system/myapp@.sevice for the systemd service will be delivered along with the package.
Ansible has built-in modules for package installation and managing systemd services, so we haven't reinvented anything here.
Cluster topology configuration
And this is where it gets interesting. Agree, it would be strange to bother with a special Ansible role for package installation and launching systemd-services.
You can configure the cluster manually:
- First option: open the Web UI and click the buttons. This will be quite suitable for a one-time launch of multiple instances.
- Second option: you can use the GraphQL API. Here you can automate something, for example, write a script in Python.
- Third option (for the strong-spirited): enter the server, connect to one of the instances using
tarantoolctl connectand perform all necessary actions with the Lua modulecartridge.
The main task of our invention is to handle this most complex part of the work for you.
Ansible allows you to write your own module and use it in a role. Our role uses such modules to manage various cluster components.
How does it work? You describe the desired state of the cluster in a declarative config, and the role provides each module with its configuration section. The module compares the current state of the cluster with what was provided. Then, through the socket of one of the instances, code is executed that brings the cluster to the desired state.
Summary
Today we explained and demonstrated how to deploy your application on Tarantool Cartridge and set up a simple topology. For this, we used Ansible—a powerful tool that stands out for its ease of use and allows simultaneous configuration of many infrastructure nodes (in our case, these are the cluster instances).
Above, we covered one of the many ways to describe the cluster configuration using Ansible. Once you understand that you are ready to move forward, explore for writing playbooks. You may find it more convenient to manage the topology using group_vars and host_vars.
Very soon we will explain how to permanently remove instances from the topology, bootstrap vshard, manage automatic failover mode, configure authorization, and patch the cluster config. Meanwhile, you can study and experiment with cluster parameter changes on your own. and experiment with changing cluster parameters.
If something isn't working, be sure to about the issue. We will resolve everything promptly!
Source: habr.com
