

In I briefly discussed the assembly, which allows you to create a computer capable of running unRAID to set up a NAS and MikroTik RouterOS in a KVM virtual machine as a replacement for a regular router.
The comments sparked some useful discussions, resulting in the need to correct mistakes in the initial assembly and write a third part! I plan to test some of the suggestions myself and hope to write the third part.
For the initial setup, you will need to connect a monitor, keyboard, and mouse to the server.
Installing unRAID
Go to and install unRAID on a USB drive (which I forgot to include in the table). The standard recommendations for USB drives are: a reliable brand and a larger physical size (for better cooling). unRAID will boot from this USB drive, so your SSDs will be dedicated to cache. More detailed official information .
Don't forget to enable VT-d and VT-x support in the BIOS!
Connect the USB drive to the server and boot it in GUI mode.
Default username and password: root with no password.
Version at the time of writing: 6.7.2
After starting the OS, ensure all connected hardware is detected. The system should see all your disks (disks are displayed on the Main tab), two Ethernet controllers, and a Wi-Fi card (you can check this conveniently in Tools -> System Devices).
Problem with Marvell SATA controllers
Due to some bug in the Marvell controller drivers, they .
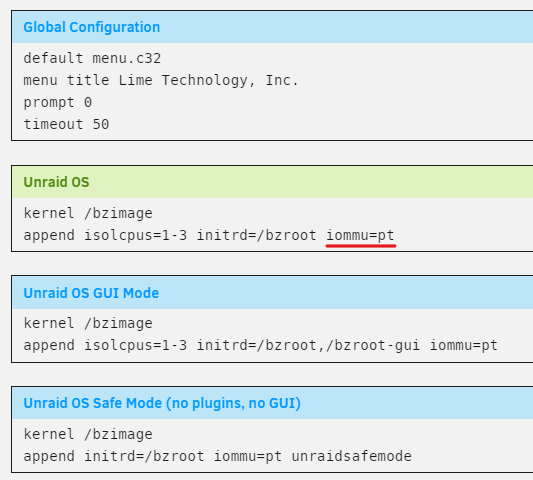
I chose the simplest solution: I added iommu=pt to the parameters passed to the Linux kernel at boot. This is done on the Main tab (then click on the 'Flash' device). You can also initially change the config on the USB drive: boot/syslinux/syslinux.cfg
About Intel vPro
I do not recommend looking for hardware that supports vPro/AMT.
Firstly, to use remote desktop properly, you need to connect an HDMI dummy or DP dummy plug; otherwise, the integrated graphics will not initialize without a connected monitor.
Secondly, the quality of Intel's client software is extremely low.
Thirdly, you can achieve the same functionality for home use using a wired or wireless HDMI/DP extender without any restrictions on hardware choices.
Network setup
Go to Settings -> Network Settings. As you might have guessed, one of the interfaces will connect to the local network, while the other connects to the internet. First, determine which one will be connected to your local network. On my motherboard, there are labels with MAC addresses on the ports, and that's how I identified which is which.
In short, here's what you need to do: assign each interface to two separate L2 bridges and set a static IP address for the one connected to the local network. The internet-facing interface does not require an IP address; RouterOS will handle that.
This is what you should end up with:
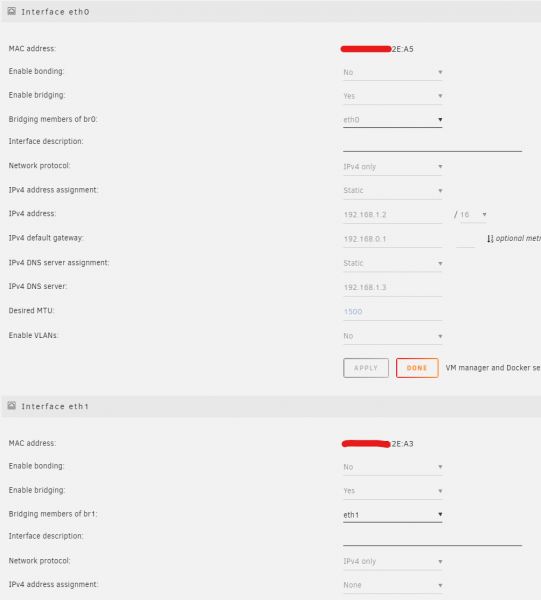
- 192.168.1.2 — the address for accessing unRAID
- 192.168.0.1 — the RouterOS address
- 192.168.1.3 — the DNS server address pi.hole
You can leave the address assignment for eth0 via DHCP, but if there's any issue with RouterOS, we won't be able to access unRAID and will need to connect a monitor and keyboard to the server.
After configuring the network, you can move on to remote configuration by manually setting the IP address on the LAN client.
Storage Configuration
To run a virtual machine, you will need storage, so it's time to set it up. I won't go into detail, as it's quite simple: you need to assign roles to the hard drives — one as Disk 1, the other as Parity.
In the first part, I mentioned that one SSD is sufficient, but that's not quite true: it's better to take two identical ones and create a cache-pool from them, so the data will be protected in case one fails. Also, unRAID does not have a mechanism for backing up data from the cache. More detailed information is provided. .
It should look like this (sorry, I haven't bought a second SSD yet):
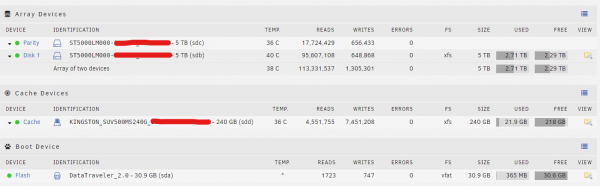
You can also immediately set up a schedule for parity checks and data transfer from the cache. This is done on the Settings -> Scheduler page.
Parity checks only need to be done every two months, while data transfer from the cache should be done nightly.
You can immediately configure the resources available over the network in the Shares tab:
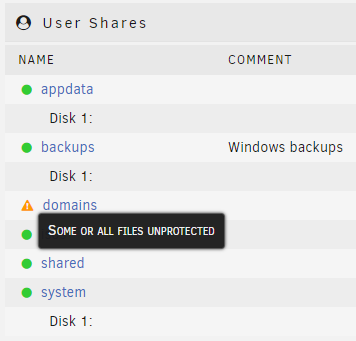
Since I only have one cache disk, domains are unprotected. Everything should be green for you.
Installing RouterOS
First, download the installation iso image (select x86 Stable CD Image) and place it in Towerisos.
Now it's time to create a virtual machine.
Enable support in Settings -> VM Manager. After that, a new tab will appear — VMs, go to it.
Click Add VM, then — Linux.
- Allocate just one core
- Memory can be set to either 128 or 256 megabytes
- Machine —
i440fx-3.1 - BIOS —
SeaBIOS - In the OS Install ISO field, select the downloaded image (
/mnt/user/isos/mikrotik-6.46.iso) - Primary vDisk Size — 256M
- Primary vDisk Bus —
SATA - Network Bridge — br0
- Add a second network interface and select br1
- If your Wi-Fi card does not appear under Other PCI Devices, don’t worry — we’ll manually configure it in the settings. If it does appear, check the box.
- For now, uncheck Start VM after creation and click Create
Remember which MAC addresses correspond to which interfaces for later mapping in RouterOS.
For some reason, automatic port assignment for different VMs hasn’t always worked for me, so open the resulting XML config and adjust the line with the VNC settings to something like:
If, like me, your Wi-Fi adapter didn’t show up in Other PCI Devices, add it manually. You need to find out its address on the PCI bus. The easiest way to do this is in Tools -> System Devices, where you will see a line:
IOMMU group 23: [168c:003c] 0b:00.0 Network controller: Qualcomm Atheros QCA986x/988x 802.11ac Wireless Network AdapterIn my case, this transforms to:
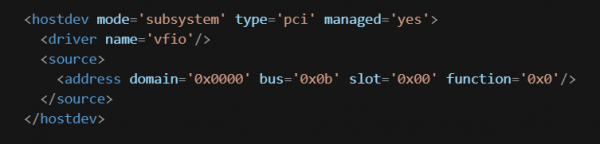
(sorry, the MD parser on Habr has issues with this snippet, had to insert it as an image)
You can start the VM and connect to it via VNC. The RouterOS installation is very straightforward! After being prompted to select packages, it’s easiest to select all by pressing a and finish the installation by pressing i, opting out of saving the old configuration and agreeing to format the disk.
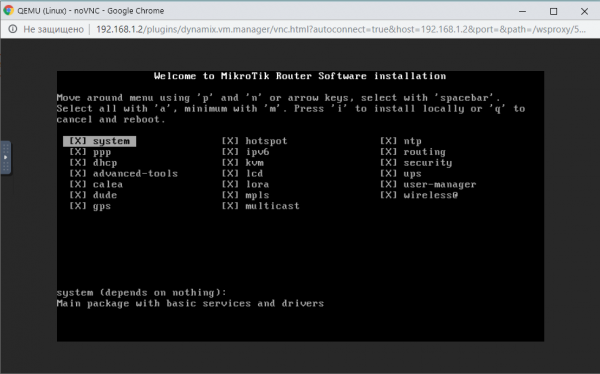
After rebooting, enter admin as the username, and leave the password blank.
Type /interface print and ensure that the system sees all three of your network interfaces (I took a screenshot of an already configured system where the names differ from the defaults):

At this stage, you can download , connect to RouterOS via MAC address, and perform further configuration through the GUI.
I believe that detailed RouterOS configuration goes beyond this article, especially since there are many manuals online, so I suggest starting with the standard Quick Setup:
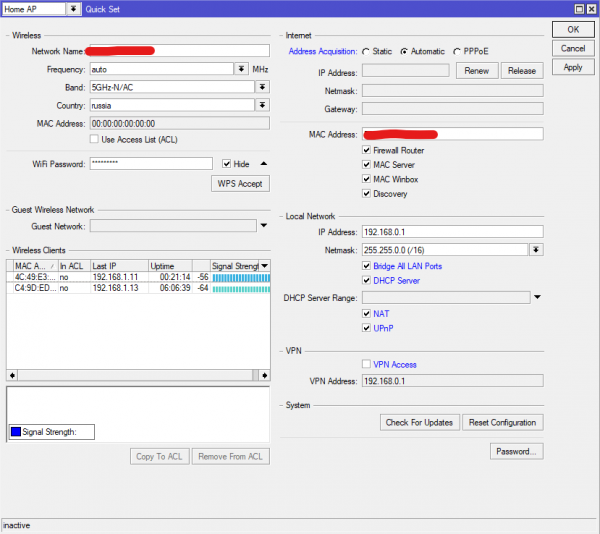
You can connect a cable with internet to a free port and switch the LAN client to automatically receive an IP address, and also check Wi-Fi functionality. Once everything is working, you can purchase and enter the RouterOS license key.
Adding a Linux VM
To work in a more familiar environment, let's create another virtual machine where we will run your favorite %distro_name%
As before, download the ISO image and place it in isos
Go to the familiar VMs tab, then Add VM; the vast majority of settings can now remain default.
- BIOS —
SeaBIOS - In the OS Install ISO section, select the downloaded image
- Primary vDisk Size — something around 10-20 GB
- Unraid Share — the path to the directory you want to make accessible to the VM; in my case,
/mnt/user/shared/ - Unraid Mount tag
shared - Network Bridge — br0
- For now, uncheck Start VM after creation and click Create
Again, in the config, edit the VNC server settings:
Install the system; it should obtain an IP via DHCP and have internet access.
To make the FS directory on the host accessible, add the following line: /etc/fstab shared /mnt/shared 9p trans=virtio,version=9p2000.L 0 0
Now you can use familiar services on a familiar Linux machine that will be easily portable to another hardware!If everything works fine and correctly turns on and off, you can purchase and enter the key for unRAID. Don’t forget that it is tied to the GUID of the flash drive (though it can be transferred). Also, without a license, automated VM start will not work.
Thank you for reading to the end!
Final
I tried not to write too much, but in my opinion, the article still turned out to be quite long. The other features of unRAID are quite simple to configure, especially since everything can be set up with a mouse.
There are good ideas for what can be installed on a VM
. I think everyone has their own needs, and it’s impossible to come up with a universal list. However, pi-hole can certainly be recommended to absolutely everyone 🙂 I hope I can continue!
Traffic exchange point: from origins to creating your own IX
Source: habr.com
