


When developing plugins for CAD applications ( these are AutoCAD, Revit, and Renga), one problem inevitably arises over time – new versions of the programs are released, their APIs change, and new versions of the plugins need to be made.
When you have only one plugin or you’re a newbie self-taught in this, you can simply copy the project, change the necessary parts, and build a new version of the plugin. Consequently, making subsequent changes in the code will lead to a significant increase in labor costs.
As you gain experience and knowledge, you will find several ways to automate this process. I have gone down this path and would like to share what I have come to in the end and how convenient it is.
To start, let's consider an approach that is obvious and one I used for a long time.
Project file references
And to keep everything simple, clear, and understandable, I will describe it all using an abstract example of plugin development.
Let's open Visual Studio (I have Community 2019 version. And yes – in Russian) and create a new solution. We will name it MySuperPluginForRevit
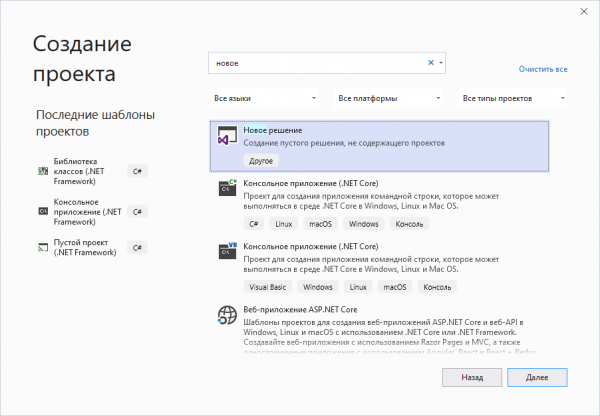
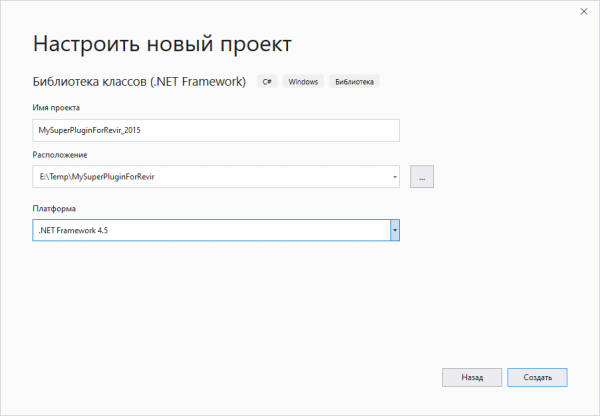
We will create a plugin for Revit for the 2015-2020 versions. Therefore, I will create a new project in the solution (Class Library Net Framework) and name it MySuperPluginForRevit_2015
We need to add references to the Revit API. Of course, we can add references to local files (we would need to install all the required SDKs or all versions of Revit), but we will take the right approach and connect the NuGet package. You can find a substantial number of packages, but I will use my own.
After connecting the package, right-click on the item “Links” and select the menu item “Move packages.config to PackageReference…»
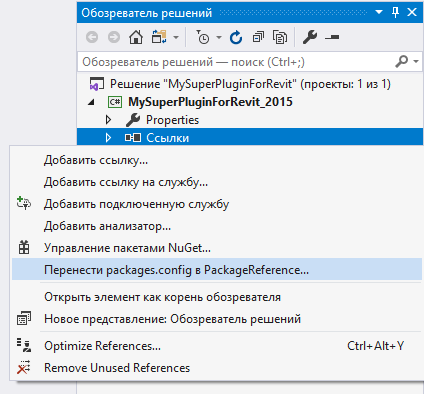
If you start to panic at this point because the important item “Copy Locally” is not set to the value false, don’t panic – go to the project folder, open the file with the .csproj extension in your preferred editor (I use Notepad++) and find the entry for our package. It currently looks like this:
1.0.0We add the property runtime. It will look like this:
1.0.0
  runtime
Now, when building the project, files from the package will not be copied to the output folder.
Let's move on – let's assume that our plugin will use something from the Revit API, which changes with each new version release. Or we simply need to change something in the code depending on the version of Revit we are making the plugin for. To handle these code differences, we will use conditional compilation symbols. Let's open the project properties and go to the tab "Building" and in the "Conditional Compilation Symbols" field, we will write R2015.
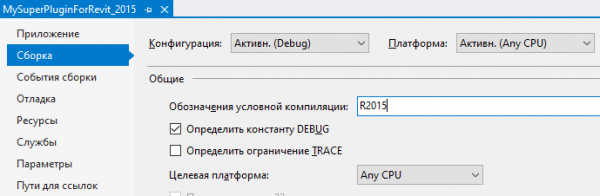
Please note that the symbol must be added for both Debug and Release configurations.
While we're in the properties window, let's go to the tab "Application" and in the "Default Namespace" and remove the suffix _2015, so that our namespace is universal and independent of the assembly name:
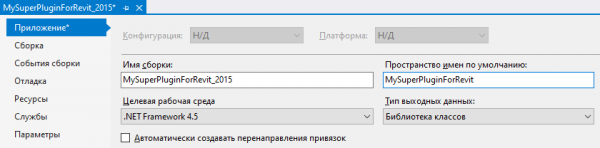
In my case, in the final product, plugins for all versions are placed in one folder, so my assembly names retain suffixes like _20xx. But you can also remove the suffix from the assembly name if the files are expected to be located in different folders.
Let's move on to the code file Class1.cs and simulate some code considering the different versions of Revit:
namespace MySuperPluginForRevit
{
    using Autodesk.Revit.Attributes;
    using Autodesk.Revit.DB;
    using Autodesk.Revit.UI;

    [Regeneration(RegenerationOption.Manual)]
    [Transaction(TransactionMode.Manual)]
    public class Class1 : IExternalCommand
    {
        public Result Execute(ExternalCommandData commandData, ref string message, ElementSet elements)
        {
#if R2015
            TaskDialog.Show("ModPlus", "Hello Revit 2015");
#elif R2016
            TaskDialog.Show("ModPlus", "Hello Revit 2016");
#elif R2017
            TaskDialog.Show("ModPlus", "Hello Revit 2017");
#elif R2018
            TaskDialog.Show("ModPlus", "Hello Revit 2018");
#elif R2019
            TaskDialog.Show("ModPlus", "Hello Revit 2019");
#elif R2020
            TaskDialog.Show("ModPlus", "Hello Revit 2020");
#endif
            return Result.Succeeded;
        }
    }
}
I've considered all Revit versions above 2015 (which were available at the time of writing this article) and also accounted for the presence of conditional compilation symbols that I create based on the same template.
Now, let's get to the main highlight. We'll create a new project in our solution, specifically for the plugin version for Revit 2016. We will repeat all the steps described above, accordingly replacing the number 2015 with 2016. However, we'll delete the file Class1.cs from the new project.
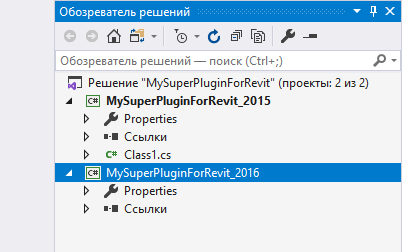
The file with the necessary code – Class1.cs – we already have, and we simply need to insert a link to it in the new project. There are two ways to insert links:
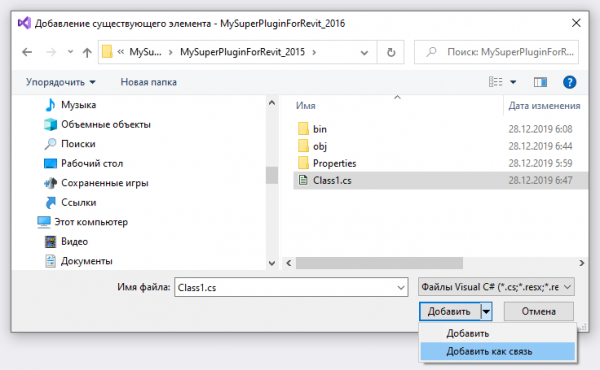
- Long – right-click on the project, select the item "Add" -> "Existing Item", in the opened window find the necessary file and instead of the option "Add" choose the option "Add as Link»
- Short – directly in the Solution Explorer, select the required file (or even files, or even entire folders) and drag it into the new project while holding down the Alt key. While dragging, you will see that when you press the Alt key, the cursor will change from a plus sign to an arrow.
UPD: I’ve caused some confusion in this paragraph — to move multiple files you should hold down Shift+Alt!
After completing the procedure, we will have a file in the second project Class1.cs with the corresponding icon (blue arrow):
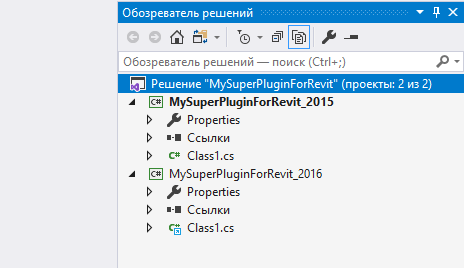
When editing code in the editor window, you can also choose which project's code to display, allowing you to see and edit the code with different conditional compilation symbols:
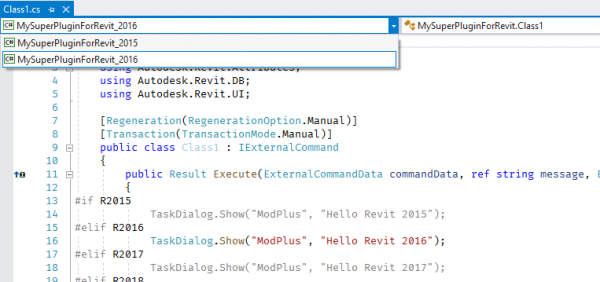
We create all other projects (2017-2020) according to this scheme. Life hack – if you drag files in the Solution Explorer not from the base project, but from a project where they are already inserted as a link, you don’t need to hold the Alt key!
The described option is quite good until a new version of the plugin is added or new files are added to the project – all this becomes quite tedious. And recently I suddenly realized how to tackle all this with one project, and we move on to the second method
Configuration Magic
Having read this far, you might exclaim, "Why did you describe the first method if the article is immediately about the second?!" I described everything to clarify the purpose of conditional compilation symbols and where our projects differ. And now it becomes clearer which specific differences we need to implement, leaving only one project.
And to make everything more obvious, we will not create a new project but make changes to our current project created by the first method.
So, first of all, we remove all projects from the solution except the main one (the one containing the files). That is, the projects for versions 2016-2020. Open the folder with the solution and delete the folders for those projects.
We are left with one project in the solution — MySuperPluginForRevit_2015. We open its properties and:
- On the "Application" tab, we remove the suffix from the assembly name _2015 (it will become clear later why)
- On the "Building» remove the conditional compilation symbol R2015 from the corresponding field
Note: the latest version of Visual Studio has a bug – conditional compilation symbols do not appear in the project properties window, although they exist. If you observe this bug, you need to remove them manually from the .csproj file. However, we still need to work in it, so let's read on.
Rename the project in the Solution Explorer by removing the suffix _2015 and then remove the project from the solution. This is necessary for maintaining order and satisfying perfectionists! Open the folder of our solution, rename the project folder in the same way, and load the project back into the solution.
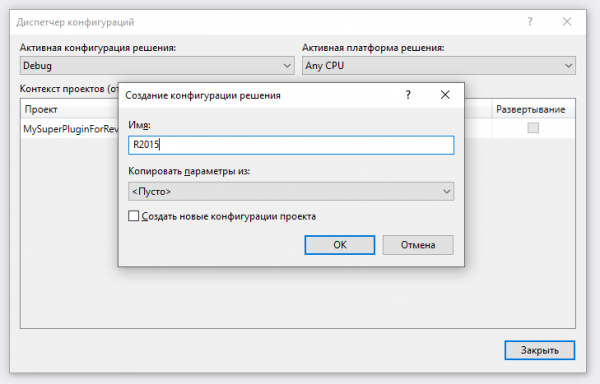
Open the Configuration Manager. The configuration Release is generally not needed, so we delete it. We create new configurations with names we are already familiar with. R2015, R2016, …, R2020. Note that you do not need to copy parameters from other configurations and you do not need to create project configurations:
Go to the project folder and open the file with the .csproj extension in your preferred editor. By the way, it can also be opened in Visual Studio – you need to unload the project and then the necessary menu item will appear in the context menu:
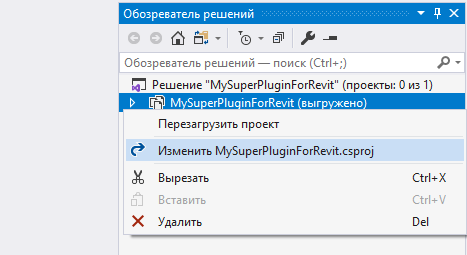
Editing in Visual Studio is even preferable, as the editor aligns and suggests.
In the file, we will see the elements – at the very top is the general one, followed by those with conditions. These elements define the properties of the project during its build. The first element, which has no conditions, specifies general properties, while the elements with conditions, respectively, change some properties depending on configurations.
We go to the general (first) element PropertyGroup and look at the property AssemblyName – this is the assembly name and it should not have a suffix _2015. If there is a suffix, remove it.
Find the element with the condition
<PropertyGroup Condition=" '$(Configuration)|$(Platform)' == 'Release|AnyCPU' ">We do not need it – delete it.
The element with the condition
<PropertyGroup Condition=" '$(Configuration)|$(Platform)' == 'Debug|AnyCPU' ">will be needed for development and debugging tasks. You can modify its properties to suit your needs – set different output paths, change conditional compilation symbols, etc.
Now we create new elements PropertyGroup for our configurations. In these elements, it is enough to specify four properties:
- OutputPath – the output folder. I set the standard value binR20xx
- DefineConstants – conditional compilation symbols. The value should be set TRACE;R20xx
- TargetFrameworkVersion – the platform version. Different versions of the Revit API require different platforms to be specified.
- AssemblyName – assembly name (i.e., filename). You can input the exact assembly name needed, but for versatility, I recommend using the value $(AssemblyName)_20xx. This is why we previously removed the suffix from the assembly name
The main advantage of all these elements is that they can easily be copied to other projects without any modifications. Later in the article, I will include the entire contents of the .csproj file.
Alright, we have dealt with the project properties – it’s not difficult. But what about the referenced libraries (NuGet packages)? If we look further, we will see that the referenced libraries are specified in elements . But here’s the catch – this element incorrectly processes conditions, like the element PropertyGroup. This might even be a bug in Visual Studio, but if you specify multiple elements ItemGroup with configuration conditions, and insert different NuGet package references inside, then when switching configurations, all listed packages are referenced in the project.
We can use the element , which works according to familiar logic if-then-else.
Using the element Choose, we specify different NuGet packages for different configurations:
All contents of csproj
<Project ToolsVersion="15.0" Debug
    AnyCPU
    {5AD738D6-4122-4E76-B865-BE7CE0F6B3EB}
    Library
    Properties
    MySuperPluginForRevit
    MySuperPluginForRevit
    v4.5
    512
    true


    true
    full
    false
    binDebug
    DEBUG;R2015
    prompt
    4


    binR2015
    TRACE;R2015
    v4.5
    $(AssemblyName)_2015


    binR2016
    TRACE;R2016
    v4.5
    $(AssemblyName)_2016


    binR2017
    TRACE;R2017
    v4.5.2
    $(AssemblyName)_2017


    binR2018
    TRACE;R2018
    v4.5.2
    $(AssemblyName)_2018


    binR2019
    TRACE;R2019
    v4.7
    $(AssemblyName)_2019


    binR2020
    TRACE;R2020
    v4.7
    $(AssemblyName)_2020


          1.0.0
          runtime


          1.0.0
          runtime


          1.0.0
          runtime


          1.0.0
          runtime


          1.0.0
          runtime


          1.0.0
          runtime
Please note that in one of the conditions I specified two configurations using OR. This way, the necessary package will be connected depending on the configuration. Debug.
And here we have almost everything perfect. We load the project back, enable the configuration we need, and call in the solution's context menu (not the project's) the option “Restore all NuGet packages” and see how our packages change.
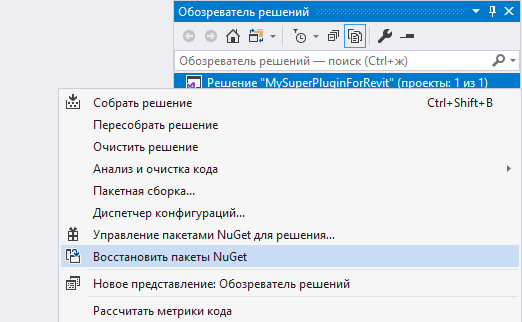
And at this stage, I hit a dead end – to build all configurations at once, we could have used batch build (the menu “Building" -> "Batch Build”), but when switching configurations, packages are not automatically restored. And during the project build, this does not happen either, although it logically should. I could not find a standard solution to this problem, and it is likely a bug in Visual Studio.
Therefore, for batch builds, it was decided to use a special automated build system . In fact, I did not want this, as I consider it excessive in the context of plugin development, but at the moment I see no other solution. And to the question “Why Nuke?” the answer is simple – we use it at work.
So, we go to the folder of our solution (not the project), hold down the key Shift and right-click on an empty space in the folder – in the context menu, select the option “Open PowerShell window here».
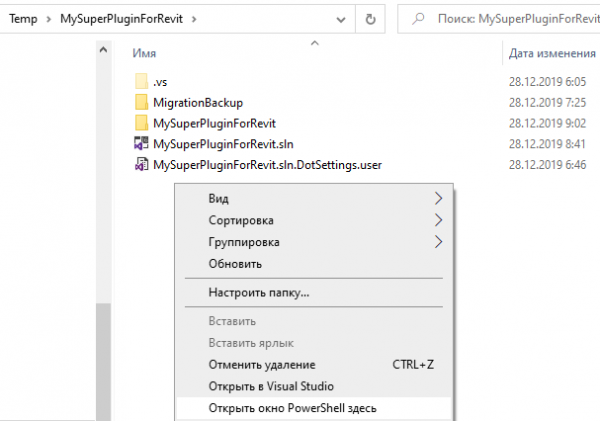
If you do not have nuke, then first type the command
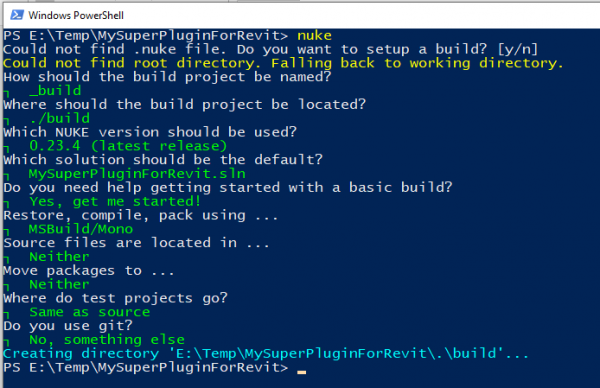
dotnet tool install Nuke.GlobalTool –globalNow type the command nuke and you will be prompted to configure nuke for the current project. I don’t know how it would be best to phrase this in Russian – in English, it will be written Could not find .nuke file. Do you want to setup a build? [y/n]
Press the Y key and there will be specific configuration options. We need the simplest option using MSBuild, so we respond as shown in the screenshot:
Let's go to Visual Studio, which will prompt us to reload the solution, since a new project has been added to it. We reload the solution and see that we have a project build in which we are only interested in one file – Build.cs
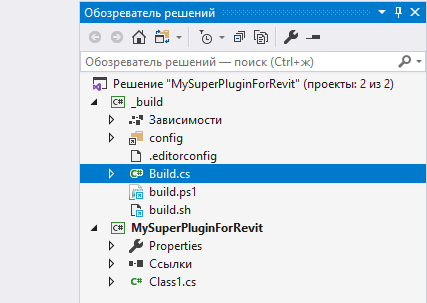
We open this file and write the build script for all configurations. Or use my script, which you can edit for your needs:
using System.IO;
using Nuke.Common;
using Nuke.Common.Execution;
using Nuke.Common.ProjectModel;
using Nuke.Common.Tools.MSBuild;
using static Nuke.Common.Tools.MSBuild.MSBuildTasks;

[CheckBuildProjectConfigurations]
[UnsetVisualStudioEnvironmentVariables]
class Build : NukeBuild
{
    public static int Main () => Execute(x => x.Compile);

    [Solution] readonly Solution Solution;

    // If the solution name and the project (plugin) name are different, then indicate the project (plugin) name here
    string PluginName => Solution.Name;

    Target Compile => _ => _
        .Executes(() =>
        {
            var project = Solution.GetProject(PluginName);
            if (project == null)
                throw new FileNotFoundException("Not found!");

            var build = new List();
            foreach (var (_, c) in project.Configurations)
            {
                var configuration = c.Split("|")[0];

                if (configuration == "Debug" || build.Contains(configuration))
                    continue;

                Logger.Normal($"Configuration: {configuration}");

                build.Add(configuration);

                MSBuild(_ => _
                    .SetProjectFile(project.Path)
                    .SetConfiguration(configuration)
                    .SetTargets("Restore"));
                MSBuild(_ => _
                    .SetProjectFile(project.Path)
                    .SetConfiguration(configuration)
                    .SetTargets("Rebuild"));
            }
        });
}
Returning to the PowerShell window and typing the command again nuke (you can type the command nuke specifying the required Target. But we have one Target, which launches by default). After pressing the Enter key, we will feel like real hackers, as the automatic build of our project for different configurations will occur just like in the movies.
By the way, you can use PowerShell directly from Visual Studio (menu “View" -> "Other Windows" -> "Package Manager Console”), but everything will be in black and white, which is not very convenient.
This concludes my article. I'm sure you will manage the AutoCAD version yourself. I hope the material presented here finds its 'clients.'
Thank you for your attention!
Source: habr.com
