

Hello! Welcome to the fifth lesson of the course . On We have covered security policies. Now it’s time to release local users to the Internet. In this lesson, we will explore how NAT works.
In addition to releasing users to the Internet, we will also discuss the method of publishing internal services. Below is a brief theory from the video as well as the video lesson itself.
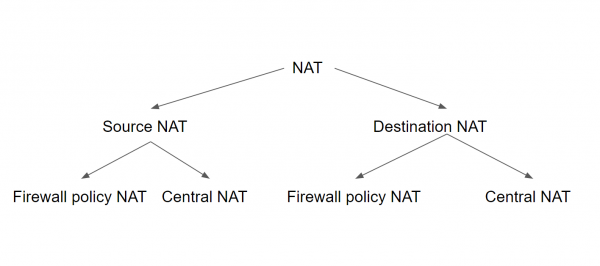
NAT (Network Address Translation) technology represents a mechanism for converting IP addresses in network packets. Fortinet classifies NAT into two types: Source NAT and Destination NAT.
The names speak for themselves — Source NAT changes the source address, while Destination NAT changes the destination address.
Furthermore, there are also several configuration options for NAT — Firewall Policy NAT and Central NAT.
When using the first option, Source and Destination NAT must be configured for each security policy. In this case, Source NAT uses either the outgoing interface's IP address or a pre-configured IP Pool. Destination NAT uses a pre-configured object (known as VIP — Virtual IP) as the destination address.
With Central NAT, the configuration of Source and Destination NAT is performed for the entire device (or virtual domain). In this case, NAT parameters apply to all policies, depending on the Source NAT and Destination NAT rules.
Source NAT rules are configured in the central Source NAT policy. Destination NAT is configured from the DNAT menu using IP addresses.
In this lesson, we will only consider Firewall Policy NAT — as practice shows, this configuration option is encountered much more frequently than Central NAT.
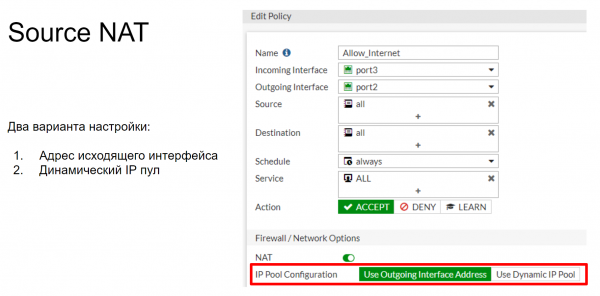
As I mentioned, when configuring Firewall Policy Source NAT, there are two configuration options: replacing the IP address with the outgoing interface's IP address or an IP address from a pre-configured IP address pool. It looks something like what is shown in the diagram below. Next, I will briefly talk about possible pools, but in practice, we will only consider the option with the outgoing interface’s address — in our setup, the IP address pools are unnecessary.
An IP pool defines one or more IP addresses that will be used as the source address during the session. These IP addresses will replace the IP address of the outgoing interface of FortiGate.
There are 4 types of IP pools that can be configured on FortiGate:
- Overload
- One-to-one
- Fixed Port Range
- Port block allocation
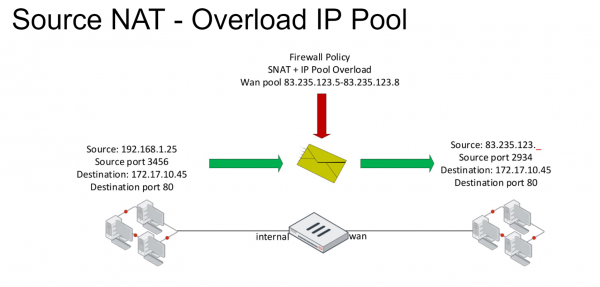
Overload is the primary IP pool. In it, IP addresses are transformed according to a many-to-one or many-to-many scheme. Port translation is also used. Let's consider the scheme shown in the figure below. We have a packet with certain Source and Destination fields. When it falls under a firewall policy that allows this packet access to the external network, a NAT rule is applied to it. As a result, in this packet, the Source field is replaced with one of the IP addresses specified in the IP pool.
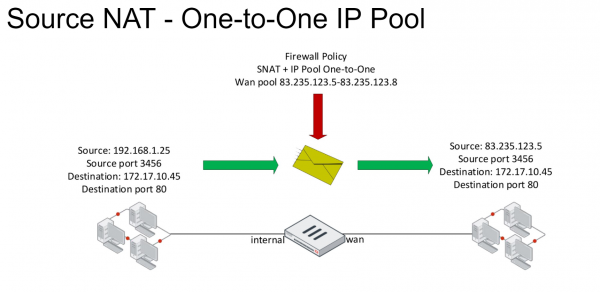
In the One to One pool, a number of external IP addresses are also defined. When a packet falls under a firewall policy with an enabled NAT rule, the IP address in the Source field is changed to one of the addresses belonging to this pool. The replacement occurs according to the rule - 'first come, first served'. To make it clearer, let's consider an example.
A computer from the local network with the IP address 192.168.1.25 sends a packet to the external network. It falls under the NAT rule, and the Source field is changed to the first IP address from the pool, in our case, it is 83.235.123.5. It is worth noting that when using this IP pool, port translation is not used. If after this, a computer from the same local network, with the address, let’s say, 192.168.1.35 sends a packet to the external network and also falls under this NAT rule, the Source field of this packet will change to 83.235.123.6. If there are no more addresses left in the pool, subsequent connections will be rejected. Thus, in this case, our NAT rule can accommodate 4 computers simultaneously.
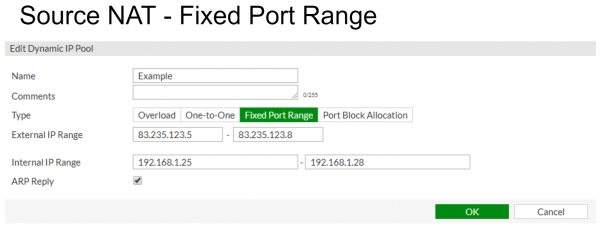
Fixed Port Range binds internal and external ranges of IP addresses to each other. Port translation is also disabled. This allows a fixed association of the start or end of the internal IP address pool with the start or end of the external IP address pool. In the example provided below, the internal address pool 192.168.1.25 — 192.168.1.28 is matched with the external address pool 83.235.123.5 — 83.235.125.8.
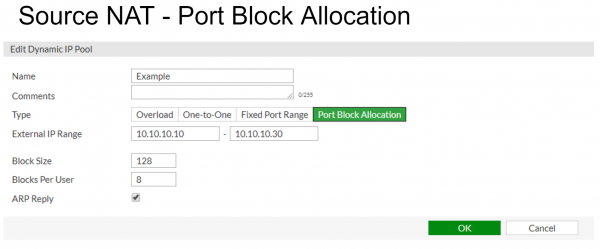
Port Block Allocation — this IP pool is used to allocate a block of ports for users of the IP pool. In addition to the IP pool itself, two parameters must also be specified here — the block size and the number of blocks allocated to each user.
Now let's discuss the Destination NAT technology. It is based on virtual IP addresses (VIP). For packets that fall under the Destination NAT rules, the IP address in the Destination field is changed: usually, a public internet address is replaced with a private server address. Virtual IP addresses are used in firewall policies as the Destination field.
The standard type of virtual IP addresses is Static NAT. This represents a one-to-one mapping of external and internal addresses.
Instead of Static NAT, virtual addresses can be restricted by port forwarding of specific ports. For example, connections to the external address on port 8080 can be associated with connections to the internal IP address on port 80.
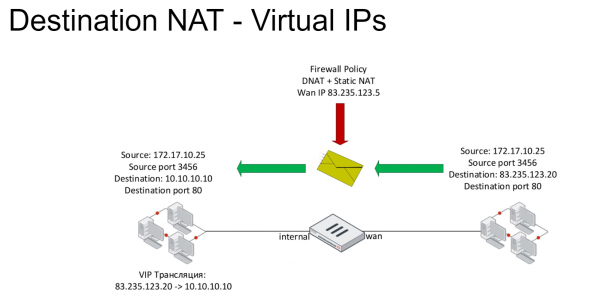
In the example below, a computer with the address 172.17.10.25 tries to access the address 83.235.123.20 on port 80. This connection falls under the DNAT rule, so the destination IP address is changed to 10.10.10.10.
The video covers the theory as well as practical examples of configuring Source and Destination NAT.
In the following lessons, we will focus on ensuring user security on the Internet. Specifically, the next lesson will cover web filtering and application control features. To not miss it, stay updated on the following channels:
Source: habr.com
