

This article is a continuation of the previous one – "».
It will cover the basic installation and configuration process of the oVirt 4.3 cluster for hosting highly available virtual machines, given that all preliminary steps to prepare the infrastructure have already been completed.
Introduction
The main goal of the article is not so much to provide a step-by-step instruction like "Next -> Yes -> Finish", but rather to highlight some of the features during its installation and configuration. The process of deploying your cluster may not always align with the description here due to specific infrastructure and environment characteristics, but the general principles will remain the same.
From a subjective perspective, is functionally similar to VMware vSphere version 5.x, but of course has its own configuration and operational quirks.
For those interested, all differences between RHEV (aka oVirt) and VMware vSphere can be found online, for example, , but I will still occasionally point out some of their differences or similarities throughout the article.
Separately, I would like to compare the handling of networks for virtual machines. oVirt implements a similar network management principle for virtual machines (VMs) as in VMware vSphere:
- using the standard Linux bridge (in VMware — Standard vSwitch), which operates on the virtualization hosts;
- using Open vSwitch (OVS) (in VMware — Distributed vSwitch) – this is a distributed virtual switch consisting of two main components: a central OVN server and OVN controllers on the managed hosts.
It should be noted that due to the simplicity of implementation, the article will describe the network configuration in oVirt for VMs using the standard Linux bridge, which is the default choice when using the KVM hypervisor.
In this regard, there are several basic rules for working with network in the cluster that are best not to violate:
- All network settings on hosts must be identical before adding them to oVirt, except for IP addresses.
- Once a host is managed by oVirt, it is highly discouraged to manually change anything in the network settings without full confidence in your actions, as the oVirt agent will simply revert them to the previous state after the host or agent is restarted.
- Adding a new network for VMs, as well as managing it, should only be done from the oVirt management console.
Another one important note — for a highly critical environment (very sensitive to financial losses), it is still recommended to use paid support and to use During the operation of the oVirt cluster, there may be various issues for which it is desirable to receive qualified assistance as soon as possible rather than trying to resolve them independently.
And finally, it is recommended before deploying the oVirt cluster, familiarize yourself with the , to be aware of at least the basic concepts and definitions; otherwise, reading the article further can become a bit challenging.
The following guide documents are fundamental for understanding the article and the principles of the oVirt cluster:
The volume isn’t very large; in an hour or two, you can grasp the main principles, and for those who enjoy details, it is recommended to read — RHEV and oVirt are essentially the same.
So, if all basic settings on the hosts, switches, and storage systems are done, we proceed directly to deploying oVirt.
Part 2. Installing and configuring the oVirt 4.3 cluster
For convenience, here’s a list of the main sections in this article that should be followed sequentially:
- Installing the oVirt management server
- Creating a new data center
- Creating a new cluster
- Installing additional hosts in a Self-Hosted environment
- Creating storage areas or Storage Domains
- Creating and configuring networks for virtual machines
- Creating an installation image for deploying a virtual machine
- Creating a virtual machine
Installing the oVirt management server
The oVirt management server is the most crucial element in the oVirt infrastructure, in the form of a virtual machine, host, or virtual device that manages the entire oVirt infrastructure. Analogues from the virtualization world include:
VMware vSphere — vCenter Server
- Microsoft Hyper-V — System Center Virtual Machine Manager (VMM).
- For installing the oVirt management server, we have two options:
Deploying the server as a specialized VM or host.
Option 1
Deploying the server as a specialized VM or host.
This option works well, but only if such a VM operates independently of the cluster, i.e., is not running on any cluster host like a regular virtual machine under KVM management.
Why can't you deploy such a VM on cluster hosts?
At the very beginning of the deployment process of the oVirt management server, we face a dilemma — we need to install the management VM, but the cluster doesn't actually exist yet. So what can we think of on the fly? Correct – install KVM on the future cluster node, then create a virtual machine on it, for example, with CentOS OS and deploy the oVirt engine in it. This is typically done for complete control over such a VM, but it's a misguided intention because in doing so, there will inevitably be problems with that management VM later on.
- It cannot be migrated in the oVirt console between hosts (nodes) of the cluster;
- when migrating using KVM via virsh migrate, this VM will be inaccessible for management from the oVirt console.
- Cluster hosts cannot be put into Maintenance mode (maintenance mode) if you migrate this VM from host to host using virsh migrate.
So do everything by the rules — use either a separate host or an independent VM running on it for the oVirt management server, or better, follow the second option as described.
Option 2
Installing the oVirt Engine Appliance on the host managed by it.
This option will be discussed further as it is more correct and suitable for our case.
The requirements for such a VM are described below; I will only add that it is recommended to have at least two hosts in the infrastructure where the management VM can be run to make it fault-tolerant. I would like to add that, as I mentioned in comments to the previous article, I still could not achieve split-brain on the oVirt cluster with two hosts, with the ability to run the hosted-engine VM on them.
Installing the oVirt Engine Appliance on the first cluster host
Link to the official documentation — , chapter “»
The document outlines the prerequisites that must be met before deploying the hosted-engine VM, as well as detailing the installation process itself, so there is no particular point in repeating it verbatim, which is why we will focus on some important details.
- Before starting any actions, be sure to enable virtualization support in the BIOS settings on the host.
- We install the hosted-engine installer package on the host:
yum -y install http://resources.ovirt.org/pub/yum-repo/ovirt-release43.rpm
yum -y install epel-release
yum install screen ovirt-hosted-engine-setup- We start the oVirt Hosted Engine deployment procedure on the host in a screen session (you can exit it using Ctrl-A + D, close it using Ctrl-D):
screen
hosted-engine --deploy
Optionally, you can start the installation with a pre-prepared answers file:
hosted-engine --deploy --config-append=/var/lib/ovirt-hosted-engine-setup/answers/answers-ohe.conf- During the hosted-engine deployment, we specify all necessary parameters:
- cluster name
- number of vCPUs and vRAM (recommended 4 vCPUs and 16 GB)
- passwords
- storage type for the hosted engine VM – in our case, FC
- LUN number for installing the hosted engine
- where the database for the hosted engine will be located – for simplicity, I recommend choosing Local (this is a PostgreSQL database running inside this VM)
and other parameters. - To install a highly available VM with a hosted engine, we previously created a special LUN with number 4 and size 150 GB on the storage system, which was then presented to the cluster hosts – see in .
Earlier, we also checked its visibility on the hosts:
multipath -ll
…
3600a098000e4b4b3000003c95d171065 dm-3 DELL    , MD38xxf
size=150G features='3 queue_if_no_path pg_init_retries 50' hwhandler='1 rdac' wp=rw
|-+- policy='service-time 0' prio=14 status=active
| `- 15:0:0:4  sdc 8:32  active ready running
`-+- policy='service-time 0' prio=9 status=enabled
`- 18:0:0:4 sdj 8:144 active ready running- The deployment process of the hosted engine is straightforward, and at the end we should receive a message like this:
[ INFO  ] Generating answer file '/var/lib/ovirt-hosted-engine-setup/answers/answers-20191129131846.conf'
[ INFO  ] Generating answer file '/etc/ovirt-hosted-engine/answers.conf'
[ INFO  ] Stage: Pre-termination
[ INFO  ] Stage: Termination
[ INFO  ] Hosted Engine successfully deployed
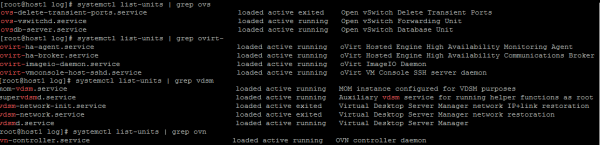
We check for the presence of oVirt services on the host:
If everything was done correctly, after the installation ends, we access through a web browser at from the administrator's computer and click [Administration Portal].
Screenshot of the 'Administration Portal'
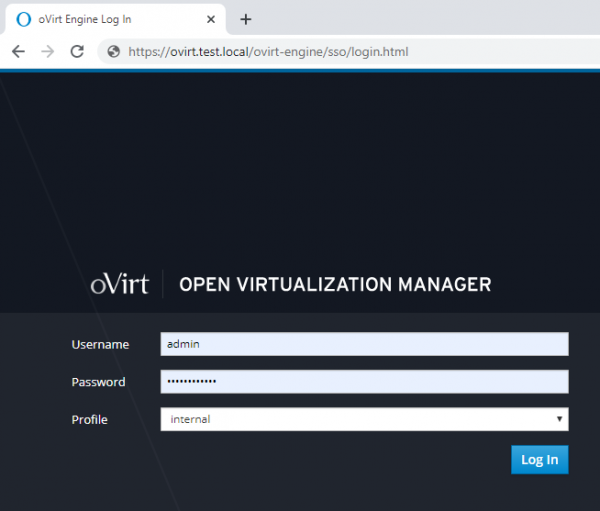
Entering the login and password (set during the installation process) in the window as shown in the screenshot, we access the Open Virtualization Manager control panel, where you can perform all actions with the virtual infrastructure:
- add data centers
- add and configure clusters
- add hosts and manage them
- add storage areas or Storage Domains for virtual machine disks
- add and configure networks for virtual machines
- add virtual machines, installation images, VM templates and manage them
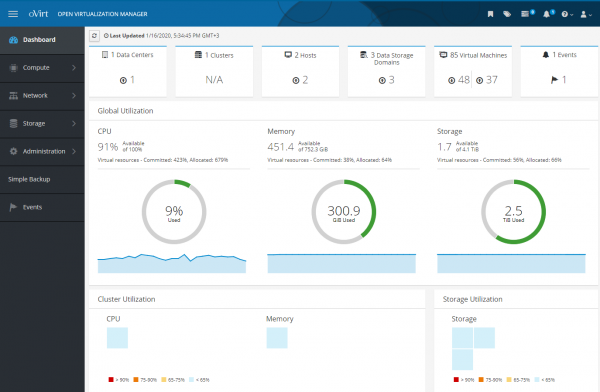
All these actions will be discussed further, some in a general overview, some in more detail with nuances.
But first, I would recommend reading this addition, which may be useful for many.
Supplement
1) In principle, if necessary, there is nothing stopping you from pre-installing the KVM hypervisor on the cluster nodes using the packages libvirt and qemu-kvm (or qemu-kvm-ev) of the desired version, although during the deployment of the oVirt cluster node, it can do this itself.
But if libvirt and qemu-kvm the installed version is not the latest, you might encounter such an error during the deployment of the hosted engine:
error: unsupported configuration: unknown CPU feature: md-clearThat is, it is necessary to have libvirt with support for , which supports such a policy:
<feature policy='require' name='md-clear'/>Installing libvirt v.4.5.0-10.el7_6.12, with md-clear support:
yum-config-manager --disable mirror.centos.org_centos-7_7_virt_x86_64_libvirt-latest_

yum install centos-release-qemu-ev
yum update
yum install qemu-kvm qemu-img virt-manager libvirt libvirt-python libvirt-client virt-install virt-viewer libguestfs libguestfs-tools dejavu-lgc-sans-fonts virt-top libvirt libvirt-python libvirt-client

systemctl enable libvirtd
systemctl restart libvirtd && systemctl status libvirtd
Check for 'md-clear' support:
virsh domcapabilities kvm | grep requireAfter that, you can continue the installation of the hosted engine.
2) In oVirt 4.3, having and using a firewall firewalld is a mandatory requirement.
If during the deployment of the VM for the hosted engine you get such an error:
[ ERROR ] fatal: [localhost]: FAILED! => {"changed": false, "msg": "firewalld is required to be enabled and active in order to correctly deploy hosted-engine. Please check, fix accordingly and re-deploy.n"}
[ ERROR ] Failed to execute stage 'Closing up': Failed executing ansible-playbook
[https://bugzilla.redhat.com/show_bug.cgi?id=1608467
Then you need to disable another firewall (if it is used), and install and start firewalld:
yum install firewalld
systemctl enable firewalld
systemctl start firewalld

firewall-cmd --state
firewall-cmd --get-default-zone
firewall-cmd --get-active-zones
firewall-cmd --get-zones
In the future, when installing the oVirt agent on a new host for the cluster, it will automatically configure the required ports. firewalld automatically.
3) Restart the host with the VM running the hosted engine.
As usual, and to the documentation.
All management of the hosted engine VM is done ONLY using the command hosted-engine on the host where it operates, forget about virsh also, as well as the fact that you can connect to this VM via SSH and execute the command ‘shutdown».
Procedure for putting the VM into maintenance mode:
hosted-engine --set-maintenance --mode=global

hosted-engine --vm-status
!! Cluster is in GLOBAL MAINTENANCE mode !!
--== Host host1.test.local (id: 1) status ==--
conf_on_shared_storage             : True
Status up-to-date                  : True
Hostname                           : host1.test.local
Host ID                            : 1
Engine status                      : {"health": "good", "vm": "up", "detail": "Up"}
Score                              : 3400
stopped                            : False
Local maintenance                  : False
crc32                              : dee1a774
local_conf_timestamp               : 1821
Host timestamp                     : 1821
Extra metadata (valid at timestamp):
        metadata_parse_version=1
        metadata_feature_version=1
        timestamp=1821 (Sat Nov 29 14:25:19 2019)
        host-id=1
        score=3400
        vm_conf_refresh_time=1821 (Sat Nov 29 14:25:19 2019)
        conf_on_shared_storage=True
        maintenance=False
        state=GlobalMaintenance
        stopped=False

hosted-engine --vm-shutdown
We restart the host with the hosted engine agent and do what we need with it.
After rebooting, we check the VM status with the hosted engine:
hosted-engine --vm-statusIf our VM with hosted-engine does not start and we see similar errors in the service log:
Error in the service log:
journalctl -u ovirt-ha-agent
...
Jun 29 14:34:44 host1 journal: ovirt-ha-agent ovirt_hosted_engine_ha.agent.hosted_engine.HostedEngine ERROR Failed to start necessary monitors
Jun 29 14:34:44 host1 journal: ovirt-ha-agent ovirt_hosted_engine_ha.agent.agent.Agent ERROR Traceback (most recent call last):#012  File "/usr/lib/python2.7/site-packages/ovirt_hosted_engine_ha/agent/agent.py", line 131, in _run_agent#012    return action(he)#012  File "/usr/lib/python2.7/site-packages/ovirt_hosted_engine_ha/agent/agent.py", line 55, in action_proper#012    return he.start_monitoring()#012  File "/usr/lib/python2.7/site-packages/ovirt_hosted_engine_ha/agent/hosted_engine.py", line 413, in start_monitoring#012    self._initialize_broker()#012  File "/usr/lib/python2.7/site-packages/ovirt_hosted_engine_ha/agent/hosted_engine.py", line 537, in _initialize_broker#012    m.get('options', {}))#012  File "/usr/lib/python2.7/site-packages/ovirt_hosted_engine_ha/lib/brokerlink.py", line 86, in start_monitor#012    ).format(t=type, o=options, e=e)#012RequestError: brokerlink - failed to start monitor via ovirt-ha-broker: [Errno 2] No such file or directory, [monitor: 'ping', options: {'addr': '172.20.32.32'}]
Jun 29 14:34:44 host1 journal: ovirt-ha-agent ovirt_hosted_engine_ha.agent.agent.Agent ERROR Trying to restart agent
Then we connect the storage and restart the agent:
hosted-engine --connect-storage
systemctl restart ovirt-ha-agent
systemctl status ovirt-ha-agent

hosted-engine --vm-start
hosted-engine --vm-status
After starting the VM with hosted-engine, we take it out of maintenance mode:
Procedure for taking the VM out of maintenance mode:
hosted-engine --check-liveliness
hosted-engine --set-maintenance --mode=none
hosted-engine --vm-status

--== Host host1.test.local (id: 1) status ==--

conf_on_shared_storage             : True
Status up-to-date                  : True
Hostname                           : host1.test.local
Host ID                            : 1
Engine status                      : {"health": "good", "vm": "up", "detail": "Up"}
Score                              : 3400
stopped                            : False
Local maintenance                  : False
crc32                              : 6d1eb25f
local_conf_timestamp               : 6222296
Host timestamp                     : 6222296
Extra metadata (valid at timestamp):
        metadata_parse_version=1
        metadata_feature_version=1
        timestamp=6222296 (Fri Jan 17 11:40:43 2020)
        host-id=1
        score=3400
        vm_conf_refresh_time=6222296 (Fri Jan 17 11:40:43 2020)
        conf_on_shared_storage=True
        maintenance=False
        state=EngineUp
        stopped=False
4) Removing the hosted engine and everything related to it.
Sometimes it is necessary to properly remove a previously installed hosted engine — according to the documentation.
Simply run the command on the host:
/usr/sbin/ovirt-hosted-engine-cleanupNext, remove unnecessary packages, backing up any configurations if necessary:
yum autoremove ovirt* qemu* virt* libvirt* libguestfs Creating a new data center
Reference documentation — oVirt Administration Guide.
First, let's define what a data center (quoting from the documentation) — is a logical entity that defines a set of resources used in a specific environment.
A data center is a kind of container consisting of:
- logical resources in the form of clusters and hosts
- network resources of the cluster in the form of logical networks and physical adapters on the hosts,
- storage resources (for VM disks, templates, images) in the form of storage domains.
A data center can include multiple clusters made up of several hosts with virtual machines running on them; it may also have multiple storage domains associated with it.
There can be multiple data centers, and they operate independently of one another. In oVirt, there is a role-based access control system, allowing permissions to be configured uniquely at both the data center level and for its individual logical elements.
A data center, or multiple data centers if applicable, are managed from a single administrative console or portal.
To create a data center, access the administrative portal and create a new data center:
Compute >> Data centers >> New
Since we're using shared storage on the SAN, the storage type must be Shared:
Screenshot with the data center creation wizard
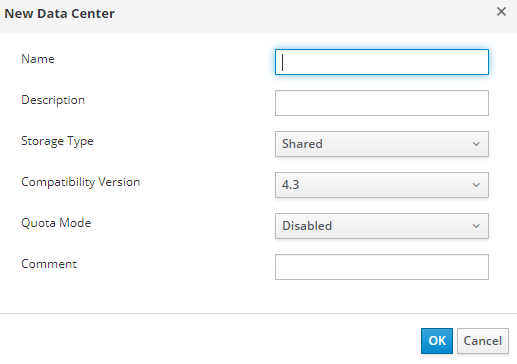
When installing a virtual machine with hosted-engine, a datacenter is created by default - Datacenter1, and the storage type can be changed to another if necessary.
Creating a datacenter is a straightforward task without any hidden nuances, and all additional actions with it are described in the documentation. Note that individual hosts with only local storage (disk) for VMs cannot join a datacenter with Storage Type - Shared (they cannot be added there), so a separate datacenter must be created for them - i.e., each individual host with local storage needs its own datacenter.
Creating a new cluster
Documentation link - oVirt Administration Guide.
Without unnecessary details, cluster - this is a logical grouping of hosts that share a storage area (in the form of shared disks on the storage system, as is the case here). It is also advisable that the hosts in the cluster be identical in hardware and have the same type of processor (Intel or AMD). Ideally, the servers in the cluster should be completely identical.
A cluster is part of a datacenter (with a specific type of storage - Local or Shared), and all hosts must belong to some cluster depending on whether they have shared storage or not.
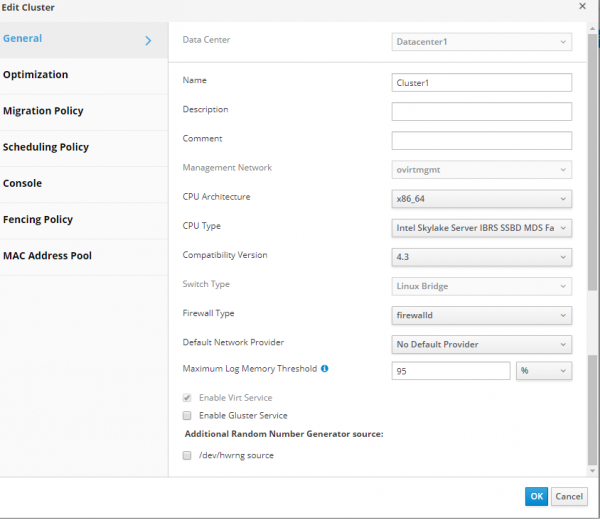
When installing a virtual machine with hosted-engine on a host, a datacenter is created by default - Datacenter1, along with a cluster - Cluster1, and further parameters can be configured, enabling additional options, adding hosts to it, etc.
As usual, to get details about all the cluster settings, it is advisable to consult the official documentation. Regarding some features of cluster configuration, I would just add that when it is created, it is sufficient to configure only the main settings on the tab General.
I will highlight the most important parameters:
- Processor type - is selected based on what processors are installed on the cluster hosts, from which manufacturer they come, and which processor on the hosts is the oldest, so that depending on this, all available processor instructions can be used in the cluster.
- Switch type - we use only Linux bridge in our cluster, so we choose it.
- Firewall type - this is clear, it is firewalld, which must be enabled and configured on the hosts.
Screenshot with cluster parameters
Adding additional hosts in a Self-Hosted environment
to the documentation.
Additional hosts for a Self-Hosted environment are added just like a regular host, with an additional step for deploying a VM with the hosted engine — Choose hosted engine deployment action >> Deploy. Since the additional host must also present a LUN for the VM with the hosted engine, it means that this host can be used for hosting a VM with the hosted engine if needed.
For redundancy, it is highly recommended to have at least two hosts where the VM with the hosted engine can be placed.
On the additional host, disable iptables (if enabled), enable firewalld
systemctl stop iptables
systemctl disable iptables

systemctl enable firewalld
systemctl start firewalld
Install the required version of KVM (if necessary):
yum-config-manager --disable mirror.centos.org_centos-7_7_virt_x86_64_libvirt-latest_

yum install centos-release-qemu-ev
yum update
yum install qemu-kvm qemu-img virt-manager libvirt libvirt-python libvirt-client virt-install virt-viewer libguestfs libguestfs-tools dejavu-lgc-sans-fonts virt-top libvirt libvirt-python libvirt-client

systemctl enable libvirtd
systemctl restart libvirtd && systemctl status libvirtd

virsh domcapabilities kvm | grep md-clear
Install the required repositories and hosted engine installer:
yum -y install http://resources.ovirt.org/pub/yum-repo/ovirt-release43.rpm
yum -y install epel-release
yum update
yum install screen ovirt-hosted-engine-setup
Next, we proceed to the console Open Virtualization Manager, add a new host, and follow the steps as described in .
As a result, after adding the additional host, we should see an interface in the admin console similar to the screenshot.
Screenshot of the admin portal — hosts
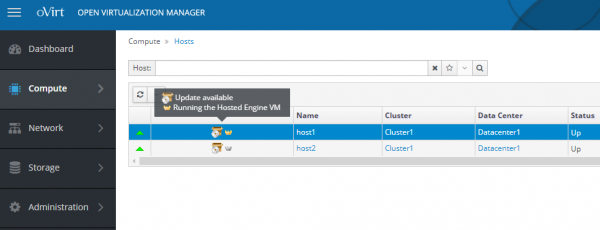
The host on which the VM with the hosted engine is currently active has a gold crown and the text "Running the Hosted Engine VM", the host where this VM can be started if needed – the text "Can run the Hosted Engine VM».
In the event of a failure of the host on which "Running the Hosted Engine VM", it will automatically restart on the second host. This VM can also be migrated from the active host to the backup for maintenance.
Configuring Power Management / fencing on oVirt hosts
Links to documentation:
- Red Hat Virtualization 4.3 -> Technical Reference ->
- oVirt Administration Guide ->
Although it may seem that adding and configuring a host has been completed, this is not quite the case.
For the hosts to function properly and to identify/fix any failures, Power Management / fencing must be configured.
Fencing, or fencing – is the process of temporarily excluding a faulty or malfunctioning host from the cluster, during which either the oVirt services on it are restarted or the host itself is rebooted.
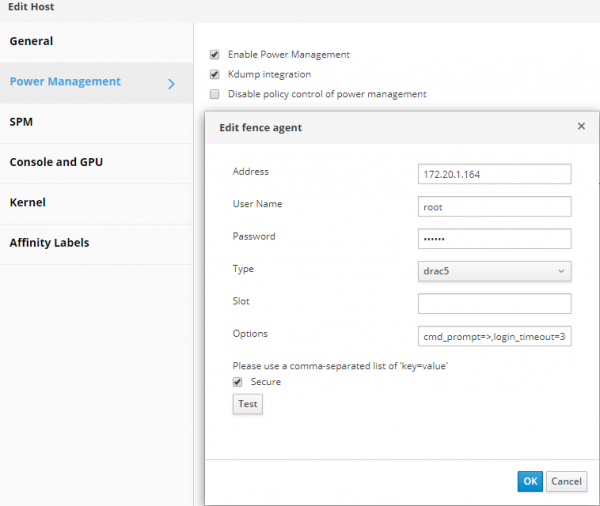
All details regarding definitions and parameters of Power Management / fencing are usually found in the documentation; I will just provide an example of how to configure this important parameter for Dell R640 servers with iDRAC 9.
- We enter the admin portal, click on Compute >> Hosts and select the host.
- Click on Edit.
- Click on the tab Power Management.
- Check the box next to the option Enable Power Management.
- Check the box next to the option Kdump integration, so that the host does not enter fencing mode during the kernel panic dump recording.
Note.
After enabling Kdump integration on an already running host, it must be reinstalled according to the procedure in the oVirt Administration Guide -> -> Reinstalling Hosts.
- Optionally, you can check the box Disable policy control of power management, if we do not want the host power management to be controlled by the cluster's scheduling policy.
- Click the button (+), to add a new power management device; the editing properties window for the agent will open.
For iDRAC9, fill in the fields:- Address – iDRAC9 address
- User Name / Password – your login and password to access iDRAC9
- Type — drac5
- note Secure
- add the following options: cmd_prompt=>,login_timeout=30
Screenshot of the 'Power Management' parameters in the host properties
Creating storage areas or Storage Domains
Documentation link — oVirt Administration Guide, .
Storage Domain, or storage domain – is a centralized location for storing virtual machine disks, installation images, templates, and snapshots.
Storage domains can be connected to the data center using various protocols, clustered and network file systems.
oVirt has three types of storage domains:
- Data Domain – for storing all data related to virtual machines (disks, templates). Data Domain cannot be shared between different data centers.
- ISO Domain (deprecated type of storage domain) – for storing OS installation images. ISO Domain can be shared between different data centers.
- Export Domain (deprecated type of storage domain) – for temporarily storing images being moved between data centers.
In our specific case, the storage domain of type Data Domain uses Fibre Channel Protocol (FCP) to connect to LUNs on the storage system.
From the perspective of oVirt, when using storage systems (FC or iSCSI), each virtual disk, snapshot, or template is a logical disk.
Block devices are combined into a whole (on cluster hosts) using a Volume Group and then divided using LVM into logical volumes that are used as virtual disks for VMs.
All these groups and numerous LVM volumes can be seen on the cluster host using the commands vgs and lvs. Naturally, all actions with such disks should only be performed from the oVirt console, except in special cases.
Virtual disks for VMs can be of two types — QCOW2 or RAW. Disks can be "thin" or "thick". Snapshots are always created as "thin".
". The management method for storage domains, or storage areas, accessed via FC, is quite logical — for each virtual disk of a VM, there is a separate logical volume that can only be written to by one host. In the case of FC connections, oVirt uses something similar to clustered LVM.
Virtual machines located on the same storage area can be migrated between hosts belonging to the same cluster.
As we can see from the description, a cluster in oVirt, like a cluster in VMware vSphere or in Hyper-V, essentially denotes the same thing – it is a logical grouping of hosts, ideally uniform in hardware composition, and having a shared storage for virtual machine disks.
Let's move directly to creating a storage domain for data (VM disks), as without it, the datacenter will not be initialized.
I remind you that all LUNs presented to the cluster hosts on the storage system must be visible to them using the command "multipath -ll».
According to ", we go to the portal, access Storage >> Domains -> New Domain and follow the instructions in the section "Adding FCP Storage".
After starting the wizard, we fill in the required fields:
- Name — we specify the cluster name
- Domain Function — Data
- Storage Type — Fibre Channel
- Host to Use — we select the host where the required LUN is available
In the list of LUNs, we mark the one we need, click Add and then OK. If necessary, additional storage area parameters can be adjusted by clicking on Advanced Parameters.
Screenshot of the wizard for adding a "Storage domain"
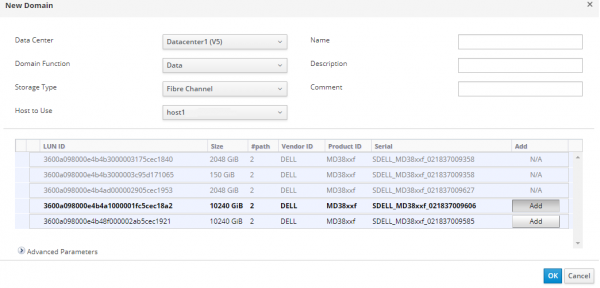
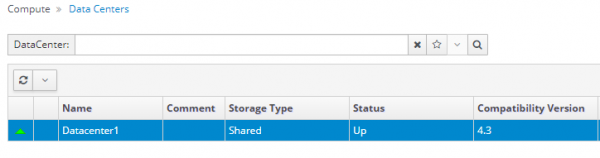
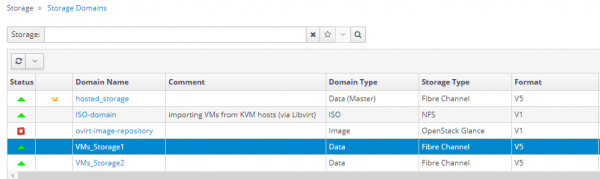
As a result of the wizard's operation, we should get a new storage area, and our datacenter will change to the status UP, or initialized:
Screenshots of the data center and its storage areas:
Creating and configuring networks for virtual machines
Documentation link — oVirt Administration Guide,
Networks serve to group logical networks used in the oVirt virtual infrastructure.
To connect the network adapter on the virtual machine with the physical adapter on the host, Linux bridge type logical interfaces are used.
To group and segregate traffic between networks, VLANs are configured on the switches.
When creating a logical network for virtual machines in oVirt, it must be assigned an identifier corresponding to the VLAN number on the switch so that VMs can interact with each other even if they operate on different nodes in the cluster.
Preliminary settings for network adapters on hosts to connect virtual machines must be completed in – configured logical interface bond1, thereafter all network settings should be made exclusively through the oVirt administrative portal.
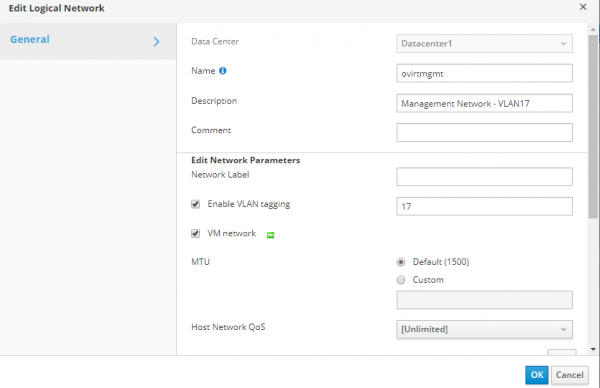
After creating a VM with hosted-engine, in addition to the automatic creation of the data center and cluster, a logical network for managing our cluster was also automatically created – ovritmgmt, to which this VM was connected.
If necessary, you can review the settings of the logical network ovritmgmt and adjust them, but you must be careful not to lose control over the oVirt infrastructure.
Settings for the ovritmgmt logical network
To create a new logical network for regular VMs, in the administrative portal go to Network >> Networks >> New, and on the tab General add a network with the desired VLAN identifier, and also check the box next to "VM Network", which means it can be assigned to VMs.
Screenshot of the new logical network VLAN32
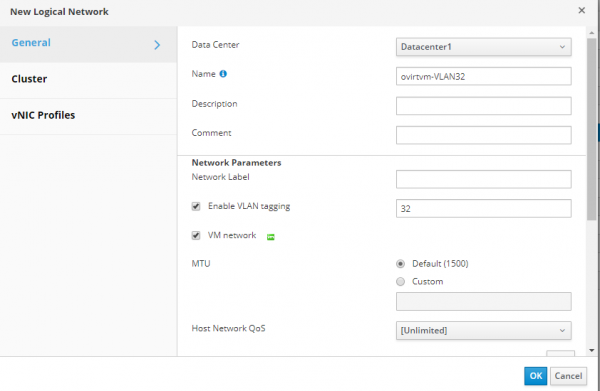
On the tab Cluster, attach this network to our cluster Cluster1.
After this, go to Compute >> Hosts, sequentially enter each host, go to the tab Network interfaces, and run the wizard Setup host networks, to bind the new logical network to the hosts.
Screenshot of the "Setup host networks" wizard
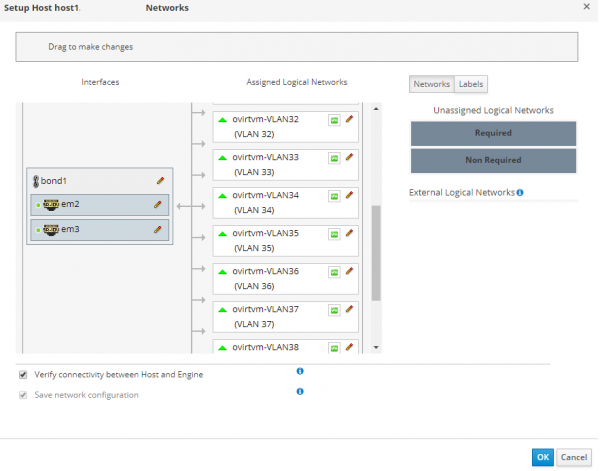
The oVirt agent will automatically make all necessary network settings on the host – it will create the VLAN and BRIDGE.
Example configuration files for new networks on the host:
cat ifcfg-bond1
# Generated by VDSM version 4.30.17.1
DEVICE=bond1
BONDING_OPTS='mode=1 miimon=100'
MACADDR=00:50:56:82:57:52
ONBOOT=yes
MTU=1500
DEFROUTE=no
NM_CONTROLLED=no
IPV6INIT=no

cat ifcfg-bond1.432
# Generated by VDSM version 4.30.17.1
DEVICE=bond1.432
VLAN=yes
BRIDGE=ovirtvm-vlan432
ONBOOT=yes
MTU=1500
DEFROUTE=no
NM_CONTROLLED=no
IPV6INIT=no

cat ifcfg-ovirtvm-vlan432
# Generated by VDSM version 4.30.17.1
DEVICE=ovirtvm-vlan432
TYPE=Bridge
DELAY=0
STP=off
ONBOOT=yes
MTU=1500
DEFROUTE=no
NM_CONTROLLED=no
IPV6INIT=no
Once again, let me remind you that on the host of the cluster IT IS NOT NECESSARY to manually create network interfaces in advance ifcfg-bond1.432 and ifcfg-ovirtvm-vlan432.
After adding the logical network and checking the connection between the host and the VM with the hosted engine, it can be used in the virtual machine.
Creating an installation image for deploying a virtual machine
Documentation link — oVirt Administration Guide, , section Uploading Images to a Data Storage Domain.
Without an OS installation image, it will not be possible to install a virtual machine, although this is not a problem if, for example, the network has with pre-created images.
In our case, such an option is not available, so we will need to import this image into oVirt manually. Previously, creating an ISO Domain was required for this, but in the new version of oVirt, it has been deprecated, and now images can be uploaded directly to the Storage domain from the administrative portal.
In the administrative portal, go to Storage >> Disks >> Upload >> Start
We add our OS image as an ISO file, filling in all the fields in the form, and click the "Test connection".
Screenshot of the installation image addition wizard
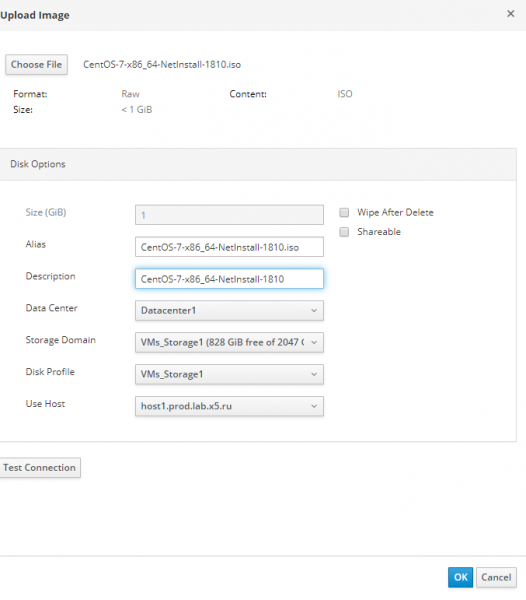
If we receive an error of the following type:
Unable to upload image to disk d6d8fd10-c1e0-4f2d-af15-90f8e636dadc due to a network error. Ensure that ovirt-imageio-proxy service is installed and configured and that ovirt-engine's CA certificate is registered as a trusted CA in the browser. The certificate can be fetched from https://ovirt.test.local/ovirt-engine/services/pki-resource?resource=ca-certificate&format=X509-PEM-CA
Then it is necessary to add the oVirt certificate to "Trusted Root CAs" (Trusted Root CA) on the administrator station from where we are trying to upload the image.
After adding the certificate to Trusted Root CA, we click "Test connection", we should receive:
Connection to ovirt-imageio-proxy was successful.After completing the certificate addition action, you can try to upload the ISO image to the Storage Domain again.
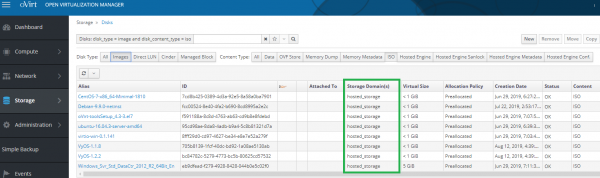
In principle, you can create a separate Storage Domain with a Data type, to store images and templates separately from VM disks, or even store them in a Storage Domain for the hosted engine, but this is up to the administrator's discretion.
Screenshot with ISO images in the Storage Domain for the hosted engine
Creating a virtual machine
Link to the documentation:
oVirt Virtual Machine Management Guide –>
After uploading the OS installation image to oVirt, you can proceed directly to creating a virtual machine. A lot of work has been done, and we are now at the final stage, which is the goal of all this – to achieve a fault-tolerant infrastructure for hosting highly available virtual machines. And all of this is completely free – not a penny has been spent on purchasing any software licenses.
To create a virtual machine with CentOS 7, the OS installation image must be uploaded.
We enter the administrative portal and go to Compute >> Virtual Machines, and start the VM creation wizard. We fill in all the parameters and fields, and click OK. It's very straightforward if you follow the documentation.
As an example, I will outline the main and additional settings for a high-availability VM, with a created disk, connected to the network, and booting from the installation image:
Screenshots of the high-availability VM settings
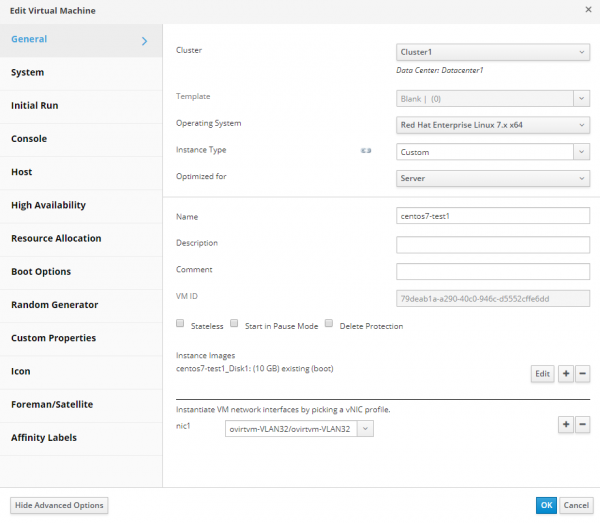
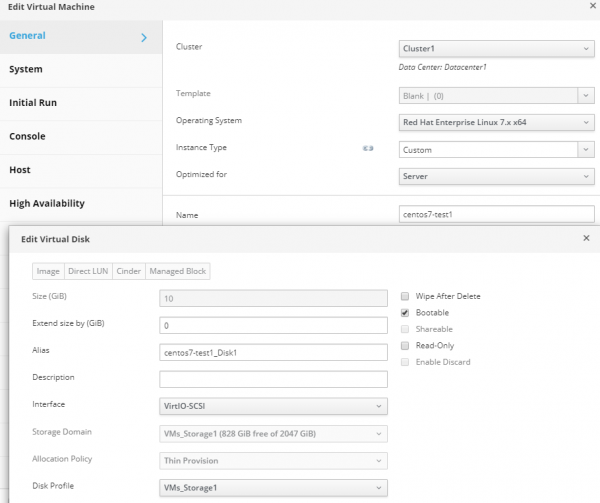
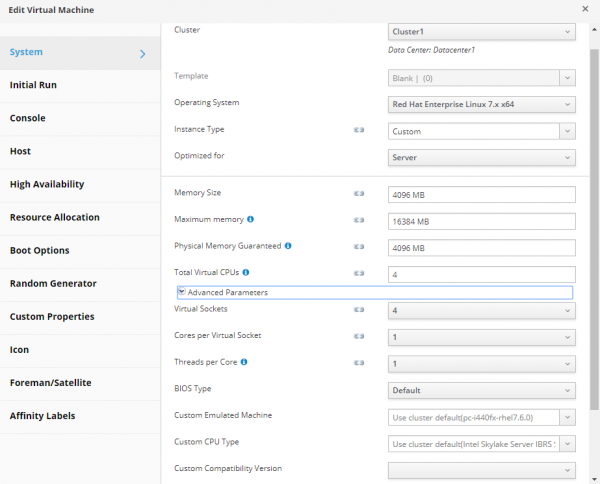
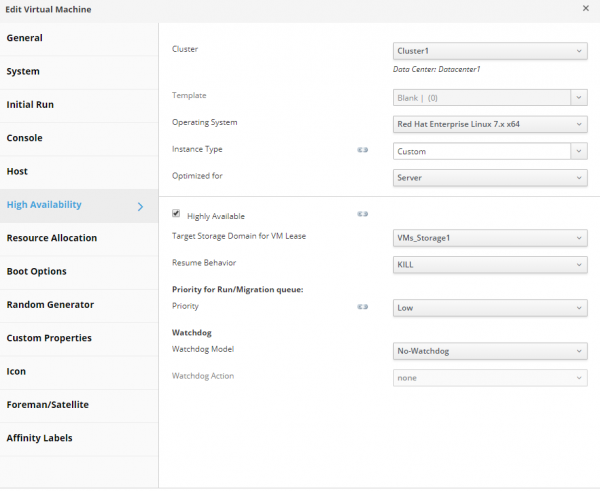
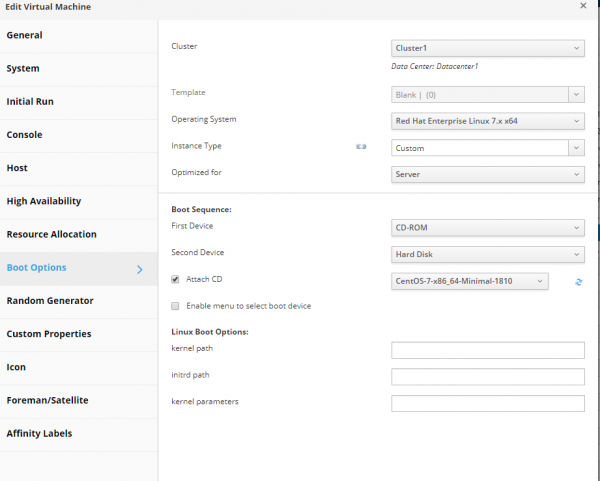
After finishing with the wizard, we close it, start the new VM, and install the OS on it.
To do this, we access the console of this VM through the administrative portal:
Screenshot of administrative portal settings for connecting to the VM console
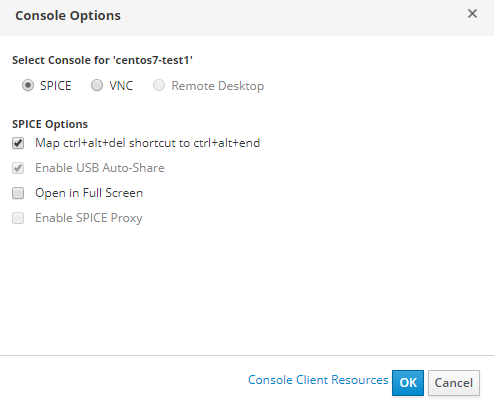
To connect to the VM console, you must first configure the console in the properties of the virtual machine.
Screenshot of VM settings, 'Console' tab
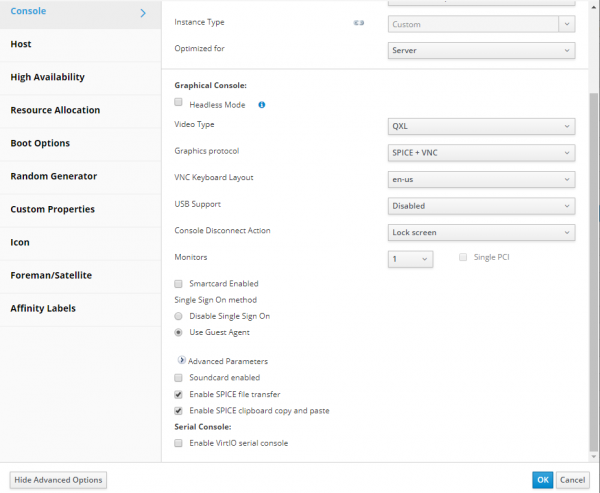
To connect to the VM console, you can use, for example, .
To connect to the VM console directly in the browser window, the connection settings via the console should be as follows:
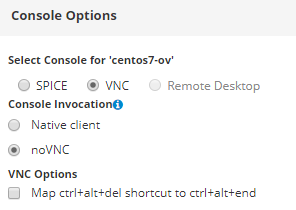
After installing the OS on the VM, it's advisable to install the oVirt guest agent:
yum -y install epel-release
yum install -y ovirt-guest-agent-common
systemctl enable ovirt-guest-agent.service && systemctl restart ovirt-guest-agent.service
systemctl status ovirt-guest-agent.service
Thus, as a result of our actions, the created VM will be high-availability, meaning that in the event of a failure of the cluster node on which it is running, oVirt will automatically restart it on the second node. This VM can also be migrated between cluster hosts for maintenance or other purposes.
Conclusion
I hope this article has conveyed that oVirt is a perfectly adequate tool for managing virtual infrastructure, which is not so difficult to deploy — the main thing is to follow certain rules and requirements described both in the article and in the documentation.
Due to the extensive nature of the article, many topics could not be included, such as step-by-step execution of various wizards with detailed explanations and screenshots, long outputs of certain commands, etc. In reality, it would require writing a whole book, which is not particularly practical given the constantly emerging new software versions with innovations and changes. The most important thing is to understand the principle of how everything works together and obtain a general action algorithm for creating a fault-tolerant platform for managing virtual machines.
Although we have created the virtual infrastructure, we now need to teach it to interact between its individual elements: hosts, virtual machines, internal networks, as well as with the external world.
This process is one of the main tasks for a systems or network administrator, which will be discussed in the next article — about the use of VyOS virtual routers in the fault-tolerant infrastructure of our enterprise (as you may have guessed, they will operate as virtual machines on our oVirt cluster).
Source: habr.com
