


The goal of this article is to introduce the reader to the basics of network interaction and network policy management in Kubernetes, as well as to the third-party plugin Calico, which extends standard capabilities. Along the way, the ease of configuration and some features will be demonstrated through real examples from our experience.
Quick Introduction to Kubernetes Networking
A Kubernetes cluster cannot be imagined without networking. We have previously published materials on their basics: '" and "».
In the context of this article, it's important to note that the network connectivity between containers and nodes is not handled by K8s itself: various CNI plugins (Container Networking Interface) are used for this purpose. We have also discussed this concept in detail. .
— provides full network connectivity between all nodes in the cluster by creating bridges on each node, attaching it to a subnet. However, complete and unregulated availability is not always beneficial. To ensure some minimal isolation within the cluster, intervention in firewall configuration is necessary. Generally, this is managed by that very CNI, which means that any external modifications to iptables may be interpreted incorrectly or ignored altogether. And "out of the box," the management of network policies within a Kubernetes cluster is provided by the
NetworkPolicy API apiVersion: networking.k8s.io/v1 kind: NetworkPolicy metadata: name: test-network-policy namespace: default spec: podSelector: matchLabels: role: db policyTypes: - Ingress - Egress ingress: - from: - ipBlock: cidr: 172.17.0.0/16 except: - 172.17.1.0/24 - namespaceSelector: matchLabels: project: myproject - podSelector: matchLabels: role: frontend ports: - protocol: TCP port: 6379 egress: - to: - ipBlock: cidr: 10.0.0.0/24 ports: - protocol: TCP port: 5978
This is not the simplest example ofThis is not the most basic example of It may deter one from wanting to understand the logic of how network policies work once and for all. However, we will still try to understand the basic principles and methods of traffic flow handling using network policies...
It makes sense that there are two types of traffic: incoming to the pod (Ingress) and outgoing from it (Egress).
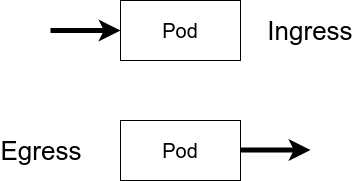
These two categories by direction are exactly how the policy is divided.
The next mandatory attribute is the selector; the entity to which the rule applies. This can be a pod (or a group of pods) or a namespace. An important detail: both types of these objects must have a label (label in Kubernetes terminology) — these are what the policies operate on.
In addition to a finite number of selectors bound by a certain label, there is the possibility of writing rules such as "Allow/deny everything/to everyone" in various forms. For this, constructs like the following are used:
  podSelector: {}
  ingress: []
  policyTypes:
  - Ingress
— in this example, all pods in the environment are denied incoming traffic. The opposite behavior can be achieved with this construct:
  podSelector: {}
  ingress:
  - {}
  policyTypes:
  - Ingress
Similarly for outgoing:
  podSelector: {}
  policyTypes:
  - Egress
— to disable it. And here is how to enable it:
  podSelector: {}
  egress:
  - {}
  policyTypes:
  - Egress
Returning to the choice of the CNI plugin for the cluster, it is worth noting that not every network plugin supports working with NetworkPolicy. For example, the aforementioned Flannel cannot configure network policies, which is in the official repository. An alternative is also mentioned there — the Open Source project , which significantly expands the standard set of Kubernetes APIs regarding network policies.

Getting acquainted with Calico: theory
The Calico plugin can be used in conjunction with Flannel (a subproject ) or independently, covering both network connectivity and availability management functions.
What capabilities does the out-of-the-box K8s solution and API set from Calico provide?
Here’s what is built into NetworkPolicy:
- policies are restricted by the environment;
- policies apply to pods labeled with tags;
- rules can be applied to pods, environments, or subnets;
- rules can contain protocols, named or symbolic port designations.
And here’s how Calico expands these functions:
- Policies can be applied to any object: pod, container, virtual machine, or interface;
- Rules can specify a specific action (deny, permit, log);
- The target or source of the rules can be a port, a range of ports, protocols, HTTP or ICMP attributes, IP or subnet (IPv4 or IPv6), or any selectors (nodes, hosts, environments);
- Additionally, traffic passing can be regulated using DNAT settings and traffic forwarding policies.
The first commits on GitHub in the Calico repository date back to July 2016, and just a year later, the project took a leading position in organizing network connectivity for Kubernetes — as evidenced by various survey results, :
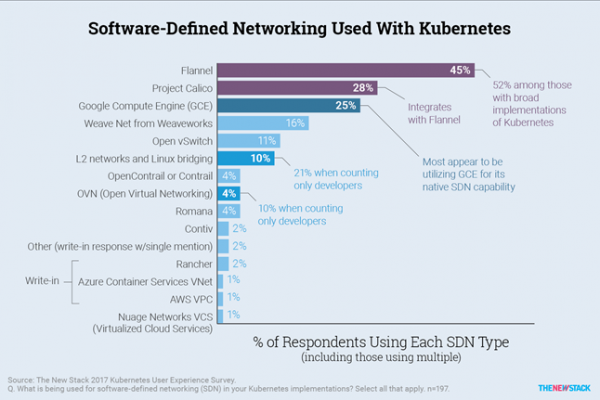
Many large managed solutions with K8s, such as , , and others, have started recommending its use.
Regarding performance, everything is great. During the testing of its product, the Calico development team demonstrated astronomical figures, running over 50,000 containers on 500 physical nodes at a rate of 20 containers per second. No issues were found when scaling. Such results even at the announcement of the first version. Independent studies focused on throughput and resource consumption also confirm Calico's performance, which is nearly on par with Flannel. :
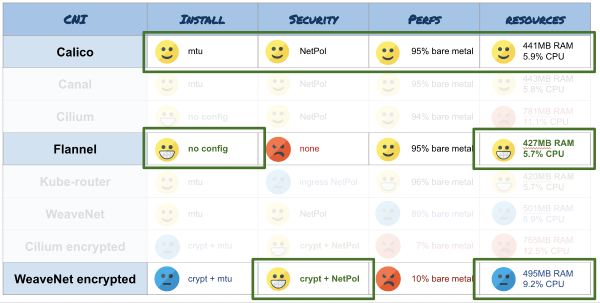
The project is evolving rapidly, supporting work in popular managed K8s solutions, OpenShift, OpenStack, and there is the possibility to use Calico when deploying a cluster using , with mentions of building Service Mesh networks ( of usage in conjunction with Istio).
Practice with Calico
In the typical case of using vanilla Kubernetes, the CNI installation comes down to using the file calico.yaml, , using kubectl apply -f.
Typically, the current version of the plugin is compatible with the last 2-3 versions of Kubernetes: operation in older versions is not tested and not guaranteed. According to the developers, Calico works on Linux kernel versions above 3.10 running on CentOS 7, Ubuntu 16, or Debian 8, on top of iptables or IPVS.
Isolation within the environment.
To gain a general understanding, let's consider a simple case to illustrate the differences between network policies in Calico notation and standard policies, as well as how the approach to rule creation enhances their readability and configurability flexibility.

In the cluster, two web applications have been deployed: one using Node.js and the other PHP, with one of them utilizing Redis. To restrict access to Redis from PHP while maintaining connectivity with Node.js, we can simply apply the following policy:
kind: NetworkPolicy
apiVersion: networking.k8s.io/v1
metadata:
  name: allow-redis-nodejs
spec:
  podSelector:
    matchLabels:
      service: redis
  ingress:
  - from:
    - podSelector:
        matchLabels:
          service: nodejs
    ports:
    - protocol: TCP
      port: 6379
Essentially, we have allowed incoming traffic on the Redis port from Node.js and explicitly denied nothing else. Once a NetworkPolicy is in place, all selectors mentioned within it start getting isolated unless specified otherwise. Moreover, the isolation rules do not apply to other objects not covered by the selector.
The example uses apiVersion Kubernetes 'out of the box,' but nothing prevents the use of . The syntax there is more elaborate, so it will require rewriting the rule for the above scenario as follows:
apiVersion: crd.projectcalico.org/v1
kind: NetworkPolicy
metadata:
  name: allow-redis-nodejs
spec:
  selector: service == 'redis'
  ingress:
  - action: Allow
    protocol: TCP
    source:
      selector: service == 'nodejs'
    destination:
      ports:
      - 6379
The aforementioned constructs for allowing or blocking all traffic using the standard NetworkPolicy API contain complex structures with parentheses that can be difficult to comprehend and memorize. In the case of Calico, to change the firewall rule logic to the opposite, it is enough to switch action: Allow to action: Deny.
Isolation by environments
Now imagine a situation where an application generates business metrics for collection in Prometheus and further analysis via Grafana. The output may include sensitive data that, by default, is accessible to everyone. Let's shield this data from prying eyes:
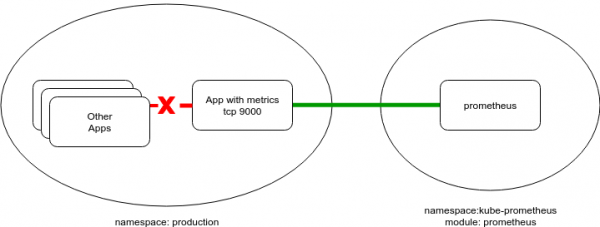
Prometheus is typically deployed in a separate service environment — in this example, it will be a namespace of the following kind:
apiVersion: v1
kind: Namespace
metadata:
  labels:
    module: prometheus
  name: kube-prometheus
Field metadata.labels this was not accidental. As mentioned above, namespaceSelector (just like podSelector) operates with labels. Therefore, to allow collecting metrics from all pods on a specific port, you need to add some label (or take one from the existing ones), and then apply a configuration like:
apiVersion: networking.k8s.io/v1
kind: NetworkPolicy
metadata:
  name: allow-metrics-prom
spec:
  podSelector: {}
  ingress:
  - from:
    - namespaceSelector:
        matchLabels:
          module: prometheus
    ports:
    - protocol: TCP
      port: 9100
In the case of using Calico policies, the syntax would be as follows:
apiVersion: crd.projectcalico.org/v1
kind: NetworkPolicy
metadata:
  name: allow-metrics-prom
spec:
  ingress:
  - action: Allow
    protocol: TCP
    source:
      namespaceSelector: module == 'prometheus'
    destination:
      ports:
      - 9100
Overall, adding such policies for specific needs can protect against malicious or accidental interference with application operations in the cluster.
The best practice, according to Calico creators, is the approach of "Deny everything and explicitly open what is necessary," noted in (similar approaches are followed by others — in particular, in ).
Applying additional Calico objects
Let me remind you that through an extended set of Calico APIs, you can regulate the availability of nodes without being limited to just pods. In the following example, using GlobalNetworkPolicy blocks the possibility of ICMP requests within the cluster (for instance, pings from pod to node, between pods, or from node to pod's IP):
apiVersion: crd.projectcalico.org/v1
kind: GlobalNetworkPolicy
metadata:
  name: block-icmp
spec:
  order: 200
  selector: all()
  types:
  - Ingress
  - Egress
  ingress:
  - action: Deny
    protocol: ICMP
  egress:
  - action: Deny
    protocol: ICMP
In the above case, it remains possible for the cluster nodes to "reach" each other via ICMP. This issue is addressed by means of GlobalNetworkPolicy, applied to the entity HostEndpoint:
apiVersion: crd.projectcalico.org/v1
kind: GlobalNetworkPolicy
metadata:
  name: deny-icmp-kube-02
spec:
  selector: "role == 'k8s-node'"
  order: 0
  ingress:
  - action: Allow
    protocol: ICMP
  egress:
  - action: Allow
    protocol: ICMP
---
apiVersion: crd.projectcalico.org/v1
kind: HostEndpoint
metadata:
  name: kube-02-eth0
  labels:
    role: k8s-node
spec:
  interfaceName: eth0
  node: kube-02
  expectedIPs: ["192.168.2.2"]
The case with VPN
Finally, I will provide a quite real example of using Calico's features for inter-cluster interaction, when the standard set of policies is insufficient. Accessing a web application by clients uses a VPN tunnel, and this access is strictly controlled and limited to a specific list of permitted services:
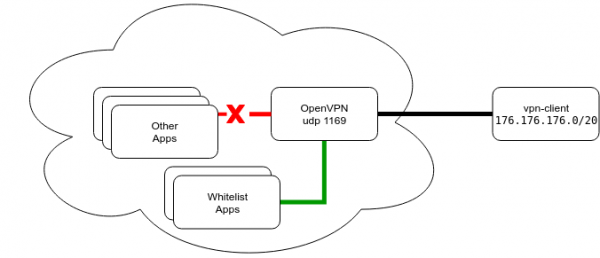
Clients connect to the VPN via the standard UDP port 1194 and receive routes to the cluster subnets of the pods and services upon connection. The subnets are pushed entirely to avoid losing services during restarts and IP address changes.
The port in the configuration is standard, which imposes certain nuances on the application configuration process and its migration to the Kubernetes cluster. For example, the AWS LoadBalancer for UDP appeared literally at the end of last year in a limited list of regions, and NodePort cannot be used because it routes to all nodes in the cluster and makes it impossible to scale the number of server instances for failover purposes. Additionally, the range of ports chosen by default will need to be changed...
As a result of considering possible solutions, the following was chosen:
- VPN pods are planned to be on a node in
hostNetwork, meaning it will be using the actual IP. - The service is exposed externally via
ClusterIP. A port is physically raised on the node, which is accessible externally with a few caveats (the conditional presence of a real IP address). - Determining the node where the pod is running is beyond the scope of our discussion. I will only say that you can rigidly 'pin' the service to the node or write a small sidecar service that will monitor the current IP address of the VPN service and update the DNS records registered with clients — depending on one's imagination.
From a routing perspective, we can precisely identify the client over the VPN by the IP address assigned by the VPN server. Below is a simple example of restricting such a client’s access to services, illustrated with the aforementioned Redis:
apiVersion: crd.projectcalico.org/v1
kind: HostEndpoint
metadata:
  name: vpnclient-eth0
  labels:
    role: vpnclient
    environment: production
spec:
  interfaceName: "*"
  node: kube-02
  expectedIPs: ["172.176.176.2"]
---
apiVersion: crd.projectcalico.org/v1
kind: GlobalNetworkPolicy
metadata:
  name: vpn-rules
spec:
  selector: "role == 'vpnclient'"
  order: 0
  applyOnForward: true
  preDNAT: true
  ingress:
  - action: Deny
    protocol: TCP
    destination:
      ports: [6379]
  - action: Allow
    protocol: UDP
    destination:
      ports: [53, 67]
Here, access to port 6379 is strictly denied, while maintaining the operation of the DNS service, the functioning of which often suffers when composing rules. Because, as mentioned earlier, when a selector appears, a default deny policy is applied to it unless stated otherwise.
Summary
Thus, with the help of the extended Calico API, you can flexibly configure and dynamically change routing in and around the cluster. Generally, its use may seem like using a cannon to shoot a sparrow, and implementing an L3 network with BGP and IP-IP tunnels appears monstrous in a simple Kubernetes installation within a flat network. However, the tool remains quite viable and useful otherwise.
Isolating the cluster to meet security requirements is not always feasible, and in such cases, Calico (or a similar solution) comes to the rescue. The examples provided in the article (with some minor adjustments) are used in several installations of our clients in AWS.
P.S.
Also read in our blog:
- «»;
- Illustrated guide to networking in Kubernetes: , ;
- «».
Source: habr.com
