

Hello everyone. As we approach the start of the new course group, we are publishing useful material written by our student and mentor in the courses, support specialist for corporate products at REG.RU — Roman Travyin.
This article will cover two cases of disk replacement and transferring information to new larger disks, followed by expanding the array and file system. The first case will involve replacing disks with the same partition table MBR/MBR or GPT/GPT, and the second case involves replacing disks with an MBR partition table with disks over 2 TB where GPT with a biosboot partition will need to be set up. In both cases, the disks we are transferring the data to are already installed in server. The file system used for the root partition is ext4.
Case 1: Replacing smaller disks with larger disks (up to 2TB)
Task: Replace the current disks with larger disks (up to 2 TB) while transferring data. In this case, we have 2 x 240 GB SSD disks (RAID-1) with the operating system installed and 2 x 1 TB SATA disks to which we need to transfer the system.
Let’s review the current disk layout.
[root@localhost ~]# lsblk
NAME           MAJ:MIN RM   SIZE RO TYPE  MOUNTPOINT
sda              8:0    0 223.6G  0 disk
├─sda1           8:1    0     1G  0 part
│ └─md126        9:126  0  1023M  0 raid1 /boot
└─sda2           8:2    0 222.5G  0 part
  └─md127        9:127  0 222.4G  0 raid1
    ├─vg0-root 253:0    0 206.4G  0 lvm   /
    └─vg0-swap 253:1    0    16G  0 lvm   [SWAP]
sdb              8:16   0 223.6G  0 disk
├─sdb1           8:17   0     1G  0 part
│ └─md126        9:126  0  1023M  0 raid1 /boot
└─sdb2           8:18   0 222.5G  0 part
  └─md127        9:127  0 222.4G  0 raid1
    ├─vg0-root 253:0    0 206.4G  0 lvm   /
    └─vg0-swap 253:1    0    16G  0 lvm   [SWAP]
sdc              8:32   0 931.5G  0 disk
sdd              8:48   0 931.5G  0 disk
Let’s check the current used space of the file system.
[root@localhost ~]# df -h
Filesystem      Size Used Avail Use% Mounted on
devtmpfs         32G    0   32G   0% /dev
tmpfs            32G    0   32G   0% /dev/shm
tmpfs            32G  9.6M   32G   1% /run
tmpfs            32G    0   32G   0% /sys/fs/cgroup
/dev/mapper/vg0-root   204G  1.3G  192G   1% /
/dev/md126       1007M 120M  837M  13% /boot
tmpfs            6.3G    0  6.3G   0% /run/user/0
The size of the file system before replacing the disks is 204 GB, with 2 software arrays md126 mounted in /boot and md127, which is used as physical volume for VG group vg0.
1. Removing Disk Partitions from Arrays
Checking the Array Status
[root@localhost ~]# cat /proc/mdstat
Personalities : [raid1]
md126 : active raid1 sda1[0] sdb1[1]
      1047552 blocks super 1.2 [2/2] [UU]
      bitmap: 0/1 pages [0KB], 65536KB chunk

md127 : active raid1 sda2[0] sdb2[1]
      233206784 blocks super 1.2 [2/2] [UU]
      bitmap: 0/2 pages [0KB], 65536KB chunk

unused devices:
There are 2 arrays in the system: md126 (mount point /boot) — consists of a partition /dev/sda1 and /dev/sdb1, md127 (LVM for swap and root filesystem) — consists of /dev/sda2 and /dev/sdb2.
Marking the partitions of the first disk that are used in each array as failed.
mdadm /dev/md126 --fail /dev/sda1

mdadm /dev/md127 --fail /dev/sda2
Removing the partitions of the block device /dev/sda from the arrays.
mdadm /dev/md126 --remove /dev/sda1

mdadm /dev/md127 --remove /dev/sda2
After we removed the disk from the array, the block device information will look as follows.
[root@localhost ~]# lsblk
NAME           MAJ:MIN RM   SIZE RO TYPE  MOUNTPOINT
sda              8:0    0 223.6G  0 disk
├─sda1           8:1    0     1G  0 part
└─sda2           8:2    0 222.5G  0 part
sdb              8:16   0 223.6G  0 disk
├─sdb1           8:17   0     1G  0 part
│ └─md126        9:126  0  1023M  0 raid1 /boot
└─sdb2           8:18   0 222.5G  0 part
  └─md127        9:127  0 222.4G  0 raid1
    ├─vg0-root 253:0    0 206.4G  0 lvm   /
    └─vg0-swap 253:1    0    16G  0 lvm   [SWAP]
sdc              8:32   0 931.5G  0 disk
sdd              8:48   0 931.5G  0 disk
Array status after removing disks.
[root@localhost ~]# cat /proc/mdstat
Personalities : [raid1]
md126 : active raid1 sdb1[1]
      1047552 blocks super 1.2 [2/1] [_U]
      bitmap: 0/1 pages [0KB], 65536KB chunk

md127 : active raid1 sdb2[1]
      233206784 blocks super 1.2 [2/1] [_U]
      bitmap: 1/2 pages [4KB], 65536KB chunk

unused devices:
2. Copying the Partition Table to a New Disk
You can check the partition table used on the disk with the following command.
fdisk -l /dev/sdb | grep 'Disk label type'
The output for MBR will be:
Disk label type: dosfor GPT:
Disk label type: gpt Copying the partition table for MBR:
sfdisk -d /dev/sdb | sfdisk /dev/sdcIn this command the first disk indicated is with the one from which the partition layout is copied, the second is where to copy.
WARNING: For GPT the first disk indicated is the disk to which the layout is copied, the second disk indicated is the disk from which to copy the layout. If the disks are confused, the initially correct layout will be overwritten and destroyed.
Copying the partition table for GPT:
sgdisk -R /dev/sdc /dev/sdbNext, assign the disk a random UUID (for GPT).
sgdisk -G /dev/sdc After executing the command, the partitions should appear on the disk. /dev/sdc.
[root@localhost ~]# lsblk
NAME           MAJ:MIN RM   SIZE RO TYPE  MOUNTPOINT
sda              8:0    0 223.6G  0 disk
├─sda1           8:1    0     1G  0 part
└─sda2           8:2    0 222.5G  0 part
sdb              8:16   0 223.6G  0 disk
├─sdb1           8:17   0     1G  0 part
│ └─md126        9:126  0  1023M  0 raid1 /boot
└─sdb2           8:18   0 222.5G  0 part
  └─md127        9:127  0 222.4G  0 raid1
    ├─vg0-root 253:0    0 206.4G  0 lvm   /
    └─vg0-swap 253:1    0    16G  0 lvm   [SWAP]
sdc              8:32   0 931.5G  0 disk
├─sdc1           8:33   0     1G  0 part
└─sdc2           8:34   0 222.5G  0 part
sdd              8:48   0 931.5G  0 disk
If the partitions on the disk are not recognized after the action has been executed /dev/sdc we execute the command to reread the partition table.
sfdisk -R /dev/sdcIf the current disks use the MBR table and the information needs to be transferred to disks larger than 2 TB, you will need to manually create a GPT partitioning on the new disks using the biosboot partition. This case will be addressed in part 2 of this article.
3. Adding new disk partitions to the array
Let's add the disk partitions to the corresponding arrays.
mdadm /dev/md126 --add /dev/sdc1

mdadm /dev/md127 --add /dev/sdc2
We check that the partitions have been added.
[root@localhost ~]# lsblk
NAME           MAJ:MIN RM   SIZE RO TYPE  MOUNTPOINT
sda              8:0    0 223.6G  0 disk
├─sda1           8:1    0     1G  0 part
└─sda2           8:2    0 222.5G  0 part
sdb              8:16   0 223.6G  0 disk
├─sdb1           8:17   0     1G  0 part
│ └─md126        9:126  0  1023M  0 raid1 /boot
└─sdb2           8:18   0 222.5G  0 part
  └─md127        9:127  0 222.4G  0 raid1
    ├─vg0-root 253:0    0 206.4G  0 lvm   /
    └─vg0-swap 253:1    0    16G  0 lvm   [SWAP]
sdc              8:32   0 931.5G  0 disk
├─sdc1           8:33   0     1G  0 part
│ └─md126        9:126  0  1023M  0 raid1 /boot
└─sdc2           8:34   0 222.5G  0 part
  └─md127        9:127  0 222.4G  0 raid1
    ├─vg0-root 253:0    0 206.4G  0 lvm   /
    └─vg0-swap 253:1    0    16G  0 lvm   [SWAP]
sdd              8:48   0 931.5G  0 disk
After that, we wait for the arrays to synchronize.
[root@localhost ~]# cat /proc/mdstat
Personalities: [raid1]
md126: active raid1 sdc1[2] sdb1[1]
      1047552 blocks super 1.2 [2/2] [UU]
      bitmap: 0/1 pages [0KB], 65536KB chunk

md127: active raid1 sdc2[2] sdb2[1]
      233206784 blocks super 1.2 [2/1] [_U]
      [==>..................]  recovery = 10.6% (24859136/233206784) finish=29.3min speed=118119K/sec
      bitmap: 2/2 pages [8KB], 65536KB chunk

unused devices:
You can continuously monitor the synchronization process using the utility watch.
watch -n 2 cat /proc/mdstat Parameter -n indicates the interval in seconds at which the command should be executed to check the progress.
We repeat steps 1 - 3 for the next disk to be replaced.
Mark the partitions of the second disk that are used in each array as faulty.
mdadm /dev/md126 --fail /dev/sdb1

mdadm /dev/md127 --fail /dev/sdb2
Remove the partitions of the block device /dev/sdb from the arrays.
mdadm /dev/md126 --remove /dev/sdb1

mdadm /dev/md127 --remove /dev/sdb2
After we removed the disk from the array, the block device information will look as follows.
[root@localhost ~]# lsblk
NAME           MAJ:MIN RM   SIZE RO TYPE  MOUNTPOINT
sda              8:0    0 223.6G  0 disk
├─sda1           8:1    0     1G  0 part
└─sda2           8:2    0 222.5G  0 part
sdb              8:16   0 223.6G  0 disk
├─sdb1           8:17   0     1G  0 part
└─sdb2           8:18   0 222.5G  0 part
sdc              8:32   0 931.5G  0 disk
├─sdc1           8:33   0     1G  0 part
│ └─md126        9:126  0  1023M  0 raid1 /boot
└─sdc2           8:34   0 222.5G  0 part
  └─md127        9:127  0 222.4G  0 raid1
    ├─vg0-root 253:0    0 206.4G  0 lvm   /
    └─vg0-swap 253:1    0    16G  0 lvm   [SWAP]
sdd              8:48   0 931.5G  0 disk
Array status after removing disks.
[root@localhost ~]# cat /proc/mdstat
Personalities : [raid1]
md126 : active raid1 sdc1[2]
      1047552 blocks super 1.2 [2/1] [U_]
      bitmap: 0/1 pages [0KB], 65536KB chunk

md127 : active raid1 sdc2[2]
      233206784 blocks super 1.2 [2/1] [U_]
      bitmap: 1/2 pages [4KB], 65536KB chunk

unused devices:
Copying the MBR partition table from the disk /dev/sdс to the disk /dev/sdd.
sfdisk -d /dev/sdc | sfdisk /dev/sdd After executing the command, the partitions should appear on the disk. /dev/sdd.
[root@localhost ~]# lsblk
NAME           MAJ:MIN RM   SIZE RO TYPE  MOUNTPOINT
sda              8:0    0 223.6G  0 disk
├─sda1           8:1    0     1G  0 part
└─sda2           8:2    0 222.5G  0 part
sdb              8:16   0 223.6G  0 disk
├─sdb1           8:17   0     1G  0 part
└─sdb2           8:18   0 222.5G  0 part
sdc              8:32   0 931.5G  0 disk
├─sdc1           8:33   0     1G  0 part
│ └─md126        9:126  0  1023M  0 raid1 /boot
└─sdc2           8:34   0 222.5G  0 part
  └─md127        9:127  0 222.4G  0 raid1
    ├─vg0-root 253:0    0 206.4G  0 lvm   /
    └─vg0-swap 253:1    0    16G  0 lvm   [SWAP]
sdd              8:48   0 931.5G  0 disk
├─sdd1           8:49   0     1G  0 part
└─sdd2           8:50   0 222.5G  0 part
Adding the disk partitions to the arrays.
mdadm /dev/md126 --add /dev/sdd1

mdadm /dev/md127 --add /dev/sdd2
We check that the partitions have been added.
[root@localhost ~]# lsblk
NAME           MAJ:MIN RM   SIZE RO TYPE  MOUNTPOINT
sda              8:0    0 223.6G  0 disk
├─sda1           8:1    0     1G  0 part
└─sda2           8:2    0 222.5G  0 part
sdb              8:16   0 223.6G  0 disk
├─sdb1           8:17   0     1G  0 part
└─sdb2           8:18   0 222.5G  0 part
sdc              8:32   0 931.5G  0 disk
├─sdc1           8:33   0     1G  0 part
│ └─md126        9:126  0  1023M  0 raid1 /boot
└─sdc2           8:34   0 222.5G  0 part
  └─md127        9:127  0 222.4G  0 raid1
    ├─vg0-root 253:0    0 206.4G  0 lvm   /
    └─vg0-swap 253:1    0    16G  0 lvm   [SWAP]
sdd              8:48   0 931.5G  0 disk
├─sdd1           8:49   0     1G  0 part
│ └─md126        9:126  0  1023M  0 raid1 /boot
└─sdd2           8:50   0 222.5G  0 part
  └─md127        9:127  0 222.4G  0 raid1
    ├─vg0-root 253:0    0 206.4G  0 lvm   /
    └─vg0-swap 253:1    0    16G  0 lvm   [SWAP]
After that, we wait for the arrays to synchronize.
[root@localhost ~]# cat /proc/mdstat
Personalities : [raid1]
md126 : active raid1 sdd1[3] sdc1[2]
      1047552 blocks super 1.2 [2/2] [UU]
      bitmap: 0/1 pages [0KB], 65536KB chunk

md127 : active raid1 sdd2[3] sdc2[2]
      233206784 blocks super 1.2 [2/1] [U_]
      [>....................] recovery =  0.5% (1200000/233206784) finish=35.4min speed=109090K/sec
      bitmap: 2/2 pages [8KB], 65536KB chunk

unused devices:
5. Installing GRUB on new disks
For CentOS:
grub2-install /dev/sdXFor Debian/Ubuntu:
grub-install /dev/sdX where X — the letter of the block device. In this case, GRUB needs to be installed on /dev/sdc and /dev/sdd.
6. Extending the root partition file system (ext4)
On the new disks /dev/sdc and /dev/sdd 931.5 GB is available. Since the partition table was copied from smaller disks, the partitions /dev/sdc2 and /dev/sdd2 222.5 GB is available.
sdc              8:32   0 931.5G  0 disk
├─sdc1           8:33   0     1G  0 part
│ └─md126        9:126  0  1023M  0 raid1 /boot
└─sdc2           8:34   0 222.5G  0 part
  └─md127        9:127  0 222.4G  0 raid1
    ├─vg0-root 253:0    0 206.4G  0 lvm   /
    └─vg0-swap 253:1    0    16G  0 lvm   [SWAP]
sdd              8:48   0 931.5G  0 disk
├─sdd1           8:49   0     1G  0 part
│ └─md126        9:126  0  1023M  0 raid1 /boot
└─sdd2           8:50   0 222.5G  0 part
  └─md127        9:127  0 222.4G  0 raid1
    ├─vg0-root 253:0    0 206.4G  0 lvm   /
    └─vg0-swap 253:1    0    16G  0 lvm   [SWAP]
Required:
- Expand partition 2 on each of the disks,
- Expand the md127 array,
- Expand the PV (physical volume),
- Expand the LV (logical volume) vg0-root,
- Expand the file system.
Using the utility parted we will enlarge the partition /dev/sdc2 to the maximum value. Execute the command parted /dev/sdc (1) and view the current partition table with the command p (2).
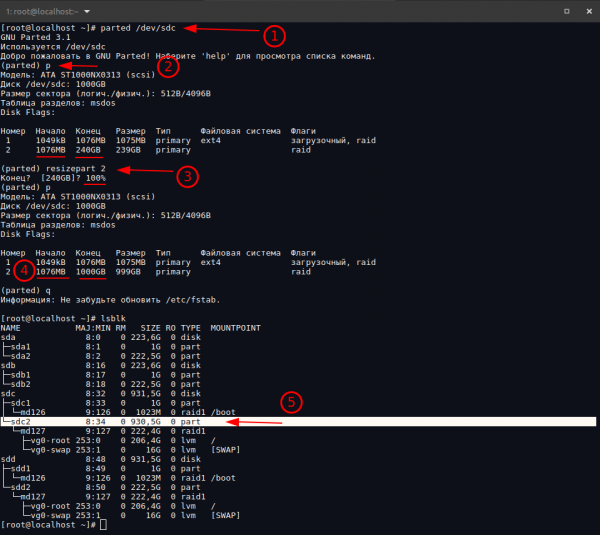
As you can see, the end of partition 2 ends at 240 GB. We will execute the partition expansion with the command resizepart 2, where 2 is the partition number (3). We specify the value in numeric format, for example, 1000 GB, or use a fraction of the disk — 100%. We check again that the partition has the new size (4).
Repeat the steps above for the disk /dev/sdd. After expanding the partitions /dev/sdc2 and /dev/sdd2 they became equal to 930.5 GB.
[root@localhost ~]# lsblk
NAME           MAJ:MIN RM   SIZE RO TYPE  MOUNTPOINT
sda              8:0    0 223.6G  0 disk
├─sda1           8:1    0     1G  0 part
└─sda2           8:2    0 222.5G  0 part
sdb              8:16   0 223.6G  0 disk
├─sdb1           8:17   0     1G  0 part
└─sdb2           8:18   0 222.5G  0 part
sdc              8:32   0 931.5G  0 disk
├─sdc1           8:33   0     1G  0 part
│ └─md126        9:126  0  1023M  0 raid1 /boot
└─sdc2           8:34   0 930.5G  0 part
  └─md127        9:127  0 222.4G  0 raid1
    ├─vg0-root 253:0    0 206.4G  0 lvm   /
    └─vg0-swap 253:1    0    16G  0 lvm   [SWAP]
sdd              8:48   0 931.5G  0 disk
├─sdd1           8:49   0     1G  0 part
│ └─md126        9:126  0  1023M  0 raid1 /boot
└─sdd2           8:50   0 930.5G  0 part
  └─md127        9:127  0 222.4G  0 raid1
    ├─vg0-root 253:0    0 206.4G  0 lvm   /
    └─vg0-swap 253:1    0    16G  0 lvm   [SWAP]
After this, we expand the array md127 to the maximum.
mdadm --grow /dev/md127 --size=maxWe check that the array has expanded. Its size has now become 930.4 GB.
[root@localhost ~]# lsblk
NAME           MAJ:MIN RM   SIZE RO TYPE  MOUNTPOINT
sda              8:0    0 223.6G  0 disk
├─sda1           8:1    0     1G  0 part
└─sda2           8:2    0 222.5G  0 part
sdb              8:16   0 223.6G  0 disk
├─sdb1           8:17   0     1G  0 part
└─sdb2           8:18   0 222.5G  0 part
sdc              8:32   0 931.5G  0 disk
├─sdc1           8:33   0     1G  0 part
│ └─md126        9:126  0  1023M  0 raid1 /boot
└─sdc2           8:34   0 930.5G  0 part
  └─md127        9:127  0 930.4G  0 raid1
    ├─vg0-root 253:0    0 206.4G  0 lvm   /
    └─vg0-swap 253:1    0    16G  0 lvm   [SWAP]
sdd              8:48   0 931.5G  0 disk
├─sdd1           8:49   0     1G  0 part
│ └─md126        9:126  0  1023M  0 raid1 /boot
└─sdd2           8:50   0 930.5G  0 part
  └─md127        9:127  0 930.4G  0 raid1
    ├─vg0-root 253:0    0 206.4G  0 lvm   /
    └─vg0-swap 253:1    0    16G  0 lvm   [SWAP]
Expanding physical volume. Before expanding, we will check the current state of PV.
[root@localhost ~]# pvscan
  PV /dev/md127   VG vg0             lvm2 [222.40 GiB / 0    free]
  Total: 1 [222.40 GiB] / in use: 1 [222.40 GiB] / in no VG: 0 [0   ]
As we can see, PV /dev/md127 is using 222.4 GB of space.
We expand PV with the following command.
pvresize /dev/md127We check the result of the PV expansion.
[
root@localhost ~]# pvscan
  PV /dev/md127   VG vg0             lvm2 [930.38 GiB / 707.98 GiB free]
  Total: 1 [930.38 GiB] / in use: 1 [930.38 GiB] / in no VG: 0 [0   ]
We expand the logical volume. Before expanding, we will check the current state of LV (1).
[root@localhost ~]# lvscan
  ACTIVE            '/dev/vg0/swap' [<16.00 GiB] inherit
  ACTIVE            '/dev/vg0/root' [<206.41 GiB] inherit
LV /dev/vg0/root is using 206.41 GB.
We expand LV with the following command (2).
lvextend -l +100%FREE /dev/mapper/vg0-rootWe check the performed action (3).
[root@localhost ~]# lvscan
  ACTIVE            '/dev/vg0/swap' [<16.00 GiB] inherit
  ACTIVE            '/dev/vg0/root' [<914.39 GiB] inherit
As we see, after expanding, the occupied disk space has become 914.39 GB.
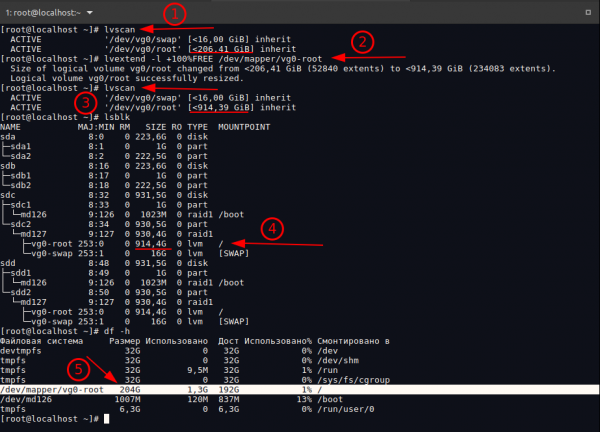
The volume of LV has increased (4), but the file system still occupies 204 GB (5).
1. We will expand the file system.
resize2fs /dev/mapper/vg0-rootWe check the size of the file system after executing the command.
[root@localhost ~]# df -h
File System     Size Used  Avail Use% Mounted on
devtmpfs                32G            0   32G            0% /dev
tmpfs                   32G            0   32G            0% /dev/shm
tmpfs                   32G         9.5M   32G            1% /run
tmpfs                   32G            0   32G            0% /sys/fs/cgroup
/dev/mapper/vg0-root   900G         1.3G  860G            1% /
/dev/md126            1007M         120M  837M           13% /boot
tmpfs                  6.3G            0  6.3G            0% /run/user/0
The size of the root file system will increase to 900 GB. After performing these actions, the old disks can be removed.
Case 2: Replacing smaller disks with larger disks (over 2TB)
Task: Replace the current disks with larger ones (2 x 3TB) while preserving the data. Here, we have disks 2 x 240 GB SSD (RAID-1) with the operating system installed, and disks 2 x 3 TB SATA, to which the system needs to be transferred. The current disks use the MBR partition table. Since the new disks are larger than 2 TB, a GPT partition table will need to be used, as MBR cannot work with disks larger than 2TB.
Let's examine the current disk layout.
[root@localhost ~]# lsblk
NAME           MAJ:MIN RM   SIZE RO TYPE  MOUNTPOINT
sda              8:0    0 223.6G  0 disk
├─sda1           8:1    0     1G  0 part
│ └─md126        9:126  0  1023M  0 raid1 /boot
└─sda2           8:2    0 222.5G  0 part
  └─md127        9:127  0 222.4G  0 raid1
    ├─vg0-root 253:0    0 206.4G  0 lvm   /
    └─vg0-swap 253:1    0    16G  0 lvm   [SWAP]
sdb              8:16   0 223.6G  0 disk
├─sdb1           8:17   0     1G  0 part
│ └─md126        9:126  0  1023M  0 raid1 /boot
└─sdb2           8:18   0 222.5G  0 part
  └─md127        9:127  0 222.4G  0 raid1
    ├─vg0-root 253:0    0 206.4G  0 lvm   /
    └─vg0-swap 253:1    0    16G  0 lvm   [SWAP]
sdc              8:32   0   2.7T  0 disk
sdd              8:48   0   2.7T  0 disk
Let's check the partition table used on the disk. /dev/sda.
[root@localhost ~]# fdisk -l /dev/sda | grep 'Disk label type'
Disk label type: dos
On the disk /dev/sdb an analogous partition table is used. Let's check the disk space usage in the system.
[root@localhost ~]# df -h
Filesystem           Size  Used Avail Use% Mounted on
devtmpfs              16G     0   16G   0% /dev
tmpfs                 16G     0   16G   0% /dev/shm
tmpfs                 16G  9.5M   16G   1% /run
tmpfs                 16G     0   16G   0% /sys/fs/cgroup
/dev/mapper/vg0-root  204G  1.3G  192G   1% /
/dev/md126           1007M 120M  837M  13% /boot
tmpfs                3.2G     0  3.2G   0% /run/user/0
As we can see, the root filesystem occupies 204 GB. Let's check the current status of the software RAID array.
1. Setting up the GPT partition table and partitioning the disk.
Let's check the disk layout by sectors.
[root@localhost ~]# parted /dev/sda print
Model: ATA KINGSTON SVP200S (scsi)
Disk /dev/sda: 240GB
Sector size (logical/physical): 512B/512B
Partition table: msdos
Disk Flags:

Number  Start    End      Size  Type      Filesystem  Flags
 1      1049kB  1076MB   1075MB  primary                    boot, raid
 2      1076MB  240GB    239GB   primary                    raid
On the new 3TB disk, we will need to create 3 partitions:
- Partition
bios_grubof size 2MiB for GPT compatibility with BIOS, - A partition for the RAID array, which will be mounted at
/boot. - A partition for the RAID array, on which will be LV root and LV swap.
Installing the utility parted with the command yum install -y parted (for CentOS), apt install -y parted (for Debian/Ubuntu).
Using parted We will execute the following commands to partition the disk.
Executing the command parted /dev/sdc and entering the disk partitioning edit mode.
Creating a GPT partition table.
(parted) mktable gpt Creating the first partition bios_grub partition and setting a flag for it.
(parted) mkpart primary 1MiB 3MiB
(parted) set 1 bios_grub on
Creating the second partition and setting a flag for it. This partition will be used as a block for the RAID array and will be mounted in /boot.
(parted) mkpart primary ext2 3MiB 1028MiB
(parted) set 2 boot on
Creating the third partition, which will also be used as a block in the array where LVM will reside.
(parted) mkpart primary 1028MiB 100% In this case, setting the flag is not required, but if necessary, it can be set with the following command.
(parted) set 3 raid onChecking the created partition table.
(parted) p
Model: ATA TOSHIBA DT01ACA3 (scsi)
Disk /dev/sdc: 3001GB
Sector size (logical/physical): 512B/4096B
Partition table: gpt
Disk Flags:

Num  Start   End     Size   File system  Name      Flags
 1    1049kB  3146kB 2097kB               primary  bios_grub
 2    3146kB  1077MB 1074MB               primary  boot
 3    1077MB  3001GB 3000GB               primary
Assigning a new random GUID to the disk.
sgdisk -G /dev/sdd
2. Removing the partitions of the first disk from the arrays
Checking the Array Status
[root@localhost ~]# cat /proc/mdstat
Personalities : [raid1]
md126 : active raid1 sda1[0] sdb1[1]
      1047552 blocks super 1.2 [2/2] [UU]
      bitmap: 0/1 pages [0KB], 65536KB chunk

md127 : active raid1 sda2[0] sdb2[1]
      233206784 blocks super 1.2 [2/2] [UU]
      bitmap: 0/2 pages [0KB], 65536KB chunk

unused devices:
The system is using 2 arrays: md126 (mount point /boot) — consists of /dev/sda1 and /dev/sdb1, md127 (LVM for swap and root filesystem) — consists of /dev/sda2 and /dev/sdb2.
Marking the partitions of the first disk that are used in each array as failed.
mdadm /dev/md126 --fail /dev/sda1

mdadm /dev/md127 --fail /dev/sda2
Remove the partitions of the block device /dev/sda from the arrays.
mdadm /dev/md126 --remove /dev/sda1

mdadm /dev/md127 --remove /dev/sda2
Checking the array status after removing the disk.
[root@localhost ~]# cat /proc/mdstat
Personalities : [raid1]
md126 : active raid1 sdb1[1]
      1047552 blocks super 1.2 [2/1] [_U]
      bitmap: 0/1 pages [0KB], 65536KB chunk

md127 : active raid1 sdb2[1]
      233206784 blocks super 1.2 [2/1] [_U]
      bitmap: 2/2 pages [8KB], 65536KB chunk

unused devices:
3. Adding new disk partitions to the array
The next step is to add the partitions of the new disk to the arrays for synchronization. Let's look at the current state of the disk partitions.
[root@localhost ~]# lsblk
NAME           MAJ:MIN RM   SIZE RO TYPE  MOUNTPOINT
sda              8:0    0 223.6G  0 disk
├─sda1           8:1    0     1G  0 part
└─sda2           8:2    0 222.5G  0 part
sdb              8:16   0 223.6G  0 disk
├─sdb1           8:17   0     1G  0 part
│ └─md126        9:126  0  1023M  0 raid1 /boot
└─sdb2           8:18   0 222.5G  0 part
  └─md127        9:127  0 222.4G  0 raid1
    ├─vg0-root 253:0    0 206.4G  0 lvm   /
    └─vg0-swap 253:1    0    16G  0 lvm   [SWAP]
sdc              8:32   0   2.7T  0 disk
├─sdc1           8:33   0     2M  0 part
├─sdc2           8:34   0     1G  0 part
└─sdc3           8:35   0   2.7T  0 part
sdd              8:48   0   2.7T  0 disk
Partition /dev/sdc1 is bios_grub partition and is not involved in creating arrays. Only the following /dev/sdc2 and /dev/sdc3. Adding these partitions to the corresponding arrays.
mdadm /dev/md126 --add /dev/sdc2

mdadm /dev/md127 --add /dev/sdc3
Afterwards, we wait for the synchronization of the array.
[root@localhost ~]# cat /proc/mdstat
Personalities : [raid1]
md126 : active raid1 sdc2[2] sdb1[1]
      1047552 blocks super 1.2 [2/2] [UU]
      bitmap: 0/1 pages [0KB], 65536KB chunk

md127 : active raid1 sdc3[2] sdb2[1]
      233206784 blocks super 1.2 [2/1] [_U]
      [>....................]  recovery =  0.2% (619904/233206784) finish=31.2min speed=123980K/sec
      bitmap: 2/2 pages [8KB], 65536KB chunk
unused devices:
Disk layout after adding partitions to the array.
[root@localhost ~]# lsblk
NAME           MAJ:MIN RM   SIZE RO TYPE  MOUNTPOINT
sda              8:0    0 223.6G  0 disk
├─sda1           8:1    0     1G  0 part
└─sda2           8:2    0 222.5G  0 part
sdb              8:16   0 223.6G  0 disk
├─sdb1           8:17   0     1G  0 part
│ └─md126        9:126  0  1023M  0 raid1 /boot
└─sdb2           8:18   0 222.5G  0 part
  └─md127        9:127  0 222.4G  0 raid1
    ├─vg0-root 253:0    0 206.4G  0 lvm   /
    └─vg0-swap 253:1    0    16G  0 lvm   [SWAP]
sdc              8:32   0   2.7T  0 disk
├─sdc1           8:33   0     2M  0 part
├─sdc2           8:34   0     1G  0 part
│ └─md126        9:126  0  1023M  0 raid1 /boot
└─sdc3           8:35   0   2.7T  0 part
  └─md127        9:127  0 222.4G  0 raid1
    ├─vg0-root 253:0    0 206.4G  0 lvm   /
    └─vg0-swap 253:1    0    16G  0 lvm   [SWAP]
sdd              8:48   0   2.7T  0 disk
4. Removing partitions from the second disk in the arrays
Mark the partitions of the second disk that are used in each array as faulty.
mdadm /dev/md126 --fail /dev/sdb1

mdadm /dev/md127 --fail /dev/sdb2
Remove the partitions of the block device /dev/sda from the arrays.
mdadm /dev/md126 --remove /dev/sdb1

mdadm /dev/md127 --remove /dev/sdb2
5. Copying the GPT partition table and synchronizing the array
To copy the GPT partition table, we will use the utility sgdisk, which is included in the package for working with disk partitions and GPT tables — gdisk.
Installation gdisk for CentOS:
yum install -y gdisk Installation gdisk for Debian/Ubuntu:
apt install -y gdiskWARNING: For GPT the first disk indicated is the disk to copying the layout, the second disk indicated is the disk from which they copy the layout. If you mix up the disks, the originally correct layout will be overwritten and destroyed.
Copying the GPT partition table.
sgdisk -R /dev/sdd /dev/sdc Disk layout after transferring the table to the disk /dev/sdd.
[root@localhost ~]# lsblk
NAME           MAJ:MIN RM   SIZE RO TYPE  MOUNTPOINT
sda              8:0    0 223.6G  0 disk
├─sda1           8:1    0     1G  0 part
└─sda2           8:2    0 222.5G  0 part
sdb              8:16   0 223.6G  0 disk
├─sdb1           8:17   0     1G  0 part
└─sdb2           8:18   0 222.5G  0 part
sdc              8:32   0   2.7T  0 disk
├─sdc1           8:33   0     2M  0 part
├─sdc2           8:34   0     1G  0 part
│ └─md126        9:126  0  1023M  0 raid1 /boot
└─sdc3           8:35   0   2.7T  0 part
  └─md127        9:127  0 222.4G  0 raid1
    ├─vg0-root 253:0    0 206.4G  0 lvm   /
    └─vg0-swap 253:1    0    16G  0 lvm   [SWAP]
sdd              8:48   0   2.7T  0 disk
├─sdd1           8:49   0     2M  0 part
├─sdd2           8:50   0     1G  0 part
└─sdd3           8:51   0   2.7T  0 part
Next, we add each of the partitions involved in the software RAID arrays.
mdadm /dev/md126 --add /dev/sdd2

mdadm /dev/md127 --add /dev/sdd3
Waiting for the array synchronization.
[root@localhost ~]# cat /proc/mdstat
Personalities: [raid1]
md126: active raid1 sdd2[3] sdc2[2]
      1047552 blocks super 1.2 [2/2] [UU]
      bitmap: 1/1 pages [4KB], 65536KB chunk

md127: active raid1 sdd3[3] sdc3[2]
      233206784 blocks super 1.2 [2/1] [U_]
      [>....................] recovery =  0.0% (148224/233206784) finish=26.2min speed=148224K/sec
      bitmap: 2/2 pages [8KB], 65536KB chunk
unused devices:
After copying the GPT partitioning to the second new disk, the partitioning will look as follows.
[root@localhost ~]# lsblk
NAME           MAJ:MIN RM   SIZE RO TYPE  MOUNTPOINT
sda              8:0    0 223.6G  0 disk
├─sda1           8:1    0     1G  0 part
└─sda2           8:2    0 222.5G  0 part
sdb              8:16   0 223.6G  0 disk
├─sdb1           8:17   0     1G  0 part
└─sdb2           8:18   0 222.5G  0 part
sdc              8:32   0   2.7T  0 disk
├─sdc1           8:33   0     2M  0 part
├─sdc2           8:34   0     1G  0 part
│ └─md126        9:126  0  1023M  0 raid1 /boot
└─sdc3           8:35   0   2.7T  0 part
  └─md127        9:127  0 222.4G  0 raid1
    ├─vg0-root 253:0    0 206.4G  0 lvm   /
    └─vg0-swap 253:1    0    16G  0 lvm   [SWAP]
sdd              8:48   0   2.7T  0 disk
├─sdd1           8:49   0     2M  0 part
├─sdd2           8:50   0     1G  0 part
│ └─md126        9:126  0  1023M  0 raid1 /boot
└─sdd3           8:51   0   2.7T  0 part
  └─md127        9:127  0 222.4G  0 raid1
    ├─vg0-root 253:0    0 206.4G  0 lvm   /
    └─vg0-swap 253:1    0    16G  0 lvm   [SWAP]
Next, we install GRUB on the new disks.
Installation for CentOS:
grub2-install /dev/sdXInstallation for Debian/Ubuntu:
grub-install /dev/sdX where X — disk letter, in our case the disks /dev/sdc and /dev/sdd.
We refresh the array information.
For CentOS:
mdadm --detail --scan --verbose > /etc/mdadm.confFor Debian/Ubuntu:
echo "DEVICE partitions" > /etc/mdadm/mdadm.conf

mdadm --detail --scan --verbose | awk '/ARRAY/ {print}' >> /etc/mdadm/mdadm.conf
We refresh the image initrd:
For CentOS:
dracut -f -v --regenerate-allFor Debian/Ubuntu:
update-initramfs -u -k allWe refresh the GRUB configuration.
For CentOS:
grub2-mkconfig -o /boot/grub2/grub.cfg
For Debian/Ubuntu:
update-grubAfter these actions, the old disks can be removed.
6. Extending the root partition file system (ext4)
Partitioning of disks before expanding the filesystem after transferring the system to 2 x 3TB disks (RAID-1).
[root@localhost ~]# lsblk
NAME           MAJ:MIN RM   SIZE RO TYPE  MOUNTPOINT
sda              8:0    0 223.6G  0 disk
sdb              8:16   0 223.6G  0 disk
sdc              8:32   0   2.7T  0 disk
├─sdc1           8:33   0     2M  0 part
├─sdc2           8:34   0     1G  0 part
│ └─md127        9:127  0  1023M  0 raid1 /boot
└─sdc3           8:35   0   2.7T  0 part
  └─md126        9:126  0 222.4G  0 raid1
    ├─vg0-root 253:0    0 206.4G  0 lvm   /
    └─vg0-swap 253:1    0    16G  0 lvm   [SWAP]
sdd              8:48   0   2.7T  0 disk
├─sdd1           8:49   0     2M  0 part
├─sdd2           8:50   0     1G  0 part
│ └─md127        9:127  0  1023M  0 raid1 /boot
└─sdd3           8:51   0   2.7T  0 part
  └─md126        9:126  0 222.4G  0 raid1
    ├─vg0-root 253:0    0 206.4G  0 lvm   /
    └─vg0-swap 253:1    0    16G  0 lvm   [SWAP]
Now the partitions /dev/sdc3 and /dev/sdd3 occupy 2.7 TB. Since we created a new disk layout with the GPT table, the size of the 3 partitions was set to the maximum possible disk space, so there is no need to expand the partition in this case.
Required:
- Expand the array md126,
- Expand the PV (physical volume),
- Expand the LV (logical volume) vg0-root,
- Expand the file system.
1. Expand the array md126 to the maximum.
mdadm --grow /dev/md126 --size=max
After expanding the array, md126 the occupied space increased to 2.7 TB.
[root@localhost ~]# lsblk
NAME           MAJ:MIN RM   SIZE RO TYPE  MOUNTPOINT
sda              8:0    0 223.6G  0 disk
sdb              8:16   0 223.6G  0 disk
sdc              8:32   0   2.7T  0 disk
├─sdc1           8:33   0     2M  0 part
├─sdc2           8:34   0     1G  0 part
│ └─md127        9:127  0  1023M  0 raid1 /boot
└─sdc3           8:35   0   2.7T  0 part
  └─md126        9:126  0   2.7T  0 raid1
    ├─vg0-root 253:0    0 206.4G  0 lvm   /
    └─vg0-swap 253:1    0    16G  0 lvm   [SWAP]
sdd              8:48   0   2.7T  0 disk
├─sdd1           8:49   0     2M  0 part
├─sdd2           8:50   0     1G  0 part
│ └─md127        9:127  0  1023M  0 raid1 /boot
└─sdd3           8:51   0   2.7T  0 part
  └─md126        9:126  0   2.7T  0 raid1
    ├─vg0-root 253:0    0 206.4G  0 lvm   /
    └─vg0-swap 253:1    0    16G  0 lvm   [SWAP]
We expand physical volume.
Before expanding, check the current value of the occupied space PV /dev/md126.
[root@localhost ~]# pvs
  PV         VG  Fmt  Attr PSize   PFree
  /dev/md126 vg0 lvm2 a--  222.40g    0
Expand the PV with the following command.
pvresize /dev/md126
Check the executed action.
[root@localhost ~]# pvs
  PV         VG  Fmt  Attr PSize  PFree
  /dev/md126 vg0 lvm2 a--  <2.73t 2.51t
We expand logical volume vg0-root.
After expanding the PV, let's check the occupied space of the VG.
[root@localhost ~]# vgs
  VG  #PV #LV #SN Attr   VSize  VFree
  vg0   1   2   0 wz--n- <2.73t 2.51t
Check the occupied LV space.
[root@localhost ~]# lvs
  LV   VG  Attr       LSize    Pool Origin Data%  Meta%  Move Log Cpy%Sync Convert
  root vg0 -wi-ao---- <206.41g
  swap vg0 -wi-ao---- <16.00g
The vg0-root volume occupies 206.41 GB.
Expand the LV to the maximum disk space.
lvextend -l +100%FREE /dev/mapper/vg0-root Check the LV space after expansion.
[root@localhost ~]# lvs
  LV   VG  Attr       LSize   Pool Origin Data%  Meta%  Move Log Cpy%Sync Convert
  root vg0 -wi-ao----   2.71t
  swap vg0 -wi-ao---- <16.00g
Expand the file system (ext4).
Check the current size of the file system.
[root@localhost ~]# df -h
Filesystem           Size Used Avail Use% Mounted on
devtmpfs                16G            0   16G            0% /dev
tmpfs                   16G            0   16G            0% /dev/shm
tmpfs                   16G         9.6M   16G            1% /run
tmpfs                   16G            0   16G            0% /sys/fs/cgroup
/dev/mapper/vg0-root   204G         1.4G  192G            1% /
/dev/md127            1007M         141M  816M           15% /boot
tmpfs                  3.2G            0  3.2G            0% /run/user/0
The /dev/mapper/vg0-root volume occupies 204 GB after expanding the LV.
Expand the file system.
resize2fs /dev/mapper/vg0-root
Checking the size of the file system after its expansion.
[root@localhost ~]# df -h
File system     Size Used  Avail Use% Mounted on
devtmpfs                16G            0   16G            0% /dev
tmpfs                   16G            0   16G            0% /dev/shm
tmpfs                   16G         9.6M   16G            1% /run
tmpfs                   16G            0   16G            0% /sys/fs/cgroup
/dev/mapper/vg0-root   2.7T         1.4G  2.6T            1% /
/dev/md127            1007M         141M  816M           15% /boot
tmpfs                  3.2G            0  3.2G            0% /run/user/0
The size of the file system has been increased to the full volume of the logical unit.
Source: habr.com
