

This article is written with the aim of expanding on the existing , but it specifically discusses the integration with Microsoft Active Directory, as well as enhancing it.
In this article, I will explain how to install and configure:
- Keycloak is an open-source project that provides a single sign-on solution for applications. It works with various protocols, including LDAP and OpenID, which are of interest to us.
- Keycloak gatekeeper is a reverse proxy application that allows you to integrate authorization via Keycloak.
- Gangway is an application that generates a config for kubectl, through which you can authenticate using OpenID and connect to the Kubernetes API.
How permissions work in Kubernetes.
We can manage user/group permissions using RBAC; there are already many articles on this topic, so I won’t go into detail. The issue is that using RBAC to restrict user permissions does not mean Kubernetes knows about users. This means we need a mechanism to deliver users to Kubernetes. To do this, we will add an OpenID provider in Kubernetes that will validate the existence of the user, while Kubernetes will manage the permissions itself.
Preparation
- You will need a Kubernetes cluster or minikube
- Active Directory
- Domains:
keycloak.example.org
kubernetes-dashboard.example.org
gangway.example.org - A certificate for the domains or a self-signed certificate
I will not go into detail on how to create a self-signed certificate; you need to create two certificates: a root certificate (Certificate Authority) and a wildcard client certificate for the domain *.example.org
After you obtain/issue the certificates, you need to add the client certificate to Kubernetes. To do this, we create a secret for it:
kubectl create secret tls tls-keycloak --cert=example.org.crt --key=example.org.pemNext, we will use it for our Ingress controller.
Installing Keycloak
I decided that the easiest method is to use ready-made solutions for this, specifically helm charts.
Install the repository and update it:
helm repo add codecentric https://codecentric.github.io/helm-charts
helm repo update
Create a file keycloak.yml with the following content:
keycloak.yml
keycloak:
  # Admin Name
  username: "test_admin"
  # Admin Password
  password: "admin"
  # These flags are needed to allow uploading scripts to Keycloak directly through the web interface. We will need this to fix a bug mentioned below.
  extraArgs: "-Dkeycloak.profile.feature.script=enabled -Dkeycloak.profile.feature.upload_scripts=enabled"
  # Enabling ingress, specifying the hostname and the certificate that we previously saved in secrets
  ingress:
    enabled: true
    path:
/
    annotations:
      kubernetes.io/ingress.class: nginx
      ingress.kubernetes.io/affinity: cookie
    hosts:
      - keycloak.example.org
    tls:
    - hosts:
        - keycloak.example.org
      secretName: tls-keycloak
  # Keycloak requires a database for its operation, for testing purposes I am deploying Postgresql directly in Kubernetes, it's better not to do this in production!
  persistence:
    deployPostgres: true
    dbVendor: postgres

postgresql:
  postgresUser: keycloak
  postgresPassword: ""
  postgresDatabase: keycloak
  persistence:
    enabled: true
Setting Up Federation
Next, access the web interface
In the left corner, click Add realm
Key
Value
Name
kubernetes
Display Name
Kubernetes
Disable email verification for users:
Client scopes -> Email -> Mappers -> Email verified (Delete)
We configure federation to import users from ActiveDirectory, I will leave screenshots below, I think it will be clearer that way.
User federation -> Add provider… -> ldap
Setting Up Federation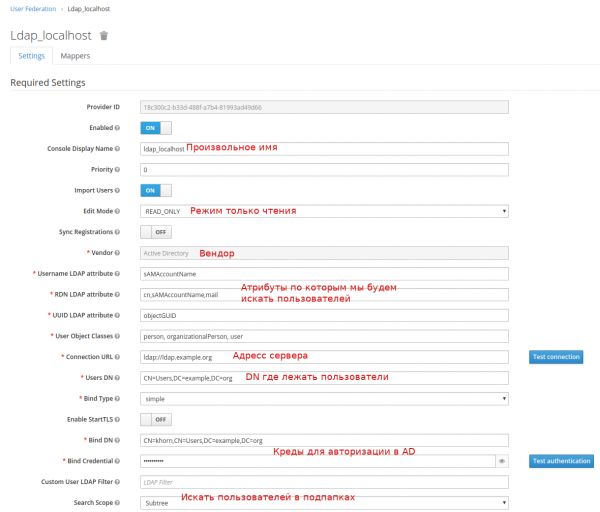
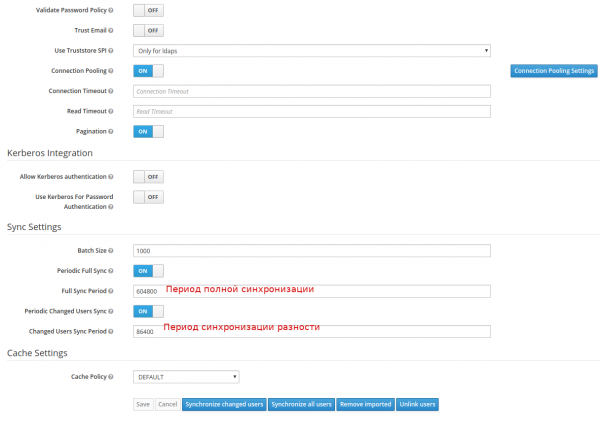
If everything is fine, after clicking the button Synchronize all users you will see a message about the successful import of users.
Next, we need to map our groups
User federation -> ldap_localhost -> Mappers -> Create
Creating a mapper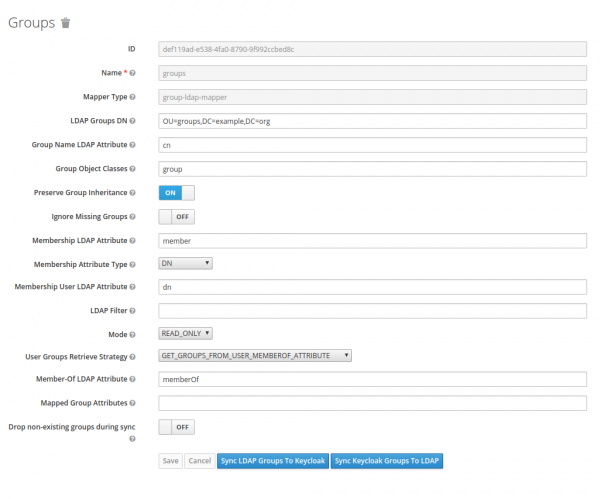
Client Configuration
You need to create a client, in Keycloak terms this is the application that will be authorized by it. I will highlight the important points in the screenshot in red.
Clients -> Create
Client Configuration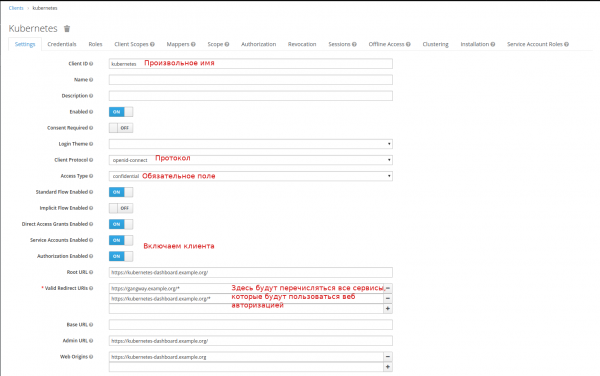
Let's create a scope for groups:
Client Scopes -> Create
Creating a scope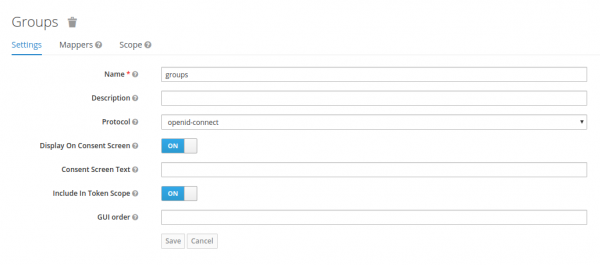
And we'll configure the mapper for them:
Client Scopes -> groups -> Mappers -> Create
Mapper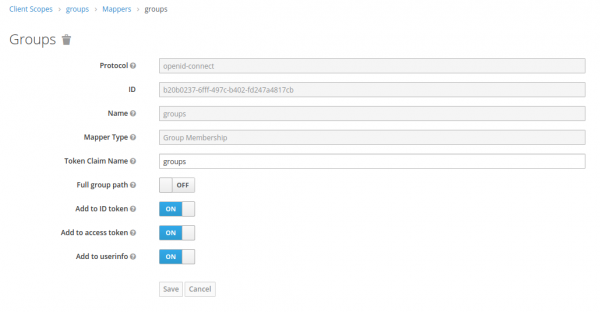
We add the mapping of our groups to Default Client Scopes:
Clients -> kubernetes -> Client Scopes -> Default Client Scopes
Select groups downward API support (simultaneously with this in Available Client Scopes, click Add selected
We obtain the secret (and write it down somewhere) that we will use for authorization in Keycloak:
Clients -> kubernetes -> Credentials -> Secret
The configuration is complete, but I encountered an error when I received a 403 error after a successful authorization. .
Fix:
Client Scopes -> roles -> Mappers -> Create
Mapper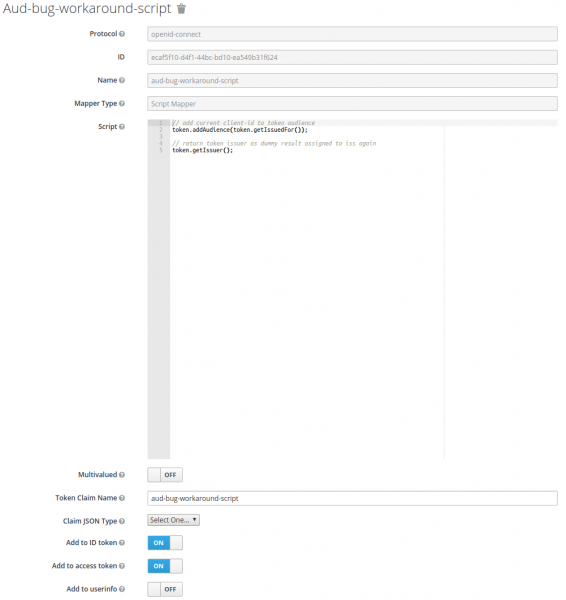
Script code
// add current client-id to token audience
token.addAudience(token.getIssuedFor());

// return token issuer as dummy result assigned to iss again
token.getIssuer();
Kubernetes Configuration
We need to specify where our root certificate from the site is located, and where the OIDC provider is located.
To do this, edit the file /etc/kubernetes/manifests/kube-apiserver.yaml
kube-apiserver.yaml
...
spec:
  containers:
  - command:
    - kube-apiserver
...
    - --oidc-ca-file=/var/lib/minikube/certs/My_Root.crt
    - --oidc-client-id=kubernetes
    - --oidc-groups-claim=groups
    - --oidc-issuer-url=https://keycloak.example.org/auth/realms/kubernetes
    - --oidc-username-claim=email
...
Updating the kubeadm config in the cluster:
kubeadm config
kubectl edit -n kube-system configmaps kubeadm-config
...
data:
  ClusterConfiguration: |
    apiServer:
      extraArgs:
        oidc-ca-file: /var/lib/minikube/certs/My_Root.crt
        oidc-client-id: kubernetes
        oidc-groups-claim: groups
        oidc-issuer-url: https://keycloak.example.org/auth/realms/kubernetes
        oidc-username-claim: email
...
auth-proxy Configuration
To protect your web application, you can use keycloak gatekeeper. Besides authorizing the user before displaying the page, this reverse proxy also transfers information about you in headers to the final application. Thus, if your application supports OpenID, the user will be automatically authorized. Let's consider the example of Kubernetes Dashboard.
Installing Kubernetes Dashboard
helm install stable/kubernetes-dashboard --name dashboard -f values_dashboard.yaml
values_dashboard.yaml
enableInsecureLogin: true
service:
  externalPort: 80
rbac:
  clusterAdminRole: true
  create: true
serviceAccount:
  create: true
  name: 'dashboard-test'
Access Control Configuration:
We will create a ClusterRoleBinding that grants admin rights (standard ClusterRole cluster-admin) to users in the DataOPS group.
kubectl apply -f rbac.yaml
rbac.yaml
apiVersion: rbac.authorization.k8s.io/v1
kind: ClusterRoleBinding
metadata:
  name: dataops_group
roleRef:
  apiGroup: rbac.authorization.k8s.io
  kind: ClusterRole
  name: cluster-admin
subjects:
- apiGroup: rbac.authorization.k8s.io
  kind: Group
  name: DataOPS
Installing keycloak gatekeeper:
helm repo add gabibbo97 https://gabibbo97.github.io/charts/
helm repo update
helm install gabibbo97/keycloak-gatekeeper --version 2.1.0 --name keycloak-gatekeeper -f values_proxy.yaml
values_proxy.yaml
# Включаем ingress
ingress:
  enabled: true
  annotations:
    kubernetes.io/ingress.class: nginx
  path: /
  hosts:
    - kubernetes-dashboard.example.org
  tls:
   - secretName: tls-keycloak
     hosts:
       - kubernetes-dashboard.example.org

# Говорим где мы будем авторизовываться у OIDC провайдера
discoveryURL: "https://keycloak.example.org/auth/realms/kubernetes"
# Имя клиента которого мы создали в Keycloak
ClientID: "kubernetes"
# Secret который я просил записать
ClientSecret: "c6ec03b8-d0b8-4cb6-97a0-03becba1d727"
# Куда перенаправить в случае успешной авторизации. Формат <SCHEMA>://<SERVICE_NAME>.><NAMESAPCE>.<CLUSTER_NAME>
upstreamURL: "http://dashboard-kubernetes-dashboard.default.svc.cluster.local"
# Пропускаем проверку сертификата, если у нас самоподписанный
skipOpenidProviderTlsVerify: true
# Настройка прав доступа, пускаем на все path если мы в группе DataOPS
rules:
  - "uri=/*|groups=DataOPS"
After this, when you try to access , you will be redirected to Keycloak and upon successful authorization, we will access the Dashboard already logged in.
Installing gangway
For convenience, you can add gangway, which will generate a config file for kubectl, allowing us to access Kubernetes as our user.
helm install --name gangway stable/gangway -f values_gangway.yaml
values_gangway.yaml
gangway:
  # Arbitrary cluster name
  clusterName: "my-k8s"
  # Where our OIDC provider is located
  authorizeURL: "https://keycloak.example.org/auth/realms/kubernetes/protocol/openid-connect/auth"
  tokenURL: "https://keycloak.example.org/auth/realms/kubernetes/protocol/openid-connect/token"
  audience: "https://keycloak.example.org/auth/realms/kubernetes/protocol/openid-connect/userinfo"
  # Theoretically, you can add groups that we've mapped here
  scopes: ["openid", "profile", "email", "offline_access"]
  redirectURL: "https://gangway.example.org/callback"
  # Client name
  clientID: "kubernetes"
  # Secret
  clientSecret: "c6ec03b8-d0b8-4cb6-97a0-03becba1d727"
  # If the default value is left, it will use the username from the claim <b>First name</b> <b>Second name</b>, and for "sub" it will use his login
  usernameClaim: "sub"
  # Domain name or IP address of the API server
  apiServerURL: "https://192.168.99.111:8443"

# Enabling Ingress
  ingress:
  enabled: true
  annotations:
    kubernetes.io/ingress.class: nginx
    nginx.ingress.kubernetes.io/proxy-buffer-size: "64k"
  path: /
  hosts:
  - gangway.example.org
  tls:
  - secretName: tls-keycloak
    hosts:
      - gangway.example.org

# If using a self-signed certificate, its (public root certificate) should be specified.
trustedCACert: |-
 -----BEGIN CERTIFICATE-----
 MIIDVzCCAj+gAwIBAgIBATANBgkqhkiG9w0BAQsFADA1MQswCQYDVQQGEwJVUzEQMA4GA1UEChMHRGF0YU9QUzEUMBIGA1UEAxMLbXkgcm9vdCBrZXkwHhcNMjAwMjE0MDkxODAwWhcNMzAwMjE0MDkxODAwWjA1MQswCQYDVQQGEwJVUzEQMA4GA1UEChMHRGF0YU9QUzEUMBIGA1UEAxMLbXkgcm9vdCBrZXkwggEiMA0GCSqGSIb3DQEBAQUAA4IBDwAwggEKAoIBAQDyP749PqqIRwNSqaK6qr0Zsi03G4PTCUlgaYTPZuMrwUVPK8xX2dWWs9MPRMOdXpgr8aSTZnVfmelIlVz4D7o2vK5rfmAe9GPcK0WbwKwXyhFU0flS9sU/g46ogHFrk03SZxQAeJhMLfEmAJm8LF5HghtGDs3t4uwGsB95o+lqPLiBvxRB8ZS3jSpYpvPgXAuZWKdZUQ3UUZf0X3hGLp7uIcIwJ7i4MduOGaQEO4cePeEJy9aDAO6qV78YmHbyh9kaW+1DL/Sgq8NmTgHGV6UOnAPKHTnMKXl6KkyUz8uLBGIdVhPxrlzG1EzXresJbJenSZ+FZqm3oLqZbw54Yp5hAgMBAAGjcjBwMA8GA1UdEwEB/wQFMAMBAf8wHQYDVR0OBBYEFHISTOU/6BQqqnOZj+1xJfxpjiG0MAsGA1UdDwQEAwIBBjARBglghkgBhvhCAQEEBAMCAAcwHgYJYIZIAYb4QgENBBEWD3hjYSBjZXJ0aWZpY2F0ZTANBgkqhkiG9w0BAQsFAAOCAQEAj7HC8ObibwOLT4ZYmISJZwub9lcE0AZ5cWkPW39j/syhdbbqjK/6jy2D3WUEbR+s1Vson5Ov7JhN5In2yfZ/ByDvBnoj7CP8Q/ZMjTJgwN7j0rgmEb3CTZvnDPAz8Ijw3FP0cjxfoZ1Z0V2F44Ry7gtLJWr06+MztXVyto3aIz1/XbMQnXYlzc3c3B5yUQIy44Ce5aLRVsAjmXNqVRmDJ2QPNLicvrhnUJsO0zFWI+zZ2hc4Ge1RotCrjfOc9hQY63jZJ17myCZ6QCD7yzMzAob4vrgmkD4q7tpGrhPY/gDcE+lUNhC7DO3l0oPy2wsnT2TEn87eyWmDiTFG9zWDew==
 -----END CERTIFICATE-----
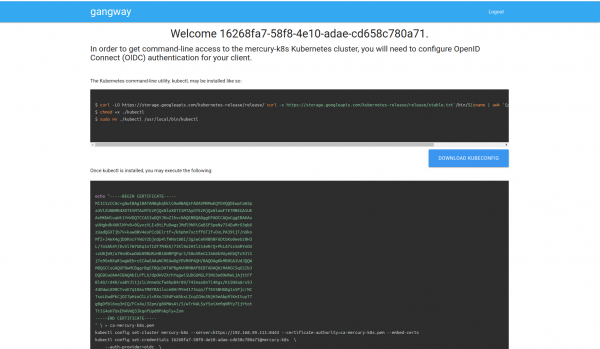
It looks something like this. It allows you to either download the config file directly or create it using a set of commands:
Source: habr.com
