

In this article I described a method to turn the 'Raspberry' into a wireless access point using the CentOS operating system. By assembling my home router according to this blueprint, I satisfied my creative ego and gained peace of mind about this critical element of my cozy infrastructure. However, the feeling of incompleteness and my inner perfectionism wouldn't let me rest: 'an imperfect result has no right to exist.' The thought that 'perfection can and must be achieved' never left my mind for a moment.
And one day, on one of the themed forums, I stumbled upon a discussion about the architecture of existing operating systems for the 'Raspberry' (aarch64 vs armhfp): what 64-bit OS could theoretically fit and run on Raspberry version 3++?
My favorite CentOS for ARM architecture from 'Userland' was in no hurry to transition to the latest kernel version and become 64-bit. And the EPEL repository, plugged in God knows from where without a digital signature, was a nightmare in my restless sleep...
As an advocate for RPM-based distributions, I was surprised to discover that one OS for the 'Raspberry' had been completely forgotten in the discussions Alpine! Despite the fact that its release

In this article, I will explain how to install Fedora (aarch64) to Raspberry Pi 3 Model B+ downward API support (simultaneously with this in in an extremely minimal configuration. I will briefly discuss the features of setting up a Wi-Fi access point identified during the experimental operation of my previous configuration on .
0. What you will need
Everything that was listed in the previous article:
- Raspberry Pi 3 Model B+;
- microSD >= 4GB (later you can 'transfer' the system to a 2GB drive);
- A Linux workstation with a microSD card reader;
- Wired network connectivity between the 'Raspberry' and the Linux workstation (in this case, no additional monitor and keyboard will be needed for setup), internet access on both devices;
- Advanced Linux skills (know how and don't be afraid of: , and ).
Similar to an iterative -build of a custom Linux, a distribution image of Fedora will be used, after which a minimal system will be created based on it (without 'compiling from source').
1. Installation of the original distribution
The coordinates of the raw system image on the network:
After writing it to the microSD and before starting to use it, you need to:
- Expand the 'root' file system (3rd partition, ext4)
parted /dev/mmcblk0 resizepart 3 100% e2fsck -f /dev/mmcblk0p3; resize2fs /dev/mmcblk0p3; e2fsck -f /dev/mmcblk0p3 for i in 1 2 3; do mkdir -p /mnt/$i; mount /dev/mmcblk0p$i /mnt/$i; done - Disable SELinux
echo 'SELINUX=disabled' > /mnt/3/etc/selinux/config - Remove the Initial Setup Wizard:
find /mnt/3/etc/systemd/ -iname initial-setup.service -delete - Allow SSH access:
mkdir -p /mnt/3/root/.ssh
cp -fv ~/ .ssh/id_rsa.pub /mnt/3/root/.ssh/authorized_keys
sed -i 's/#PermitRootLogin.* /PermitRootLogin yes/g' /mnt/3/etc/ssh/sshd_config
Now you can boot the 'Raspberry Pi' from microSD and connect to it over the network.
Cold boot takes about one and a half minutes. System parameters after booting:
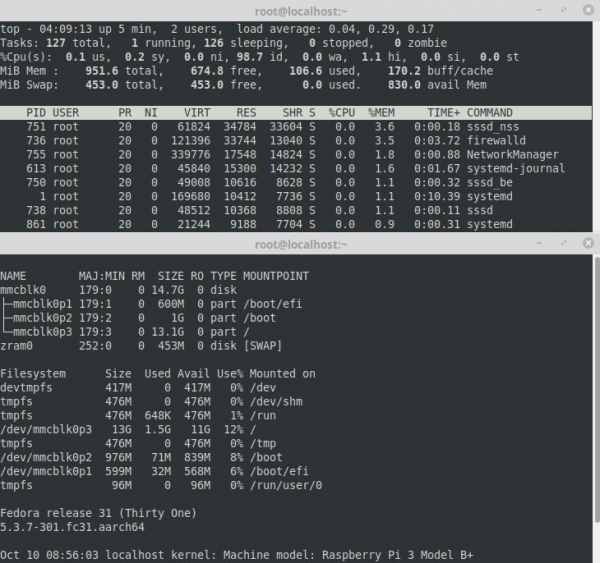
rpm -qa | wc -l
444
2. Building a minimal system
Unfortunately, the 'minimal distribution' from the developers turns out to be far from the most modest in resource consumption. The system image can be made even smaller.
To do this, you need to run a script on the 'Raspberry Pi':
#!/bin/bash

. /etc/os-release
P=$(mktemp --directory $(pwd)/$ID-$VERSION_ID.XXX)

dnf --installroot=$P --releasever=$VERSION_ID --setopt=install_weak_deps=false
--assumeyes install
    bcm283x-firmware
    dnf
    grub2-efi-aa64
    kernel
    openssh-server
    shim-aa64

for f in /boot/efi/EFI/fedora/grub.cfg
         /boot/efi/EFI/fedora/grubenv
         /boot/efi/rpi3-u-boot.bin
         /etc/default/grub
         /etc/fstab
do
  cp -fv $f $P$f
done

rm  -fv $P/dev/*
rm -rfv $P/var/cache/dnf

echo "--------------------------------------------------------------------------------"
du -hs $P
After the script execution, a subdirectory ($P) will be created in the current directory, containing the root of the new minimal edition of the OS. You can turn off the 'Raspberry Pi' and return the microSD to the Linux workstation.
3. Installation of the minimal system
The installation consists of copying the files of the minimal OS image (obtained in the previous step) to the specially prepared microSD in the corresponding directories.
A 2GB card with two partitions is sufficient:
- /boot/efi — EFI+FAT32, bootable, 100MB;
- / (root) — EXT4, all remaining space.
After preparing the microSD and copying the files to it, you need to:
- repair the OS boot;
- enable network;
- configure SSH access.
Repairing the boot consists of replacing the UUIDs of the partitions in the files:
microSD:/boot/efi/EFI/fedora/grub.cfg
microSD:/boot/efi/EFI/fedora/grubenv
and the parameter saved_entry= in the last file
In the file:
microSD:/etc/fstab
you can find the old values, and the current (actual) ones can be seen from the output of the command:
blkid | grep mmcblk | sort
After replacement, you should also correct the content of fstab on the microSD so that the mount points match the new UUIDs of the partitions.
Network operability at the first boot of the 'Raspberry Pi' can be achieved with a small 'hack' — create a link (schematically):
ln -s /usr/lib/systemd/system/systemd-networkd.service
microSD:/etc/systemd/system/multi-user.target.wants
and the file:
mkdir -p microSD:/etc/systemd/network
cat > microSD:/etc/systemd/network/dhcp.network << EOF
[Match]
Name=*
[Network]
DHCP=ipv4
EOF
After a successful boot — tidy up the startup :
systemctl disable systemd-networkd
systemctl enable systemd-networkd
Superuser access via ssh is configured similarly to item 1.
Once everything is done carefully and correctly, you can move the microSD into the 'Raspberry' and start using the 64-bit OS in ultra-minimal mode.
4. Ready system
The image of the ready system created according to the instructions above can be downloaded via the link:
This will be an archive containing two files: the installation script and a TGZ with the OS files. The archive needs to be unpacked on a Linux workstation, insert the microSD (a 2GB card is sufficient), and run the script with the parameter — the device name:
./install /dev/mmcblk0
Be careful!
Without any warnings, the device will be formatted and the operating system will be installed on it.
After the script has successfully run, you can move the card back to the 'Raspberry' and use it: obtain an IP via dhcp, password — '1'.
The system is cleared of any IDs and keys, which makes each new installation unique.
I will repeat once again, the system is — minimal! So don't be afraid: DNF is available, for it to work properly you will have to 'figure out' the correct .
A cold start of the 'Raspberry' takes about 40 seconds. System specifications after boot:
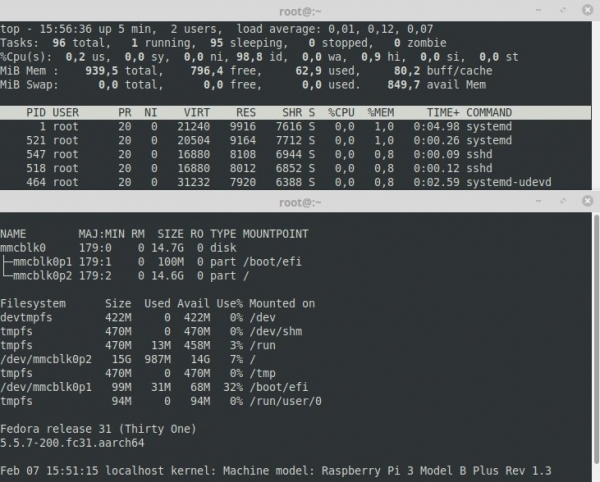
rpm -qa | wc -l
191
5. Wi-Fi
Let me elaborate on the features of implementing a Wi-Fi access point. For specifics, you can refer to my previous .
EPEL is no longer needed — all packages are contained in the official repositories.
Perhaps it would be wise to abandon , as in Fedora, unlike CentOS, — a fairly recent systemd-networkd is available, which has proper built-in DHCP/DNS servers. But the fact that in RHEL8 the developers , doesn't instill confidence in the bright future of the project (scoundrels). In short, I haven't tried it.
Moreover, the current drivers for the built-in Wi-Fi adapter can be downloaded directly from .
This is how the Broadcom firmware files look on my 'Raspberry' (schematically):
ls /usr/lib/firmware/brcm | grep 43455

 [612775] brcmfmac43455-sdio.bin
  [14828] brcmfmac43455-sdio.clm_blob
[symlink] brcmfmac43455-sdio.raspberrypi,3-model-b-plus.txt -> brcmfmac43455-sdio.txt
   [2099] brcmfmac43455-sdio.txt
Without them, it won't support 5GHz/AC.
Regarding the number and names of interfaces. Now I strongly recommend to everyone not to resort to the "services" of software switches without a good reason (), which introduce significant load on the network stack and hinder routing. If multiple wireless adapters are not planned, only physical interfaces should be used. I have two Wi-Fi, so I only combine them into a software bridge (although it can be done without this, by looking at the hostapd configuration differently).
And I love to rename interfaces.
To do this in Fedora, you need to create a symbolic link:
/etc/systemd/network/99-default.link -> /dev/null
and then you can give meaningful names without digging into , but only using systemd-networkd tools.
Here’s how the network adapters are named in my router:
1: lo:  mtu 65536 qdisc noqueue state UNKNOWN group default qlen 1000

2: wan:  mtu 1500 qdisc fq_codel state UP group default qlen 1000

3: lan:  mtu 1500 qdisc noqueue state UP group default qlen 1000

4: int:  mtu 1500 qdisc fq_codel master lan state UP group default qlen 1000

5: ext:  mtu 1500 qdisc mq master lan state UP group default qlen 1000
- int — internal, ext — external (USB) Wi-Fi adapters grouped into a "bridge" lan;
- wan — Ethernet adapter connected to the Internet.
Did you notice? — really cool stuff. Together with the latest Linux kernel, it works wonders in the wireless range: heavy "torrent downloading" won't suddenly degrade the speed for neighbors. Even home IP-TV working "over the air" doesn’t "break up" or "stutter" at all under heavy load!
The service file for the .
daemon has undergone some changes. It now looks like this (using the built-in adapter as an example):
[Unit]
Description=Hostapd IEEE 802.11 AP, IEEE 802.1X/WPA/WPA2/EAP/RADIUS Authenticator
After=network.target
BindsTo=sys-subsystem-net-devices-int.device

[Service]
Type=forking
PIDFile=/run/hostapd-int.pid
#ExecStartPre=/usr/sbin/iw dev int set power_save off
ExecStart=/usr/sbin/hostapd /path/to/hostapd-int.conf -P /run/hostapd-int.pid -B

[Install]
RequiredBy=sys-subsystem-net-devices-int.device
And the "magical" hostapd-int.conf for operation in 5GHz/AC:
ssid=rpi
wpa_passphrase=FedoRullezZ

# 5180 MHz  [36] (20.0 dBm)
# 5200 MHz  [40] (20.0 dBm)
# 5220 MHz  [44] (20.0 dBm)
# 5240 MHz  [48] (20.0 dBm)
# 5745 MHz [149] (20.0 dBm)
# 5765 MHz [153] (20.0 dBm)
# 5785 MHz [157] (20.0 dBm)
# 5805 MHz [161] (20.0 dBm)
# 5825 MHz [165] (20.0 dBm)

channel=36
#channel=149

# channel+6
# http://blog.fraggod.net/2017/04/27/wifi-hostapd-configuration-for-80211ac-networks.html

vht_oper_centr_freq_seg0_idx=42
#vht_oper_centr_freq_seg0_idx=155

country_code=US

interface=int
bridge=lan

driver=nl80211

auth_algs=1
wpa=2
wpa_key_mgmt=WPA-PSK
rsn_pairwise=CCMP

macaddr_acl=0

hw_mode=a
wmm_enabled=1

# N
ieee80211n=1
require_ht=1
ht_capab=[HT40+][SHORT-GI-40][SHORT-GI-20]

# AC
ieee80211ac=1
ieee80211d=0
ieee80211h=0
vht_oper_chwidth=1
require_vht=1
vht_capab=[SHORT-GI-80]
A bit of "Photoshop" done with my "Ericsson A1018s":
(Internet connection — 100 Mbps)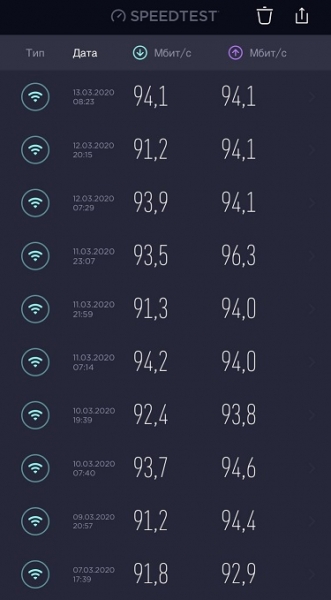
And finally, a brief FAQ.
6. FAQ
6.1 Why create a Wi-Fi router on Raspberry?
One could simply answer that it’s interesting to try and that’s all.
But in reality, I believe the topic is quite serious. In the age of "bloody" Internet, purchasing a router from a store and becoming a hostage of its manufacturer is quite a bleak prospect. Many people already understand the danger of having a CVE or a backdoor embedded in their devices.
Of course, one can migrate to WRT firmware from enthusiasts. There’s probably more trust in them, but if you don’t want to be dependent on them either, then only a self-made product fits the bill. Ideally, it should be a full-fledged computer capable of realizing all sorts of things. In terms of routing, of course.
Therefore, choosing the "Raspberry" is purely an economic move: a real computer that is still inexpensive. Although, it may have its own "dualisms" inside.
6.2 But Raspberry is a "low-end router": slow and with one Ethernet port!
As a home Wi-Fi router, the "Raspberry" suits me more than well. I've already mentioned the speed "in the air" above. And one Ethernet port – well, an analogous product from Apple has approximately the same setup!
But seriously, of course, I would prefer more. And despite the fact that all devices in my household are connected wirelessly, sometimes a wired connection is still required. For such cases, I have a "mobile hub" prepared:
a device like this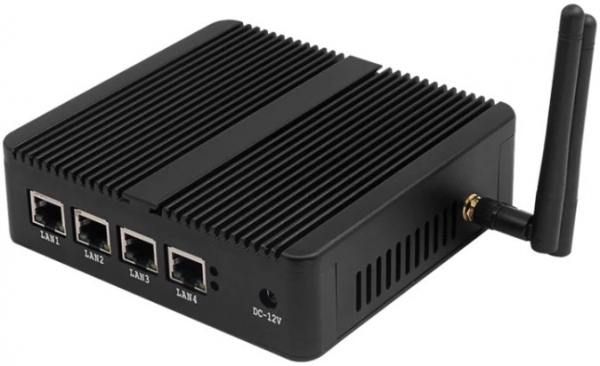
6.3 If this is a router, then nothing has been said about TCP/IP "tuning", which is important!
In addition to configuring the network stack (tcp_fastopen, YeAH, etc.), this article and the previous one do not cover other nuances, particularly the process of preparing microSD for optimal use (although the installer tries to format the memory card in a clever way). The process of improvement is endless; you just have to know when to stop.
6.4 Why Fedora?
Because I like it! Fedora is the 'mainstream' system for geeks, which this article is intended for. At the time of writing, it is perhaps the only OS that is officially supported for Raspberry in a 64-bit version by a substantial team of developers (from whom I'm still waiting for updates). ).
6.5 Does Bluetooth work? What about video/audio/GPIO?
I don't know. The article is about the minimal installation of the system and its subsequent use as a Wi-Fi router.
6.6 Why do all articles about CentOS/Fedora/RedHat start with disabling SELinux?
Because the system is minimal; it doesn't even have a firewall or utilities for configuring it. Those who need it can install everything necessary additionally.
6.7 The system is unusable, can't change the password—there's no passwd. No ping, nothing!
There is . Or this install option isn't for you—use the distribution from the developers instead.
6.8 Where's the SWAP? I can't live without it!
Really? Well, okay:
fallocate -l 1G /swap
chmod -v 0600 /swap
mkswap -f /swap
swapon -v /swap
grep "/swap" /etc/fstab || echo "/swap swap swap defaults 0 0" >> /etc/fstab
6.9 I would like to download a ready-made image with an configured Wi-Fi access point!
Preparing the installer 'for everyone' will require some time and effort. If anyone finds this really interesting and necessary—let me know; we will come up with something.
I will conclude here.
I wish everyone safe surfing and maximum control over their infrastructure!
Source: habr.com
