

There is a lot of reference literature online, but sometimes the simplest advice becomes the most valuable. The team translated , which the article's author compiled after a year of working with Kubernetes. The tips are not sorted by importance, but we believe everyone will find something useful.
The Simplest Command for Working with Kubernetes
To start with, perhaps the simplest and most useful action in working with Kubernetes is the following command that enables command autocompletion kubectl in the bash shell:
echo "source > ~/.bashrc
Autocompletion kubectl will be written to the .bashrc file and will automatically activate every time the shell is started. This speeds up typing long commands and parameters, such as all-namespaces.For more details, refer to the .
Default Memory and CPU Limits in Namespaces
If an application is written incorrectly, for example, it opens a new connection to the database every second but never closes it, a memory leak occurs in the cluster. If no memory limit is set for the application during deployment, this can lead to node failure.
To prevent this, Kubernetes allows you to set default limits for each namespace. They are specified in a yaml file for the specific namespace. Here’s an example of such a file:
apiVersion: v1
kind: LimitRange
metadata:
  name: mem-limit-range
spec:
  limits:
  - default:
      memory: 512Mi
    defaultRequest:
      memory: 256Mi
    type: Container
Create such a yaml file and apply it to any namespace. For example, to the namespace limit-example.Now, for any container deployed in this namespace, a limit of 512Mi will apply unless another individual limit is set for that container.
Garbage Collection in Older Versions of Kubernetes
By default, Kubelet starts garbage collection when /var/lib/docker occupies 90% of available disk space. This is great; however, until Kubernetes version 1.7, there was no default limit on the number of used inode descriptors (inodes), which correspond to the number of files in the filesystem.
Potentially, your container /var/lib/docker may use only 50% of the disk space, but the inodes may run out, causing worker issues.
In older versions of kubelet from 1.4 to 1.6, you will need to add the following flag:
--eviction-hard
=memory.available<100Mi,nodefs.available<10%,nodefs.inodesFree<5%
In version 1.7 and later, this flag is set by default. However, earlier versions do not monitor the inode limit.
Minikube… a small but powerful local Kubernetes
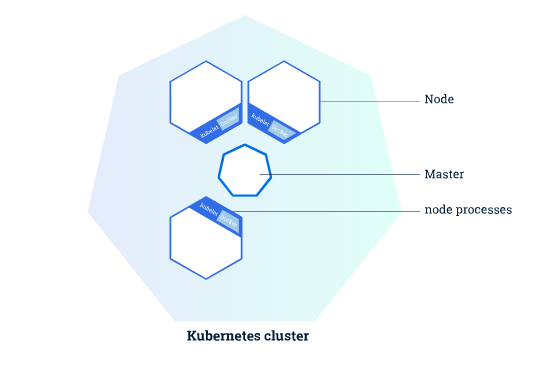
Minikube is the easiest way to run a local Kubernetes cluster. It starts with a simple command:
minikube start
As a result of this command, a real Kubernetes cluster runs on your computer.
The trick is how to build an application and run it locally in this cluster. If no special instructions are given, the Docker image will be built on your computer, not in the cluster.
To make Docker send the image to the local Kubernetes cluster, the following command is given to the docker-machine:
eval $(minikube docker-env)
Now we can build applications on the local Kubernetes cluster.
Don’t give kubectl access to everyone
It seems obvious, but if multiple teams use the same cluster for their applications (which is what Kubernetes was created for), you shouldn't just hand out access to everyone. kubectlIt's better to separate teams by allocating each of them their own namespace and controlling access with RBAC policies.
You can go through the trouble of specifying access rights, read, create, delete, and other operations for each pod. But the main thing is to limit access to secrets, allowing it only to administrators. This way, we delineate who can administer the cluster and who can simply deploy in it.
Manage pod budgets
How to ensure there are no downtimes for applications in the Kubernetes cluster? PodDisruptionBudget and PodDisruptionBudget once again.
Clusters are periodically updated, and nodes are drained. Nothing stands still; that is the reality. Each deployment with more than one instance should definitely include a PDB (PodDisruptionBudget). It is created in a simple yaml file that is applied to the cluster. The scope of a specific PDB is defined by label selectors.
Note: The PDB budget is only considered during a reversible budget violation (). In situations like hardware failures, the PDB will not trigger.
Example of a PDB:
apiVersion: policy/v1beta1
kind: PodDisruptionBudget
metadata:
  name: app-a-pdb
spec:
  minAvailable: 2
  selector:
      matchLabels:
        app: app-a
The two main parameters are matchLabels and minAvailableThe first parameter specifies which applications the budget applies to. For example, if I have deployments with labels app: app-a and app: app-b, then this PDB will only be applied to the first one.
Parameter minAvailable is considered during the drain (cleanup) of the node. For example, in our case, during the drain, all instances are evicted app: app-a, except for two.
This allows you to control how many instances of the application should be running at any given time.
Application health monitoring
Such monitoring can be done in two ways: using Readiness or Liveness probes.
The first probe (readiness) determines the container's readiness to accept traffic.
The second (liveness) indicates whether the container is functioning correctly or needs to be restarted.
The corresponding configurations are simply added to the yaml for deployment. Here you can specify timeouts, delay times, and the number of retries. More details can be found in .
Labels everywhere
Labels are one of the fundamental concepts in Kubernetes. They allow objects to freely associate with one another as well as create queries based on labels. In Kubernetes, you can even go to a client and observe events for specific labels.
You can do almost anything with labels, but a good example would be creating multiple environments to run programs in a single cluster.
Let's say you are using the same cluster for dev and qa. This means that you can have the application app-a, simultaneously running in both environments. qa and devIn this case, we can separately address the instance of the application in a specific environment by specifying the corresponding parameter environment. For example, app: app-a and environment: dev for one environment, and app: app-a and environment: qa for the second.
This allows accessing both instances of the application, for instance, conducting testing simultaneously.
Get organized
Kubernetes is a very powerful system, but any system can eventually get bogged down by a large number of processes. Kubelet runs all the processes and checks you've specified, as well as its own.
Of course, one orphan service won't slow the system down, and Kubernetes is designed for scaling from the start. But when instead of one service a million appear, kubelet starts to choke.
If for any reason you are deleting a deployment (container, image, anything), just make sure to perform a complete cleanup.
Meet Go
We saved the best advice for last. Learn the Go programming language.
Kubernetes is built in Go, all extensions are written in Go, and the client library client-go is officially supported.
It can be used for various interesting things. For example, to extend the Kubernetes system to your liking. This allows you to use your own programs for data collection, application deployment, or simple container cleanup.
Learning the Go programming language and mastering client-go is arguably the most important advice for new Kubernetes users.
What else to read:
- .
- ?
- .
Source: habr.com
