

Introduction
Recently, while working on my thesis, I encountered the need to create an Ubuntu image for a single-board computer that already had ROS installed (Robot Operating System – the operating system for robots). In short, my thesis focuses on managing a group of robots. The robots are equipped with two wheels and three distance sensors. Everything is controlled from ROS, which runs on the ODROID-C2 board.
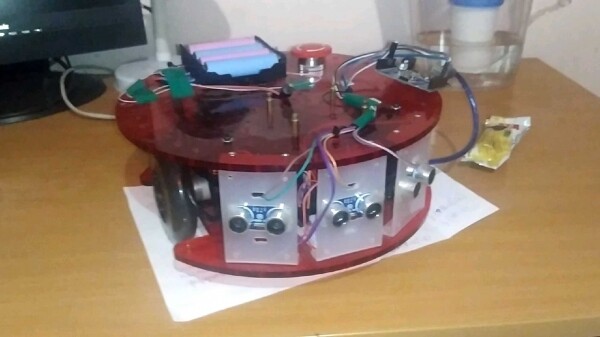
Robot Ladybug. Sorry for the poor quality of the photo
I neither had the time nor the desire to install ROS on each robot separately, which led to the need for a system image with ROS already installed. After browsing the internet, I found several approaches on how this could be done.
In general, all the solutions found can be divided into the following groups.
- Programs that create an image from a ready and configured system (, , , systemback, etc.)
- Projects that allow you to build your own image (, )
- Building an image by hand ( and , plus )
Using solutions from the first group seemed to be the easiest and most attractive option, but I couldn't create a live system image for ODROID. The second group of solutions also didn't suit me due to the relatively high entry threshold. Building by hand according to the available tutorials was also unsuitable, as my image didn't have a compressed file system.
Eventually, after stumbling upon a video about chroot (chroot — change root, link to the video at the end of the post) and its capabilities, I decided to use it. I will further describe my specific case of customizing Ubuntu for robotics developers.
Input data:
- The entire process of modifying the image (except for writing to the SD card using balenaEtcher) was carried out in Ubuntu 18.04.
- The operating system, which I modified the build of – Ubuntu 18.04.3 mate desktop version.
- The machine, on which the compiled system must operate – ODROID-C2.
Image preparation
Download the Ubuntu image for ODROID from
Unpack the archive
unxz –kvCreate a directory where we will mount the image
mkdir mntDetermine the partition where the file system is located
fileLook for a partition with a file system in ext2, ext3, or ext4 format. We need the starting address of the partition (highlighted in red in the screenshot):

Note. The location of the file system can also be viewed using a utility parted.We mount the image
sudo mount -o loop,offset=$((264192*512)) mnt/The required partition starts at block 264192 (your numbers may differ); the size of one block is 512 bytes, multiplying them gives the offset in bytes.
Now we navigate to the directory of the mounted system and chroot into it.
cd mnt/
sudo chroot ~/livecd/mnt/ bin/sh
~/livecd/mnt — the full path to the directory with the mounted system
bin/sh — shell (can also be replaced with bin/bash)
Now we can proceed to install the necessary packages and applications.

Installing ROS
I installed the latest version of ROS (ROS Melodic) following .
Updating the package list
sudo apt-get updateI encountered an error here:
Err:6 http://deb.odroid.in/c2 bionic InRelease
The following signatures were invalid: EXPKEYSIG 5360FB9DAB19BAC9 Mauro Ribeiro (mdrjr)
This is related to the fact that the signature key for the packages has expired. To update the keys, type:
sudo apt-key adv --keyserver keyserver.ubuntu.com --recv-keys AB19BAC9Preparing the system for ROS installation
sudo sh -c 'echo "deb http://packages.ros.org/ros/ubuntu $(lsb_release -sc) main" > /etc/apt/sources.list.d/ros-latest.list'sudo apt-key adv --keyserver 'hkp://keyserver.ubuntu.com:80' --recv-key C1CF6E31E6BADE8868B172B4F42ED6FBAB17C654sudo apt updateInstalling ROS
Unfortunately, I was unable to install the desktop version of ROS, so I installed only the base packages:sudo apt install ros-melodic-ros-base apt search ros-melodicNote 1. During the installation process, I sometimes encountered an error:
dpkg: error: failed to write status database record about 'iputils-ping' to '/var/lib/dpkg/status': No space left on deviceThis was fixed by clearing the apt cache:
sudo apt-get clean; sudo apt-get autocleanNote 2. After installation, source the command:
source /opt/ros/melodic/setup.bashit won’t work since we haven’t launched bash, so it SHOULD NOT be typed in the terminal.
Installing necessary dependencies
sudo apt install python-rosdep python-rosinstall python-rosinstall-generator python-wstool build-essentialsudo apt install python-rosdepsudo rosdep init rosdep updateSetting up permissions
Since we are chrooted and, in fact, performing all actions under the root of the assembled system, ROS will also run only with superuser privileges.
When trying to run roscore without sudo, an error occurs:Traceback (most recent call last): File "/opt/ros/melodic/lib/python2.7/dist-packages/roslaunch/__init__.py", line 230, in main write_pid_file(options.pid_fn, options.core, options.port) File "/opt/ros/melodic/lib/python2.7/dist-packages/roslaunch/__init__.py", line 106, in write_pid_file with open(pid_fn, "w") as f: IOError: [Errno 13] Permission denied: '/home/user/.ros/roscore-11311.pid'To avoid this error, we will recursively change the permissions of the home directory of the ROS user. To do this, type:
sudo rosdep fix-permissionsInstalling the rviz and rqt packages
sudo apt-get install ros-melodic-rqt ros-melodic-rviz
Final Touches
- Exiting chroot:
sigreturn - Unmounting the image
cd .. sudo umount mnt/ - Packaging the system image into an archive
xz –ckv1
All done! Now, using , you can write the system image to the SD card, insert it into the ODROID-C2, and you will have Ubuntu with ROS installed!
Links:
- This video was very helpful in understanding how to chroot into Linux and why it is necessary:
Source: habr.com
