

As we approach the start of the course prepared a translation of interesting material.

AIDE stands for 'Advanced Intrusion Detection Environment' – it is one of the most popular systems for monitoring changes in Linux-based operating systems. AIDE is used to protect against malware, viruses, and to detect unauthorized actions. To verify file integrity and detect intrusions, AIDE creates a database with file information and compares the current state of the system with this database. AIDE helps reduce incident investigation time by focusing on files that have been changed.
AIDE Features:
- Support for various file attributes, including: file type, inode, uid, gid, permissions, number of links, mtime, ctime, and atime.
- Support for Gzip compression, SELinux, XAttrs, Posix ACL, and filesystem attributes.
- Support for various algorithms, including md5, sha1, sha256, sha512, rmd160, crc32, etc.
- Sending notifications via email.
In this article, we will discuss how to install and use AIDE for intrusion detection on CentOS 8.
Prerequisites
- A server running CentOS 8, with at least 2 GB of RAM.
- Root access
Getting Started
First, it is recommended to update the system. To do this, execute the following command.
dnf update -yAfter the update, restart the system for the changes to take effect.
Installing AIDE
AIDE is available in the default CentOS 8 repository. You can easily install it by executing the following command:
dnf install aide -yOnce the installation is complete, you can check the AIDE version using the following command:
aide --versionYou should see the following:
Aide 0.16

Compiled with the following options:

WITH_MMAP
WITH_PCRE
WITH_POSIX_ACL
WITH_SELINUX
WITH_XATTR
WITH_E2FSATTRS
WITH_LSTAT64
WITH_READDIR64
WITH_ZLIB
WITH_CURL
WITH_GCRYPT
WITH_AUDIT
CONFIG_FILE = "/etc/aide.conf"
Available Options aide can be viewed as follows:
aide --help 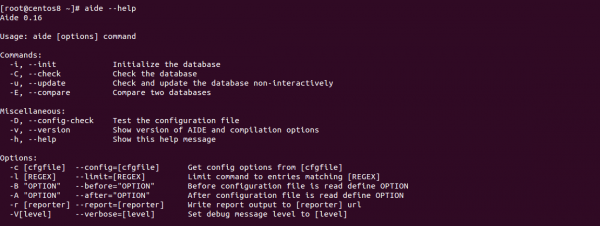
Creating and Initializing the Database
The first thing you need to do after installing AIDE is to initialize it. Initialization involves creating a database (snapshot) of all files and directories on the server.
To initialize the database, execute the following command:
aide --initYou should see the following:
Start timestamp: 2020-01-16 03:03:19 -0500 (AIDE 0.16)
AIDE initialized database at /var/lib/aide/aide.db.new.gz

Number of entries:	49472

---------------------------------------------------
The attributes of the (uncompressed) database(s):
---------------------------------------------------

/var/lib/aide/aide.db.new.gz
  MD5      : 4N79P7hPE2uxJJ1o7na9sA==
  SHA1     : Ic2XBj50MKiPd1UGrtcUk4LGs0M=
  RMD160   : rHMMy5WwHVb9TGUc+TBHFHsPCrk=
  TIGER    : vkb2bvB1r7DbT3n6d1qYVfDzrNCzTkI0
  SHA256   : tW3KmjcDef2gNXYqnOPT1l0gDFd0tBh9
             xWXT2iaEHgQ=
  SHA512   : VPMRQnz72+JRgNQhL16dxQC9c+GiYB8g
             uZp6uZNqTvTdxw+w/IYDSanTtt/fEkiI
             nDw6lgDNI/ls2esijukliQ==


End timestamp: 2020-01-16 03:03:44 -0500 (run time: 0m 25s)
The command above will create a new database. aide.db.new.gz in the directory /var/lib/aide. It can be viewed using the following command:
ls -l /var/lib/aideResult:
total 2800
-rw------- 1 root root 2863809 Jan 16 03:03 aide.db.new.gz
AIDE will not use this new database file until it is renamed to aide.db.gz. This can be done as follows:
mv /var/lib/aide/aide.db.new.gz /var/lib/aide/aide.db.gzIt is recommended to periodically update this database to ensure necessary change monitoring.
You can change the database location by modifying the parameter DBDIR in the file /etc/aide.conf.
Running a check
Now AIDE is ready to use the new database. Run the first AIDE check without making any changes:
aide --checkExecuting this command will take some time depending on the size of your filesystem and the amount of RAM on your server. After the check is complete, you should see the following:
Start timestamp: 2020-01-16 03:05:07 -0500 (AIDE 0.16)
AIDE found NO differences between database and filesystem. Looks okay!!
The output above indicates that all files and directories match the AIDE database.
Testing AIDE
By default, AIDE does not monitor the default root directory of Apache. /var/www/html. Let's configure AIDE to monitor it. To do this, you need to edit the file /etc/aide.conf.
nano /etc/aide.conf Add above the line "/root/CONTENT_EX" the following:
/var/www/html/ CONTENT_EX Next, create a file aide.txt in the directory /var/www/html/, using the following command:
echo "Test AIDE" > /var/www/html/aide.txtNow run the AIDE check and ensure the created file is detected.
aide --checkYou should see the following:
Start timestamp: 2020-01-16 03:09:40 -0500 (AIDE 0.16)
AIDE found differences between database and filesystem!!

Summary:
  Total number of entries:	49475
  Added entries:		1
  Removed entries:		0
  Changed entries:		0

---------------------------------------------------
Added entries:
---------------------------------------------------

f++++++++++++++++: /var/www/html/aide.txt
We can see that the created file was detected. aide.txt.
After analyzing the detected changes, update the AIDE database.
aide --updateAfter the update, you will see the following:
Start timestamp: 2020-01-16 03:10:41 -0500 (AIDE 0.16)
AIDE found differences between database and filesystem!!
New AIDE database written to /var/lib/aide/aide.db.new.gz

Summary:
  Total number of entries:	49475
  Added entries:		1
  Removed entries:		0
  Changed entries:		0

---------------------------------------------------
Added entries:
---------------------------------------------------

f++++++++++++++++: /var/www/html/aide.txt
The command above will create a new database. aide.db.new.gz in the directory
/var/lib/aide/You can view it using the following command:
ls -l /var/lib/aide/Result:
total 5600
-rw------- 1 root root 2864012 Jan 16 03:09 aide.db.gz
-rw------- 1 root root 2864100 Jan 16 03:11 aide.db.new.gz
Now rename the new database again so that AIDE uses the new database for tracking further changes. You can rename it as follows:
mv /var/lib/aide/aide.db.new.gz /var/lib/aide/aide.db.gzRun the check again to ensure that AIDE is using the new database:
aide --checkYou should see the following:
Start timestamp: 2020-01-16 03:12:29 -0500 (AIDE 0.16)
AIDE found NO differences between database and filesystem. Looks okay!!
Automating the check
It's a good idea to run AIDE checks every day and send the report via email. This process can be automated using cron.
nano /etc/crontabTo run AIDE checks every day at 10:15, add the following line to the end of the file:
15 10 * * * root /usr/sbin/aide --checkNow AIDE will notify you by email. You can check your email using the following command:
tail -f /var/mail/rootThe AIDE log can be viewed using the following command:
tail -f /var/log/aide/aide.logConclusion
In this article, you learned how to use AIDE to detect file changes and identify unauthorized access to the server. For additional configuration, you can modify the configuration file /etc/aide.conf. For security purposes, it is recommended to keep the database and configuration file on a read-only medium. Additional information can be found in the documentation. .
Source: habr.com
