

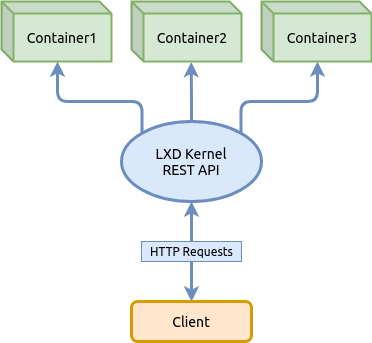
LXD — is a next-generation container management system, as stated by . It provides a user interface similar to virtual machines, but instead uses Linux containers.
The LXD core — is a privileged daemon (a service running with root rights), which offers a REST API through a local Unix socket, as well as over the network if appropriately configured. Clients, such as the command-line tool provided with LXD, send requests via this REST API. This means that regardless of whether you are accessing a local host or a remote one, everything works the same.
In this article, we will not delve into the concepts of LXD or explore all the available features outlined in the documentation, including the recent implementation in the latest versions of LXD for QEMU virtual machine support alongside containers. Instead, we will cover only the basic capabilities of container management — setting up storage pools, networks, launching containers, applying resource limits, and looking at how to use snapshots so you can gain a basic understanding of LXD and utilize containers in Linux.
For complete information, please refer to the official source:
Navigation
Installing LXD
Installing LXD on Ubuntu distributions
In the Ubuntu 19.10 distribution, the package lxd has a translation into :
apt search lxd

lxd/eoan 1:0.7 all
  Transitional package - lxd -> snap (lxd)
This means that two packages will be installed at once, one system package and the other as a snap package. Installing two packages in the system can create a problem where the system package may become orphaned if the snap package is removed by the snap package manager.
To find the package lxd in the snap repository, you can use the following command:
snap find lxd

Name             Version        Summary
lxd              3.21           System container manager and API
lxd-demo-server  0+git.6d54658  Online software demo sessions using LXD
nova             ocata          OpenStack Compute Service (nova)
nova-hypervisor  ocata          OpenStack Compute Service - KVM Hypervisor (nova)
distrobuilder    1.0            Image builder for LXC and LXD
fabrica          0.1            Build snaps by simply pointing a web form to...
satellite        0.1.2          Advanced scalable Open source intelligence platform
By running the command list you can check that the package lxd is not yet installed:
snap list

Name  Version    Rev   Tracking  Publisher   Notes
core  16-2.43.3  8689  stable    canonical✓  core
Despite the fact that LXD is a snap package, it should be installed via the system package lxd, which will create the necessary group and utilities in the system /usr/bin etc.
sudo apt update
sudo apt install lxd
Let's make sure that the package is installed as a snap package:
snap list

Name  Version    Rev    Tracking  Publisher   Notes
core  16-2.43.3  8689   stable    canonical✓  core
lxd   3.21       13474  stable/...  canonical✓  -
Installing LXD on Arch Linux distributions
To install the LXD package in the system, you need to run the following commands; the first one updates the list of packages available in the repository, the second one directly installs the package:
sudo pacman -Syyu && sudo pacman -S lxdAfter installing the package, to manage LXD as a regular user, you need to add them to the system group lxd:
sudo usermod -a -G lxd user1Let's check that the user user1 has been added to the group lxd:
id -Gn user1

user1 adm dialout cdrom floppy sudo audio dip video plugdev netdev lxd
If the group lxd is not visible in the list, you need to re-enable the user's session. To do this, log out and log back in with the same user.
We enable in systemd the loading of the LXD service at system startup:
sudo systemctl enable lxdStarting the service:
sudo systemctl start lxdCheck the status of the service:
sudo systemctl status lxdLXD Storage
Before initializing, we need to understand how the storage in LXD is logically arranged.
Storage (Storage) of one or more Storage Pool which uses one of the supported file systems such as ZFS, BTRFS, LVM, or ordinary directories. Each Storage Pool is divided into volumes (Storage Volume) that contain images, containers, or data for other purposes.
- Images — are specially assembled distributions without a Linux kernel that are available from external sources.
- Containers — are deployed distributions from images, ready for use.
- Snapshots — are snapshots of the state of containers that can be reverted to.

For managing storage in LXD, the command is lxc storage you can get help on which by specifying the key — lxc storage --help
The following command displays a list of all Storage Pool in LXD storage:
lxc storage list

+---------+-------------+--------+--------------------------------+---------+
|  NAME   | DESCRIPTION | DRIVER |             SOURCE             | USED BY |
+---------+-------------+--------+--------------------------------+---------+
| hddpool |             | btrfs  | /dev/loop1                     | 2       |
+---------+-------------+--------+--------------------------------+---------+
| ssdpool |             | btrfs  | /var/lib/lxd/disks/ssdpool.img | 4       |
+---------+-------------+--------+--------------------------------+---------+
To view the list of all Storage Volume in the selected Storage Pool the command is lxc storage volume list:
lxc storage volume list hddpool

+-------+----------------------------------+-------------+---------+
| TYPE  |          NAME                    | DESCRIPTION | USED BY |
+-------+----------------------------------+-------------+---------+
| image | ebd565585223487526ddb3607f515... |             | 1       |
+-------+----------------------------------+-------------+---------+
lxc storage volume list ssdpool
+-----------+----------------------------------+-------------+---------+
| TYPE | NAME | DESCRIPTION | USED BY |
+-----------+----------------------------------+-------------+---------+
| container | alp3 | | 1 |
+-----------+----------------------------------+-------------+---------+
| container | jupyter | | 1 |
+-----------+----------------------------------+-------------+---------+
| image | ebd565585223487526ddb3607f515... | | 1 |
+-----------+----------------------------------+-------------+---------+Also, if the BTRFS file system was selected during creation, you can obtain a list of Storage Pool subvolumes Storage Volume or in BTRFS interpretation using the tools of this file system: sudo btrfs subvolume list -p /var/lib/lxd/storage-pools/hddpoolID 257 gen 818 parent 5 top level 5 path images/ebd565585223487526ddb3607f5156e875c15a89e21b61ef004132196da6a0a3
sudo btrfs subvolume list -p /var/lib/lxd/storage-pools/ssdpool

ID 257 gen 1820 parent 5 top level 5 path images/ebd565585223487526ddb3607f5156e875c15a89e21b61ef004132196da6a0a3
ID 260 gen 1819 parent 5 top level 5 path containers/jupyter
ID 263 gen 1820 parent 5 top level 5 path containers/alp3
Before creating and using containers, a general initialization of LXD must be performed, which sets up and configures the network as well as storage. This can be done manually with the standard client commands available in the list by calling the commandInitializing LXD
lxc --help or using the initialization wizard. or by using the initialization wizard lxd init after answering a few questions.
Choosing a file system for the Storage Pool
During LXD initialization, several questions are asked, including the type of filesystem for the default one. Storage PoolBy default, the BTRFS filesystem is selected for it. It will not be possible to change to another filesystem after creation.To choose a filesystem, a :
Feature
Directory
Btrfs
LVM
ZFS
CEPH
Optimized image storage
no
yes
yes
yes
yes
Optimized instance creation
no
yes
yes
yes
yes
Optimized snapshot creation
no
yes
yes
yes
yes
Optimized image transfer
no
yes
no
yes
yes
Optimized instance transfer
no
yes
no
yes
yes
Copy on write
no
yes
yes
yes
yes
Block based
no
no
yes
no
yes
Instant cloning
no
yes
yes
yes
yes
Storage driver usable inside a container
yes
yes
no
no
no
Restore from older snapshots (not latest)
yes
yes
yes
no
yes
Storage quotas
yes(*)
yes
yes
yes
no
Initializing network and Storage Pool using the wizard
The next command we'll look at allows you to set up the main components of LXD by answering simple questions through the initialization wizard.
Run the command lxc init and enter answers to the questions after the colon as shown in the example below or modify them according to your conditions:
lxd init

Would you like to use LXD clustering? (yes/no) [default=no]:
Do you want to configure a new storage pool? (yes/no) [default=yes]:
Name of the new storage pool [default=default]: ssdpool
Name of the storage backend to use (lvm, btrfs, dir) [default=btrfs]:
Create a new BTRFS pool? (yes/no) [default=yes]:
Would you like to use an existing block device? (yes/no) [default=no]:
Size in GB of the new loop device (1GB minimum) [default=15GB]: 10GB
Would you like to connect to a MAAS server? (yes/no) [default=no]:
Would you like to create a new local network bridge? (yes/no) [default=yes]:
What should the new bridge be called? [default=lxdbr0]:
What IPv4 address should be used? (CIDR subnet notation, “auto” or “none”) [default=auto]: 10.0.5.1/24
Would you like LXD to NAT IPv4 traffic on your bridge? [default=yes]:
What IPv6 address should be used? (CIDR subnet notation, “auto” or “none”) [default=auto]: none
Would you like LXD to be available over the network? (yes/no) [default=no]:
Would you like stale cached images to be updated automatically? (yes/no) [default=yes] no
Would you like a YAML "lxd init" preseed to be printed? (yes/no) [default=no]:
Creating an additional Storage Pool
In the previous step, we created Storage Pool which we named ssdpool and the file is located in my system at the address /var/lib/lxd/disks/ssdpool.img. This filesystem address corresponds to the physical SSD disk in my PC.
In the following steps, to enhance understanding of the role that Storage Pool plays in storage, we will create a second Storage Pool which will physically reside on a different type of disk, on an HDD. The problem is that LXD does not allow creating Storage Pool outside the address, /var/lib/lxd/disks/ and even symbolic links will not work, . We can bypass this restriction when initializing/formatting Storage Pool by specifying the value as a block device instead of a path to a loopback file by indicating this in the key source.
So, before creating Storage Pool You need to define a loopback file or an existing partition in your file system that it will use. To do this, we will create and use a file limited to a size of 10GB:
dd if=/dev/zero of=/mnt/work/lxd/hddpool.img bs=1MB count=10000

10000+0 records in
10000+0 records out
10000000000 bytes (10 GB, 9.3 GiB) copied, 38.4414 s, 260 MB/s
Let's connect the loopback file to a free loop device:
sudo losetup --find --show /mnt/work/lxd/hddpool.img

/dev/loop1
Thanks to the key --show the execution of the command returns the name of the device to which our loopback file is connected. If necessary, we can display a list of all occupied devices of this type to verify our actions:
losetup -l

NAME       SIZELIMIT OFFSET AUTOCLEAR RO BACK-FILE                      DIO LOG-SEC
/dev/loop1         0      0         0  0 /mnt/work/lxd/hddpool.img        0     512
/dev/loop0         0      0         1  0 /var/lib/lxd/disks/ssdpool.img   0     512
From the list, we can see that a loopback file is connected to the device /dev/loop1 , and the device /mnt/work/lxd/hddpool.imgwhich corresponds to the default one. /dev/loop0 , and the device /var/lib/lxd/disks/ssdpool.img The next command creates a new Storage Pool.
in LXD based on the just prepared loopback file. LXD formats the loopback file Storage Pool in the device /mnt/work/lxd/hddpool.img as a BTRFS file system: /dev/loop1 lxc storage create hddpool btrfs size=10GB source=/dev/loop1
Let's output the list of allon the screen: Storage Pool lxc storage list+---------+-------------+--------+--------------------------------+---------+ | NAME | DESCRIPTION | DRIVER | SOURCE | USED BY | +---------+-------------+--------+--------------------------------+---------+ | hddpool | | btrfs | /dev/loop1 | 0 | +---------+-------------+--------+--------------------------------+---------+ | ssdpool | | btrfs | /var/lib/lxd/disks/ssdpool.img | 0 | +---------+-------------+--------+--------------------------------+---------+
After creation, if necessary, it can be expanded. For aIncreasing the size of the Storage Pool
based on the BTRFS file system, execute the following commands: Storage Poolsudo truncate -s +5G /mnt/work/lxd/hddpool.img sudo losetup -c /dev/loop1 sudo btrfs filesystem resize max /var/lib/lxd/storage-pools/hddpool Storage Pool We have one small problem: upon rebooting the host system, the file
"will "drop" from the deviceAuto-mounting a loopback file in the loopback device slot
and the LXD service will fail to start because it won’t see it in this device. To solve this issue, you need to create a system service that will attach that file to the device /mnt/work/lxd/hddpool.img upon the host system's boot. /dev/loop1 unit /dev/loop1 file of type
Let's create service for the SystemD initialization system: cat << EOF | sudo tee -a /etc/systemd/system/lxd-hddpool.service [Unit] Description=Losetup LXD Storage Pool (hddpool) After=local-fs.target[Service] Type=oneshot ExecStart=/sbin/losetup /dev/loop1 /mnt/work/lxd/hddpool.img RemainAfterExit=true[Install] WantedBy=local-fs.target EOF downward API support (simultaneously with this in /etc/systemd/system/ We activate the service:
cat << EOF | sudo tee -a /etc/systemd/system/lxd-hddpool.service
[Unit]
Description=Losetup LXD Storage Pool (hddpool)
After=local-fs.target

[Service]
Type=oneshot
ExecStart=/sbin/losetup /dev/loop1 /mnt/work/lxd/hddpool.img
RemainAfterExit=true

[Install]
WantedBy=local-fs.target
EOF
Activate the service:
sudo systemctl enable lxd-hddpool

Created symlink /etc/systemd/system/local-fs.target.wants/lxd-hddpool.service → /etc/systemd/system/lxd-hddpool.service.
After restarting the host system, we check the service status:
systemctl status lxd-hddpool.service

● lxd-hddpool.service - Losetup LXD Storage Pool (hddpool)
     Loaded: loaded (/etc/systemd/system/lxd-hddpool.service; enabled; vendor preset: disabled)
     Active: active (exited) since Wed 2020-04-08 03:43:53 MSK; 1min 37s ago
    Process: 711 ExecStart=/sbin/losetup /dev/loop1 /mnt/work/lxd/hddpool.img (code=exited, status=0/SUCCESS)
   Main PID: 711 (code=exited, status=0/SUCCESS)

Apr 08 03:43:52 manjaro systemd[1]: Starting Losetup LXD Storage Pool (hddpool)...
Apr 08 03:43:53 manjaro systemd[1]: Finished Losetup LXD Storage Pool (hddpool).
From the output, we can confirm that the service status is active, even though the execution of our single-command script has completed, this option allowed us to do so. RemainAfterExit=true.
Security. Container privileges
Since all container processes actually run in isolation on the host system using its kernel, LXD offers process privileges for additional protection against container processes accessing the host system, where:
Privileged containers — these are containers where processes with UID and GID correspond to the same owner as on the host system. For instance, a process running in a container with UID equal to 0 has the same access rights as a host system process with UID equal to 0. In other words, the root user in a container has all the rights not only in the container but also on the host system if they can escape the isolated namespace of the container.
Unprivileged containers — these are containers in which processes belong to an owner with UID and GID numbers from 0 to 65535, but for the host system, the owner is masked using added SubUID and SubGID bits, respectively. For example, a user with UID=0 in a container will be seen on the host system as
SubUID + UID. This protects the host system, since if any process in the container can escape its isolated namespace, it can only interact with the host system as a process with an unknown, very high UID/GID.
By default, newly created containers have an unprivileged status, so we need to define SubUID and SubGID.
We will create two configuration files in which we will set the mask for SubUID and SubGID respectively:
sudo touch /etc{/subuid,/subgid}
sudo usermod --add-subuids 1000000-1065535 root
sudo usermod --add-subgids 1000000-1065535 root
To apply the changes, the LXD service must be restarted:
sudo systemctl restart lxdCreating a virtual network switch
Since we previously initialized the network using the initialization wizard lxd init and created a network device lxdbr0, in this section we will simply familiarize ourselves with the network in LXD and how to create a virtual switch (network bridge) using the client command.
The following diagram demonstrates how the switch (network bridge) connects the host and containers in the network:
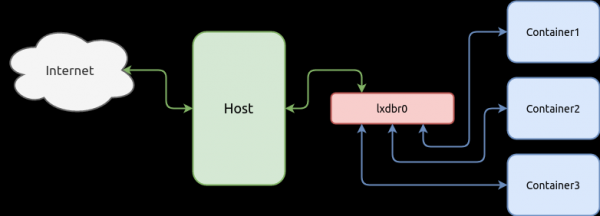
Containers can interact over the network with other containers or the host on which these containers are managed. To enable this, the virtual network interfaces of the containers must be linked to the virtual switch. We will create the switch first, and the network interfaces of the container will be linked in subsequent chapters after the container itself has been created.
The following command creates a switch with a subnet 10.0.5.0/24 and an IPv4 address 10.0.5.1/24, and enables ipv4.nat so that the containers can access the internet through the host using NAT service:
lxc network create lxdbr0 ipv4.address=10.0.5.1/24 ipv4.nat=true ipv6.address=noneCheck the list of network devices available to LXD:
lxc network list

+--------+----------+---------+-------------+---------+
|  NAME  |   TYPE   | MANAGED | DESCRIPTION | USED BY |
+--------+----------+---------+-------------+---------+
| eno1   | physical | NO      |             | 0       |
+--------+----------+---------+-------------+---------+
| lxdbr0 | bridge   | YES     |             | 0       |
+--------+----------+---------+-------------+---------+
Additionally, you can confirm the creation of the network device using the standard tool in the Linux distribution — ip link or ip addr:
ip addr

1: lo:  mtu 65536 qdisc noqueue state UNKNOWN group default qlen 1000
    link/loopback 00:00:00:00:00:00 brd 00:00:00:00:00:00
    inet 127.0.0.1/8 scope host lo
       valid_lft forever preferred_lft forever
    inet6 ::1/128 scope host
       valid_lft forever preferred_lft forever
2: eno1:  mtu 1500 qdisc fq_codel state UP group default qlen 1000
    link/ether bc:ee:7b:5a:6b:44 brd ff:ff:ff:ff:ff:ff
    altname enp0s25
    inet6 fe80::9571:11f3:6e0c:c07b/64 scope link noprefixroute
       valid_lft forever preferred_lft forever
3: lxdbr0:  mtu 1500 qdisc noqueue state UP group default qlen 1000
    link/ether c2:38:90:df:cb:59 brd ff:ff:ff:ff:ff:ff
    inet 10.0.5.1/24 scope global lxdbr0
       valid_lft forever preferred_lft forever
    inet6 fe80::c038:90ff:fedf:cb59/64 scope link
       valid_lft forever preferred_lft forever
5: veth3ddab174@if4:  mtu 1500 qdisc noqueue master lxdbr0 state UP group default qlen 1000
    link/ether ca:c3:5c:1d:22:26 brd ff:ff:ff:ff:ff:ff link-netnsid 0
Configuration profile
Each container in LXD has its own configuration and can extend it with globally declared configurations called configuration profiles. Applying configuration profiles to a container follows a cascading model; the following example demonstrates this:
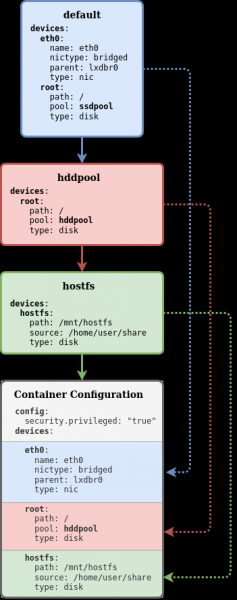
In this example, three profiles have been created in the LXD system: default, hddpool and hostfs. All three profiles are applied to a container that has a local configuration (gray zone). The profile default has a device root which has the parameter pool equal to ssdpool, but due to the cascading model of configuration application, we can apply a profile for the container that hddpool which has the parameter pool overrides this same parameter from the profile default and the container will receive the device configuration root with the parameter pool equal to hddpool, while the profile hostfs simply adds a new device to the container.
To view the list of available configuration profiles, the following command serves:
lxc profile list

+---------+---------+
|  NAME   | USED BY |
+---------+---------+
| default | 1       |
+---------+---------+
| hddroot | 0       |
+---------+---------+
| ssdroot | 1       |
+---------+---------+
The complete list of available commands for working with profiles can be obtained by adding the key --help:
lxc profile --help

Description:
  Manage profiles

Usage:
  lxc profile [command]

Available Commands:
  add         Add profiles to instances
  assign      Assign sets of profiles to instances
  copy        Copy profiles
  create      Create profiles
  delete      Delete profiles
  device      Manage instance devices
  edit        Edit profile configurations as YAML
  get         Get values for profile configuration keys
  list        List profiles
  remove      Remove profiles from instances
  rename      Rename profiles
  set         Set profile configuration keys
  show        Show profile configurations
  unset       Unset profile configuration keys
Editing a profile
The default configuration profile default does not have a network card configuration for the container, and all newly created containers do not have a network; local (dedicated) network devices must be created separately. However, we can create a global network device in the configuration profile that will be shared among all containers using this profile. Thus, immediately after the command to create a new container, they will have a network connection. Moreover, there are no limitations; we can always create a local network device later if necessary.
The following command will add a device to the configuration profile eth0 of type nic attached to the network lxdbr0:
lxc profile device add default eth0 nic network=lxdbr0 name=eth0It is important to note that since we actually added a device to the configuration profile, if we specified a static IP address for the device, all containers that apply this profile would share the same IP address. If there is a need to create a container with a dedicated static IP address, a network device configuration should be created at the container level (local configuration) with the IP address parameter, rather than at the profile level.
Let's check the profile:
lxc profile show default

config: {}
description: Default LXD profile
devices:
  eth0:
    name: eth0
    network: lxdbr0
    type: nic
  root:
    path: /
pool: ssdpool
    type: disk
name: default
used_by: []
In this profile, we can see that two devices will be created for all newly created containers:
eth0— A device of typenicconnected to a switch (network bridge)lxdbr0root— A device of typediskthat uses a storage pool.ssdpool
Creating new profiles
To use with previously created Storage Pool containers, we will create a configuration profile ssdroot in which we will add a device of type disk with a mount point / (root) using the previously created Storage Pool — ssdpool:
lxc profile create ssdroot
lxc profile device add ssdroot root disk path=/ pool=ssdpool
Similarly, we create a device of type disk, but in this case using Storage Pool — hddpool:
lxc profile create hddroot
lxc profile device add hddroot root disk path=/ pool=hddpool
Checking configuration profiles:
lxc profile show ssdroot

config: {}
description: ""
devices:
  root:
    path: /
    pool: ssdpool
    type: disk
name: ssdroot
used_by: []
lxc profile show hddroot
config: {}
description: ""
devices:
root:
path: /
pool: hddpool
type: disk
name: hddroot
used_by: []Image repository
Containers are created from images that are specially built distributions without a Linux kernel. Therefore, before starting the container, it must be instantiated from this image. The source of the images is a local repository into which images are uploaded from external repositories.
Remote image repositories
By default, LXD is set up to fetch images from three remote sources:
- ubuntu: (for stable Ubuntu images)
- ubuntu-daily: (for daily Ubuntu images)
- images: (for a bunch of other distros)
lxc remote list

+-----------------+------------------------------------------+--------+--------+
|      NAME       |                   URL                    | PUBLIC | STATIC |
+-----------------+------------------------------------------+--------+--------+
| images          | https://images.linuxcontainers.org       | YES    | NO     |
+-----------------+------------------------------------------+--------+--------+
| local (default) | unix://                                  | NO     | YES    |
+-----------------+------------------------------------------+--------+--------+
| ubuntu          | https://cloud-images.ubuntu.com/releases | YES    | YES    |
+-----------------+------------------------------------------+--------+--------+
| ubuntu-daily    | https://cloud-images.ubuntu.com/daily    | YES    | YES    |
+-----------------+------------------------------------------+--------+--------+
For example, the repository ubuntu: has the following images:
lxc image -c dasut list ubuntu: | head -n 11

+----------------------------------------------+--------------+----------+------------+
|                   DESCRIPTION                | ARCHITECTURE |   SIZE   |   TYPE     |
+----------------------------------------------+--------------+----------+------------+
| ubuntu 12.04 LTS amd64 (release) (20150728)  | x86_64       | 153.72MB | CONTAINER  |
+----------------------------------------------+--------------+----------+------------+
| ubuntu 12.04 LTS amd64 (release) (20150819)  | x86_64       | 152.91MB | CONTAINER  |
+----------------------------------------------+--------------+----------+------------+
| ubuntu 12.04 LTS amd64 (release) (20150906)  | x86_64       | 154.69MB | CONTAINER  |
+----------------------------------------------+--------------+----------+------------+
| ubuntu 12.04 LTS amd64 (release) (20150930)  | x86_64       | 153.86MB | CONTAINER  |
+----------------------------------------------+--------------+----------+------------+
To output a limited number of columns, we used the option -c with the parameters dasut, and also limited the length of the list with the command head.
Filtering is available for outputting the list of images. The following command will display a list of all available architectures of the distribution :
lxc image -c ldast list images:alpine/3.11

+------------------------------+--------------------------------------+--------------+
|            ALIAS             |             DESCRIPTION              | ARCHITECTURE |
+------------------------------+--------------------------------------+--------------+
| alpine/3.11 (3 more)         | Alpine 3.11 amd64 (20200220_13:00)   | x86_64       |
+------------------------------+--------------------------------------+--------------+
| alpine/3.11/arm64 (1 more)   | Alpine 3.11 arm64 (20200220_13:00)   | aarch64      |
+------------------------------+--------------------------------------+--------------+
| alpine/3.11/armhf (1 more)   | Alpine 3.11 armhf (20200220_13:00)   | armv7l       |
+------------------------------+--------------------------------------+--------------+
| alpine/3.11/i386 (1 more)    | Alpine 3.11 i386 (20200220_13:01)    | i686         |
+------------------------------+--------------------------------------+--------------+
| alpine/3.11/ppc64el (1 more) | Alpine 3.11 ppc64el (20200220_13:00) | ppc64le      |
+------------------------------+--------------------------------------+--------------+
| alpine/3.11/s390x (1 more)   | Alpine 3.11 s390x (20200220_13:00)   | s390x        |
+------------------------------+--------------------------------------+--------------+
Local image repository
To begin using the container, you need to add an image from the global repository to your local one. local:Currently, the local repository is empty, and we can confirm this with the command lxc image list. If the method list does not specify a repository, the default will be the local repository — local:
lxc image list local:

+-------+-------------+--------+-------------+--------------+------+------+
| ALIAS | FINGERPRINT | PUBLIC | DESCRIPTION | ARCHITECTURE | TYPE | SIZE |
+-------+-------------+--------+-------------+--------------+------+------+
Image management in the repository is performed using the following methods:
The command
Description
lxc image alias
Manage image aliases
lxc image copy
Copy images between servers
lxc image delete
Delete images
lxc image edit
Edit image properties
lxc image export
Export and download images
lxc image import
Import images into the image store
lxc image info
Show useful information about images
lxc image list
List images
lxc image refresh
Refresh images
lxc image show
Show image properties
We are copying the image from the global repository to the local one. images::
lxc image copy images:alpine/3.11/amd64 local: --alias=alpine3

Image copied successfully!
Let's display a list of all images currently available in the local repository. local::
lxc image -c lfdatsu list local:

+---------+--------------+------------------------------------+--------------+
|  ALIAS  | FINGERPRINT  |            DESCRIPTION             | ARCHITECTURE |
+---------+--------------+------------------------------------+--------------+
| alpine3 | 73a3093d4a5c | Alpine 3.11 amd64 (20200220_13:00) | x86_64       |
+---------+--------------+------------------------------------+--------------+
LXD Configuration
In addition to the interactive mode, LXD also supports a non-interactive configuration mode, which allows the configuration to be set using a YAML file, a special format that lets you apply the entire configuration at once, bypassing the need for numerous interactive commands discussed earlier in this article, including network configuration, profile creation, etc. We won't cover this area here; you can refer to the .
The next interactive command lxc config that we will discuss allows you to set the configuration. For example, to prevent downloaded images in the local repository from automatically updating from global repositories, we can enable this behavior with the following command:
lxc config set images.auto_update_cached=falseCreating and managing a container
The command used to create a container is lxc init which takes the values repository:image and then the desired identifier for the container. The repository can be specified as local. local: This is also true for any global repository. If a repository is not specified, the local repository is used by default to search for the image. If the image is specified from a global repository, it will first be downloaded into the local repository and then used to create the container.
Let's execute the following command to create our first container:
lxc init alpine3 alp --storage=hddpool --profile=default --profile=hddrootLet's break down the command keys that we are using here:
alpine3— This specifies the alias for the image that was previously downloaded to the local repository. If an alias was not created for this image, it can always be referenced by its Fingerprint which is displayed in the table.alp— This sets the identifier for the container.--storage— This key indicates which Storage Pool storage pool the container will be created in.--profile— These keys cascade the configuration from the previously created profiles onto the container.
We start the container, which begins to run the distribution's init system:
lxc start alpAdditionally, you can use the command lxc launch which allows combining the commands lxc init and lxc start into a single operation.
Check the state of the container:
lxc list -c ns46tb
+------+---------+------------------+------+-----------+--------------+
| NAME |  STATE  |       IPV4       | IPV6 |   TYPE    | STORAGE POOL |
+------+---------+------------------+------+-----------+--------------+
| alp  | RUNNING | 10.0.5.46 (eth0) |      | CONTAINER | hddpool      |
+------+---------+------------------+------+-----------+--------------+
Check the configuration of the container:
lxc config show alp

architecture: x86_64
config:
  image.architecture: amd64
  image.description: Alpine 3.11 amd64 (20200326_13:39)
  image.os: Alpine
  image.release: "3.11"
  image.serial: "20200326_13:39"
  image.type: squashfs
  volatile.base_image: ebd565585223487526ddb3607f5156e875c15a89e21b61ef004132196da6a0a3
  volatile.eth0.host_name: vethb1fe71d8
  volatile.eth0.hwaddr: 00:16:3e:5f:73:3e
  volatile.idmap.base: "0"
  volatile.idmap.current: '[{"Isuid":true,"Isgid":false,"Hostid":1000000,"Nsid":0,"Maprange":65536},{"Isuid":false,"Isgid":true,"Hostid":1000000,"Nsid":0,"Maprange":65536}]'
  volatile.idmap.next: '[{"Isuid":true,"Isgid":false,"Hostid":1000000,"Nsid":0,"Maprange":65536},{"Isuid":false,"Isgid":true,"Hostid":1000000,"Nsid":0,"Maprange":65536}]'
  volatile.last_state.idmap: '[{"Isuid":true,"Isgid":false,"Hostid":1000000,"Nsid":0,"Maprange":65536},{"Isuid":false,"Isgid":true,"Hostid":1000000,"Nsid":0,"Maprange":65536}]'
  volatile.last_state.power: RUNNING
devices:
  root:
    path: \
    pool: hddpool
    type: disk
ephemeral: false
profiles:
- default
- hddroot
stateful: false
description: ""
In the section profiles we can verify that this container uses two configuration profiles — default and hddroot. In the section devices we can find only one device, as the network device was created at the profile level. defaultTo see all devices used by the container, you need to add the key --expanded:
lxc config show alp --expanded

architecture: x86_64
config:
  image.architecture: amd64
  image.description: Alpine 3.11 amd64 (20200326_13:39)
  image.os: Alpine
  image.release: "3.11"
  image.serial: "20200326_13:39"
  image.type: squashfs
  volatile.base_image: ebd565585223487526ddb3607f5156e875c15a89e21b61ef004132196da6a0a3
  volatile.eth0.host_name: vethb1fe71d8
  volatile.eth0.hwaddr: 00:16:3e:5f:73:3e
  volatile.idmap.base: "0"
  volatile.idmap.current: '[{"Isuid":true,"Isgid":false,"Hostid":1000000,"Nsid":0,"Maprange":65536},{"Isuid":false,"Isgid":true,"Hostid":1000000,"Nsid":0,"Maprange":65536}]'
  volatile.idmap.next: '[{"Isuid":true,"Isgid":false,"Hostid":1000000,"Nsid":0,"Maprange":65536},{"Isuid":false,"Isgid":true,"Hostid":1000000,"Nsid":0,"Maprange":65536}]'
  volatile.last_state.idmap: '[{"Isuid":true,"Isgid":false,"Hostid":1000000,"Nsid":0,"Maprange":65536},{"Isuid":false,"Isgid":true,"Hostid":1000000,"Nsid":0,"Maprange":65536}]'
  volatile.last_state.power: RUNNING
devices:
  eth0:
    name: eth0
    network: lxdbr0
    type: nic
  root:
    path: \/
    pool: hddpool
    type: disk
ephemeral: false
profiles:
- default
- hddroot
stateful: false
description: ""
Setting a static IP address
If we attempt to set an IP address for the network device eth0 with the command lxc config device set alp designed for container configuration, we will get an error stating that the device does not exist because the device eth0 used by the container belongs to the profile default:
lxc config device set alp eth0 ipv4.address 10.0.5.5

Error: The device doesn't exist
We can of course set a static IP address for eth0 the device in the profile, but it will be the same for all containers that use this profile. Therefore, let's add a dedicated device for the container:
lxc config device add alp eth0 nic name=eth0 nictype=bridged parent=lxdbr0 ipv4.address=10.0.5.5Then we need to restart the container:
lxc restart alpIf we now look at the container configuration, we don’t need to apply the option --expanded to see the network device eth0, because we created it at the container level and it has cascaded over the same device from the profile default:
lxc config show alp

architecture: x86_64
config:
  image.architecture: amd64
  image.description: Alpine 3.11 amd64 (20200326_13:39)
  image.os: Alpine
  image.release: "3.11"
  image.serial: "20200326_13:39"
  image.type: squashfs
  volatile.base_image: ebd565585223487526ddb3607f5156e875c15a89e21b61ef004132196da6a0a3
  volatile.eth0.host_name: veth2a1dc59d
  volatile.eth0.hwaddr: 00:16:3e:0e:e2:71
  volatile.idmap.base: "0"
  volatile.idmap.current: '[{"Isuid":true,"Isgid":false,"Hostid":1000000,"Nsid":0,"Maprange":65536},{"Isuid":false,"Isgid":true,"Hostid":1000000,"Nsid":0,"Maprange":65536}]'
  volatile.idmap.next: '[{"Isuid":true,"Isgid":false,"Hostid":1000000,"Nsid":0,"Maprange":65536},{"Isuid":false,"Isgid":true,"Hostid":1000000,"Nsid":0,"Maprange":65536}]'
  volatile.last_state.idmap: '[{"Isuid":true,"Isgid":false,"Hostid":1000000,"Nsid":0,"Maprange":65536},{"Isuid":false,"Isgid":true,"Hostid":1000000,"Nsid":0,"Maprange":65536}]'
  volatile.last_state.power: RUNNING
devices:
  eth0:
    ipv4.address: 10.0.5.5
    name: eth0
    nictype: bridged
    parent: lxdbr0
    type: nic
  root:
    path: \/
    pool: hddpool
    type: disk
ephemeral: false
profiles:
- default
- hddroot
stateful: false
description: ""
Removing a container
The command for deleting a container is lxc delete, but before deleting the container, it must be stopped using the command lxc stop:
lxc stop alplxc list
+------+---------+-------------------+------+-----------+-----------+
| NAME | STATE | IPV4 | IPV6 | TYPE | SNAPSHOTS |
+------+---------+-------------------+------+-----------+-----------+
| alp | STOPPED | 10.0.5.10 (eth0) | | CONTAINER | 0 |
+------+---------+-------------------+------+-----------+-----------+Once we have confirmed that the container's state is STOPPED, it can be removed from Storage Pool:
lxc delete alpAccessing a container
To execute commands in the container directly, bypassing network connections, use the command lxc exec which executes commands in the container without launching a system shell. If you need to run a command in the shell, using shell patterns such as variables, file redirection (pipe), etc., you need to explicitly launch the shell and pass the command as an argument, for example:
lxc exec alp -- \/bin\/sh -c "echo $HOME"The command used an escape character for the special character $ so that the variable $HOME is not interpreted on the host machine, but is interpreted only inside the container.
It is also possible to start an interactive shell session and end it using the hotkey CTRL+D:
lxc exec alp -- \/bin\/shManaging container resources
In LXD, you can manage container resources using a special set of configuration. The complete list of container configuration parameters can be found .
Limiting RAM resources
Parameter limits.memory limits the amount of RAM available to the container. The value specified is a number followed by one of the .
Let's set a memory limit of 256 MB for the container:
lxc config set alp limits.memory 256MBThere are also other parameters to limit memory:
limits.memory.enforcelimits.memory.hugepageslimits.memory.swaplimits.memory.swap.priority
The command lxc config show allows you to display the entire container configuration, including the applied resource limits that were set:
lxc config show alp

architecture: x86_64
config:
  image.architecture: amd64
  image.description: Alpine 3.11 amd64 (20200220_13:00)
  image.os: Alpine
  image.release: "3.11"
  image.serial: "20200220_13:00"
  image.type: squashfs
  limits.memory: 256MB
  volatile.base_image: 73a3093d4a5ce0148fd84b95369b3fbecd19a537ddfd2e2d20caa2eef0e8fd60
  volatile.eth0.host_name: veth75b6df07
  volatile.eth0.hwaddr: 00:16:3e:a1:e7:46
  volatile.idmap.base: "0"
  volatile.idmap.current: '[]'
  volatile.idmap.next: '[]'
  volatile.last_state.idmap: '[]'
  volatile.last_state.power: RUNNING
devices: {}
ephemeral: false
profiles:
- default
stateful: false
description: ""
Limiting CPU resources
To limit CPU resources, there are several :
limit.cpu— binds the container to one or more CPU coreslimits.cpu.allowance— manages either the CFS scheduler quotas when the time limit is reached or a universal mechanism for sharing CPU resources when a percentage value is exceededlimits.cpu.priority— scheduler priority when multiple instances sharing a set of processors are assigned the same percentage of CPUs
lxc config set alp limits.cpu.allowance 40%lxc config show alp
architecture: x86_64
config:
image.architecture: amd64
image.description: Alpine 3.11 amd64 (20200220_13:00)
image.os: Alpine
image.release: "3.11"
image.serial: "20200220_13:00"
image.type: squashfs
limits.cpu.allowance: 40%
limits.memory: 256MB
volatile.base_image: 73a3093d4a5ce0148fd84b95369b3fbecd19a537ddfd2e2d20caa2eef0e8fd60
volatile.eth0.host_name: veth75b6df07
volatile.eth0.hwaddr: 00:16:3e:a1:e7:46
volatile.idmap.base: "0"
volatile.idmap.current: '[]'
volatile.idmap.next: '[]'
volatile.last_state.idmap: '[]'
volatile.last_state.power: RUNNING
devices: {}
ephemeral: false
profiles:
- default
stateful: false
description: ""Limiting disk space
In addition to limits such as limits.read, limits.write we can also limit the amount of disk space used by the container (only works with ZFS or BTRFS):
lxc config device set alp root size=2GBAfter setting, in the parameter devices.root.size we can confirm the set limit:
lxc config show alp
...
devices:
  root:
    path: /
    pool: hddpool
    size: 2GB
    type: disk
ephemeral: false
profiles:
- default
- hddroot
stateful: false
description: ""
To view the disk quotas in use, we can obtain from the command lxc info:
lxc info alp
...
Resources:
  Processes: 5
  Disk usage:
    root: 1.05GB
  CPU usage:
    CPU usage (in seconds): 1
  Memory usage:
    Memory (current): 5.46MB
  Network usage:
    eth0:
      Bytes received: 802B
      Bytes sent: 1.59kB
      Packets received: 4
      Packets sent: 14
    lo:
      Bytes received: 0B
      Bytes sent: 0B
      Packets received: 0
      Packets sent: 0
Despite the fact that we set a limit for the root device of the container at 2GB, system utilities such as df will not see this limit. To demonstrate this, we will conduct a small test to see how it works.
Let's create 2 identical containers in the same Storage Pool (hddpool):
lxc init alpine3 alp1 --storage=hddpool --profile=default --profile=hddroot
lxc init alpine3 alp2 --storage=hddpool --profile=default --profile=hddroot
lxc list
+------+---------+------------------+------+-----------+-----------+
| NAME | STATE | IPV4 | IPV6 | TYPE | SNAPSHOTS |
+------+---------+------------------+------+-----------+-----------+
| alp1 | RUNNING | 10.0.5.46 (eth0) | | CONTAINER | 0 |
+------+---------+------------------+------+-----------+-----------+
| alp2 | RUNNING | 10.0.5.30 (eth0) | | CONTAINER | 0 |
+------+---------+------------------+------+-----------+-----------+In one of the containers, we will create a file sized 1GB:
lxc exec alp1 -- dd if=\/dev\/urandom of=file.img bs=1M count=1000Let's verify that the file was created:
lxc exec alp1 -- ls -lh
total 1000M
-rw-r--r--    1 root     root     1000.0M Mar 27 10:16 file.img
If we check the second container for the existence of the file in the same location, it will not be there, which is expected, as each container operates within its own Storage Volume in the same Storage Pool:
lxc exec alp2 -- ls -lh
total 0
But let's compare the values reported df on both containers:
lxc exec alp1 -- df -hT
Filesystem           Type            Size      Used Available Use% Mounted on
\/dev\/loop1           btrfs           9.3G   1016.4M      7.8G  11% \/
...
lxc exec alp2 -- df -hT
Filesystem Type Size Used Available Use% Mounted on
\/dev\/loop1 btrfs 9.3G 1016.4M 7.8G 11% \/
...The device /dev/loop1 mounted as the root filesystem is Storage Pool which these containers use, therefore they share its capacity equally.
Resource usage statistics
To view the resource usage statistics for a container, you can use the following command:
lxc info alp

Name: alp
Location: none
Remote: unix:\/\/
Architecture: x86_64
Created: 2020\/04\/08 18:05 UTC
Status: Running
Type: container
Profiles: default, hddroot
Pid: 19219
Ips:
  eth0: inet    10.0.5.5        veth2a1dc59d
  eth0: inet6   fe80::216:3eff:fe0e:e271        veth2a1dc59d
  lo:   inet    127.0.0.1
  lo:   inet6   ::1
Resources:
  Processes: 5
  Disk usage:
    root: 495.62kB
  CPU usage:
    CPU usage (in seconds): 1
  Memory usage:
    Memory (current): 4.79MB
  Network usage:
    eth0:
      Bytes received: 730B
      Bytes sent: 1.59kB
      Packets received: 3
      Packets sent: 14
    lo:
      Bytes received: 0B
      Bytes sent: 0B
      Packets received: 0
      Packets sent: 0
Working with snapshots
LXD provides the ability to create snapshots and restore the container state from them.
To create a snapshot, execute the following command:
lxc snapshot alp snapshot1The command lxc snapshot does not have a key list, therefore, to view the list of snapshots, you need to use the command that outputs general information about the container:
lxc info alp
...
...
Snapshots:
  snapshot1 (taken at 2020/04/08 18:18 UTC) (stateless)
You can restore the container from a snapshot using the command lxc restore specifying the container for which the restoration will be performed and the snapshot alias:
lxc restore alp snapshot1The following command is used to delete a snapshot. Note that the syntax of the command differs from all the others; here, you need to specify a forward slash after the container name. If you omit the slash, the snapshot deletion command will be interpreted as a container deletion command!
lxc delete alp/snapshot1In the example above, we explored what are known as stateless snapshots. In LXD, there is another type of snapshot — stateful, which saves the current state of all processes in the container. There are several interesting and useful features associated with stateful snapshots.
What else?
- For Python developers, there is a module which provides an API to LXD
UPDATE 10.04.2020 15:00: Added navigation
Source: habr.com
