

Banana Pi 64 is a single-board computer similar to Raspberry Pi, but with several Ethernet ports, allowing it to be turned into a router based on a general-purpose Linux distribution.
Yes, OpenWrt is already available, but it comes with its own quirks, GUI, and CLI; there's Mikrotik too, but it also has its own GUI/CLI, and Wireguard doesn't work out of the box... Overall, I want a router with flexible settings while sticking to standard Linux that I work with every day.
In this article, terms like BPI, R64, and single-board computer will refer to the Banana Pi R64 itself.
Choosing an image. Booting via eMMC
The very first skill to acquire when working with in general and with R64 in particular is to learn how to load an operating system onto it and have the ability to interact with it, since R64 does not have a monitor port (like HDMI, for example). When everything fails — WiFi, Ethernet, Bluetooth, USB stop working, you have UART available, through which you can always check what went wrong and even execute a few commands from the console if necessary.
Algorithm for connecting to R64 via USB-UART:
- head to the electronics store for a USB-UART cable (PL2303, Serial-to-USB)
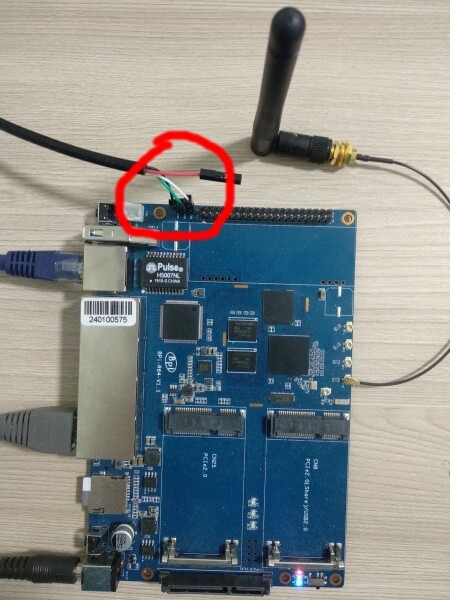
- connect one USB end to the computer and the other, UART, to R64, with three wires out of four as shown in the picture below
- launch in the computer console
sudo minicom
After this, in most cases, the single-board computer console will appear = success.
More details can be found .
Next, it's easiest to boot the operating system from an SD card: download it from the image and upload it:
unzip -p 2019-08-23-ubuntu-16.04-lite-preview-bpi-r64-sd-emmc.img.zip | pv | sudo dd of=/dev/mmcblk0 bs=10M status=noxferinsert the card into the SD slot of R64, turn it on, and watch the boot process first for uboot, then standard Linux boot via the connected console.
An alternative boot option is using the built-in 8GB eMMC flash card in R64. Follow the wiki instructions to rewrite the image onto the device.
/dev/mmcblk0 в BPI, перегружаемся, вытаскиваем SD-карту, включаем BPI снова… и не работает. Как туда-сюда Boot select don’t touch it.
The thing is, at least for BPI, you need to set a special flag to be able to boot from the internal flash memory:
root@bpi-r64:~# ./mmc extcsd read /dev/mmcblk1 | grep 'PARTITION_CONFIG'\nBoot configuration bytes [PARTITION_CONFIG: 0x00]\nroot@bpi-r64:~# ./mmc bootpart enable 1 1 /dev/mmcblk1\nroot@bpi-r64:~# ./mmc extcsd read /dev/mmcblk1 | grep 'PARTITION_CONFIG'\nBoot configuration bytes [PARTITION_CONFIG: 0x48]Next, you need to write the preloader in a special boot section.
root@bpi-r64:~# echo 0 > /sys/block/mmcblk0boot0/force_ro
root@bpi-r64:~# dd if=preloader_evb7622_64_foremmc.bin of=/dev/mmcblk0boot0
The manufacturer R64 (China) has released this binary. . What it does is unknown (there is no source code), but it won't work without it either.
In general, after this, images start loading from eMMC as well. If you want to figure it out and create images from scratch, you'll need to write a few more files (preloader for the SD card, ATF, u-boot) just to get to loading the kernel. This topic is still , but the main thing for us is that it works, and that's that.
Currently, I don’t use eMMC booting, to be honest, an SD card is enough, but I spent quite a bit of time getting it to work, so I’ll include it in the article.
Choosing the operating system. Armbian
The first application task is to launch a VPN, naturally Wireguard. It immediately became clear that it was not compiled from the kernel side, and there are no headers. I rebuilt the kernel and, by habit from x86, compiled the kernel module using DKMS. However, the build speed on arm64 for even small utilities surprisingly disappointed me. Then another kernel module was required, and so on. In general, it turns out that everything related to the kernel is better built on a warm-lamp x86 laptop, then simply copied to R64, rebooted, and tested.
The userspace part is another matter. In my case of choosing Debian, everything for arm64 architecture is already available on packages.debian.org, and nothing needs to be rebuilt.
To avoid creating yet another bicycle, I to BPI R64.
More specifically: the userspace part is Armbian, and the kernel is taken from the repository -'s. The latest image can be downloaded .
All development activity for the software part of R64 is conducted on . Generally speaking, the manufacturer himself is keen to popularize the router under Openwrt, but thanks to the efforts of developer Frank from Germany, all features quickly make their way into the kernel for Debian. It's surprising, but Frank is active in every thread of the forum.
Organizing the workspace: cables
I want to separately discuss how to set up the SBC (not just BPI) during development/testing so that it doesn't require running an Ethernet cable from the internet source across the room/office. The thing is, on one hand, you need to provide the device with internet access, but on the other hand, the device itself can fail, especially the Wifi.
Initially, I decided to buy a cheap USB Wifi "dongle," plug it into the only port on the BPI, and forget about wires. I got an inexpensive TP-LINK TL-WN725N USB 2.0, but it quickly became clear that it wouldn't work: the dongle requires a kernel driver, which of course wasn't available (later I compiled the required RTL8XXXU driver, but it was still impractical). The Ethernet cable cluttered up the room for a while.
In the end, I was able to eliminate the cable using a Tenda MW3 (Wifi mesh system): I simply placed one cube under the table and connected the BPI to the LAN port of the latter with a one-meter Ethernet cable. Success.
Wireguard, RKN, Bird
One of the wishes for which I use Banana PI is to have unrestricted access to websites blocked by RKN, specifically for Telegram and calls in Slack. Articles on this topic have already been suggested on Habr: , , .
I implemented the deployment of such a solution using Ansible: .
It is assumed that the VPS operates under Ubuntu 18.04. I tested its functionality on two hosts in Europe: Amazon and Digital Ocean.
So, we installed the aforementioned Armbian on the R64, which is accessible via ssh under the name hm-bananapi-1 and has internet access. We sequentially deploy Ansible, automation scripts, and launch the installation on the R64:
# зависимости для Debian-based дистрибутивов
$ sudo apt install --no-install-recommends python3-pip python3-setuptools python3-wheel git
$ which pip3
/usr/bin/pip3

# ansible с pybook, скриптование на Python
$ pip3 install https://github.com/muravjov/ansible/archive/ansible-2.10.0.dev0-pybook2019.tar.gz

$ export PATH=~/.local/bin:$PATH
$ which ansible-playbook
/home/sa/.local/bin/ansible-playbook

$ git clone https://github.com/muravjov/ansible-bpi-r64.git
$ cd ansible-bpi-r64

$ git submodule update --init

# убеждаемся в доступности hm-bananapi-1
$ ssh hm-bananapi-1 which python3
/usr/bin/python3

# собственно установка
$ ansible-playbook ./router.py -l hm-bananapi-1
Next, we need to similarly deploy our VPN on the VPS:
ansible-playbook ./router.py -l current-vpnHere, the argument is always current-vpn, while the actual name of the VPS is set in a variable (in this case, it is paris-vpn-aws-t2-micro-1):
$ grep current_vpn group_vars/all
current_vpn: paris-vpn-aws-t2-micro-1
#current_vpn: frankfurt-vpn-d0-starter-1
Ah yes, before all these operations, you need to generate secrets (specifically Wireguard keys) in the folder ./secrets, the directory should look like .
Ansible Automation in Python
You can notice that instead of YAML format, Ansible commands are encoded in Python scripts. For comparison, here's how to start the bird daemon the usual way:
- name: start bird
  systemd:
    name: bird
    state: started
    enabled: yes
and how to do the same through Python:
with mapping:
    append("name", "start bird")
    with mapping("systemd"):
        append("name",  "bird")
        append("state", "started")
        append("enabled", "yes")
Writing Ansible commands in Python code allows for code reuse and opens up all the capabilities of a general-purpose language. For example, installing bird on R64 and VPS:
install_bird("router/bird.conf.j2")
install_bird("vpn/bird.conf.j2")
view the function code .
This feature called pybook within . There is currently no documentation for pybook, I will fix this oversight later.
What does think about this.
Monitoring. Prometheus
In summary: telegram works, linkedin and pornhub do too, overall user experience is fine. But everything can break, and Chinese hardware as well.
Kernel updates can also be interesting: for example, I wanted to update the kernel from 5.4 to 5.6, you know, Wireguard comes out of the box, no need to patch… Said and done: I meticulously ported patches from 5.4 to 5.6, the kernel booted up, the tunnel to VPS pings, but bird can't connect with the error "BGP Error"… "In horror, I rolled back" (c) to 5.4; migrating to 5.6 is postponed to TODO.
Therefore, in addition to installing the router and VPS, I added monitoring (on x86 Ubuntu 18.04), which is installed on a separate host with the following components:
- prometheus, alertmanager, blackbox_exporter — all in docker
- alerts are sent to a telegram channel using the bot metalmatze/alertmanager-bot — also in docker
- tor for the bot, so that the bot can alert situations when the internet is available, but telegram still doesn't work, and the bot itself cannot connect
- application : NodeVPNTroubles (no ping to VPS), BirdVPNTroubles (no Bird session), AntifilterDownloadTroubles (error downloading blocked IPs), SiteTroubles (the troublesome telegram is unavailable)
- system alerts, for example, HostGrowingDiskReadLatency (cheap SD card stops being read)
Example of monitoring installation:
ansible-playbook ./monitoring.py -l monitoring-preprodAuto Discovery for prometheus is set up in the folder /etc/prometheus/auto_http, here is an example of adding a host to monitoring (by default, hosts are not monitored):
bash << 'EOF'
HOSTNAME=hm-bananapi-1
IP_ADDRESS=`ssh -G $HOSTNAME | awk '/^hostname / { print $2 }'`

ssh monitoring-preprod sudo sponge /etc/prometheus/auto_http/$HOSTNAME.json << EOF2
[
  {
    "targets": ["$IP_ADDRESS:9100"],
    "labels": {
      "env": "prod",
      "hostname": "$HOSTNAME"
    }
  }
]
EOF2
EOF
TODO: 2 providers, 2 BPI, anycast failover
In addition to everything, I planned to connect to two providers so that the internet continues to work even if one provider has network issues or forgot to pay for the internet, etc., and other human factors.
The most advanced user experience on the topic of multi-wan is described for the Mwan3 system under Openwrt. This solution has rich functionality, but configuration and operation for multi-wan are quite troublesome. One example: if you access some websites from two IP addresses at once, they may not like it, and they will stop working => "the internet is not working."
Considering this experience, I decided that multihoming is not a priority for now, only failover. However, it seems that in the latest versions of Linux, everything should work with a single command like:
ip route add default
    nexthop via 192.168.1.1 weight 10
    nexthop via 192.168.2.1 weight 5
So, to avoid a single point of failure, we take 2 BPI, connect each to one provider, interconnect them, and we will make the connection dynamic routing through bird/OSPF.
Next, on each, we will announce the same IP address in case the service is available (internet, DNS). That is, we will not manually set the default route, but use bird instead. I saw this solution .
I haven't implemented this functionality yet; the pesky coronavirus has caused delays (not everything arrived from AliExpress; another online store, Layta, promised delivery within a week, but it's been more than a month; the second provider couldn't run the cable before the lockdown, only managed to drill a hole in the wall for the cable).
How to order R64
The board itself is available in the official store .
It's also better to order right away:
- + indicate the standard plug type EU or US
- cooling: radiators/fans; because both the CPU and the switch chip heat up
- a wifi antenna,
There's a catch — the shipping cost has become unreasonably high at the official store for some time. Manager Judy Huang insisted that there is no mistake, and an ePacket can be chosen for $5, but I saw that for Russia, only EMS is available for >$33. Unpleasant, but not critical. Moreover, if you choose any other country for delivery (I went through all continents), shipping will be around $5. Russophobes?.. But then I found that for France, the shipping cost is also around $30, and I calmed down.
Ultimately, Judy suggested placing the order but not paying (hint: put less on the card so the automatic payment doesn't go through); write to her, and she will lower the shipping cost to a reasonable amount. Success.
Issues
Not everything works perfectly yet.
Performance
Ansible commands in Python run slowly, even idle ones, taking 20-30 seconds; significantly longer than on an x86 laptop. Initially, they execute fairly quickly, around 3 seconds, but then slow down dramatically. This might be due to the CPU overheating (throttling). The Go code also runs slowly:
# запрос метрик для прометея из node_exporter на Go
$ time curl -s http://172.30.1.1:9100/metrics > /dev/null

real    0m6,118s
user    0m0,005s
sys     0m0,009s

# однако температура 51 градус, не так и много
sa@bananapir64:~$ cat /sys/devices/virtual/thermal/thermal_zone0/temp
51700
Wifi
Wifi works, but on Armbian it stops working after about a day, displaying:
sa@bananapir64:~$ dmesg | grep -E 'mt7622_wmac.*timeout'
[470303.802539] mt7622_wmac 18000000.wmac: Message 38 (seq 3) timeout
[470314.042508] mt7622_wmac 18000000.wmac: Message 50 (seq 4) timeout
...
Only a restart helps. Need to investigate further. .
Ethernet
Ethernet works, but after about a day, packets (DHCP) from the R64 stop coming.
Restarting the interface helps:
ifdown br0; sleep 30; ifup br0The driver is new, not yet accepted into the kernel, hopefully, the Chinese developer Landen Chao will finish it. .
Source: habr.com
