

Have you ever experimented with code or system utilities in Linux in a way that you don’t have to worry about the base system and won't wipe everything out in case of a code error that should run with root privileges?
What about when you need to test or run an entire cluster of various microservices on a single machine? A hundred or even a thousand?
With virtual machines managed by a hypervisor, such tasks may be solved, but at what cost? For example, a container in LXD based on the Alpine Linux distribution minimally consumes just 7.60MB of RAM, and where the root partition after startup occupies 9.5MB! How do you like that, Elon Musk? I recommend checking out the basic features of LXD — a container system in Linux.
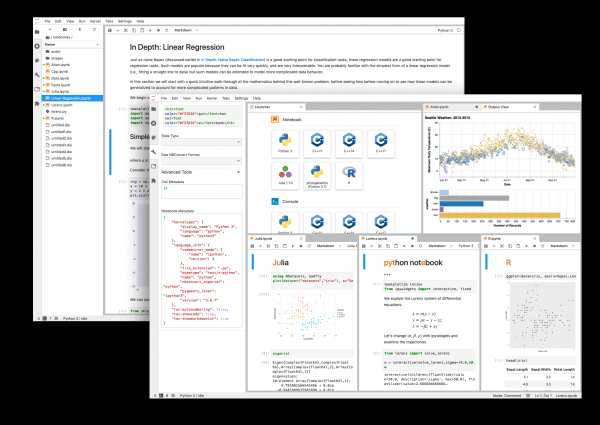
After it became clear what LXD containers are, let's move on and think, what if there was a platform-combine where you could safely run code for the host, generate graphs, dynamically (interactively) link UI widgets with your code, and complement the code with text and blackjack… formatting? Something like an interactive blog? Wow… I want it! I want it! 🙂
Look under the cut where we will launch JupyterLab — the next generation user interface instead of the outdated Jupyter Notebook, and we will also install Python modules such as NumPy, Pandas, Matplotlib, IPyWidgets which will enable everything mentioned above and save it all in a special file — an IPython notebook.
Navigation
- Launch Plan into Orbit
- Installing and configuring the base system
- Installing essential software and configuring the system
- Installing and configuring JupyterLab
- Sharing data with the host
- Hello, World!
- Expanding Python capabilities
- Testing modules in JupyterLab
- What else?
Launch Plan into Orbit ^
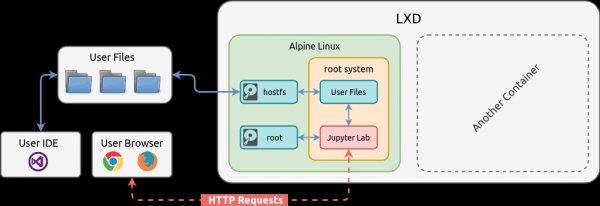
Let's outline a brief action plan to make it easier to implement the scheme above:
- We will install and launch a container based on the distribution Alpine Linux. We will use this distribution because it focuses on minimalism, and we will only install the essential software, nothing extra.
- We will add an additional virtual disk to the container, which we will name —
hostfsand mount it to the root filesystem. This disk will allow the use of files on the host from a specified directory within the container. Thus, the data will be independent of the container. Should the container be deleted, the data will remain on the host. Additionally, this setup is useful for sharing data between multiple containers without using the standard network mechanisms of the container distribution. - We will install Bash, sudo, the necessary libraries, add and configure the system user.
- We will install Python, modules, and compile their binary dependencies.
- We will install and run. JupyterLab, set up the appearance, and install extensions for it.
In this article, we will start with launching the container; we will not cover the installation and configuration of LXD, all of which you can find in another article — Basic capabilities of LXD — container management in Linux.
Installing and configuring the base system ^
We create a container with the command in which we specify the image — alpine3, an identifier for the container — jupyterlab and if necessary, the configuration profiles:
lxc init alpine3 jupyterlab --profile=default --profile=hddrootHere I am using a configuration profile hddroot that specifies to create a container with a root partition in Storage Pool located on a physical HDD disk:
lxc profile show hddroot

config: {}
description: ""
devices:
  root:
    path: /
    pool: hddpool
    type: disk
name: hddroot
used_by: []
lxc storage show hddpool
config:
size: 10GB
source: /dev/loop1
volatile.initial_source: /dev/loop1
description: ""
name: hddpool
driver: btrfs
used_by:
- /1.0/images/ebd565585223487526ddb3607f5156e875c15a89e21b61ef004132196da6a0a3
- /1.0/profiles/hddroot
status: Created
locations:
- noneThis gives me the ability to experiment with containers on the HDD disk while saving resources from the SSD disk that is also present in my system 🙂 for which I have created a separate configuration profile. ssdroot.
After creating the container, it is in a state STOPPED, so we need to start it by launching the init system in it:
lxc start jupyterlabLet's output the list of containers in LXD using the key -c which indicates what ccolumns to display on the screen:
lxc list -c ns4b
+------------+---------+-------------------+--------------+
|    NAME    |  STATE  |       IPV4        | STORAGE POOL |
+------------+---------+-------------------+--------------+
| jupyterlab | RUNNING | 10.0.5.198 (eth0) | hddpool      |
+------------+---------+-------------------+--------------+
When creating the container, the IP address was chosen randomly, as we used a configuration profile default that was previously configured in the article Basic capabilities of LXD — container management in Linux.
We will change this IP address to a more memorable one by creating a network interface at the container level rather than at the configuration profile level, as it currently is in the existing configuration. This is not mandatory; you can skip it.
Creating a network interface eth0 which we link to a switch (network bridge) lxdbr0 in which we enabled NAT previously and the container will now have Internet access, and we assign a static IP address to the interface — 10.0.5.5:
lxc config device add jupyterlab eth0 nic name=eth0 nictype=bridged parent=lxdbr0 ipv4.address=10.0.5.5After adding the device, the container needs to be restarted:
lxc restart jupyterlabChecking the container status:
lxc list -c ns4b
+------------+---------+------------------+--------------+
|    NAME    |  STATE  |       IPV4       | STORAGE POOL |
+------------+---------+------------------+--------------+
| jupyterlab | RUNNING | 10.0.5.5 (eth0)  | hddpool      |
+------------+---------+------------------+--------------+
Installing essential software and configuring the system ^
To administer our container, we need to install the following software:
Package
Description
bash
The GNU Bourne Again shell
bash-completion
Programmable completion for the bash shell
sudo
Give certain users the ability to run some commands as root
shadow
Password and account management tool suite with support for shadow files and PAM
tzdata
Sources for time zone and daylight saving time data
nano
Pico editor clone with enhancements
Additionally, you can install system support for man-pages by installing the following packages — man man-pages mdocml-apropos less
lxc exec jupyterlab -- apk add bash bash-completion sudo shadow tzdata nanoLet's break down the commands and options we used:
lxc— Calls the LXD clientexec— LXD client method that runs a command in the containerjupyterlab— Container identifier--— Special option that indicates to not interpret the remaining options as flags forlxcand pass the entire remaining line as is to the containerapk— Package manager of the Alpine Linux distributionadd— Package manager method that installs the packages specified after the command
Next, let's set the time zone in the system Europe/Moscow:
lxc exec jupyterlab -- cp /usr/share/zoneinfo/Europe/Moscow /etc/localtimeAfter setting the time zone, the package tzdata is no longer needed in the system, it will take up space, so we will remove it:
lxc exec jupyterlab -- apk del tzdataChecking the time zone:
lxc exec jupyterlab -- date

Wed Apr 15 10:49:56 MSK 2020
To avoid spending too much time configuring Bash for new users in the container, the following steps will copy the existing skel files from the host system. This will enhance Bash in the container in interactive mode. My host system is Manjaro Linux and the copied files /etc/skel/.bash_profile, /etc/skel/.bashrc, /etc/skel/.dir_colors are generally compatible with Alpine Linux and do not cause critical issues, but yours may be a different distribution and you need to troubleshoot in case of errors when launching Bash in the container.
Copying skel files to the container. Key --create-dirs will create the necessary directories if they do not exist:
lxc file push /etc/skel/.bash_profile jupyterlab/etc/skel/.bash_profile --create-dirs
lxc file push /etc/skel/.bashrc jupyterlab/etc/skel/.bashrc
lxc file push /etc/skel/.dir_colors jupyterlab/etc/skel/.dir_colors
For an existing root user, we will copy the newly copied skel files into the home directory of the container:
lxc exec jupyterlab -- cp /etc/skel/.bash_profile /root/.bash_profile
lxc exec jupyterlab -- cp /etc/skel/.bashrc /root/.bashrc
lxc exec jupyterlab -- cp /etc/skel/.dir_colors /root/.dir_colors
In Alpine Linux, the system shell is set for users /bin/sh, we will replace it for root the user with Bash:
lxc exec jupyterlab -- usermod --shell=/bin/bash rootTo root if the user was not passwordless, a password needs to be set. The following command will generate and set a new random password that you will see on the console screen after execution:
lxc exec jupyterlab -- /bin/bash -c "PASSWD=$(head /dev/urandom | tr -dc A-Za-z0-9 | head -c 12); echo "root:$PASSWD" | chpasswd && echo "New Password: $PASSWD""

New Password: sFiXEvBswuWA
Also, we will create a new system user — jupyter for which we will later configure JupyterLab:
lxc exec jupyterlab -- useradd --create-home --shell=/bin/bash jupyterWe will generate and set a password for them:
lxc exec jupyterlab -- /bin/bash -c "PASSWD=$(head /dev/urandom | tr -dc A-Za-z0-9 | head -c 12); echo "jupyter:$PASSWD" | chpasswd && echo "New Password: $PASSWD""

New Password: ZIcbzWrF8tki
Next, we will execute two commands, the first will create a system group sudo, and the second will add the user to it jupyter:
lxc exec jupyterlab -- groupadd --system sudo
lxc exec jupyterlab -- groupmems --group sudo --add jupyter
Let's check the groups that the user belongs to jupyter:
lxc exec jupyterlab -- id -Gn jupyter

jupyter sudo
All right — let's move on.
We will allow all users who belong to the group sudo to use the command sudo. To do this, execute the following script, which sed uncomments the line of the parameter in the configuration file /etc/sudoers:
lxc exec jupyterlab -- /bin/bash -c "sed --in-place -e '/^#[ t]*%sudo[ t]*ALL=(ALL)[ t]*ALL$/ s/^[# ]*//' /etc/sudoers"Installing and configuring JupyterLab ^
JupyterLab — this is a Python application, so we need to first install this interpreter. Also, JupyterLab we will be installing using the Python package manager pip, not the system one, because it might be outdated in the system repository, and hence, we need to manually resolve dependencies by installing the following packages — python3 python3-dev gcc libc-dev zeromq-dev:
lxc exec jupyterlab -- apk add python3 python3-dev gcc libc-dev zeromq-devWe will update the Python modules and package manager pip to the latest version:
lxc exec jupyterlab -- python3 -m pip install --upgrade pip setuptools wheelInstalling JupyterLab through the package manager pip:
lxc exec jupyterlab -- python3 -m pip install jupyterlabSince the extensions in JupyterLab are experimental and are not officially provided with the jupyterlab package, so we need to install and configure this manually.
Let's install NodeJS and its package manager — NPM, since JupyterLab it uses them for its extensions:
lxc exec jupyterlab -- apk add nodejs npmTo ensure the extensions for JupyterLab that we will install work, they need to be installed in the user's directory since the application will run as a user jupyter. The problem is that there is no parameter in the startup command to pass a directory; the application only recognizes the environment variable, so we need to define it. For this, we will write the command to export the variable JUPYTERLAB_DIR in the user's environment jupyter, in the file .bashrc, which executes every time the user logs in:
lxc exec jupyterlab -- su -l jupyter -c "echo -e "nexport JUPYTERLAB_DIR=$HOME/.local/share/jupyter/lab" >> .bashrc"With the next command, we will install a special extension — the extension manager in JupyterLab:
lxc exec jupyterlab -- su -l jupyter -c "export JUPYTERLAB_DIR=$HOME/.local/share/jupyter/lab; jupyter labextension install --no-build @jupyter-widgets/jupyterlab-manager"Now everything is ready for the first launch JupyterLab, but we can still install a few useful extensions:
toc— Table of Contents, generates a list of headings in the article/notebookjupyterlab-horizon-theme— UI themejupyterlab_neon_theme— UI themejupyterlab-ubu-theme— Another theme from the author of this article 🙂 But in this case, the installation will be shown from the GitHub repository.
So, execute the following commands sequentially to install these extensions:
lxc exec jupyterlab -- su -l jupyter -c "export JUPYTERLAB_DIR=$HOME/.local/share/jupyter/lab; jupyter labextension install --no-build @jupyterlab/toc @mohirio/jupyterlab-horizon-theme @yeebc/jupyterlab_neon_theme"lxc exec jupyterlab -- su -l jupyter -c "wget -c https://github.com/microcoder/jupyterlab-ubu-theme/archive/master.zip"lxc exec jupyterlab -- su -l jupyter -c "unzip -q master.zip && rm master.zip"lxc exec jupyterlab -- su -l jupyter -c "export JUPYTERLAB_DIR=$HOME/.local/share/jupyter/lab; jupyter labextension install --no-build jupyterlab-ubu-theme-master"lxc exec jupyterlab -- su -l jupyter -c "rm -r jupyterlab-ubu-theme-master"After installing the extensions, we need to compile them since earlier, during installation, we specified the key --no-build to save time. Now we will significantly speed up by compiling them all at once:
lxc exec jupyterlab -- su -l jupyter -c "export JUPYTERLAB_DIR=$HOME/.local/share/jupyter/lab; jupyter lab build"Now execute the following two commands for the first launch. JupyterLabYou could launch it with a single command, but in this case, the launch command will be remembered by bash in the container, not on the host, where there are already enough commands to write to the history 🙂
Log in to the container as a user jupyter:
lxc exec jupyterlab -- su -l jupyterNext, run JupyterLab with the flags and parameters as specified:
[jupyter@jupyterlab ~]$ jupyter lab --ip=0.0.0.0 --no-browserOpen a web browser and go to http://10.0.5.5:8888 and on the opened page enter the access token that you will see in the console. Copy it and paste it on the page, then click . After logging in, go to the extensions menu on the left, as shown in the picture below, where you will be prompted to accept the security risks when activating the extensions manager by installing extensions from third parties for which the team LoginJupyterLab development is not responsible: However, this is precisely why we isolate it completely
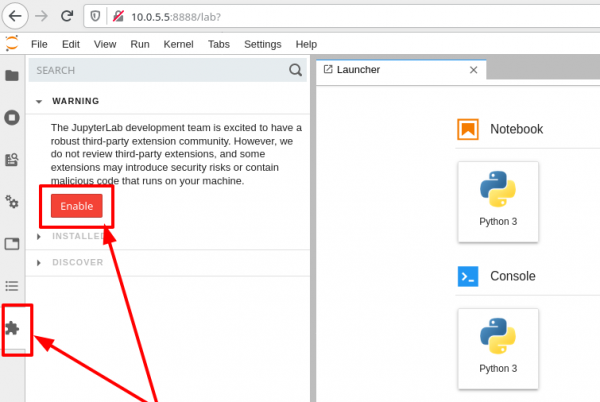
and place it in a container so that third-party extensions requiring and using NodeJS cannot at least steal data from the disk except for the data we open inside the container. Accessing your private documents on the host from JupyterLab processes in the container is unlikely to succeed, and even if it does, you would need file privileges in the host system since we run the container in /home unprivileged mode . Based on this information you can assess the risk of enabling extensions inCreated IPython notebooks (pages in JupyterLab.
) will now be created in the user's home directory — JupyterLab, but we plan to share data between the host and the container, so return to the console and stop /home/jupyterby executing the hotkey — JupyterLab CTRL+C and responding to the prompt. Then disconnect the interactive user session y by executing the hotkey jupyter To share data with the host, you need to create a device in the container that allows it and for this, execute the following command where we specify the following flags: CTRL+D.
Sharing data with the host ^
lxc config device add
— The command adds a device configuration— The identifier of the container to which the configuration is addedjupyter— The identifier of the device. You can specify any name.hostfs— Specifies the type of devicediskpath— Specifies the path in the container to which LXD will mount this device.— Specifies the path in the container where LXD will mount this devicesourceSpecify the source, the path to the directory on the host that you wish to share with the container. Indicate the path according to your preferences.
lxc config device add jupyterlab hostfs disk path=/mnt/hostfs source=/home/dv/projects/ipython-notebooksFor the directory /home/dv/projects/ipython-notebooks the container user with UID equal to must have permissions set as SubUID + UID, see chapter Security. Container Privileges in the article Basic capabilities of LXD — container management in Linux.
Set the permissions on the host, where the container user will be the owner jupyter, and the variable $USER will specify your host user as the group:
sudo chown 1001000:$USER /home/dv/projects/ipython-notebooksHello, World! ^
If you still have an open console session in the container with JupyterLab, restart it with the new flag --notebook-dir setting the value /mnt/hostfs as the path to the root of notebooks in the container for the device we created in the previous step:
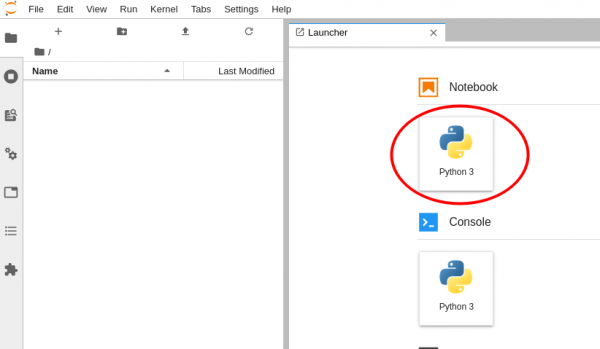
jupyter lab --ip=0.0.0.0 --no-browser --notebook-dir=/mnt/hostfsThen go to the page http://10.0.5.5:8888 and create your first notebook by clicking the button on the page as shown in the picture below:
Then in the field on the page, enter the Python code that will output the classic Hello World!. After entering, press CTRL+ENTER or the 'play' button on the top toolbar for JupyterLab to execute this:
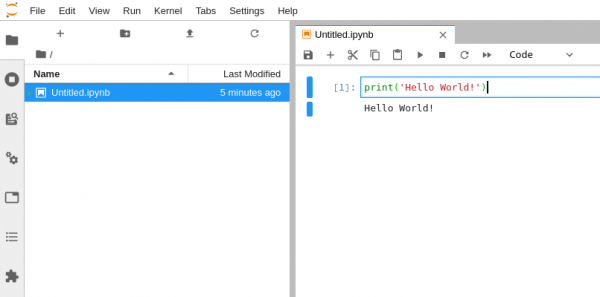
That's almost everything ready to use, but it wouldn't be interesting if we don't install additional Python modules (full-fledged applications) that significantly expand the standard capabilities of Python in JupyterLab, so let's move on 🙂
P.S. Interestingly, the old implementation of Jupyter codenamed Jupyter Notebook has not gone anywhere and it exists in parallel with JupyterLab. To switch to the old version, go to the link by adding the suffix to the address/tree, and transitioning to the new version is done with the suffix /lab, but it is not necessary to specify it:
- Jupyter Notebook — http://10.0.5.5:8888/tree
- Jupyter Lab — http://10.0.5.5:8888/lab
Expanding Python capabilities ^
In this section, we will install such powerful Python modules whose results will be integrated into notebooks. NumPy, Pandas, Matplotlib, IPyWidgets Before installing the listed Python modules via the package manager, JupyterLab.
we must first allow system dependencies in Alpine Linux: pip g++
— Needed for compiling modules, as some of them are implemented inand connected to Python at runtime as binary modules. C++ freetype-dev— a dependency for the Python module.Installing dependencies: Matplotlib
lxc exec jupyterlab -- apk add g++ freetype-dev
lxc exec jupyterlab -- apk add g++ freetype-devThere is one issue, in the current state of the Alpine Linux distribution, it is impossible to compile a new version of NumPy, a compilation error will occur that I was unable to resolve:
ERROR: Could not build wheels for numpy which use PEP 517 and cannot be installed directly
Therefore, we will install this module as a system package that provides a pre-compiled version, although it is slightly older than the one currently available on the website:
lxc exec jupyterlab -- apk add py3-numpy py3-numpy-devNext, we install Python modules via the package manager. pipBe patient, as some modules will be compiled, and this will take a few minutes. On my machine, the compilation took about 15 minutes:
lxc exec jupyterlab -- python3 -m pip install pandas ipywidgets matplotlibCleaning up installation caches:
lxc exec jupyterlab -- rm -rf /home/*/.cache/pip/*
lxc exec jupyterlab -- rm -rf /root/.cache/pip/*
Testing modules in JupyterLab ^
If you have it running JupyterLab, restart it so that the new installed modules can be activated. To do this, in your console session, press and responding where it is running and type y at the stop prompt, then restart JupyterLab by pressing the 'up' arrow on your keyboard, so you don't have to re-enter the command, and then Enter to start:
jupyter lab --ip=0.0.0.0 --no-browser --notebook-dir=/mnt/hostfsGo to the page http://10.0.5.5:8888/lab or refresh the page in your browser, then enter the following code in a new notebook cell:
%matplotlib inline

from ipywidgets import interactive
import matplotlib.pyplot as plt
import numpy as np

def f(m, b):
    plt.figure(2)
    x = np.linspace(-10, 10, num=1000)
    plt.plot(x, m * x + b)
    plt.ylim(-5, 5)
    plt.show()

interactive_plot = interactive(f, m=(-2.0, 2.0), b=(-3, 3, 0.5))
output = interactive_plot.children[-1]
output.layout.height = '350px'
interactive_plot
You should get a result like in the picture below, where IPyWidgets generates a UI element on the page that interacts with the source code, and also Matplotlib outputs the result of the code in the form of a picture as a graph of a function:
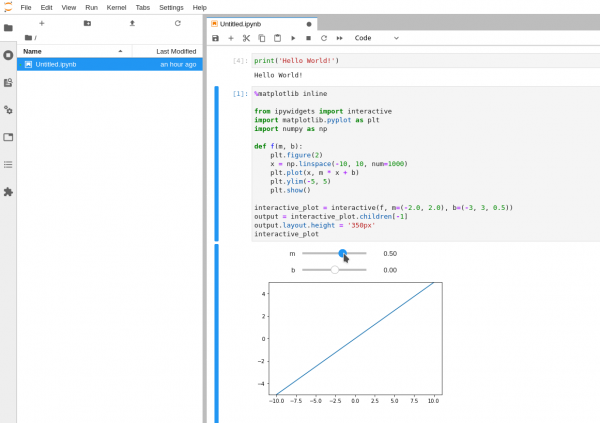
Many examples IPyWidgets you can find in the tutorials. here
What else? ^
Well done if you stayed and made it to the very end of the article. I specifically did not post a ready script at the end of the article that would install JupyterLab in 'one click', to encourage the hard workers 🙂 But you can do it yourself since you already know how, by gathering the commands into a single Bash script 🙂
Also, you can:
- Set a network name for the container instead of an IP address by entering it in simple
/etc/hostsand type the address in the browser http://jupyter.local:8888 - Play around with resource limits for the container, for this read the chapter in basic capabilities of LXD or get more information on the LXD developer's website.
- Change theme:
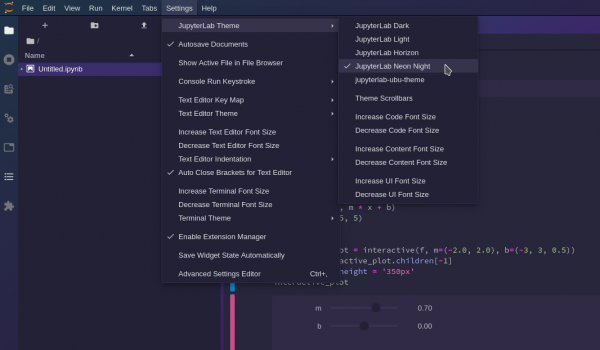
And much more you can do! That's all. Wishing you success!
UPDATE: 04/15/2020 18:30 — Fixed errors in the chapter "Hello, World!"
UPDATE: 04/16/2020 10:00 — Adjusted and added text in the description of the extension manager activation JupyterLab
UPDATE: 04/16/2020 10:40 — Corrected identified errors in the text and made some improvements to the chapter "Installing Basic Software and System Configuration"
Source: habr.com
