

Or how to get beautiful badges for your project in one evening of easy coding
Probably every developer with at least one pet project at some point has the itch for beautiful badges displaying statuses, code coverage, package versions in nuget... And this itch led me to write this article. In preparing to write it, I created this beauty in one of my projects:
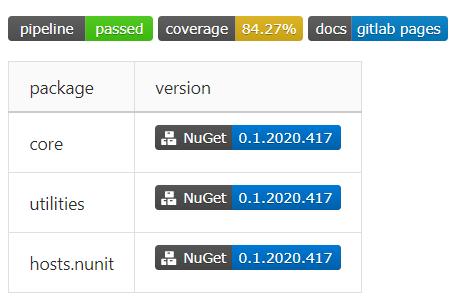
This article will cover the basic setup of continuous integration and delivery for a class library project on .Net Core in GitLab, with documentation published in GitLab Pages and the built packages sent to a private feed in Azure DevOps.
VS Code was used as the development environment with the extension (for validating the configuration file directly from the development environment).
Brief Introduction
CD is when you just pushed, and the client’s system is already down?
What CI/CD is and why it’s needed can easily be googled. Comprehensive documentation on setting up pipelines in GitLab can be found . Here, I will briefly and, as far as possible without flaws, describe the system's operation from a bird's-eye view:
- the developer sends a commit to the repository, creates a merge request via the website, or in some other way explicitly or implicitly triggers the pipeline,
- from the configuration, all tasks that can be started in this context are selected,
- tasks are organized according to their stages,
- stages are executed sequentially — i.e. in parallel all tasks of this stage are executed,
- if a stage fails (i.e. at least one task of the stage fails) — the pipeline stops (almost always),
- if all stages are completed successfully, the pipeline is considered successful.
Thus, we have:
- a pipeline is a set of tasks organized into stages, which can compile, test, package code, deploy the ready build to a cloud service, etc.
- stage (stage) is a unit of organization of the pipeline, contains 1+ tasks,
- task (job) is a unit of work in the pipeline. It consists of a script (mandatory), trigger conditions, publication/caching settings for artifacts, and much more.
Therefore, the task when configuring CI/CD boils down to creating a set of tasks that implement all necessary actions for building, testing, and publishing code and artifacts.
Before we begin: why?
- Why GitLab?
Because when the need arose to create private repositories for pet projects, they were paid on GitHub, and I am cheap. Repositories became free, but that is not enough reason for me to move to GitHub yet.
- Why not Azure DevOps Pipelines?
Because the setup there is elementary — no command line knowledge is required. Integration with external git providers takes a couple of clicks, importing SSH keys for pushing commits to the repository is also straightforward, and the pipeline can be easily set up even without a template.
Starting position: what we have and what we want
We have:
- a repository in GitLab.
We want:
- automatic building and testing for each merge request,
- building packages for each merge request and pushing to master if a specific line is included in the commit message,
- sending the built packages to a private feed in Azure DevOps,
- building documentation and publishing it on GitLab Pages,
- badges!11
The described requirements fit perfectly into the following pipeline model:
- Stage 1 — build
- We build the code, and publish the output files as artifacts
- Stage 2 — testing
- We retrieve artifacts from the build stage, run tests, and gather code coverage data
- Stage 3 — deployment
- Task 1 — we build the nuget package and send it to Azure DevOps
- Task 2 — we build the site from the xmldoc in the source code and publish it on GitLab Pages
Let's get started!
We assemble the configuration
We prepare the accounts
We create an account in
Navigate to
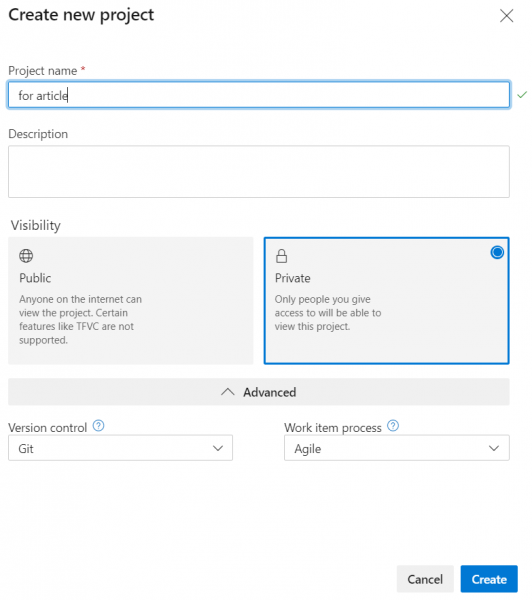
We create a new project
- Name — anything
- Visibility — any

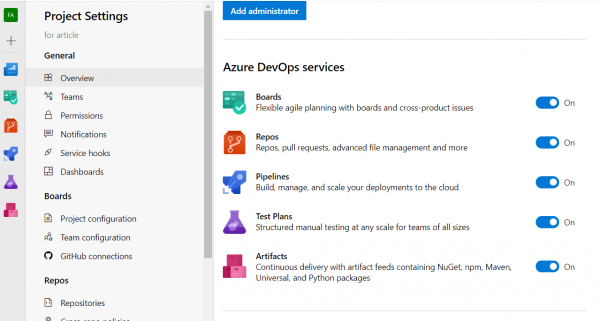
When clicking the Create button, the project will be created and we will be taken to its page. On this page, unnecessary features can be disabled by going to the project's settings (the bottom link on the left -> Overview -> block Azure DevOps Services)

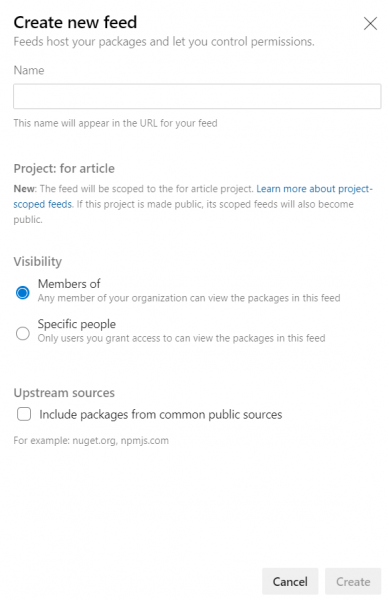
We go to Artifacts, click Create feed
- We enter the source name
- We choose visibility
- We uncheck the box Include packages from common public sources, to prevent the source from becoming a trash bin for nuget clones

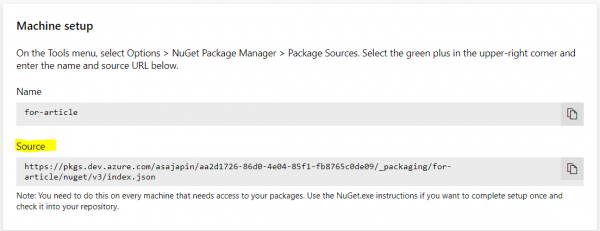
We click Connect to feed, select Visual Studio, and copy the Source from the Machine Setup block

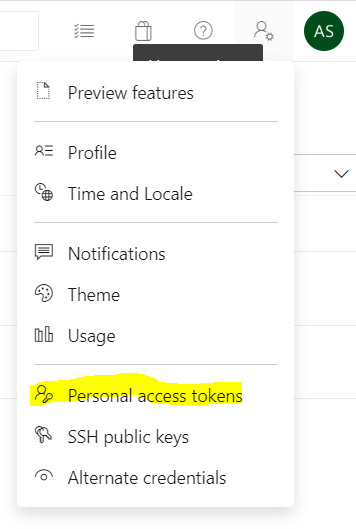
We go to the account settings, select Personal Access Token

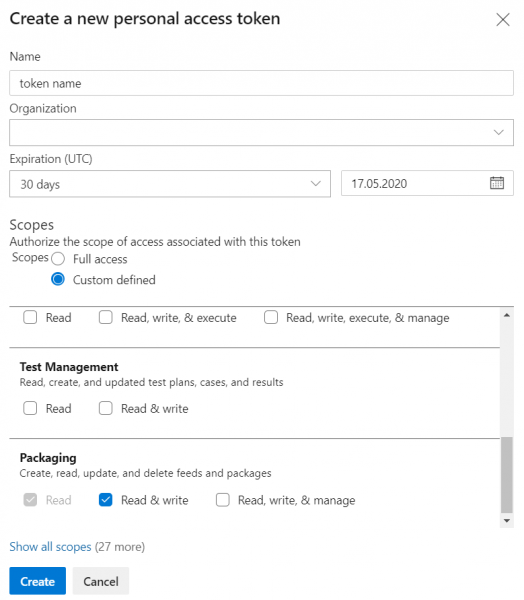
We create a new access token
- Name — arbitrary
- Organization — current
- Duration — maximum 1 year
- Scope — Packaging/Read & Write

Copy the created token — after closing the modal window the value will be unavailable
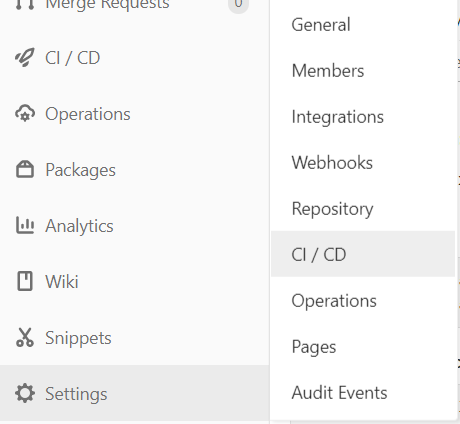
Go to the repository settings in GitLab, select CI/CD settings

Expand the Variables section, add a new one
- Name — any name without spaces (will be available in the command shell)
- Value — access token from item 9
- Select Mask variable

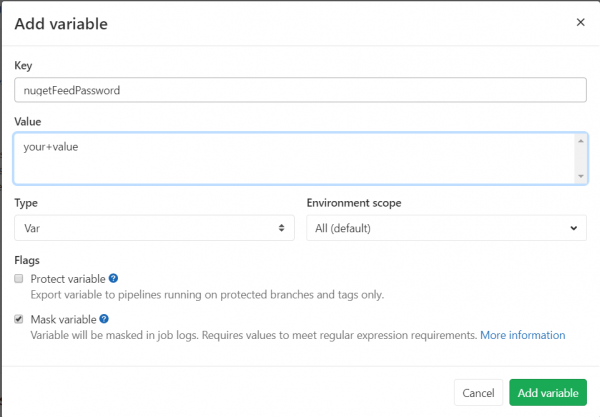
At this point, the preliminary setup is complete.
Preparing the configuration framework
By default, a file is used to configure CI/CD in GitLab .gitlab-ci.yml from the root of the repository. You can set a custom path to this file in the repository settings, but in this case, it's not necessary.
As can be seen from the extension, the file contains configuration in the format YAML. The documentation describes in detail what keys can be at the top level of the configuration and in each of the nested levels.
First, let's add a link to the docker image in the configuration file where the tasks will be executed. To do this, we find . In which has a detailed guide on which image to choose for different tasks. For our build, we can use the .Net Core 3.1 image, so we confidently add the following line in the configuration.
image: mcr.microsoft.com/dotnet/core/sdk:3.1Now, when the pipeline is launched, the specified image from Microsoft's image repository will be downloaded, where all tasks from the configuration will be executed.
The next step is to add stagestages. By default, GitLab defines 5 stages:
.pre— executed before all stages,.post— executed after all stages,build— first after.prethe stage,test— second stage,deploy— third stage.
There is nothing preventing us from explicitly declaring them, however. The order in which the stages are specified affects the order in which they are executed. To complete the exposition, let's add to the configuration:
stages:
  - build
  - test
  - deploy
For debugging, it makes sense to gather information about the environment in which the tasks are executed. Let's add a global set of commands that will be executed before each task using before_script:
before_script:
  - $PSVersionTable.PSVersion
  - dotnet --version
  - nuget help | select-string Version
We need to add at least one task so that the pipeline triggers upon commit. For now, let's add an empty task for demonstration:
dummy job:
  script:
    - echo ok
We initiate validation, receive a message that everything is fine, commit, push, and check the results on the site… And we encounter a script error — bash: .PSVersion: command not found. WTF?
It all makes sense — by default, the runners (responsible for executing job scripts, provided by GitLab) use bash to execute commands. This can be fixed by explicitly specifying in the job description which tags the executing pipeline runner must have:
dummy job on windows:
  script:
    - echo ok
  tags:
    - windows
Great! Now the pipeline is executing.
The attentive reader, by repeating the mentioned steps, will notice that the job ran in the stage test, even though we didn't specify a stage. As you can guess, test is the default stage.
Let's continue creating the configuration skeleton by adding all the tasks described above:
build job:
  script:
    - echo "building..."
  tags:
    - windows
  stage: build

test and cover job:
  script:
    - echo "running tests and coverage analysis..."
  tags:
    - windows
  stage: test

pack and deploy job:
  script:
    - echo "packing and pushing to nuget..."
  tags:
    - windows
  stage: deploy

pages:
  script:
    - echo "creating docs..."
  tags:
    - windows
  stage: deploy
We received a not very functional, but still valid pipeline.
Configuring triggers
Since no filters for triggering are specified for any of the tasks, the pipeline will completely execute on every commit push to the repository. Since this is not the desired behavior in general, we will configure trigger filters for the tasks.
Filters can be configured in two formats: and . In short, only/except allows configuring filters based on triggers (merge_request, for example — configures the job to run on every creation of a merge request and on every commit push to the branch that is the source in the merge request) and branch names (including using regular expressions); rules allows configuring a set of conditions and, optionally, modifying the execution condition of the task depending on the success of previous tasks ().
Let's recall the set of requirements — building and testing only for merge requests, packaging and sending to Azure DevOps — for merge requests and pushes to master, generating documentation — for pushes to master.
First, let's configure the code build task by adding a trigger rule that executes only on merge requests:
build job:
  # snip
  only:
    - merge_request
Now let's configure the packaging task to trigger on merge requests and commits to master:
pack and deploy job:
  # snip
  only:
    - merge_request
    - master
As you can see, everything is straightforward and direct.
You can also configure the job to trigger only if a merge request is created with a specific target or source branch:
  rules:
    - if: $CI_MERGE_REQUEST_TARGET_BRANCH_NAME == "master"
Conditions can use ; rules rules are not compatible with rules only/except.
Artifact retention settings
During the execution of the job build job artifacts will be created that can be reused in subsequent jobs. To do this, you need to add paths in the job configuration for the files that will need to be saved and reused in the following jobs, under the key :
build job:
  # snip
  artifacts:
    paths:
      - path/to/build/artifacts
      - another/path
      - MyCoolLib.*/bin/Release/*
Paths support wildcards, which definitely simplifies their specification.
If the job creates artifacts, each subsequent job will be able to access them—they will be located at the same paths relative to the root of the repository, where they were generated from the source job. Artifacts are also available for download on the website.
Now that we have a prepared (and verified) configuration framework, we can proceed to writing the scripts for the jobs.
Writing scripts
Perhaps once long ago, in a galaxy far, far away, building projects (including .net) from the command line was a pain. Nowadays, you can build, test, and publish a project with 3 commands:
dotnet build
dotnet test
dotnet pack
Naturally, there are some nuances that will complicate the commands a bit.
- We want a release build, not a debug build, so we add
-c Release to each command - During testing, we want to collect code coverage data, so we need to include a coverage analyzer in the test libraries:
- All test libraries should include the package
coverlet.msbuild:dotnet add package coverlet.msbuildfrom the project folder - In the test command, we'll add
/p:CollectCoverage=true - In the testing job configuration, we'll add a key to obtain coverage results (see below)
- All test libraries should include the package
- When packing the code into nuget packages, we will specify the output directory for the packages:
-o .
Collecting code coverage data
Coverlet outputs the test run statistics to the console after the tests are executed:
Calculating coverage result...
  Generating report 'C:Usersxxxsourcereposmy-projectmyProject.testscoverage.json'

+-------------+--------+--------+--------+
| Module      | Line   | Branch | Method |
+-------------+--------+--------+--------+
| project 1   | 83.24% | 66.66% | 92.1%  |
+-------------+--------+--------+--------+
| project 2   | 87.5%  | 50%    | 100%   |
+-------------+--------+--------+--------+
| project 3   | 100%   | 83.33% | 100%   |
+-------------+--------+--------+--------+

+---------+--------+--------+--------+
|         | Line   | Branch | Method |
+---------+--------+--------+--------+
| Total   | 84.27% | 65.76% | 92.94% |
+---------+--------+--------+--------+
| Average | 90.24% | 66.66% | 97.36% |
+---------+--------+--------+--------+
GitLab allows you to specify a regular expression to obtain statistics, which can then be displayed as a badge. The regular expression is set in the task settings with the key coverage; the expression must contain a capture group, the value of which will be passed to the badge:
test and cover job:
  # snip
  coverage: \/|s*Totals*|s*(d+[,.]d+%)\/
Here we obtain statistics from the line with overall line coverage.
Publishing packages and documentation
Both actions are set for the last stage of the pipeline — since the build and tests have passed, it's time to share the results with the world.
First, let's look at publishing to the package source:
If the project does not have a nuget configuration file (
nuget.config), we will create a new one:dotnet new nugetconfigWhy: the image may have restricted write access to global (user and machine) configurations. To avoid errors, we will simply create a new local configuration and work with that.
- Let's add a new package source to the local configuration:
nuget sources add -name -source -username -password -configfile nuget.config -StorePasswordInClearTextname— local name of the source, it's not criticalurl— URL of the source from the 'Preparing Accounts' step, item 6organization— name of the organization in Azure DevOpsgitlab variable— name of the variable with the access token added in GitLab ('Preparing Accounts', item 11). Naturally, in the format$variableName-StorePasswordInClearText— a hack to bypass access denial error ()- In case of errors, it may be helpful to add
-verbosity detailed
- Sending the package to the source:
nuget push -source -skipduplicate -apikey *.nupkg- We are sending all packages from the current directory, hence
*.nupkg. name— from the previous step.respectively. It is advisable to place them on a shared resource accessible from all nodes in the cluster.— any string. In Azure DevOps, the Connect to feed window always provides an example stringaz.-skipduplicate— when attempting to send an already existing package without this key, the source will return an error409 Conflict; with the key, the submission will be skipped.
- We are sending all packages from the current directory, hence
Now let's configure the documentation generation:
- To start, in the repository, in the master branch, we initialize the docfx project. To do this, execute the command from the root:
docfx initand in interactive mode, we will specify key parameters for building the documentation. A detailed description of the minimal project configuration .- It is important to specify the output directory during setup.
..public— GitLab by default takes the contents of the public folder at the root of the repository as the source for Pages. Since the project will be located in a subfolder within the repository, we add to the output path by going one level up.
- It is important to specify the output directory during setup.
- Let's push the changes to GitLab.
- We'll add a task to the pipeline configuration
pages(a reserved word for site publishing tasks in GitLab Pages):- Script:
nuget install docfx.console -version 2.51.0— will install docfx; the version is specified to ensure the correctness of the package installation paths..docfx.console.2.51.0toolsdocfx.exe .docfx_projectdocfx.json— we are building the documentation
- Artifacts node:
- Script:
pages:
  # snip
  artifacts:
    paths:
      - public
A lyrical digression about docfx
Earlier, when setting up the project, I specified the code source for the documentation as the solution file. The main disadvantage is that documentation is generated even for test projects. If this is not needed, a value can be assigned to the node metadata.src:
{
  "metadata": [
    {
      "src": [
        {
          "src": "..\/",
          "files": [
            "**\/*.csproj"
          ],
          "exclude":[
            "*.tests*\/**"
          ]
        }
      ],
      \/\/ --- snip ---
    },
    \/\/ --- snip ---
  ],
  \/\/ --- snip ---
}
metadata.src.src: "..\/"— we go one level up from the locationdocfx.json, as search up the directory tree does not work in patterns.metadata.src.files: ["**\/*.csproj"]— a global pattern, we collect all C# projects from all directories.metadata.src.exclude: ["*.tests*\/**"]— a global pattern, we exclude everything from folders named.testsin the title
Intermediate summary
Such a simple configuration can be composed literally in half an hour and a couple of cups of coffee, which will allow checking with each merge request and push to master that the code builds and tests pass, to generate a new package, update documentation, and delight the eye with beautiful badges in the project's README.
Final .gitlab-ci.yml
image: mcr.microsoft.com/dotnet/core/sdk:3.1

before_script:
  - $PSVersionTable.PSVersion
  - dotnet --version
  - nuget help | select-string Version

stages:
  - build
  - test
  - deploy

build job:
  stage: build
  script:
    - dotnet build -c Release
  tags:
    - windows
  only:
    - merge_requests
    - master
  artifacts:
    paths:
      - your/path/to/binaries

test and cover job:
  stage: test
  tags:
    - windows
  script:
    - dotnet test -c Release /p:CollectCoverage=true
  coverage: /|s*Totals*|s*(\d+[,.]\d+%)\
  only:
    - merge_requests
    - master

pack and deploy job:
  stage: deploy
  tags:
    - windows
  script:
    - dotnet pack -c Release -o .
    - dotnet new nugetconfig
    - nuget sources add -name feedName -source https://pkgs.dev.azure.com/your-organization/_packaging/your-feed/nuget/v3/index.json -username your-organization -password $nugetFeedToken -configfile nuget.config -StorePasswordInClearText
    - nuget push -source feedName -skipduplicate -apikey az *.nupkg
  only:
    - master

pages:
  tags:
    - windows
  stage: deploy
  script:
    - nuget install docfx.console -version 2.51.0
    - $env:path = "$env:path;$($(get-location).Path)"
    - .docfx.console.2.51.0toolsdocfx.exe .docfxdocfx.json
  artifacts:
    paths:
      - public
  only:
    - master
Speaking of badges
After all, that's what it was all about!
Badges with pipeline statuses and code coverage are available in GitLab in the CI/CD settings in the Gtntral pipelines section:
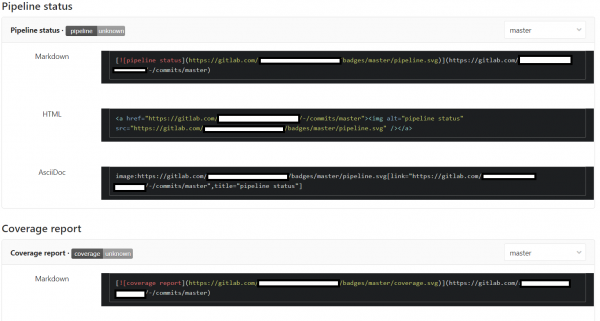
I created a badge linking to the documentation on the platform — it's pretty straightforward there; you can create your own badge and obtain it via a request.

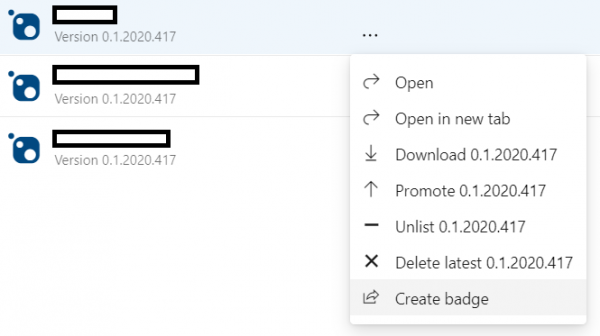
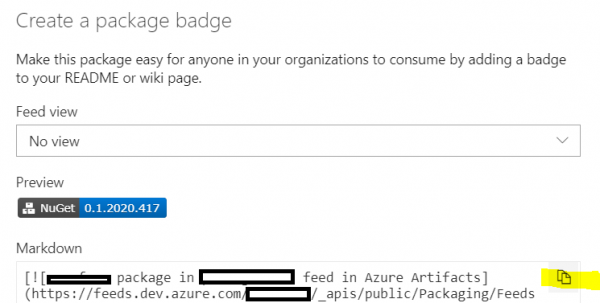
Azure DevOps Artifacts also allows creating badges for packages specifying the current version. To do this, in the source on the Azure DevOps site, click on Create badge for the chosen package and copy the markdown markup:
Adding some beauty
Highlighting common configuration fragments
While writing the configuration and searching through the documentation, I stumbled upon an interesting YAML feature — reusing fragments.
As can be seen from the task settings, they all require a tag windows on the runner, and trigger upon push to master/creating a merge request (except for documentation). Let's add this to the fragment we will reuse:
.common_tags: &common_tags
  tags:
    - windows
.common_only: &common_only
  only:
    - merge_requests
    - master
And now we can insert the previously declared fragment into the task description:
build job:
  <<: *common_tags
  <<: *common_only
Fragment names should start with a dot to avoid being interpreted as a task.
Versioning packages
When creating a package, the compiler checks the command line keys, and in their absence — project files; upon finding the Version node, it takes its value as the version of the package being built. Thus, to build a package with a new version, you need to either update it in the project file or pass it as a command-line argument.
Let's add another request — let the last two numbers in the version be the year and date of the package build, and also add pre-release versions. Of course, you can add this data to the project file and check it before each submission — but it can also be done in the pipeline, extracting the package version from the context and passing it through a command-line argument.
Let’s agree that if the commit message contains a line of the form release (v.\/ver.\/version) (rev.\/revision )?, we will take the package version from this line, supplement it with the current date, and pass it as an argument to the command dotnet pack. If the line is absent — we simply will not build the package.
This task is solved by the following script:
# регулярное выражение для поиска строки с версией
$rx = "releases+(v.?|ver.?|version)s*(?<maj>d+)(?<min>.d+)?(?<rel>.d+)?s*((rev.?|revision)?s+(?<rev>[a-zA-Z0-9-_]+))?"
# ищем строку в сообщении коммита, передаваемом в одной из предопределяемых GitLab'ом переменных
$found = $env:CI_COMMIT_MESSAGE -match $rx
# совпадений нет - выходим
if (!$found) { Write-Output "no release info found, aborting"; exit }
# извлекаем мажорную и минорную версии
$maj = $matches['maj']
$min = $matches['min']
# если строка содержит номер релиза - используем его, иначе - текущий год
if ($matches.ContainsKey('rel')) { $rel = $matches['rel'] } else { $rel = ".$(get-date -format "yyyy")" }
# в качестве номера сборки - текущие месяц и день
$bld = $(get-date -format "MMdd")
# если есть данные по пререлизной версии - включаем их в версию
if ($matches.ContainsKey('rev')) { $rev = "-$($matches['rev'])" } else { $rev = '' }
# собираем единую строку версии
$version = "$maj$min$rel.$bld$rev"
# собираем пакеты
dotnet pack -c Release -o . /p:Version=$version
We add the script to the job pack and deploy job and observe the package builds strictly when the specified string is present in the commit message.
Total
After spending about half an hour to an hour on writing the configuration, debugging in local PowerShell, and possibly a couple of failed runs, we have obtained a simple configuration for automating routine tasks.
Of course, GitLab CI/CD is much broader and more multifaceted than it may seem after reading this guide — . There is even , allowing you to
automatically detect, build, test, deploy, and monitor your applications.
Now the plan is to configure a pipeline for deploying applications in Azure, using Pulumi and automatically determining the target environment, which will be covered in the next article.
Source: habr.com
